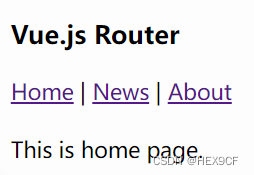
实现简单版vue-router3
前置知识:
1、vue 插件机制 :
vue.use(arg) arg可以是一个函数和对象,需要有一个install方法,如果是函数(没有install方法),则直接执行该函数。install 方法第一个参数是 Vue 构造函数
思路(以hash为例)
1、监听hash值改变,触发 router-view 更新
2、如何在每个router-view 中拿到 当前地址和组件的对应关系,以及如何在hash值改变时自 动更新(本文思路是将 routeOptions 挂载在Vue实例上)
注:
Vue.util.defineReactive(this, 'current', init)
此方法是为了实现current响应式,只有current是响应式数据, router-view 里面的 render 函数才会随着数据变化而变化(当路由变化的时候this.current 改变)
let Vue
class VueRouter {
  constructor(options) {
    console.log(options)
    let init = '/'
    // Vue.util.defineReactive(this, 'current', window.location.hash.slice(1))
    Vue.util.defineReactive(this, 'current', init)  // 实现响应式
    this.current = '/'  // 当前路径
    this.routes = options.routes || []
    this.mode = options.mode || 'hash' // 路由模式 hash 或者 history
    this.init()
  }
  init() {
    if (this.mode === 'hash') {
      location.hash = '/'
      // 项目第一次加载
      window.addEventListener('load', () => {
        this.current = location.hash.slice(1)
      })
      window.addEventListener('hashchange', () => {
        this.current = location.hash.slice(1)
      })
    }
  }

}

// install 居然在 constructor 先执行
VueRouter.install = function (_Vue) {
  console.log(_Vue)
  Vue = _Vue
  // 给调用组件添加一个属性router
  Vue.mixin({  // 每一个组件都会执行 beforeCreate 方法
    beforeCreate() {
      if (this.$options.router) { // 只有根实例才有 router 属性
        console.log('jbjbjb----->')
        Vue.prototype.$router = this.$options.router
      }
    }
  })
  // 全局组件
  // 创建全局组件 router-link
  Vue.component('router-link', {
    props: {
      to: { // router-link 的to 属性
        type: String,
      }
    },
    render(h) {
      console.log('router-link---->', this.to)
      return h('a', { attrs: { href: '#' + this.to } }, this.$slots.default)
    }
  })
  // 创建全局组件 router-view
  Vue.component('router-view', {
    render(h) { // 只有响应式数据变化才会 出发 render 方法
      console.log('router-view---->', this.$router)
      const current = this.$router.current
      const routes = this.$router.routes
      let com = routes.find((item) => {
        return item.path === current
      })
      return h(com.component)
    }
  })
}


export default VueRouter;