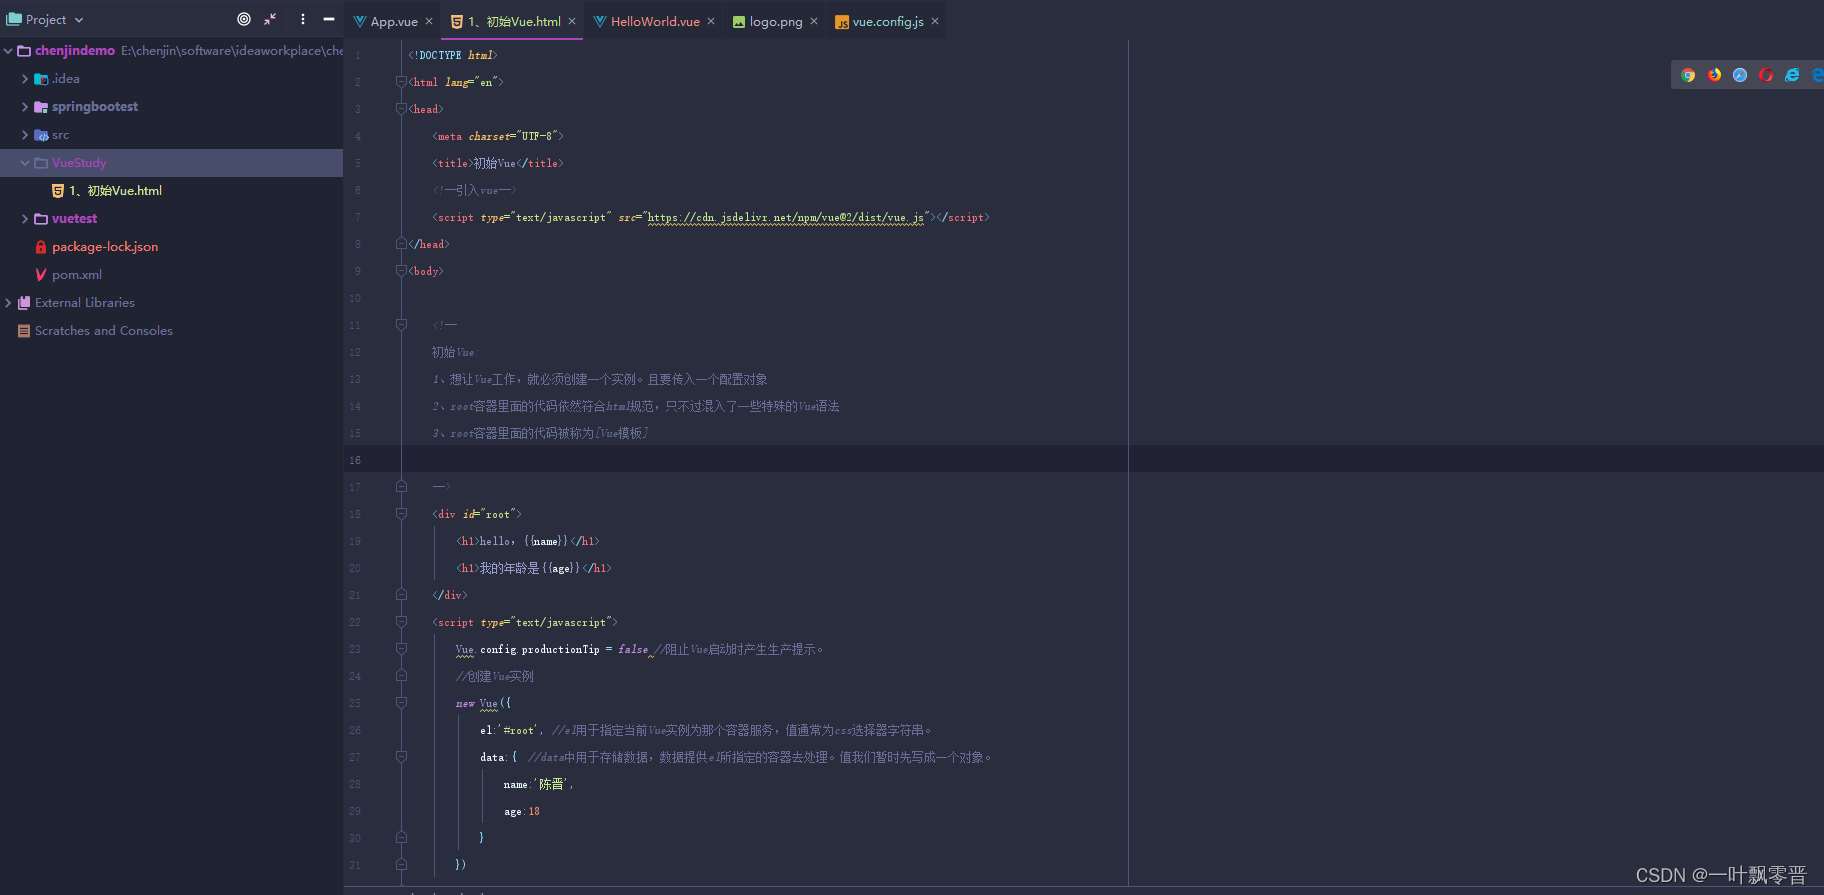
1. 基本语法
1.0 基本模版
<!DOCTYPE html>
<html lang="zh-CN">
<head>
    <meta charset="UTF-8">
    <meta name="viewport" content="width=device-width, initial-scale=1.0">
    <meta http-equiv="X-UA-Compatible" content="ie=edge">
    <title></title>
    <style>
    </style>
    <script src="../js/vue.js"></script>
</head>
<body>
    <div id="root">
    </div>
    <script>
        const vm = new Vue({
            el: '#root',
            data: {
            },
            methods: {
            },
        })
    </script>
</body>
</html>
1.1 插值
1.1.1 data 的使用
1.1.1.1 函数式
//对象式可能会造成多个对象用的data是同一个,当某个人改变了data里的数据,其他人也会跟着变,而函数式可以避免,这就是为什么组件
//的data都是使用函数式的形式
data: (){
	return {
		XX: XX,
	}
}
函数式的妙用(样式绑定)
<!-- style作为对象绑定 -->
<!DOCTYPE html>
<html lang="zh-CN">
<head>
    <meta charset="UTF-8">
    <meta name="viewport" content="width=device-width, initial-scale=1.0">
    <meta http-equiv="X-UA-Compatible" content="ie=edge">
    <title></title>
    <style>
        .basic {
            height: 100px;
            width: 100px;
            border: 1px solid black;
        }
        .class1 {
            background-color: skyblue;
        }
    </style>
    <script src="../js/vue.js"></script>
</head>
<body>

    <div id="root">
        <div v-bind:class="style"></div>
    </div>

    <script>
        const vm = new Vue({
            el: '#root',
            data: {
                style: {
                    basic: true,
                    class1: false,
                }
            },
            methods: {
            },
        })
    </script>
</body>
</html>
<!-- style作为字符串绑定 -->
<!DOCTYPE html>
<html lang="zh-CN">
<head>
    <meta charset="UTF-8">
    <meta name="viewport" content="width=device-width, initial-scale=1.0">
    <meta http-equiv="X-UA-Compatible" content="ie=edge">
    <title></title>
    <style>
        .basic {
            height: 100px;
            width: 100px;
            border: 1px solid black;
        }
        .class1 {
            background-color: skyblue;
        }
    </style>
    <script src="../js/vue.js"></script>
</head>
<body>

    <div id="root">
        <div v-bind:class="style1"></div>
        <button @click="addBasic">加上basic样式</button>
        <button @click="addClass1">加上.class1样式</button>
    </div>

    <script>
        const vm = new Vue({
            el: '#root',
            data: {
                style1: ''
            },
            methods: {
                addBasic() {
                    this.style1 += ' basic'
                },
                addClass1() {
                    this.style1 += ' class1'
                }
            },
        })
    </script>
</body>
</html>
<!-- style 作为数组绑定 -->
<!DOCTYPE html>
<html lang="zh-CN">
<head>
    <meta charset="UTF-8">
    <meta name="viewport" content="width=device-width, initial-scale=1.0">
    <meta http-equiv="X-UA-Compatible" content="ie=edge">
    <title></title>
    <style>
        .basic {
            height: 100px;
            width: 100px;
            border: 1px solid black;
        }
        .class1 {
            background-color: skyblue;
        }
    </style>
    <script src="../js/vue.js"></script>
</head>
<body>

    <div id="root">
        <div :class="style1"></div>
        <button @click="addStyle">添加所有样式</button>

    </div>

    <script>
        const vm = new Vue({
            el: '#root',
            data: {
                style1: []
            },
            methods: {
                addStyle() {
                    this.style1.push('class1', 'basic')
                }
            },
        })
    </script>
</body>
</html>
1.1.1.2 对象式
data: {
	XX: XX,
}
1.1.1 插值符号 : {{属性}}
1.2 事件
1.2.1 事件说明
<!-- 方法会传event对象 -->
<div id="root">
    <button @click="showInfo()"></button>
</div>

<script>
    const vm = new Vue({
        el: '#root',
        data: {

        },
        methods: {
            showInfo() {
                console.log(event);
            },
        },
    })
</script>
1.2.2 事件修饰符
.stop:阻止事件的冒泡
.prevent:阻止事件的默认行为
.capture:使用事件的捕获模式(得加在父亲身上), 父亲先触发事件,儿子后触发
.self:只有当触发同一(!!)事件的元素是加了这个修饰的属性才触发(用在父亲身上)
.passive:立即执行时间的默认行为,不用等回调完函数
.once:只执行一次
<!-- 冒泡事件 -->
<div id="root">
    <!-- stop阻止事件的冒泡 -->
    <div @click="showAlertDiv()">
        <!-- <button @click="showAlert()">按我</button> -->
        <button @click.stop="showAlert()">按我</button>
    </div>
    <!-- prevent 阻止了a的跳转和颜色变化-->
    <!-- <a @click="showAlert()" v-bind:href="url">超链接</a> -->
    <a @click.prevent="showAlert()" v-bind:href="url">超链接</a>

    <!-- capture使用事件的捕获模式(得加在父亲身上), 父亲先触发事件,儿子后触发 -->
    <div @click.capture="showAlertDiv()">
        <button @click="showAlert()">按我</button>
    </div>

    <!-- self可以让只有当触发同一(!!)事件的元素是加了这个修饰的属性才触发(用在父亲身上) -->
    <div @click.self="showAlert()">
        <button @click="showAlert()">按我</button>
    </div>
    <!-- passive立即执行事件的默认行为,不等回调完函数 -->
    <br>
    <a @click="testPassive()" href="https://www.baidu.com">点我测试passive</a>
</div>
<script>
    const vm = new Vue({
        el: '#root',
        data: {
            url: 'https://www.baidu.com'
        },
        methods: {
            showAlert() {
                alert("警告")
            },
            showAlertDiv() {
                console.log("儿子触发啦")
                alert("div警告")
            },
            testPassive() {
                for (let i = 0; i < 10000; i++) {
                    console.log('@')
                }
            }
        }

    })
</script>
1.2.3 按键事件
<div id="root">
    <!-- @keyup.[键] / @keydown.[键]-->
    <!-- 常用按键别名(可以连写)
        enter, delete, esc, space, tab, up, down, left, right
    -->
    <!-- 空格输出内容 -->
    <input @keydown.space="method($event)" type="text">
    <!-- 也可以通过keyboard触发 -->
    <input @keydown.space="method()" type="text">
</div>
<script>
    const vm = new Vue({
        el: '#root',
        data: {

        },
        methods: {
            method(e) {
                console.log(e.keyCode)
            }
        }
    })
</script>
1.2 常用指令
1.2.1 v-bind 和 v-model
二者一般用来绑定标签的属性
v-bind : 单向绑定
v-model : 双向绑定 (绑定表单的name)
- 只能绑定**“文本框,单选按钮,复选框,文本域,下拉列表”**等
- 文本框/单选按钮/textarea, 绑定的数据是字符串类型
- 单个复选框, 绑定的是boolean类型
- 多个复选框, 绑定的是数组
- select单选对应字符串,多选对应也是数组
<!-- v-model在表单的使用 -->
<div id="root">
    <form @submit.prevent="submit">
        账号:<input type="text" name="username" v-model="username">
        <br>
        密码:<input type="password" name="pwd" v-model="pwd">
        <br>
        性别:<input type="radio" name="sex" v-model="sex" value="男">男
              <input type="radio" name="sex" v-model="sex" value="女">女
        <br>
        年龄:<input type="number" name="age" v-model.number="age">
        <br>
        爱好:<input type="checkbox" name="hobby" value="喝酒" v-model="hobby">喝酒
              <input type="checkbox" name="hobby" value="抽烟" v-model="hobby">抽烟
              <input type="checkbox" name="hobby" value="烫头" v-model="hobby">烫头
              <br>
        备注:
        <br>
        <textarea rows="50" cols="50" v-model.lazy="content" name="textarea"></textarea>
        <br>
        <input type="submit">
    </form>
</div>

<script>
    const vm = new Vue({
        el: '#root',
        data: {
            username:'',
            pwd: '',
            content:'',
            age: '',
            sex:'',
            hobby: []
        },
        methods: {
            submit() {
                console.log('提交了')
                console.log(JSON.stringify(this._data))
            }
        }

    })

</script>
1.2.2 v-text 和 v-html
v-text 和 v-html 绑定某个vue变量,输出信息到页面上
<div id="root">
    <!-- v-text无法识别标签 -->
    <div v-text="text"></div>
    用户输入渲染text<input type="text" id="text" @keyup.enter="submitText">
    <!-- v-html能识别标签 -->
    <div v-html="html"></div>
    用户输入渲染html<input type="text" id="html" @keyup.enter="submitHtml">
</div>

<script>
    const vm = new Vue({
        el: '#root',
        data: {
            text: '',
            html: '',
        },
        methods: {
            submitText() {
                console.log(document.getElementById("text").value)
                this.text = document.getElementById("text").value;
            },
            submitHtml() {
                console.log(document.getElementById("html").value)
                this.html = document.getElementById("html").value;
            }
        }
    })
</script>
1.2.3 v-on
绑定事件,可以用 “@[事件]” 简写
1.2.4 v-cloak
<style>
    /* v-cloak配合style可以解决网速慢给用户显示出为加载的插值语法等信息 */
    [v-cloak] {
        display: none;
    }
</style>
1.2.5 v-once
v-once 绑定某个标签,让该标签只能在Vue创建时渲染,后续则无法渲染
<div id="root">
    <!-- 只在初次渲染时动态渲染 -->
    <div v-once>{{n}}</div>
    <div>{{n}}</div>
    <button @click="n++"></button>
</div>
1.2.6 v-pre
v-pre 不让 Vue 进行解析,有利于增加页面渲染速度
<div id="root">
    <!-- v-pre直接不让vue去解析 -->
    <div v-pre>{{n}}</div>
    <div>{{n}}</div>
</div>
1.2.7 自定义指令
注意点:
	1.  自定义的指令作为方法写在 directives 里
	2.   在标签使用自定义指令时,需要加 v-[自定义指令],但在定义时无需
- 自定义指令有 函数式 和 对象式 两种
1.2.7.1 函数式
<div id="root">
    <div>{{n}}</div>
    放大十倍 :<div id="tenTimes" v-big="10 * n"></div>
</div>
<script>
    const vm = new Vue({
        el: '#root',
        data: {
            n: 1,
        },
        directives: {
            big(element, binding) {
                console.log(element)
                console.log(binding)
                element.innerText = binding.value;
            }
        }
    })
</script>
1.2.7.2对象式
<div id="root">
    <!-- 引入:一开页面自动获取焦点 -->
    <input type="text" v-big>
</div>
<script>
    const vm = new Vue({
        el: '#root',
        data: {

        },
        directives: {
            big: {
                // 成功绑定时
                bind() {
                    console.log('bind')

                },
                // 元素插入页面时
                inserted(element, binding) {
                    console.log('insert')
                    element.focus();
                },
                // 模版重新解析时
                update() {
                    console.log('update')
                    element.focus();
                }
            }
        }
    })
</script>
1.3 属性
1.3.1 计算属性
<!-- 引入:两个输入框输入姓或名,下面输出姓名 -->
<div id="root">
    姓:<input type="text" v-model="firstName">
    <br>
    名:<input type="text" v-model="lastName">
    <br>
    姓名:<span>{{fullName}}</span>
</div>

<script>
    const vm = new Vue({
        el: '#root',
        data: {
            firstName: '',
            lastName: '',
        },
        //这种是简写形式(只有当只使用 get()方法时,才可以简写)
        computed: {
            fullName() {
                return this.firstName + this.lastName
            }
        }
        //完整版
        /*
        computed: {
        	fullName {
        		//get在初次读取fullName和fullName依赖的数据被改变时方可调用
        		get() {
        			return this.firstName + this.lastName
                }
                //set的调用只有在fullName被改变时才会调用,但是fullName依赖的数据发生变化引起的fullName的改变不会
                //调用set()
    			set() {

                }
    		}
    	}
    	*/

    })
</script>
1.3.2 监听属性
<div id="root">
    <div>今天天气很{{isHot ? "炎热" : "凉爽"}}</div>
    <button @click="isHot = !isHot"></button>
</div>

<script>
    const vm = new Vue({
        el: '#root',
        data: {
            isHot: true,
        },
        //简写 (只有当只使用handler()时可以简写)
        watch: {
            isHot(newValue, oldValue) {
                console.log(oldValue)
                console.log(newValue)
            }
        }
        //这是完整版的
        /*
        watch : {
                isHot : {
                    handler(newValue, oldValue) {
                        console.log(oldValue);
                        console.log(newValue);
                    },
                }
            }

    	}
    	*/
    })
</script>
1.3.3 深度监视
<div id="root">
    <div>{{person.id}}-{{person.name}}</div>
    <button @click="changeName">改对象属性</button>
    <br>
    <button @click="changeNum">改正常属性</button>
</div>
<script>
    const vm = new Vue({
        el: '#root',
        data: {
            person: {
                id : 1,
                name : '陈庆威'
            },
            num : 1
        },
        methods: {
            changeName() {
                this.person.name = Math.random()
            },
            changeNum() {
                this.num = Math.random()
            }
        },
        // 正常的watch是监视不到对象内容的变化的
        watch: {
            //可以通过'对象.属性'监视
            // 'person.name'() {
            //     alert("我被改变了")
            //     console.log("我被改变了1")
            // },
            // 开启深度监视
            person: {
                deep: true,
                handler() {
                    alert("我被改变了")
                    console.log("我被改变了2")
                }
            },
            num() {
                alert("我被改变了")
                console.log("我被改变了")
            }
        }
    })
</script>
1.4 条件渲染
1.4.1 v-if 和 v-show
- v-if 和 v-show 绑定的变量需要 布尔型
- v-if 和 v-show 对比:
v-if 会直接操作节点(添加或删除)
v-show会直接给标签加上display:none,在频繁操作中更有优势
<div id="root">
    <div v-if="isCool">{{weatherStr}}</div>
    <div v-else-if="isHot">{{weatherStr}}</div>
    <div v-if="isCommon">{{weatherStr}}</div>
    <!-- <div v-show="isCool">{{weatherStr}}</div>
    <div v-show="isHot">{{weatherStr}}</div>
    <div v-show="isCommon">{{weatherStr}}</div> -->
    <button @click="changeWeather()"></button>
</div>
<script>
    const vm = new Vue({
        el: '#root',
        data: {
            weather : ['凉爽', '炎热', '一般'],
            weatherStr: '',
            isCool : false,
            isHot : false,
            isCommon : false,
        },
        methods: {
           changeWeather() {
                let randomNum = Math.floor(Math.random() * 3);//0 1 2
                this.isCool = randomNum == 0;
                this.isHot = randomNum == 1;
                this.isCommon = randomNum == 2;
                this.weatherStr = this.weather[randomNum];
           }
        },
        computed : {

        },
        watch : {

        }
    })
</script>
- 若要使用 if -> else -if -> else 的结构,需要将这些标签连着写,否则会报错
<div v-if="isCool">{{weatherStr}}</div>
<div v-else-if="isHot">{{weatherStr}}</div>
<div v-else="isCommon">{{weatherStr}}</div>
- 操作多个元素
<template v-if="true">
	<div></div>
    <div></div>
    <div></div>
</template>
1.5 列表渲染
1.5.1 v-for
<div id="root">
    <!-- 数组 -->
    <ul>
        <li v-for="a in arr" :key="arr.index">
            {{a}}
        </li>
    </ul>
    <!-- 对象 -->
    <ul>
        <li v-for="a in object" :key="object.index">
            {{a}}
        </li>
    </ul>
    <!-- 字符串 -->
    <ul>
        <li v-for="a in str" :key="arr.index">
            {{a}}
        </li>
    </ul>
    <!-- 指定次数 -->
    <ul>
        <li v-for="a in 5">
            {{a}}
        </li>
    </ul>
</div>

<script>
    const vm = new Vue({
        el: '#root',
        data: {
            arr: [
                1, 2, 3, 4
            ],
            object: {
                id: 1,
                name: '陈庆威',
                age: 29,
            },
            str: '123',

        },

    })
</script>
1.5.2 key的原理
 <!-- 重点:虚拟Dom和真实Dom的理解、Diff算法、节点复用 -->
<div id="root">
    <ul>
        <!-- 以index作为key输入框会有问题 -->
        <!-- <li v-for="(a) in objectArr" :key="objectArr.index">
            {{a.id}}-{{a.name}}-{{a.age}}
            <input type="text">
        </li> -->
        <!-- 以唯一键为key更有效率(节点复用), 不会出现问题 -->
        <li v-for="(a) in objectArr" :key="a.id">
            {{a.id}}-{{a.name}}-{{a.age}}
            <input type="text">
        </li>
    </ul>
    <button @click="addElementHead">向头添加</button>
    <button @click="addElementTail">向尾添加</button>
</div>

<script>
    const vm = new Vue({
        el: '#root',
        data: {
            objectArr: [
                {id: 1, name: '小王', age: 20},
                {id: 2, name: '小陈', age: 21},
                {id: 3, name: '小黄', age: 22},
            ]
        },
        methods: {
            addElementHead() {
                this.objectArr.unshift({id: 4, name: '小狗', age: 23})
            },
            addElementTail() {
                this.objectArr.push({id: 4, name: '小狗', age: 23});
            }
        }
    })
</script>
1.5.3 列表过滤
<!-- 场景:用户输入姓名,下面显示模糊搜索的结果-->
<div id="root">
    姓名检索:<input type="text" v-model:value="keyword">
    <ul>
        <li v-for="p in filterArr" :key="p.id">
            {{p.id}}-{{p.name}}
        </li>
    </ul>
</div>

<script>
    const vm = new Vue({
        el: '#root',
        data: {
            persons: [
                {id:'001', name:'周建军'},
                {id:'002', name:'周欣欣'},
                {id:'003', name:'黄建建'},
                {id:'004', name:'黄欣欣'},
            ],
            keyword: ''
        },
        computed: {
            filterArr: {
                get() {
                    return this.persons.filter((p) => {
                        return p.name.indexOf(this.keyword) > -1
                    })
                }
            }
        }
    })
</script>
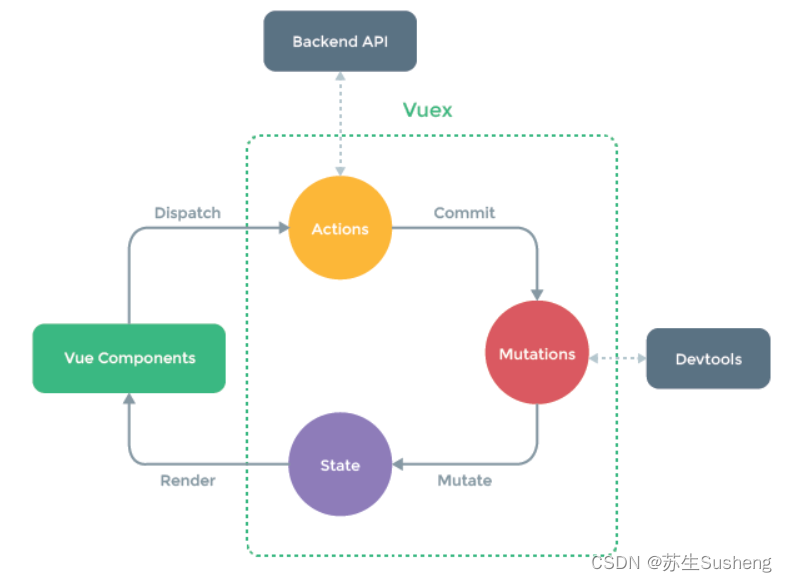
![[<span style='color:red;'>vue</span><span style='color:red;'>2</span>]深入理解<span style='color:red;'>vuex</span>](https://img-blog.csdnimg.cn/img_convert/9ea29ea1d8ec1c35f31f9d79dca3032f.png)