Springboot
一、基本内容
1、概述
Spring Boot 是一个用于创建基于 Spring 框架的应用程序的开源框架。
Spring Boot 通过简化配置、提供自动化功能和强大的依赖管理,使得开发人员可以更加专注于业务逻辑的实现,极大地提高了开发效率和应用程序的可维护性,成为构建现代化、高效率的 Java 应用程序的首选框架之一。
2、关键特性与优势
- 与Spring无缝对接:只需要
run就能创建一个独立的、生产级别的Spring应用,不需要打war包了。 - 内嵌容器:Spring Boot 支持内嵌容器,如 Tomcat、Jetty 和 Undertow,可以直接将应用程序打包为可执行的
jar文件。 - 自动装配:Spring Boot 为 Spring平台 及 第三方库 提供开箱即用的默认配置,只要引入相关的
starter即可。 - 简化配置:Spring Boot 中只需要配置
application.properties/application.yml即可。 - 简化部署:Spring Boot 内嵌了 tomcat,只需要将项目打成 jar 包,使用 java -jar xxx.jar 一键式启动项目。
- 简化监控:引入 actuator 依赖,直接使用 REST 方式来获取进程的运行期性能参数,从而达到监控的目的。
二、依赖管理
1、父工程依赖
引入SpringBoot父工程依赖
<parent>
    <groupId>org.springframework.boot</groupId>
    <artifactId>spring-boot-starter-parent</artifactId>
    <version>2.3.2.RELEASE</version>
    <relativePath/>
</parent>
其中已经管理了各种依赖及对应版本。使用时只需要指定坐标,版本都由SpringBoot管理,避免了依赖间的冲突。
<!-- 点进 spring-boot-dependencies,可以看到里边已经包含了各种依赖与版本 -->
<parent>
    <groupId>org.springframework.boot</groupId>
    <artifactId>spring-boot-dependencies</artifactId>
    <version>2.3.2.RELEASE</version>
</parent>
| 核心模块 | 模块说明 |
|---|---|
| spring-boot | 核心加载 |
| spring-boot-test | 支持SpringBoot的单元测试 |
| spring-boot-actuator | 监控健康管理应用 |
| spring-boot-loader | 允许你构建可用java –jar直接运行的jar包 |
| spring-boot-autoconfigure | 自动配置尝试推测用户可能需要的bean |
| spring-boot-starter-security | security权限系统的支持 |
| spring-boot-starter-amqp | 对AMQP消息队列的支持 |
| spring-boot-starter-web | web项目的支持 |
| spring-boot-starter-aop | aop的支持 |
| spring-boot-starter-jdbc | jdbc的支持 |
2、依赖管理
我们点进 spring-boot-starter-parent ,看到 spring-boot-dependencies
<!-- spring-boot-starter-parent-2.3.2.RELEASE.pom -->

<!-- 点进 spring-boot-dependencies,可以看到里边已经包含了各种依赖与版本 -->
<parent>
    <groupId>org.springframework.boot</groupId>
    <artifactId>spring-boot-dependencies</artifactId>
    <version>2.3.2.RELEASE</version>
</parent>
再进入 spring-boot-dependencies,可以看到里边已经管理了各种依赖及对应版本。
<!-- spring-boot-starter-parent-2.3.2.RELEASE.pom -->

<properties>
    <!-- lombok依赖版本 -->
    <lombok.version>1.18.12</lombok.version>
    <!-- ..... -->
</properties>
<dependencyManagement>
    <!-- web工程起步依赖 -->
    <dependency>
        <groupId>org.springframework.boot</groupId>
        <artifactId>spring-boot-starter-web</artifactId>
        <version>${spring-boot.version}</version>
    </dependency>
    <!-- lombok依赖 -->
    <dependency>
        <groupId>org.projectlombok</groupId>
        <artifactId>lombok</artifactId>
        <version>${lombok.version}</version>
    </dependency>
    <!-- 单元测试依赖 -->
    <dependency>
        <groupId>org.springframework.boot</groupId>
        <artifactId>spring-boot-starter-test</artifactId>
        <version>${spring-boot.version}</version>
    </dependency>
    <!-- ..... -->
</dependencyManagement>
使用时只需要指定坐标,SpringBoot 会自动导入相关依赖,版本都由SpringBoot管理,避免了依赖间的冲突。
<dependencies>
    <!-- web工程起步依赖 -->
    <dependency>
        <groupId>org.springframework.boot</groupId>
        <artifactId>spring-boot-starter-web</artifactId>
    </dependency>
    <!-- lombok依赖 -->
    <dependency>
        <groupId>org.projectlombok</groupId>
        <artifactId>lombok</artifactId>
        <optional>true</optional>
    </dependency>
    <!-- 单元测试依赖 -->
    <dependency>
        <groupId>org.springframework.boot</groupId>
        <artifactId>spring-boot-starter-test</artifactId>
        <scope>test</scope>
    </dependency>
</dependencies>
3、properties属性
通过在 properties 标签中定义一些属性,可以提高项目的可维护性和可配置性,同时简化了对版本号的管理。
<properties>
    <!-- 指定项目编译和运行所使用的 Java 版本 -->
    <java.version>1.8</java.version>
    <!-- 指定项目源代码的编码格式 -->
    <project.build.sourceEncoding>UTF-8</project.build.sourceEncoding>
    <!-- 指定项目报告的输出编码格式 -->
    <project.reporting.outputEncoding>UTF-8</project.reporting.outputEncoding>
    <!-- 指定项目构建输出的最终文件名 -->
    <project.build.finalName>my-application</project.build.finalName>
    <!-- 指定 Maven 编译器的源码和目标字节码版本 -->
    <maven.compiler.source>11</maven.compiler.source>
    <maven.compiler.target>11</maven.compiler.target>
    <!-- 指定 Maven 在构建项目时跳过执行测试阶段,不会运行任何测试用例。 -->
    <skipTests>true</skipTests>
</properties>
properties 标签定义的属性,可以在 pom.xml 文件中使用 ${} 语法来引用这些属性,从而实现统一管理和配置。
三、配置管理
SpringBoot 使用的是一个全局的配置文件,位置在 src/main/resources/ 目录下,可以对全局的默认配置进行修改。
配置文件名是固定的,可以是 application.properties 或 application.yml。
1、yaml 配置文件
application.yml的语法风格完全不同于application.properties,但是作用一样。
# yaml文件举例
pay:
  nopassword:
    max-amount-per-deal: 1000
    max-amount-total: 1000
yaml配置文件的语法:
- 属性名称 和 属性值 用 冒号
:隔开,:之后必须有一个空格。 - 驼峰规则:变量名大写变小写,中间用 横杠
-连接(也可以不用驼峰) - 使用缩进表示层级关系
- 缩进不允许使用tab,只允许空格
- 缩进的空格数不重要,只要相同层级的元素左对齐即可(一般缩进两个空格)
- 字符串类型不用加引号
- 集合类型
- 集合中的属性值作为属性变量的下级。
- 为了区分属性和属性值,用 横杠
-表示 - 横杠
-与具体值之间有一个空格
2、配置文件的读取
SpringBoot的配置文件 主要是 Key-Value 的形式,其中属性Key主要分为两种:
默认属性:根据 《默认属性列表》 填写,SpringBoot将 自动读取配置 和 进行初始化。(配置文件可配置属性 官网文档)自定义属性:根据需求任意填写,但需要 手动读取配置 和 进行初始化。
# 默认属性
server:
  port: 8081
  servlet:
    context-path: /platform
  tomcat:
    uri-encoding: utf-8

# 自定义属性
pay:
  nopassword:
    max-amount-per-deal: 1000
    max-amount-total: 1000
1)Environment对象
注入Environment对象,通过 getProperty("配置属性的key") 方法获得 application.yml 中的属性值
@SpringBootTest
@ActiveProfiles("dev")
@RunWith(SpringRunner.class)
public class SpringBootCoreTest {

    @Autowired
    Environment environment;

    @Test
    public void environmentTest() {

        // 获取yaml配置
        String serverPort = environment.getProperty("server.port");
        System.out.println(serverPort);

        // 获取当前的运行环境
        String[] activeProfiles = environment.getActiveProfiles();
        System.out.println(Arrays.toString(activeProfiles));
    }
}
8090
[dev]
2)@Value注解
通过 @Value注解,获取application.yml中的属性值。
@SpringBootTest
@ActiveProfiles("dev")
@RunWith(SpringRunner.class)
public class SpringBootCoreTest {


    @Value("${server.port}")
    private Integer port;

    @Test
    public void valueAnnotationTest() {

        // @Value获取yaml配置
        System.out.println(port);
    }
}
3)@ConfigurationProperties
如果属性很多,使用上面两种方式就会很麻烦。SpringBoot提供了@ConfigurationProperties注解。
/**
 * `@ConfigurationProperties` 可以将 配置文件中的属性 映射到 Java Bean的属性
 */
@Target({
    ElementType.TYPE, ElementType.METHOD })
@Retention(RetentionPolicy.RUNTIME)
@Documented
public @interface ConfigurationProperties {

    // value 和 prefix 都用来指定配置文件中的前缀
    @AliasFor("prefix")
	String value() default "";
    @AliasFor("value")
	String prefix() default "";

    // 表示在绑定属性时忽略无效字段(即无法转换为目标属性类型的字段)
    boolean ignoreInvalidFields() default false;

    // 表示在绑定属性时忽略未知字段(即配置文件中存在但 Java Bean 中没有相应属性的字段)
    boolean ignoreUnknownFields() default true;
}
约定:
@ConfigurationProperties注解中prefix属性的值 必须和 配置文件中属性的前缀 保持一致。@ConfigurationProperties标记的 实体类的成员变量名 必须和 配置文件中的属性(不含前缀) 保持一致。@ConfigurationProperties标记的 实体类的成员变量 需要 提供getter和setter方法。
注意:
@ConfigurationProperties主要用来把配置文件与实体类相关联,并不会向Spring容器注入相关处理类- 需要配合其他注解使用,将标记了
@ConfigurationProperties的处理类注入Spring容器。
【1】搭配 @Component
@Data
@Component
@ConfigurationProperties(prefix = "pay.nopassword")
public class BankProperties {

    private Double maxAmountPerDeal;
    private Double maxAmountTotal;
    private Account account;
}
【2】搭配 @EnableConfigurationProperties
@Data
@ConfigurationProperties(prefix = "pay.nopassword")
public class BankProperties {

    private Double maxAmountPerDeal;
    private Double maxAmountTotal;
    private Account account;
}
在带有 @Configuration 注解的类上添加 @EnableConfigurationProperties
@EnableConfigurationProperties(BankProperties.class)
@Configuration
public class BankConfig {


}
@EnableConfigurationProperties 将一个被标记 @ConfigurationProperties 的配置类注入Spring容器。
没有被@ConfigurationProperties注解标记的类不能作为@EnableConfigurationProperties的参数。
【3】搭配 @ConfigurationPropertiesScan
@Data
@ConfigurationProperties(prefix = "pay.nopassword")
public class BankProperties {

    private Double maxAmountPerDeal;
    private Double maxAmountTotal;
    private Account account;
}
在带有 @Configuration 注解的类上添加 @ConfigurationPropertiesScan
@ConfigurationPropertiesScan  // 开启属性扫描(默认扫描 其所在的包及其子包下的所有类)
@Configuration
public class BankConfig {


}
3、各类型的yaml示例
1)yaml文件
# yaml映射各种类型
load:
  test:
    # 基本数据类型(String不用加引号)
    name: 张三
    marry: false
    age: 18
    height: 176
    weight: 66.6

    # Date:必须使用yyyy/MM/dd HH:mm:ss,其他格式都会报错
    birth-day: 1996/09/11 20:12:33
    # LocalDate:必须加 @DateTimeFormat,格式需要一致
    birth-local-date: 1996-09-11
    # LocalDateTime:必须加 @DateTimeFormat,格式需要一致
    birth-local-date-time: 1996-09-11 20:12:33

    # Object
    teacher:
      age: 18
      name: 老师

    # Enum:不区分大小写
    course: chinese

    # Array、List、Set(都有以下三种写法,其中Set会去重)
    interest-list: [唱歌, 跳舞]
    interest-set: 唱歌, 跳舞, 跳舞
    interest-array:
      - 唱歌
      - 跳舞

    # List<Enum>
    course-list: chinese, english, math
    # List<Object>:当List的元素为Object时,不能省略[],否则会报错
    teacher-list: [{
   name: 张老师, age: 17}, {
   name: 王老师, age: 17}]

    # Map<String, Object>
    teacher-map:
      chinese: {
   name: 张老师, age: 17}
      english: {
   name: 王老师, age: 18}
    # Map<String, List<Object>>
    all-teacher-map:
      chinese:
        - {
   name: 赵老师, age: 17}
        - {
   name: 钱老师, age: 17}
      english: [{
   name: 孙老师, age: 17}, {
   name: 李老师, age: 17}]
2)Properties文件
@Data
@Component
@ConfigurationProperties(prefix = "load.test")
public class YamlProperties {


    /**
     * 基本数据类型
     */
    private String name;
    private Boolean marry;
    private Integer age;
    private Long height;
    private Double weight;

    /**
     * 日期类型
     */
    private Date birthDay;
    @DateTimeFormat(pattern="yyyy-MM-dd")
    private LocalDate birthLocalDate;
    @DateTimeFormat(pattern="yyyy-MM-dd HH:mm:ss")
    private LocalDateTime birthLocalDateTime;

    /**
     * 对象
     */
    private Teacher teacher;

    /**
     * 枚举
     */
    private CourseEnum course;

    /**
     * Array、List、Set
     */
    private String[] interestArray;
    private List<String> interestList;
    private Set<String> interestSet;

    private List<CourseEnum> courseList;
    private List<Teacher> teacherList;

    /**
     * Map
     */
    private Map<String, Teacher> teacherMap;
    private Map<String, List<Teacher>> allTeacherMap;

    @Data
    public static class Teacher {

        private String name;
        private Integer age;
    }

    @Getter
    @RequiredArgsConstructor
    public enum CourseEnum {


        CHINESE(1, "语文"),
        ENGLISH(2, "英语"),
        MATH(3, "数学");

        private final Integer id;
        private final String name;
    }

    @Override
    public String toString() {

        return "YamlProperties{" +
            "name='" + name + '\'' +
            ", marry=" + marry +
            ", age=" + age +
            ", height=" + height +
            ", weight=" + weight +
            '}';
    }
}
4、多环境配置
不同开发环境的配置多少会有一些差异,如果每次切换环境,都需要修改配置文件,不仅容易出错,而且还很麻烦。
SpringBoot允许提前编写各个环境的配置文件,然后在不同场景,指定使用不同的配置文件。但文件的命名必须要符合规范。
- 首先,核心文件是
application.yml,不能少。 - 然后,定义
application-xxx.yml,这里xxx就是环境名称。- 本地环境:
application-local.yml - 开发环境:
application-dev.yml - 测试环境:
application-test.yml - 生产环境:
application-prod.yml
- 本地环境:
- 最后,在
application.yml或环境变量中,通过spring.profiles.active来指定环境名称。
1)application.yml配置
在 application.yml 主配置文件中,指定profile,激活目标yml文件
spring:
  profiles:
    active: dev  # 生效的环境
2)配置 VM options
在 application.yml 主配置文件中,通过${}定义动态变量
spring:
  profiles:
    active: ${
   env}   # 生效的环境
IDEA:编辑启动应用配置,在 VM options 中添加-D命令:-Denv=dev
-D表示后面要设置参数,其后跟的是变量名=变量值
3)配置 Active profiles
IDEA:编辑启动应用配置,在 Active profiles 中添加 环境信息:dev
5、加载顺序与覆盖
加载顺序:
bootstrap.yml>application.properties>application.yml>application-dev.yml(不同环境的配置)
覆盖规则:
- 如果有相同的配置,后加载的 会覆盖 先加载的。
6、配置提示的依赖
自定义的类 和 配置文件 绑定 一般没有提示(添加 @ConfigurationProperties 注解后)

可以增加以下依赖
<dependencies>
    <dependency>
        <groupId>org.springframework.boot</groupId>
        <artifactId>spring-boot-configuration-processor</artifactId>
        <optional>true</optional>
    </dependency>
</dependencies>
类写完后点击bulid,成功后就能找到自己的配置类的元数据信息
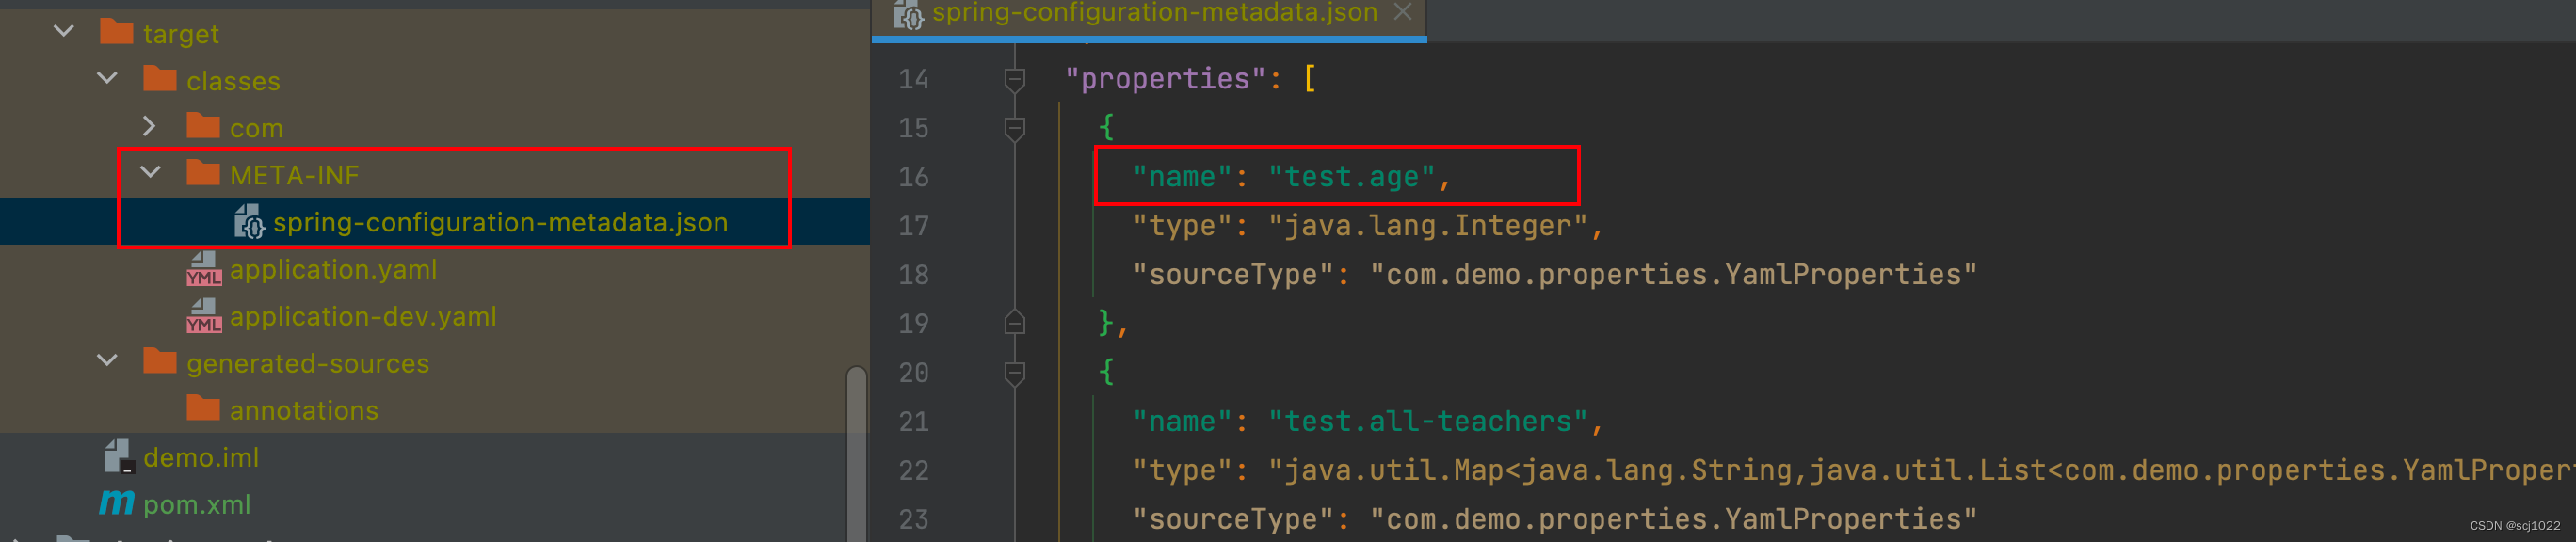
这样在yaml文件中,就能通过提示进行配置了

四、项目启动/部署
1、main方法
IDEA:在项目中,找到main函数,直接右键运行即可
2、mvn 命令
进入项目目录(pom文件所在目录),并打开 Terminal 控制台,输入maven命令:
mvn spring-boot:run
要使用mvn命令,需要先安装好maven, 配置好环境变量!
3、java -jar
进入项目目录(pom文件所在目录),对项目进行打包
mvn package
然后进入项目目录下的 target 目录,可以看到一个打包好的jar包:
.../target/xxx.jar
运行打好的 jar包
java -jar xxx.jar