目录
一、CSS 伪元素
CSS伪元素是指,在CSS 中使用一些特殊的选择器,创建出来的虚拟元素, 并不是实际存在的HTML元素;
- 用来选择和操作文档中的特定部分,实现一些特殊效果;
- 伪元素使得在不增加额外HTML标签的情况下,对文档中的内容进行样式化;
- 伪元素也是一种元素,可以设置html中支持的各种属性,包括元素的布局、定位、宽高、背景等等;
本文主要介绍::before 、::after 这个两个伪元素的相关内容和一些使用场景;
二、::before ::after 介绍
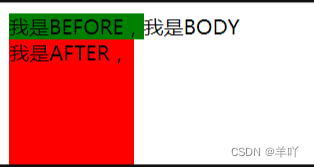
::before ::after 伪元素用来给元素前面或者后面插入指定内容;
- 使用content属性来指定要插入的内容;
- 必须配合content属性一起使用,content的属性值可以为空;
- 伪元素的display属性值默认为inline;
1、::before
::before选择器用来向指定元素之前插入内容;
(1)语法
元素::before{
    content: "要插入的内容";
    /* 其他属性 */
}
(2)示例
给页面所有的p元素前面插入内容;
<style>
    p::before{
        content: "使用::before伪元素插入的内容——";
        /* 其他属性 */
    }
</style>
<body>
    <div>
        <p>第一个P标签中的内容</p>
        <p>第二个P标签中的内容</p>
        <p>第三个P标签中的内容</p>
    </div>
</body>
2、::after
::after选择器用来向指定元素之后插入内容;
(1)语法
元素::after{
    content: "要插入的内容";
    /* 其他属性 */
}
(2)示例
给页面所有的p元素后面插入内容;
<style>
    p::after{
        content: "——使用::after伪元素插入的内容";
        /* 其他属性 */
    }
</style>
<body>
    <div>
        <p>第一个P标签中的内容</p>
        <p>第二个P标签中的内容</p>
        <p>第三个P标签中的内容</p>
    </div>
</body>
3、content 常用属性值
::before ::after 必须配合content属性一起使用,以下是content的常用属性值:
| 序号 | 属性值 | 说明 |
|---|---|---|
| 1 | string | 设置文本内容; |
| 2 | url("url") | 设置图片等媒体文件的URL链接; |
| 3 | open-quote | 设置为前引号; |
| 4 | close-quote | 设置为后引号; |
| 5 | attr(attribute) | 将元素的 attribute 属性以字符串形式返回; |
| 6 | counter | 设定计数器; |
| 7 | none | 设置 content 为空值; |
| 8 | normal | 在 :before 和 :after 伪类元素中会被视为 none,即也是空值; |
(1)设置文本内容
设置content的属性值为string类型,即可给伪元素添加文本;
<style>
    span::before{
        content: "使用::before添加的文本前缀——————";
    }
    span::after{
        content: "————使用::after添加的文本后缀";
    }
</style>
......
<body>
    <span class="box">我是HTML元素中的文本</span>
</body>
(2)设置媒体链接
通过url()属性值,即可导入媒体文件为伪元素的内容;
<style>
    .container {
        margin: 100px;
    }
    .avatar::after{
        content: url("D:\\test\\girl.png");
        display: block;
    }
</style>
......
<body>
    <div class="container">
        <div class="avatar">示例图片</div>
    </div>
</body>
注意,这里使用url添加的图片不能设置大小,最好通过背景添加图片;
(3)设置前 || 后引号
通过open-quote或close-quote属性值,即可给设置伪元素的内容为前引号或后引号;
<style>
    p:nth-child(1)::before{
        content:open-quote;
        /* 其他属性 */
    }
    p:nth-child(2)::after{
        content:close-quote;
    }
</style>
......
<body>
    <div>
        <p>添加前引号</p>
        <p>添加后引号</p>
    </div>
</body>
(4)获取元素属性
通过attr()获取元素的某一个属性值(以字符串的形式返回),并设置为伪元素的内容;
<style>
    a:after {
        content: " (" attr(href) ")";
    }
</style>
......
<body>
    <div><a href="https://www.csdn.net">CSDN</a>点击跳转至CSDN...</div>
    <div><a href="https://www.baidu.com">百度</a>点击跳转至百度...</div>
</body>
(5)设置计数器
<style>
    div {
        counter-increment: index;
    }
    div:before {
        content:counter(index);
    }
</style>
......
<body>
    <div>、、、、、、我是第1个div、、、、、、</div>
    <div>、、、、、、我是第2个div、、、、、、</div>
    <div>、、、、、、我是第3个div、、、、、、</div>
    <div>、、、、、、我是第4个div、、、、、、</div>
</body>
三、::before ::after 应用场景
虽然 ::before ::after 这两个伪元素的使用方式非常简单,但若能灵活应用,就能实现一些很不错的CSS效果;
1、设置统一字符
<style>
    p::before{
        content: "* ";
        color: red;
        font-size: 24px;
        /* 其他属性 */
    }
    p::after{
        content: ":____________";
        /* 其他属性 */
    }
</style>
...
<body>
    <div>
        <p>姓名</p>
        <p>年龄</p>
        <p>出生日期</p>
        <p>居住地址</p>
    </div>
</body>
2、通过背景添加图片
<style>
    .container{
        margin: 100px;
    }
    .container::after{
        content: "";
        display:block;
        width: 260px;
        height: 260px;
        background-image: url("D:\\test\\girl.png");
        background-position: center;
        background-size: cover;
    }
</style>
......
<body>
    <div class="container">通过背景添加图片</div>
</body>
3、添加装饰线
<style>
    .line{
        display: flex;
        align-items: center;
        margin: 60px;
        height: 40px;
        font-size: 18px;
    }
    .line::before, .line::after{
        content: "";
        width: 300px;
        border-top: 6px double;
        margin: 5px;
    }

</style>
......
<body>
    <div class="line">添加装饰线</div>
</body>
4、右侧展开箭头
<style>
    .container{
        display: flex;
        flex-direction: column;
        align-items: center;
        justify-content: center;

        width: 400px;
        margin: 100px auto;
        padding: 30px 0;
        border-radius: 8px;
        box-shadow: 0 0 4px 1px #acacac;
    }

    .setting-item{
        position: relative;
        align-items: center;
        display: flex;
        width: 300px;
        height: 40px;
        margin-bottom: 20px;
        border-bottom: 1px solid #ccc;
    }

    .setting-item::after{
        position: absolute;
        right: 0;
        content: "";
        width: 8px;
        height: 8px;
        border-top: 1px solid #666;
        border-right: 1px solid #666;
        transform: rotate(45deg);
    }

</style>
......
<body>
    <div class="container">
        <div class="setting-item">账号设置</div>
        <div class="setting-item">权限管理</div>
        <div class="setting-item">相关服务</div>
        <div class="setting-item">帮助与反馈</div>
        <div class="setting-item">......</div>
    </div>
</body>
5、对话框小三角
<style>
    .container {
        width: 400px;
        margin: 100px auto;
        padding: 30px 0;
        border-radius: 8px;
        box-shadow: 0 0 4px 1px yellowgreen;
    }

    .left-box,.right-box {
        display: flex;
    }

    .right-box {
        justify-content: end;
    }

    span {
        position: relative;
        display: flex;
        align-items: center;

        background-color: yellowgreen;
        border-radius: 6px;
        margin: 4px 14px;
        padding: 16px;
    }

    .left-box span::before, .right-box span::after{
        position: absolute;
        content: "";
        width: 12px;
        height: 12px;
        background-color: yellowgreen;
        transform: rotate(45deg);
    }

    .left-box span::before{
        left: -6px;
    }
    .right-box span::after {
        right: -6px;
    }
</style>

......

<body>
    <div class="container">
        <div class="left-box">
            <span>Nice to meet you!</span>
        </div>
        <div class="right-box">
            <span>Nice to meet you, too!</span>
        </div>
    </div>
</body>
6、插入icon图标
<style>
    .login-box{
        display: flex;
        flex-direction: column;
        align-items: center;
        justify-content: center;

        width: 400px;
        height: 400px;
        margin: 100px auto;
        border-radius: 8px;
        box-shadow: 0 0 4px 1px #acacac;
    }
    .title{
        font-size: 24px;
        font-weight: 700;
        margin-bottom: 40px;
    }
    .account, .pwd, .login-btn, .forgot-pwd{
        width: 300px;
        height: 40px;
        line-height: 40px;
    }

    .account, .pwd{
        display: flex;
        align-items: center;
        border-bottom: 1px solid #ccc;
        font-size: 14px;
        color: #888;
    }
    .pwd{
        margin-top: 20px;
    }
    .account::before, .pwd::before{
        content: '';
        display: inline-block;
        width: 24px;
        height: 24px;
        background-repeat: no-repeat;
        background-position: center center;
        background-size: contain;
        margin-right: 8px;
    }
    .account::before{
        background-image: url("D:\\test\\user.svg");
    }
    .pwd::before {
        background-image: url("D:\\test\\pwd.svg");
    }

    .login-btn{
        text-align: center;
        color: #fff;
        font-size: 16px;
        font-weight: 700;
        background: #2687F0;
        border-radius: 5px;
        margin-top: 40px;
    }

    .forgot-pwd{
        text-align: right;
        font-size: 14px;
        color: #888;
        margin-top: 20px;
    }
</style>
......
<body>
    <div class="login-box">
        <div class="title">XXX 管理系统</div>
        <div class="account">请输入账号</div>
        <div class="pwd">请输入密码</div>
        <div class="login-btn">登 录</div>
        <div class="forgot-pwd">忘记密码</div>
    </div>
</body>
=========================================================================
每天进步一点点~!
一个实用的CSS小技巧~!


![[HCTF 2018]WarmUp1](https://i-blog.csdnimg.cn/direct/5c84eff24c634273a0bf774963e867c2.png)