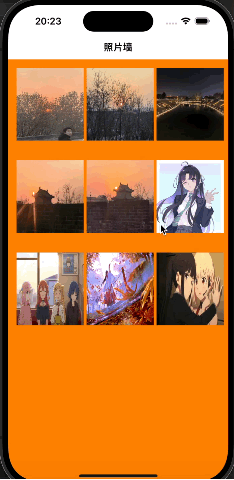
照片墙案例
在实现照片墙案例之前先讲一下userInteractionEnable这个属性。
首先这个属性属于UIView,这个属性是bool类型,如果为YES的话,这个UIView会接受有关touch和keyboard的相关操作,然后UIView就可以通过相应的一些方法来处理这些操作。如果为NO的话,这个UIView他会不接受发生在这个UIView上有关touch和keyboard的相关操作。所以在照片墙中我们为了实现一个点击就放大的效果,一定要开启这个部分内容。
其次就是我们需要创建一个手势识别器,这里介绍一下手势识别器。
UITapGestureRecognizer*这个就是我们创建一个手势识别器。然后我们通过下面的手段来设置他的相应的数据
UITapGestureRecognizer* tap = [[UITapGestureRecognizer alloc] initWithTarget:self action:@selector(press:)];//创建一个手势识别器,并且添加相应的方法
tap.numberOfTapsRequired = 1;//设置触摸次数
tap.numberOfTouchesRequired = 1;//设置触摸点个数
[iView addGestureRecognizer:tap];//添加手势识别器到view中
//触摸后实现方法函数
- (void) press:(UITapGestureRecognizer*) tap {
    UIImageView* imageView = (UIImageView*) tap.view;
    //创建显示的视图控制器
    ShowImage* imageShow = [[ShowImage alloc] init];
    //点击的图像视图赋值
    imageShow.imageTag = imageView.tag;
    imageShow.image = imageView.image;
    //将控制器推出
    [self.navigationController pushViewController:imageShow animated:YES];
}
实现一个照片墙,我们需要两个步骤,一个是我们照片墙的主页面,一个是点击后我们需要将这个图片放大,将它呈现在手机上,所以我们还是需要两个视图控制器,以及一个导航控制器去管理两个视图控制器。
那么我们先创建一个导航控制器。
- (void)scene:(UIScene *)scene willConnectToSession:(UISceneSession *)session options:(UISceneConnectionOptions *)connectionOptions {
    self.window.frame = [UIScreen mainScreen].bounds;
    UINavigationController* nav = [[UINavigationController alloc] initWithRootViewController:[[VCRoot alloc] init]];
    self.window.rootViewController = nav;
    [self.window makeKeyAndVisible];
    // Use this method to optionally configure and attach the UIWindow `window` to the provided UIWindowScene `scene`.
    // If using a storyboard, the `window` property will automatically be initialized and attached to the scene.
    // This delegate does not imply the connecting scene or session are new (see `application:configurationForConnectingSceneSession` instead).
}
接下来在创建我们的根视图控制器。
#import "VCRoot.h"
#import "ShowImage.h"
@interface VCRoot ()

@end

@implementation VCRoot

- (void)viewDidLoad {
    [super viewDidLoad];
    self.title = @"照片墙";
    self.view.backgroundColor = [UIColor orangeColor];
  //设置导航栏的透明度
    self.navigationController.navigationBar.translucent = YES;
  //设置导航栏样式
    UINavigationBarAppearance* app = [[UINavigationBarAppearance alloc] init];
    app.backgroundColor = [UIColor whiteColor];
    app.shadowImage = [[UIImage alloc] init];
    app.shadowColor = nil;

    self.navigationController.navigationBar.standardAppearance = app;
    self.navigationController.navigationBar.scrollEdgeAppearance = app;

  //创建一个滑动视图
    CGRect screenBounds = [[UIScreen mainScreen] bounds];
    UIScrollView* sv = [[UIScrollView alloc] initWithFrame:screenBounds];
    sv.contentSize = CGSizeMake(screenBounds.size.width, screenBounds.size.height * 1.5);
  //通过一个for循环将图片添加到我们的滑动视图上面
    for (int i = 0; i < 9; i++) {
        NSString* strName = [NSString stringWithFormat:@"%d.jpg", i + 1];
        UIImage* image = [UIImage imageNamed:strName];
        UIImageView* iView = [[UIImageView alloc] initWithImage: image];
        iView.frame = CGRectMake(15 + (i % 3) * 125, 15 + (i / 3) * 165 , 120, 130);
        [sv addSubview:iView];
        iView.userInteractionEnabled = YES;
        UITapGestureRecognizer* tap = [[UITapGestureRecognizer alloc] initWithTarget:self action:@selector(press:)];
        tap.numberOfTapsRequired = 1;
        tap.numberOfTouchesRequired = 1;
        [iView addGestureRecognizer:tap];
        iView.tag = 101 + i;
    }
    [self.view addSubview:sv];
    // Do any additional setup after loading the view.
}
- (void) press:(UITapGestureRecognizer*) tap {
    UIImageView* imageView = (UIImageView*) tap.view;
    //创建显示的视图控制器
    ShowImage* imageShow = [[ShowImage alloc] init];
    //点击的图像视图赋值
    imageShow.imageTag = imageView.tag;
    imageShow.image = imageView.image;
    //将控制器推出
    [self.navigationController pushViewController:imageShow animated:YES];
}
/*
#pragma mark - Navigation

// In a storyboard-based application, you will often want to do a little preparation before navigation
- (void)prepareForSegue:(UIStoryboardSegue *)segue sender:(id)sender {
    // Get the new view controller using [segue destinationViewController].
    // Pass the selected object to the new view controller.
}
*/

@end
这时候我们需要考虑到一个传递照片到第二个视图控制器上面的办法,这里注意我们要通过image的tag属性让我们的image可以被正常传递过去,因为这里要注意一个视图只能有一个父亲视图,否则就会导致只能点击后会消失的问题。
#import "ShowImage.h"

@interface ShowImage ()

@end

@implementation ShowImage

- (void)viewDidLoad {
    [super viewDidLoad];
    self.title = @"展示照片";
    //一个视图对象只有一个根视图
    //当我们把视图添加到新的父亲上的时候
    //会删除掉上一个存在的
    self.view.backgroundColor = [UIColor orangeColor];
    _imageView = [[UIImageView alloc] init];
    _imageView.frame = CGRectMake(40, 200, 320, 480);
    _imageView.image = [UIImage imageNamed:[NSString stringWithFormat:@"%ld.jpg", _imageTag - 100]];
    [self.view addSubview: _imageView];
    // Do any additional setup after loading the view.
}
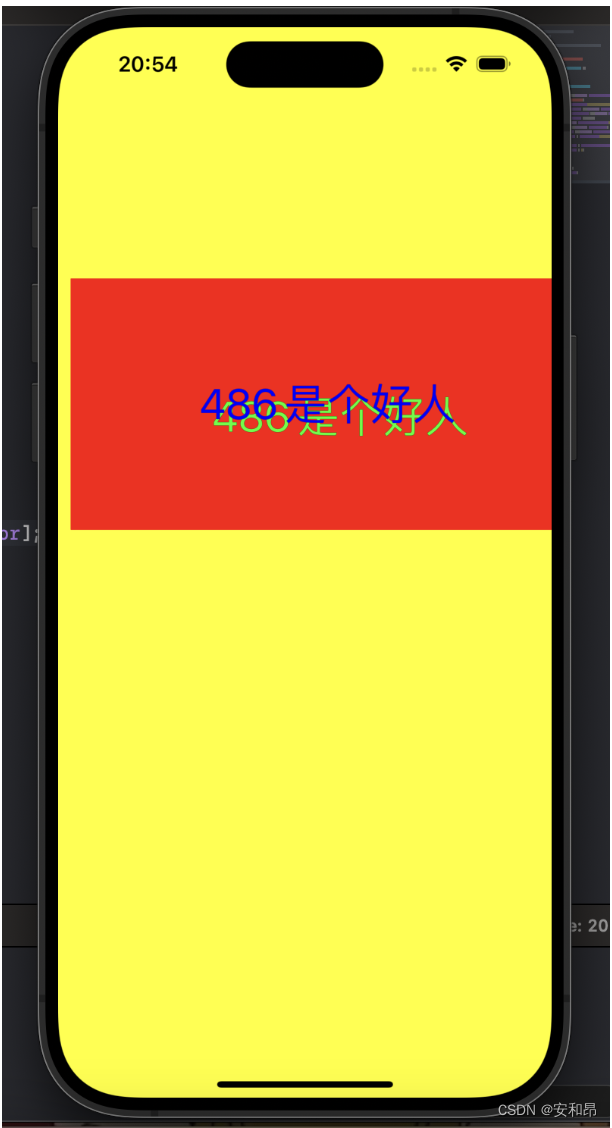
实现效果为: