文章目录
由于系统原因导致Flink作业无法正常运行的情况非常多,且很多时候都是无法避免的。对于Flink集群来讲,能够快速从异常状态中恢复,同时保证处理数据的正确性和一致性非常重要。Flink主要借助Checkpoint的方式保障整个系统状态数据的一致性,也就是基于ABS算法实现轻量级快照服务。
本节我们详细了解Checkpoint的设计与实现。
1. Checkpoint的整体设计
Checkpoint的执行过程分为三个阶段:启动、执行以及确认完成。其中Checkpoint的启动过程由JobManager管理节点中的CheckpointCoordinator组件控制,该组件会周期性地向数据源节点发送执行Checkpoint的请求,执行频率取决于用户配置的CheckpointInterval参数。
执行过程:
- 在JobManager管理节点通过CheckpointCoordinator组件向每个数据源节点发送Checkpoint执行请求,此时数据源节点中的算子会将
消费数据对应的Position发送到JobManager管理节点中。- JobManager节点会存储Checkpoint元数据,用于记录每次执行Checkpoint操作过程中算子的元数据信息,例如在FlinkKafkaConsumer中会记录消费Kafka主题的偏移量,用于确认从Kafka主题中读取数据的位置。
- 在数据源节点执行完Checkpoint操作后,继续向下游节点发送CheckpointBarrier事件,下游算子通过对齐Barrier事件,触发该算子的Checkpoint操作。
当下游的map算子接收到数据源节点的Checkpoint
Barrier事件后,首先对当前算子的数据进行处理,并等待其他上游数据源节点的Barrier事件到达。该过程就是Checkpoint
Barrier对齐,目的是确保属于同一Checkpoint的数据能够全部到达当前节点。
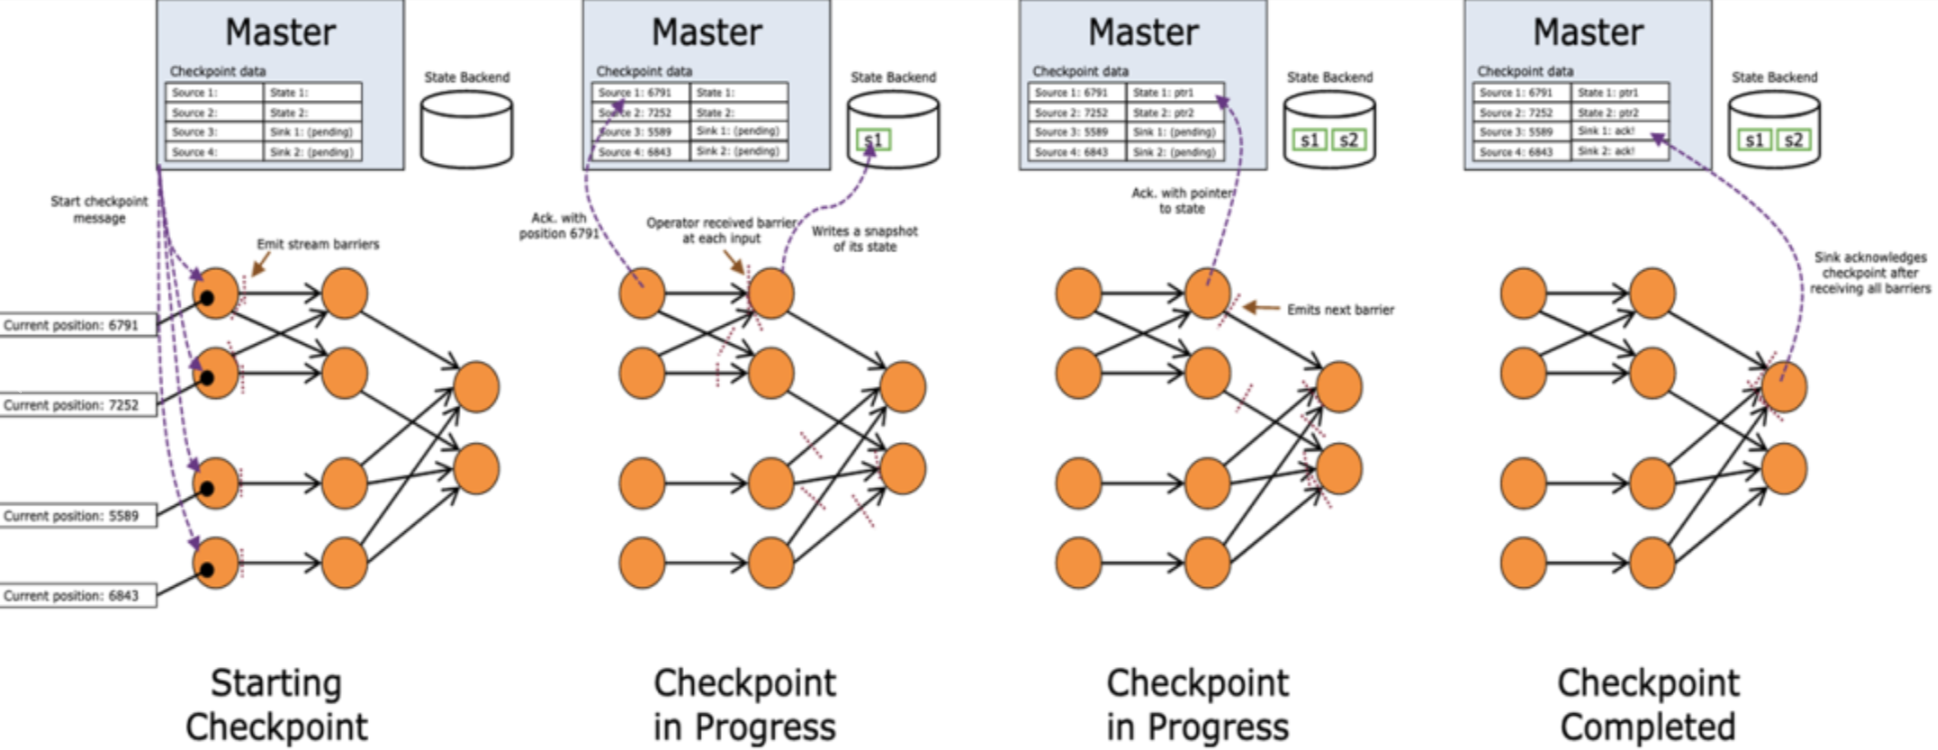
Barrier事件的作用就是切分不同Checkpoint批次的数据。
当map算子接收到所有上游的Barrier事件后,就会触发当前算子的Checkpoint操作,并将状态数据快照到指定的外部持久化介质中,该操作主要借助状态后端存储实现。
当状态数据执行完毕后,继续将Barrier事件发送至下游的算子,进行后续算子的Checkpoint操作。
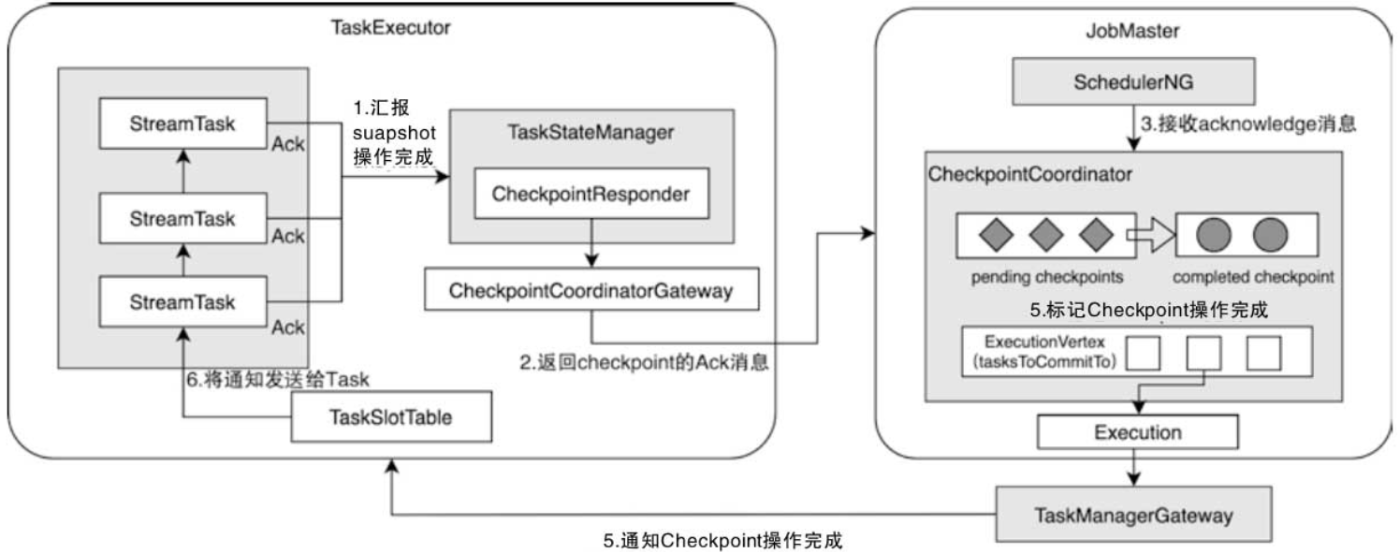
另外,在map算子中执行完Checkpoint操作后,也会向JobManager管理节点发送Ack消息,确认当前算子的Checkpoint操作正常执行。此时Checkpoint数据会存储该算子对应的状态数据,如果StateBackend为MemoryStateBackend,则主要会将状态数据存储在JobManager的堆内存中。
sink节点的ack
像map算子节点一样,当Barrier事件到达sink类型的节点后,sink节点也会进行Barrier对齐操作,确认上游节点的数据全部接入。然后对接入的数据进行处理,将结果输出到外部系统中。完成以上步骤后,sink节点会向JobManager管理节点发送Ack确认消息,确认当前Checkpoint中的状态数据都正常进行了持久化操作。(之后呢?当任务结束之后,cp会消失还是?)
2. Checkpoint创建源码解析
通过调用StreamExecutionEnvironment.enableCheckpointing(),开启Checkpoint。
此时Checkpoint的配置会被存储在StreamGraph中,然后将StreamGraph中的CheckpointConfig转换为JobCheckpointingSettings数据结构存储在JobGraph对象中,并伴随JobGraph提交到集群运行。启动JobMaster服务后,JobMaster调度和执行Checkpoint操作。
2.1. DefaultExecutionGraphBuilder.buildGraph
如下代码,通过JobGraph构建ExecutionGraph的过程中,获取JobGraph中存储的JobCheckpointingSettings配置,然后创建ExecutionGraph。
1)根据snapshotSettings配置获取triggerVertices、ackVertices以及confirmVertices节点集合,并转换为对应的ExecutionJobVertex集合。
- 其中triggerVertices集合存储了所有SourceOperator节点,这些节点通过CheckpointCoordinator主动触发Checkpoint操作。
- ackVertices和confirmVertices集合存储了StreamGraph中的全部节点,代表所有节点都需要返回Ack确认信息并确认Checkpoint执行成功。
2)创建CompletedCheckpointStore组件,用于存储Checkpoint过程中的元数据。
- 当对作业进行恢复操作时会在CompletedCheckpointStore中检索最新完成的Checkpoint元数据信息,然后基于元数据信息恢复Checkpoint中存储的状态数据。CompletedCheckpointStore有两种实现,分别为StandaloneCompletedCheckpointStore和ZooKeeperCompletedCheckpointStore。
- 在CompletedCheckpointStore中通过maxNumberOfCheckpointsToRetain参数配置以及结合checkpointIdCounter计数器保证只会存储固定数量的CompletedCheckpoint。
3)创建CheckpointStatsTracker实例
用于监控和追踪Checkpoint执行和更新的情况,包括Checkpoint执行的统计信息以及执行状况,WebUI中显示的Checkpoint监控数据主要来自CheckpointStatsTracker。4)创建StateBackend,从UserClassLoader中反序列化出应用指定的StateBackend并设定为applicationConfiguredBackend。
5)初始化用户自定义的Checkpoint Hook函数
6)最终调用executionGraph.enableCheckpointing()方法,在作业的执行和调度过程中开启Checkpoint。
// 配置状态数据checkpointing
// 从jobGraph中获取JobCheckpointingSettings
JobCheckpointingSettings snapshotSettings = jobGraph.getCheckpointingSettings();
//如果snapshotSettings不为空,则开启checkpoint功能
if (snapshotSettings != null) {

   List<ExecutionJobVertex> triggerVertices =
         idToVertex(snapshotSettings.getVerticesToTrigger(), executionGraph);
   List<ExecutionJobVertex> ackVertices =
         idToVertex(snapshotSettings.getVerticesToAcknowledge(), executionGraph);
   List<ExecutionJobVertex> confirmVertices =
         idToVertex(snapshotSettings.getVerticesToConfirm(), executionGraph);
   //创建CompletedCheckpointStore
   CompletedCheckpointStore completedCheckpoints;
   CheckpointIDCounter checkpointIdCounter;
   try {

      int maxNumberOfCheckpointsToRetain = jobManagerConfig.getInteger(
          CheckpointingOptions.MAX_RETAINED_CHECKPOINTS);
      if (maxNumberOfCheckpointsToRetain <= 0) {

         maxNumberOfCheckpointsToRetain = CheckpointingOptions.MAX_RETAINED_
            CHECKPOINTS.defaultValue();
      }
      // 通过recoveryFactory创建CheckpointStore
      completedCheckpoints = recoveryFactory.createCheckpointStore(jobId,
         maxNumberOfCheckpointsToRetain, classLoader);
      // 通过recoveryFactory创建CheckpointIDCounter
      checkpointIdCounter = recoveryFactory.createCheckpointIDCounter(jobId);
   }
   catch (Exception e) {

      throw new JobExecutionException(jobId, "Failed to initialize high-
         availability checkpoint handler", e);
   }
   // 获取checkpoints最长的记录次数
   int historySize = jobManagerConfig.getInteger(WebOptions.CHECKPOINTS_HISTORY_SIZE);
   // 创建CheckpointStatsTracker实例
   CheckpointStatsTracker checkpointStatsTracker = new CheckpointStatsTracker(
         historySize,
         ackVertices,
         snapshotSettings.getCheckpointCoordinatorConfiguration(),
         metrics);
   // 从application中获取StateBackend
   final StateBackend applicationConfiguredBackend;
   final SerializedValue<StateBackend> serializedAppConfigured =
      snapshotSettings.getDefaultStateBackend();
   if (serializedAppConfigured == null) {

      applicationConfiguredBackend = null;
   }
   else {

      try {

         applicationConfiguredBackend = serializedAppConfigured.
            deserializeValue(classLoader);
      } catch (IOException | ClassNotFoundException e) {

         throw new JobExecutionException(jobId,
            "Could not deserialize application-defined state backend.", e);
      }
   }
   // 获取最终的rootBackend
   final StateBackend rootBackend;
   try {

      rootBackend = StateBackendLoader.fromApplicationOrConfigOrDefault(
         applicationConfiguredBackend, jobManagerConfig, classLoader, log);
   }
   catch (IllegalConfigurationException | IOException |
      DynamicCodeLoadingException e) {

         throw new JobExecutionException(jobId,
            "Could not instantiate configured state backend", e);
   }
   // 初始化用户自定义的checkpoint Hooks函数
   final SerializedValue<MasterTriggerRestoreHook.Factory[]> serializedHooks =
      snapshotSettings.getMasterHooks();
   final List<MasterTriggerRestoreHook<?>> hooks;
   // 如果serializedHooks为空,则hooks为空
   if (serializedHooks == null) {

      hooks = Collections.emptyList();
   }
   else {

   // 加载MasterTriggerRestoreHook
      final MasterTriggerRestoreHook.Factory[] hookFactories;
      try {

         hookFactories = serializedHooks.deserializeValue(classLoader);
      }
      catch (IOException | ClassNotFoundException e) {

         throw new JobExecutionException(jobId,
            "Could not instantiate user-defined checkpoint hooks", e);
      }
      // 设定ClassLoader为UserClassLoader
      final Thread thread = Thread.currentThread();
      final ClassLoader originalClassLoader = thread.getContextClassLoader();
      thread.setContextClassLoader(classLoader);
      // 创建hooks函数
      try {

         hooks = new ArrayList<>(hookFactories.length);
         for (MasterTriggerRestoreHook.Factory factory : hookFactories) {

            hooks.add(MasterHooks.wrapHook(factory.create(), classLoader));
         }
      }
      // 将thread的ContextClassLoader设定为originalClassLoader
      finally {

         thread.setContextClassLoader(originalClassLoader);
      }
   }
   // 获取CheckpointCoordinatorConfiguration
   final CheckpointCoordinatorConfiguration chkConfig =
      snapshotSettings.getCheckpointCoordinatorConfiguration();
   // 开启executionGraph中的Checkpoint功能
   executionGraph.enableCheckpointing(
      chkConfig,
      triggerVertices,
      ackVertices,
      confirmVertices,
      hooks,
      checkpointIdCounter,
      completedCheckpoints,
      rootBackend,
      checkpointStatsTracker);
}
2.2. ExecutionGraph.enableCheckpointing
继续看ExecutionGraph.enableCheckpointing()方法的实现,包含如下逻辑。
- 将tasksToTrigger、tasksToWaitFor以及tasksToCommitTo三个ExecutionJobVertex集合转换为ExecutionVertex[]数组,每个ExecutionVertex代表ExecutionJobVertex中的一个SubTask节点。
- 容错管理:创建CheckpointFailureManager,用于Checkpoint执行过程中的
容错管理,包含failJob和failJobDueToTaskFailure两个处理方法。- 定时调度和执行:创建checkpointCoordinatorTimer,用于Checkpoint异步线程的定时调度和执行。
- 协调和管理作业中的Checkpoint:创建CheckpointCoordinator组件,通过CheckpointCoordinator协调和管理作业中的Checkpoint,同时收集各Task节点中Checkpoint的执行状况等信息。
- Hook:将Master Hook注册到CheckpointCoordinator中,实现用户自定义Hook代码的调用。
- 控制CheckpointCoordinator的启停:将JobStatusListener的实现类CheckpointCoordinatorDeActivator注册到JobManager中,此时系统会根据作业的运行状态控制CheckpointCoordinator的启停,当作业的状态为Running时会触发启动CheckpointCoordinator组件。
public void enableCheckpointing(
      CheckpointCoordinatorConfiguration chkConfig,
      List<ExecutionJobVertex> verticesToTrigger,
      List<ExecutionJobVertex> verticesToWaitFor,
      List<ExecutionJobVertex> verticesToCommitTo,
      List<MasterTriggerRestoreHook<?>> masterHooks,
      CheckpointIDCounter checkpointIDCounter,
      CompletedCheckpointStore checkpointStore,
      StateBackend checkpointStateBackend,
      CheckpointStatsTracker statsTracker) {

   checkState(state == JobStatus.CREATED, "Job must be in CREATED state");
   checkState(checkpointCoordinator == null, "checkpointing already enabled");
   ExecutionVertex[] tasksToTrigger = collectExecutionVertices(verticesToTrigger);
   ExecutionVertex[] tasksToWaitFor = collectExecutionVertices(verticesToWaitFor);
   ExecutionVertex[] tasksToCommitTo = collectExecutionVertices(verticesToCommitTo);
   checkpointStatsTracker = checkNotNull(statsTracker, "CheckpointStatsTracker");
   // 创建CheckpointFailureManager
   CheckpointFailureManager failureManager = new CheckpointFailureManager(
      chkConfig.getTolerableCheckpointFailureNumber(),
      new CheckpointFailureManager.FailJobCallback() {

         @Override
         public void failJob(Throwable cause) {

            getJobMasterMainThreadExecutor().execute(() -> failGlobal(cause));
         }
         @Override
         public void failJobDueToTaskFailure(Throwable cause,
                                             ExecutionAttemptID failingTask) {

            getJobMasterMainThreadExecutor()
               .execute(()  -> failGlobalIfExecutionIsStillRunning(cause,
                  failingTask));
         }
      }
   );
   // 创建checkpointCoordinatorTimer
   checkState(checkpointCoordinatorTimer == null);
   checkpointCoordinatorTimer = Executors.newSingleThreadScheduledExecutor(
      new DispatcherThreadFactory(
         Thread.currentThread().getThreadGroup(), "Checkpoint Timer"));
   // 创建checkpointCoordinator
   checkpointCoordinator = new CheckpointCoordinator(
      jobInformation.getJobId(),
      chkConfig,
      tasksToTrigger,
      tasksToWaitFor,
      tasksToCommitTo,
      checkpointIDCounter,
      checkpointStore,
      checkpointStateBackend,
      ioExecutor,
      new ScheduledExecutorServiceAdapter(checkpointCoordinatorTimer),
      SharedStateRegistry.DEFAULT_FACTORY,
      failureManager);
   // 向checkpoint Coordinator中注册master Hooks
   for (MasterTriggerRestoreHook<?> hook : masterHooks) {

      if (!checkpointCoordinator.addMasterHook(hook)) {

         LOG.warn("Trying to register multiple checkpoint hooks with the name: {}",
                  hook.getIdentifier());
      }
   }
   //向checkpointCoordinator中设定checkpointStatsTracker
   checkpointCoordinator.setCheckpointStatsTracker(checkpointStatsTracker);
     // 注册JobStatusListener,用于自动启动CheckpointCoordinator
   if (chkConfig.getCheckpointInterval() != Long.MAX_VALUE) {

      registerJobStatusListener(checkpointCoordinator.
         createActivatorDeactivator());
   }
   this.stateBackendName = checkpointStateBackend.getClass().getSimpleName();
}
参考:《Flink设计与实现:核心原理与源码解析》–张利兵


![代码随想录算法训练营第二十四天 | 回溯算法理论基础,77. 组合 [回溯篇]](https://img-blog.csdnimg.cn/direct/a34f6881cfd94dfa8b5eb65d7cdcbd1e.png)