Python OpenCV实现图片像素区域缩放
前言
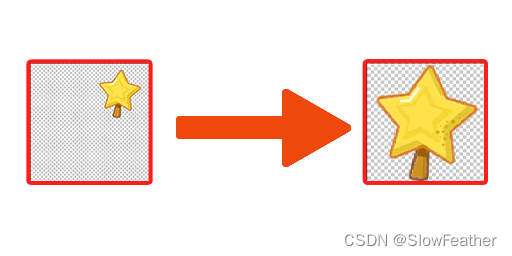
遇到一个要将大量图片缩放成统一规格的难题,并且这些图片周围还有很多空白像素,所以用Python实现一下。
项目
安装OpenCV和Pillow
pip install opencv-python
pip install pillow
思路
先把周围的空白像素去掉,再进行中心缩放,放到规定大小的矩形内即可。
代码编写
需要设置input_folder 和output_folder 还有缩放后的尺寸target_size 。
import cv2
from PIL import Image
import os
import numpy as np

def center_zoom(input_folder, output_folder, target_size):
    # 确保输出文件夹存在
    if not os.path.exists(output_folder):
        os.makedirs(output_folder)

    # 遍历输入文件夹中的所有文件
    for filename in os.listdir(input_folder):
        file_path = os.path.join(input_folder, filename)
        # 确保文件是图像
        if file_path.lower().endswith(('.png', '.jpg', '.jpeg', '.bmp', '.gif')):
            with Image.open(file_path) as img:
                img = img.convert('RGBA')  # 确保图像有透明通道
                img_np = np.array(img)[:,:,0:3]  # 只取RGB通道用于边缘检测
                edges = cv2.Canny(img_np, threshold1=30, threshold2=100)  # 边缘检测
                y_indices, x_indices = np.where(edges > 0)  # 找到边缘像素的坐标
                if len(x_indices) == 0 or len(y_indices) == 0:  # 如果没有找到边缘,直接跳过
                    continue
                x_min, x_max = np.min(x_indices), np.max(x_indices)
                y_min, y_max = np.min(y_indices), np.max(y_indices)

                # 根据裁剪区域裁剪出有像素区域
                img_np = np.array(img)
                img_np = img_np[y_min:y_max, x_min:x_max, :]
                img = Image.fromarray(img_np)

                # 创建一个完全透明的背景图像
                background = Image.new('RGBA', (target_size[0], target_size[1]), (0, 0, 0, 0))

                # 获取原始图像的宽度和高度
                original_width, original_height = img.size

                # 获取目标图像的宽度和高度
                target_width, target_height = target_size

                # 计算原始图像的长宽比
                original_aspect_ratio = original_width / original_height

                # 计算目标图像的长宽比
                target_aspect_ratio = target_size[0] / target_size[1]

                # 如果原始图像的长宽比大于目标图像的长宽比
                if original_aspect_ratio > target_aspect_ratio:
                    # 计算调整后的宽度
                    new_width = target_width
                    # 计算调整后的高度
                    new_height = int(target_width / original_aspect_ratio)
                else:
                    # 计算调整后的高度
                    new_height = target_height
                    # 计算调整后的宽度
                    new_width = int(target_height * original_aspect_ratio)

                # 调整图像大小,保持长宽比不变
                img = img.resize((new_width, new_height), Image.LANCZOS)

                # 创建一个完全透明的背景图像
                background = Image.new('RGBA', target_size, (0, 0, 0, 0))

                # 计算将图像放入背景图像的位置
                x_offset = (target_width - new_width) // 2
                y_offset = (target_height - new_height) // 2

                # 将图像粘贴到背景图像的中心位置
                background.paste(img, (x_offset, y_offset))

                # 保存到输出文件夹
                background.save(os.path.join(output_folder, filename))


# 指定输入和输出文件夹以及目标图像尺寸
input_folder = r'D:\Project\Python_Project\AutomaticCardSynthesis\TestCardImage'
output_folder = r'D:\Project\Python_Project\AutomaticCardSynthesis\OutputCardImage'
target_size = (128, 128)  # 传递一个包含宽和高的元组
center_zoom(input_folder, output_folder, target_size)