使用 HTML、CSS 和 JavaScript 创建动态表格
在本教程中,我们将创建一个动态表格,允许用户添加行、选择项目,并执行批量操作,如全选或删除选中的行。我们将通过 HTML、CSS 和 JavaScript 来实现这一功能。让我们逐步了解每个部分是如何协同工作的。
HTML 结构
我们的 HTML 文档设置了页面的基本结构:
<!DOCTYPE html>
<html lang="en">
<head>
    <meta charset="UTF-8">
    <meta name="viewport" content="width=device-width, initial-scale=1.0">
    <title>动态表格</title>
    <style>
        /* CSS 样式在这里 */
    </style>
</head>
<body>
    <div class="container">
        <!-- 输入字段和添加按钮 -->
        <div class="div_1">
            <input type="text" name="id" id="id" placeholder="请输入编号">
            <input type="text" name="name" id="name" placeholder="请输入用户名">
            <input type="text" name="sex" id="sex" placeholder="请输入性别">
            <input type="button" value="添加" id="bn_add">
        </div>

        <!-- 表格显示学生信息 -->
        <div class="div_2">
            <table>
                <caption>学生信息表</caption>
                <!-- 表头 -->
                <tr onmouseover="doOver(this);" onmouseout="doOut(this);">
                    <th><input type="checkbox" id="doChoose"></th>
                    <th>编号</th>
                    <th>姓名</th>
                    <th>性别</th>
                    <th>操作</th>
                </tr>
                <!-- 示例数据行 -->
                <tr onmouseover="doOver(this);" onmouseout="doOut(this);">
                    <td><input type="checkbox" name="user"></td>
                    <td>1</td>
                    <td>张三</td>
                    <td>男</td>
                    <td><a href="javascript:void(0);" onclick="delTr(this);">删除</a></td>
                </tr>
            </table>
        </div>

        <!-- 操作按钮 -->
        <div class="div_3">
            <input type="button" value="全选" id="chooseAll">
            <input type="button" value="全不选" id="chooseNull">
            <input type="button" value="反选" id="chooseFan">
            <input type="button" value="删除" id="deleteTable">
        </div>
    </div>
    <script>
        /* JavaScript 函数在这里 */
    </script>
</body>
</html>
HTML 元素说明
- 容器 Div:
.container类将所有元素包裹在一起,为其添加了内边距和阴影效果,使页面看起来更像卡片。
- 输入字段和按钮:
.div_1类包含 ID、姓名和性别的输入字段以及一个添加新行的按钮。
- 表格:
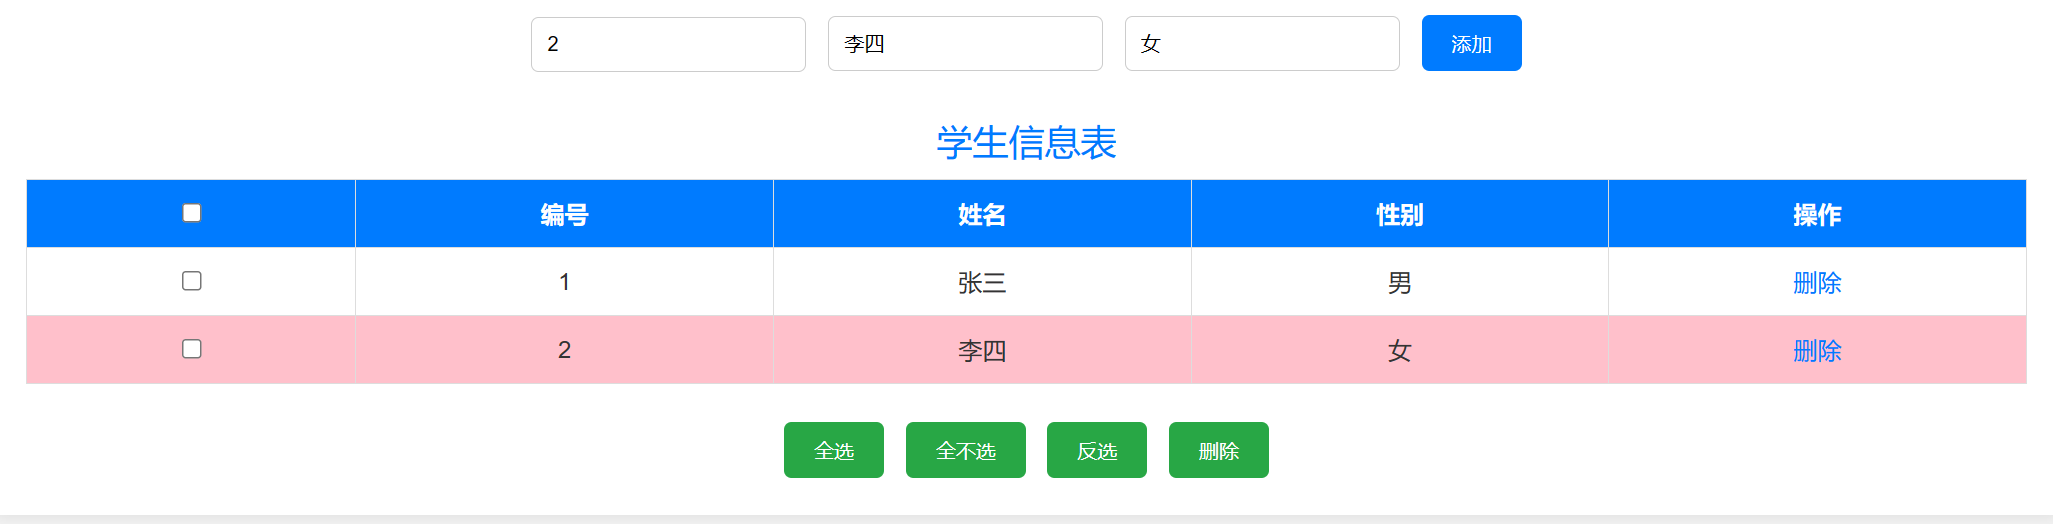
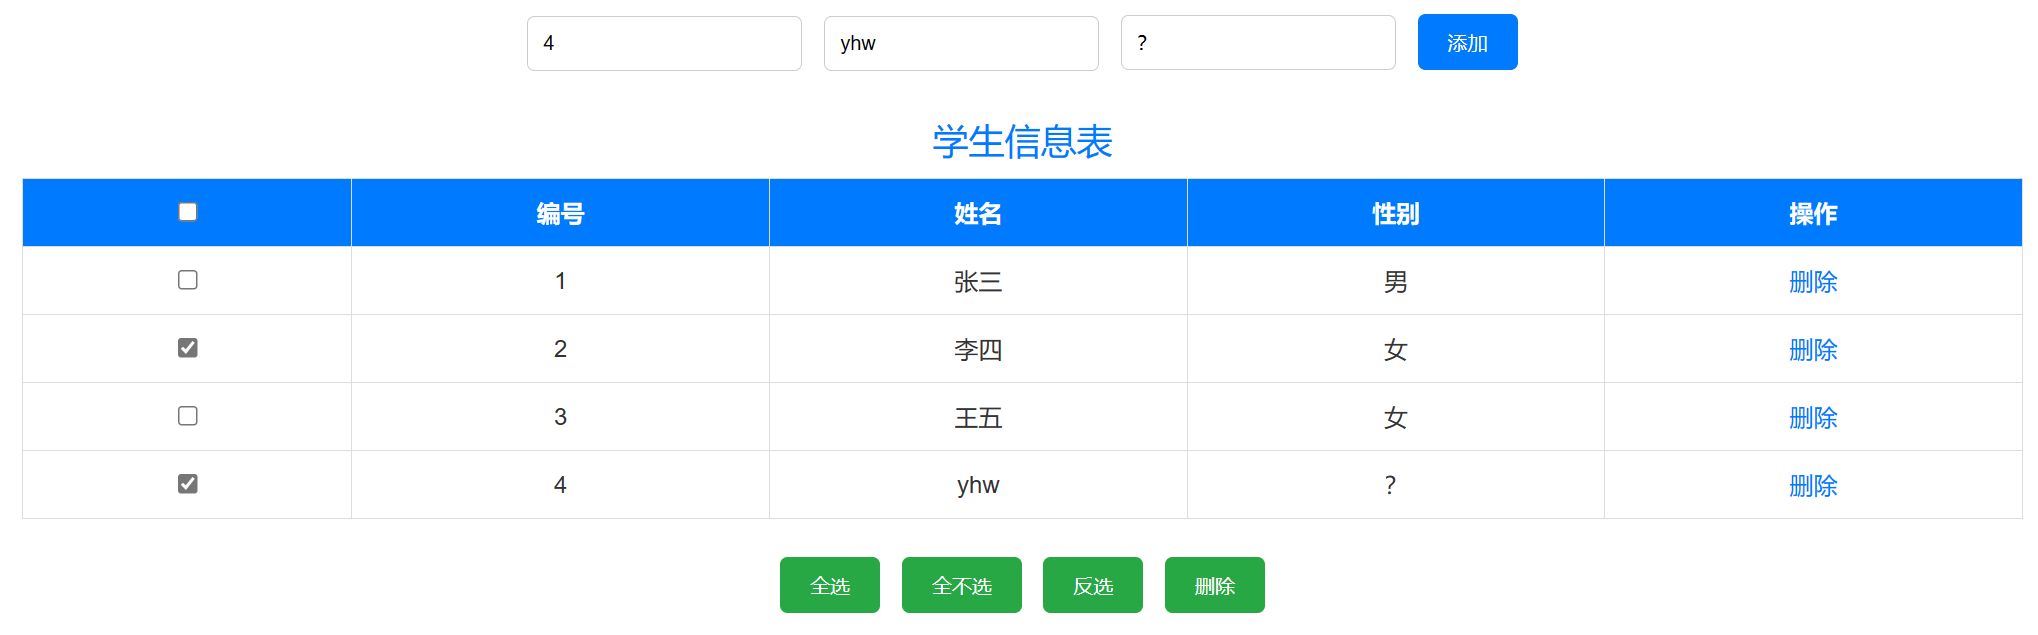
- 表格显示学生信息,包含选择框、编号、姓名、性别和操作列。每一行都有一个删除选项。
- 操作按钮:
.div_3类包含全选、全不选、反选和删除选中行的按钮。
CSS 样式
CSS 用于美化表格和输入字段。以下是 CSS 的简要说明:
body {
    font-family: Arial, sans-serif; /* 设置全局字体 */
    background-color: #f2f2f2; /* 设置背景颜色 */
    color: #333; /* 设置文本颜色 */
    margin: 0; /* 去除默认外边距 */
    padding: 20px; /* 设置页面内边距 */
}

.container {
    width: 80%; /* 设置容器宽度 */
    margin: auto; /* 居中容器 */
    background: #fff; /* 背景颜色为白色 */
    padding: 20px; /* 添加内边距 */
    box-shadow: 0 0 10px rgba(0, 0, 0, 0.1); /* 添加阴影效果 */
}

.div_1 {
    text-align: center; /* 居中对齐内容 */
    margin-bottom: 20px; /* 添加下边距 */
}

.div_1 input[type="text"] {
    padding: 10px; /* 添加内边距 */
    margin-right: 10px; /* 添加右边距 */
    border: 1px solid #ccc; /* 设置边框 */
    border-radius: 5px; /* 设置圆角边框 */
}

.div_1 input[type="button"] {
    padding: 10px 20px; /* 添加内边距 */
    background-color: #007BFF; /* 背景颜色 */
    color: white; /* 文本颜色 */
    border: none; /* 去除边框 */
    border-radius: 5px; /* 设置圆角边框 */
    cursor: pointer; /* 设置鼠标样式 */
}

.div_1 input[type="button"]:hover {
    background-color: #0056b3; /* 悬停时背景颜色变化 */
}

table {
    width: 100%; /* 设置表格宽度 */
    border-collapse: collapse; /* 合并边框 */
    margin-bottom: 20px; /* 添加下边距 */
}

table,
td,
th {
    border: 1px solid #ddd; /* 设置边框 */
}

th,
td {
    padding: 12px; /* 添加内边距 */
    text-align: center; /* 居中对齐文本 */
}

th {
    background-color: #007BFF; /* 表头背景颜色 */
    color: white; /* 表头文本颜色 */
}

caption {
    font-size: 1.5em; /* 设置标题字体大小 */
    margin: 10px; /* 添加边距 */
    color: #007BFF; /* 设置标题颜色 */
}

.div_3 {
    text-align: center; /* 居中对齐内容 */
    font-family: Arial, sans-serif; /* 设置字体 */
    color: #333; /* 设置文本颜色 */
}

.div_3 input[type="button"] {
    padding: 10px 20px; /* 添加内边距 */
    margin: 5px; /* 添加边距 */
    background-color: #28a745; /* 背景颜色 */
    color: white; /* 文本颜色 */
    border: none; /* 去除边框 */
    border-radius: 5px; /* 设置圆角边框 */
    cursor: pointer; /* 设置鼠标样式 */
}

.div_3 input[type="button"]:hover {
    background-color: #218838; /* 悬停时背景颜色变化 */
}

tr:hover {
    background-color: #f1f1f1; /* 行悬停时背景颜色变化 */
}

a {
    color: #007BFF; /* 链接颜色 */
    text-decoration: none; /* 去除下划线 */
}

a:hover {
    text-decoration: underline; /* 悬停时添加下划线 */
}
关键 CSS 特性
- 容器样式:
.container类将内容居中,并添加了内边距和阴影效果,使页面更具吸引力。
- 按钮样式:
- 按钮具有内边距、背景色和悬停效果,提高了可用性。
- 表格样式:
- 表格有清晰的边框、内边距,并且行在悬停时有背景色变化效果,提升了用户体验。
- 链接样式:
- 链接样式与整体主题一致,并在悬停时显示下划线。
JavaScript 功能
JavaScript 代码处理表格的动态功能:
// 获取添加按钮元素
let add = document.getElementById("bn_add");

// 点击添加按钮时触发的事件处理函数
add.onclick = function () {
    // 获取输入字段的值
    let id_text = document.getElementById("id").value;
    let name_text = document.getElementById("name").value;
    let sex_text = document.getElementById("sex").value;

    // 获取表格元素
    let table = document.getElementsByTagName("table")[0];
    // 插入新行
    let newRow = table.insertRow();
    newRow.innerHTML =
        "<td><input type='checkbox' name='user'></td>" +
        "<td>" + id_text + "</td>" +
        "<td>" + name_text + "</td>" +
        "<td>" + sex_text + "</td>" +
        "<td><a href='javascript:void(0);' οnclick='delTr(this);'>删除</a></td>";
    // 添加鼠标悬停效果
    newRow.onmouseover = function () {
        doOver(newRow);
    };
    newRow.onmouseout = function () {
        doOut(newRow);
    };
}

// 主选择框的点击事件处理函数
document.getElementById("doChoose").onclick = function () {
    let userArray = document.getElementsByName("user");
    for (let index = 0; index < userArray.length; index++) {
        userArray[index].checked = this.checked; // 根据主选择框的状态设置复选框的状态
    }
};

// 删除指定行的函数
function delTr(obj) {
    let table = obj.parentNode.parentNode.parentNode; // 获取表格
    let tr = obj.parentNode.parentNode; // 获取当前行
    table.removeChild(tr); // 删除当前行
}

// 全选操作
document.getElementById("chooseAll").onclick = function () {
    let userArray = document.getElementsByName("user");
    for (let index = 0; index < userArray.length; index++) {
        userArray[index].checked = true; // 全部勾选
    }
}

// 全不选操作
document.getElementById("chooseNull").onclick = function () {
    let userArray = document.getElementsByName("user");
    for (let index = 0; index < userArray.length; index++) {
        userArray[index].checked = false; // 全部取消勾选
    }
}

// 反选操作
document.getElementById("chooseFan").onclick = function () {
    let userArray = document.getElementsByName("user");
    for (let index = 0; index < userArray.length; index++) {
        userArray[index].checked = !userArray[index].checked; // 反转每个复选框的状态
    }
}

// 删除选中行操作
document.getElementById("deleteTable").onclick = function () {
    let userArray = document.getElementsByName("user");
    for (let index = userArray.length - 1; index >= 0; index--) {
        if (userArray[index].checked) {
            delTr(userArray[index]); // 删除选中的行
        }
    }
}

// 行悬停效果函数
function doOver(row) {
    row.style.backgroundColor = "pink"; // 悬停时背景色变为粉色
}

// 行悬停离开效果函数
function doOut(row) {
    row.style.backgroundColor = "white"; // 离开时背景色恢复为白色
}
JavaScript 功能说明
添加行:
add.onclick处理输入字段的值,并在表格中添加新行,同时设置了悬停效果。
在插入行时使用let newRow = table.insertRow();可以有效的插入表格,使得表格为一体 或者使用childNode等属性插入 直接table.innerHTML += 表格代码不会将其拼接为一个整体表格。调整了使用 innerHTML 方法添加新行的方式,确保将新行正确插入表格中,而不是简单地将其附加到表格的 innerHTML。全选/全不选操作:
doChoose处理全选和全不选操作,根据主选择框的状态更新复选框。
删除操作:
delTr函数通过获取父元素删除特定行。
批量操作按钮:
chooseAll、chooseNull和chooseFan分别实现全选、全不选和反选复选框。
//批量删除 document.getElementById("deleteTable").onclick = function () { let userArray = document.getElementsByName("user"); for (let index = userArray.length - 1; index >= 0; index--) { if (userArray[index].checked) { delTr(userArray[index]); // 删除选中的行 } } } 如果我们正序删除时,userArray.length会不断变化这样会使我们每次只能删除一般,这时我们可以采取倒序删除的方法,原理如下: 倒着删除不会出现上述错误的原因是,当你从后往前删除时,每次删除一行后,不会影响到尚未遍历到的元素索引。具体来说: 当你正向删除时,如果删除的是索引较小的元素,后面的元素会向前移动一个位置,导致索引发生变化,从而跳过某些元素。 倒着删除时,每次删除操作都影响已经遍历过的元素,不会影响到尚未遍历到的元素的索引,因此不会跳过任何元素。 让我们详细看一下这两种删除方式的工作原理。 正向删除 假设你有一个数组 userArray,其长度为 5,其中元素分别为 A, B, C, D, E,并且你需要删除 B 和 D。 初始状态:[A, B, C, D, E] 第一次删除 B 后:[A, C, D, E] C 和 D 分别移动到原来 B 和 C 的位置。 第二次遍历到原来的索引 3 位置:E,跳过了 D。 倒着删除 初始状态:[A, B, C, D, E] 第一次删除 D 后:[A, B, C, E] E 移动到原来 D 的位置。 第二次删除 B 后:[A, C, E] 此时,C 和 E 的位置没有影响。 从后往前删除时,每次删除操作都不会影响到未遍历到的元素的索引,因此不会出现跳过的问题。行悬停效果:
doOver和doOut函数在行悬停时更改背景颜色,提高用户体验。
完整源码:
<!DOCTYPE html>
<html lang="en">

<head>
    <meta charset="UTF-8">
    <meta name="viewport" content="width=device-width, initial-scale=1.0">
    <title>动态表格</title>
    <style>
        body {
            font-family: Arial, sans-serif;
            background-color: #f2f2f2;
            color: #333;
            margin: 0;
            padding: 20px;
        }

        .container {
            width: 80%;
            margin: auto;
            background: #fff;
            padding: 20px;
            box-shadow: 0 0 10px rgba(0, 0, 0, 0.1);
        }

        .div_1 {
            text-align: center;
            margin-bottom: 20px;
        }

        .div_1 input[type="text"] {
            padding: 10px;
            margin-right: 10px;
            border: 1px solid #ccc;
            border-radius: 5px;
        }

        .div_1 input[type="button"] {
            padding: 10px 20px;
            background-color: #007BFF;
            color: white;
            border: none;
            border-radius: 5px;
            cursor: pointer;
        }

        .div_1 input[type="button"]:hover {
            background-color: #0056b3;
        }

        table {
            width: 100%;
            border-collapse: collapse;
            margin-bottom: 20px;
        }

        table,
        td,
        th {
            border: 1px solid #ddd;
        }

        th,
        td {
            padding: 12px;
            text-align: center;
        }

        th {
            background-color: #007BFF;
            color: white;
        }

        caption {
            font-size: 1.5em;
            margin: 10px;
            color: #007BFF;
        }

        .div_3 {
            text-align: center;
            font-family: Arial, sans-serif;
            color: #333;
        }

        .div_3 input[type="button"] {
            padding: 10px 20px;
            margin: 5px;
            background-color: #28a745;
            color: white;
            border: none;
            border-radius: 5px;
            cursor: pointer;
        }

        .div_3 input[type="button"]:hover {
            background-color: #218838;
        }

        tr:hover {
            background-color: #f1f1f1;
        }

        a {
            color: #007BFF;
            text-decoration: none;
        }

        a:hover {
            text-decoration: underline;
        }
    </style>
</head>

<body>
    <div class="container">
        <div class="div_1">
            <input type="text" name="id" id="id" placeholder="请输入编号">
            <input type="text" name="name" id="name" placeholder="请输入用户名">
            <input type="text" name="sex" id="sex" placeholder="请输入性别">
            <input type="button" value="添加" id="bn_add">
        </div>

        <div class="div_2">
            <table>
                <caption>学生信息表</caption>
                <tr onmouseover="doOver(this);" onmouseout="doOut(this);">
                    <th><input type="checkbox" id="doChoose"></th>
                    <th>编号</th>
                    <th>姓名</th>
                    <th>性别</th>
                    <th>操作</th>
                </tr>

                <tr onmouseover="doOver(this);" onmouseout="doOut(this);">
                    <td><input type="checkbox" name="user"></td>
                    <td>1</td>
                    <td>张三</td>
                    <td>男</td>
                    <td><a href="javascript:void(0);" onclick="delTr(this);">删除</a></td>
                </tr>
            </table>
        </div>

        <div class="div_3">
            <input type="button" value="全选" id="chooseAll">
            <input type="button" value="全不选" id="chooseNull">
            <input type="button" value="反选" id="chooseFan">
            <input type="button" value="删除" id="deleteTable">
        </div>
    </div>

    <script>
        let add = document.getElementById("bn_add");
        add.onclick = function () {
            let id_text = document.getElementById("id").value;
            let name_text = document.getElementById("name").value;
            let sex_text = document.getElementById("sex").value;

            let table = document.getElementsByTagName("table")[0];
            let newRow = table.insertRow();
            newRow.innerHTML =
                "<td><input type='checkbox' name='user'></td>" +
                "<td>" + id_text + "</td>" +
                "<td>" + name_text + "</td>" +
                "<td>" + sex_text + "</td>" +
                "<td><a href='javascript:void(0);' οnclick='delTr(this);'>删除</a></td>";
            newRow.onmouseover = function () {
                doOver(newRow);
            };
            newRow.onmouseout = function () {
                doOut(newRow);
            };
        }

        document.getElementById("doChoose").onclick = function () {
            let userArray = document.getElementsByName("user");
            for (let index = 0; index < userArray.length; index++) {
                userArray[index].checked = this.checked;
            }
        };

        function delTr(obj) {
            let table = obj.parentNode.parentNode.parentNode;
            let tr = obj.parentNode.parentNode;
            table.removeChild(tr);
        }

        document.getElementById("chooseAll").onclick = function () {
            let userArray = document.getElementsByName("user");
            for (let index = 0; index < userArray.length; index++) {
                userArray[index].checked = true;
            }
        }

        document.getElementById("chooseNull").onclick = function () {
            let userArray = document.getElementsByName("user");
            for (let index = 0; index < userArray.length; index++) {
                userArray[index].checked = false;
            }
        }

        document.getElementById("chooseFan").onclick = function () {
            let userArray = document.getElementsByName("user");
            for (let index = 0; index < userArray.length; index++) {
                userArray[index].checked = !userArray[index].checked;
            }
        }

        document.getElementById("deleteTable").onclick = function () {
            let userArray = document.getElementsByName("user");
            for (let index = userArray.length - 1; index >= 0; index--) {
                if (userArray[index].checked) {
                    delTr(userArray[index]);
                }
            }
        }

        //悬停在每一行上面变化颜色
        function doOver(row) {
            row.style.backgroundColor = "pink";
        }

        function doOut(row) {
            row.style.backgroundColor = "white";
        }
    </script>
</body>

</html>