教程 0:MMFEWSHOT 检测概述
在 MMFewShot 中,有三个用于获取数据的重要组件:
Datasets:ann_cfg从少数镜头设置中加载注释并过滤图像和注释。
Dataset Wrappers:确定采样逻辑,例如根据查询图像采样支持图像。
Dataloader Wrappers:封装来自多个数据集的数据。
总而言之,我们目前支持 4 种不同的数据流进行训练:
fine-tune based:与常规检测相同。
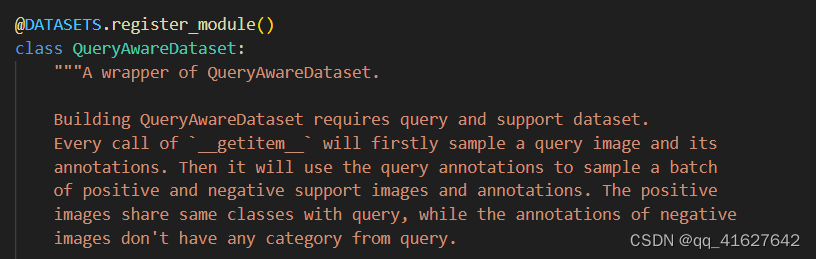
query aware:它将返回来自同一数据集的查询数据和支持数据。
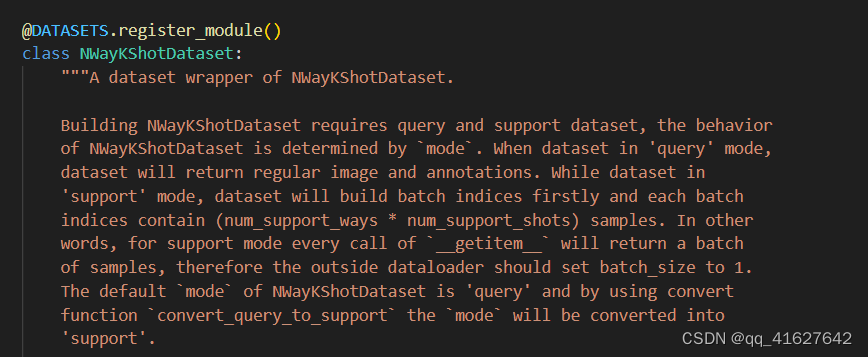
n way k shot:它将首先从单独的数据集中采样查询数据(常规)和支持数据(N way k shot),然后用数据加载器包装器将它们封装起来。
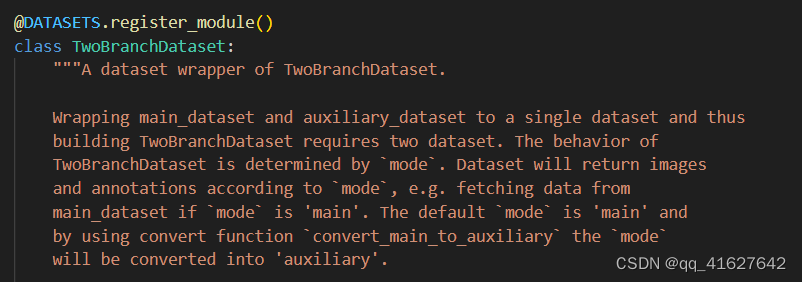
two branch:它将首先从单独的数据集中采样主数据(常规)和辅助数据(常规),然后用数据加载器包装器将它们封装起来。
检测:
regular testing:与定期检测相同。
testing for query-support based detector:在测试之前会有一个模型初始化步骤,它是由QuerySupportEvalHook实现的。更多的实现细节可以参考mmfew .detection.core. evaluate .eval_hooks
教程 1:了解配置
我们在配置系统中采用了模块化和继承设计,方便进行各种实验。如果你想检查配置文件,你可以运行查看完整的配置。mmfewshot 的检测部分建立在 mmdet 之上,因此强烈建议学习mmdet的基础知识。python tools/misc/print_config.py /PATH/TO/CONFIG
1、 配置文件命名约定
我们遵循以下风格来命名配置文件。建议贡献者也遵循相同的风格。
{model}_[model setting]_{backbone}_{neck}_[norm setting]_[misc]_[gpu x batch_per_gpu]_{dataset}_{data setting}
{xxx}是必填字段,也是[yyy]可选的。
{model}:模型类型如faster_rcnn、、mask_rcnn等等。
[model setting]:针对某些模型的特定设置,例如contrastive-loss等fsce。
{backbone}:主干类型,如r50(ResNet-50)、x101(ResNeXt-101)。
{neck}:颈型类似fpn, c4。
[norm_setting]:bn除非另有说明,否则使用(批量标准化),其他标准化层类型可以是gn(组标准化)、syncbn(同步批量标准化)。gn-head表示GN 仅适用于头部/颈部,而gn-all表示 GN 适用于整个模型,例如骨干、颈部、头部。
[misc]:模型的其他设置/插件,例如dconv, gcb, attention, albu, mstrain.
[gpu x batch_per_gpu]默认使用GPU 和每个 GPU 的样本数:8xb2 is used by default.
{dataset}:数据集,dataset like coco, voc-split1, voc-split2 and voc-split3.
{data setting}:like base-training or 1shot-fine-tuning.
2、在配置中使用中间变量
配置文件中使用了一些中间变量,例如数据集中的train_pipeline/ test_pipeline。值得注意的是,在修改子配置中的中间变量时,用户需要再次将中间变量传递到相应的字段中。例如,我们想使用多尺度策略来训练 Mask R-CNN。train_pipeline/test_pipeline是我们想要修改的中间变量。
_base_ = './faster_rcnn_r50_caffe_fpn.py'
img_norm_cfg = dict(
    mean=[123.675, 116.28, 103.53], std=[58.395, 57.12, 57.375], to_rgb=True)
train_pipeline = [
    dict(type='LoadImageFromFile'),
    dict(type='LoadAnnotations', with_bbox=True, with_mask=True),
    dict(
        type='Resize',
        img_scale=[(1333, 640), (1333, 672), (1333, 704), (1333, 736),
                   (1333, 768), (1333, 800)],
        multiscale_mode="value",
        keep_ratio=True),
    dict(type='RandomFlip', flip_ratio=0.5),
    dict(type='Normalize', **img_norm_cfg),
    dict(type='Pad', size_divisor=32),
    dict(type='DefaultFormatBundle'),
    dict(type='Collect', keys=['img', 'gt_bboxes', 'gt_labels', 'gt_masks']),
]
test_pipeline = [
    dict(type='LoadImageFromFile'),
    dict(
        type='MultiScaleFlipAug',
        img_scale=(1333, 800),
        flip=False,
        transforms=[
            dict(type='Resize', keep_ratio=True),
            dict(type='RandomFlip'),
            dict(type='Normalize', **img_norm_cfg),
            dict(type='Pad', size_divisor=32),
            dict(type='ImageToTensor', keys=['img']),
            dict(type='Collect', keys=['img']),
        ])
]
data = dict(
    train=dict(pipeline=train_pipeline),
    val=dict(pipeline=test_pipeline),
    test=dict(pipeline=test_pipeline))
我们首先定义新的train_pipeline/test_pipeline并将它们传递给data。
Similarly, if we would like to switch from SyncBN to BN or MMSyncBN, we need to substitute every norm_cfg in the config.
_base_ = './faster_rcnn_r50_caffe_fpn.py'
norm_cfg = dict(type='BN', requires_grad=True)
model = dict(
    backbone=dict(norm_cfg=norm_cfg),
    neck=dict(norm_cfg=norm_cfg),
    ...)
3、TFA 示例
为了帮助用户对现代分类系统中的完整配置和模块有一个基本的了解,我们对 coco 10 镜头微调设置中的 TFA 配置做了简要的评论,如下所示。有关更详细的用法和每个模块对应的替代方案,请参阅 API 文档。
train_pipeline = [  # Training pipeline
    # First pipeline to load images from file path
    dict(type='LoadImageFromFile'),
    # Second pipeline to load annotations for current image
    dict(type='LoadAnnotations', with_bbox=True),
    # Augmentation pipeline that resize the images and their annotations
    dict(type='Resize',
         # The multiple scales of image
         img_scale=[(1333, 640), (1333, 672), (1333, 704), (1333, 736),
                    (1333, 768), (1333, 800)],
         # whether to keep the ratio between height and width
         keep_ratio=True,
         # the scales will be sampled from img_scale
         multiscale_mode='value'),
    # RandomFlip config, flip_ratio: the ratio or probability to flip
    dict(type='RandomFlip', flip_ratio=0.5),
    # Image normalization config to normalize the input images
    dict(type='Normalize',
         # Mean values used to in pre-trained backbone models
         mean=[103.53, 116.28, 123.675],
         # Standard variance used to in pre-trained backbone models
         std=[1.0, 1.0, 1.0],
         # The channel orders of image used in pre-trained backbone models
         to_rgb=False),
    # Padding config, size_divisor: the number the padded images should be divisible
    dict(type='Pad', size_divisor=32),
    # Default format bundle to gather data in the pipeline
    dict(type='DefaultFormatBundle'),
    # Pipeline that decides which keys in the data should be passed to the detector
    dict(type='Collect', keys=['img', 'gt_bboxes', 'gt_labels'])
]
test_pipeline = [  # test pipeline
    # First pipeline to load images from file path
    dict(type='LoadImageFromFile'),
    # An encapsulation that encapsulates the testing augmentations
    dict(type='MultiScaleFlipAug',
         # Decides the largest scale for testing, used for the Resize pipeline
         img_scale=(1333, 800),
         flip=False,  # Whether to flip images during testing
         transforms=[
             # Use resize augmentation
             dict(type='Resize', keep_ratio=True),
             # Augmentation pipeline that flip the images and their annotations
             dict(type='RandomFlip'),
             # Augmentation pipeline that normalize the input images
             dict(type='Normalize',
                  # Mean values used in pre-trained backbone models
                  mean=[103.53, 116.28, 123.675],
                  # Standard variance used in pre-trained backbone models
                  std=[1.0, 1.0, 1.0],
                  # The channel orders of image used in pre-trained backbone models
                  to_rgb=False),
             # Padding config, size_divisor: the number the padded images should be divisible
             dict(type='Pad', size_divisor=32),
             # Default format bundle to gather data in the pipeline
             dict(type='ImageToTensor', keys=['img']),
             # Pipeline that decides which keys in the data should be passed to the detector
             dict(type='Collect', keys=['img'])
         ])
]
data = dict(
    # Batch size of a single GPU
    samples_per_gpu=2,
    # Worker to pre-fetch data for each single GPU
    workers_per_gpu=2,
    train=dict(  # Train dataset config
        save_dataset=False,  # whether to save data_information into json file
        # the pre-defined few shot setting are saved in `FewShotCocoDefaultDataset`
        type='FewShotCocoDefaultDataset',
        ann_cfg=[dict(method='TFA', setting='10SHOT')],  # pre-defined few shot setting
        img_prefix='data/coco/',  # prefix of images
        num_novel_shots=10,  # the max number of instances for novel classes
        num_base_shots=10,  # the max number of instances for base classes
        pipeline=train_pipeline,  # training pipeline
        classes='ALL_CLASSES',  # pre-defined classes split saved in dataset
        # whether to split the annotation (each image only contains one instance)
        instance_wise=False),
    val=dict(  # Validation dataset config
        type='FewShotCocoDataset',  # type of dataset
        ann_cfg=[dict(type='ann_file',  # type of ann_file
                      # path to ann_file
                      ann_file='data/few_shot_ann/coco/annotations/val.json')],
        # prefix of image
        img_prefix='data/coco/',
        pipeline=test_pipeline,  # testing pipeline
        classes='ALL_CLASSES'),
    test=dict(  # Testing dataset config
        type='FewShotCocoDataset',  # type of dataset
        ann_cfg=[dict(type='ann_file',  # type of ann_file
                      # path to ann_file
                      ann_file='data/few_shot_ann/coco/annotations/val.json')],
        # prefix of image
        img_prefix='data/coco/',
        pipeline=test_pipeline,  # testing pipeline
        test_mode=True,  # indicate in test mode
        classes='ALL_CLASSES'))  # pre-defined classes split saved in dataset
# The config to build the evaluation hook, refer to
# https://github.com/open-mmlab/mmdetection/blob/master/mmdet/core/evaluation/eval_hooks.py#L7
# for more details.
evaluation = dict(
    interval=80000,  # Evaluation interval
    metric='bbox',  # Metrics used during evaluation
    classwise=True,  # whether to show result of each class
    # eval results in pre-defined split of classes
    class_splits=['BASE_CLASSES', 'NOVEL_CLASSES'])
# Config used to build optimizer, support all the optimizers
# in PyTorch whose arguments are also the same as those in PyTorch
optimizer = dict(type='SGD', lr=0.001, momentum=0.9, weight_decay=0.0001)
# Config used to build the optimizer hook, refer to
# https://github.com/open-mmlab/mmcv/blob/master/mmcv/runner/hooks/optimizer.py#L8
# for implementation details. Most of the methods do not use gradient clip.
optimizer_config = dict(grad_clip=None)
# Learning rate scheduler config used to register LrUpdater hook
lr_config = dict(
    # The policy of scheduler, also support CosineAnnealing, Cyclic, etc.
    # Refer to details of supported LrUpdater from
    # https://github.com/open-mmlab/mmcv/blob/master/mmcv/runner/hooks/lr_updater.py#L9.
    policy='step',
    # The warmup policy, also support `exp` and `constant`.
    warmup='linear',
    # The number of iterations for warmup
    warmup_iters=10,
    # The ratio of the starting learning rate used for warmup
    warmup_ratio=0.001,
    # Steps to decay the learning rate
    step=[144000])
# Type of runner to use (i.e. IterBasedRunner or EpochBasedRunner)
runner = dict(type='IterBasedRunner', max_iters=160000)
model = dict(  # The config of backbone
    type='TFA',  # The name of detector
    backbone=dict(
        type='ResNet',  # The name of detector
        # The depth of backbone, usually it is 50 or 101 for ResNet and ResNext backbones.
        depth=101,
        num_stages=4,  # Number of stages of the backbone.
        # The index of output feature maps produced in each stages
        out_indices=(0, 1, 2, 3),
        # The weights from stages 1 to 4 are frozen
        frozen_stages=4,
        # The config of normalization layers.
        norm_cfg=dict(type='BN', requires_grad=False),
        # Whether to freeze the statistics in BN
        norm_eval=True,
        # The style of backbone, 'pytorch' means that stride 2 layers are in 3x3 conv,
        # 'caffe' means stride 2 layers are in 1x1 convs.
        style='caffe'),
    neck=dict(
        # The neck of detector is FPN. For more details, please refer to
        # https://github.com/open-mmlab/mmdetection/blob/master/mmdet/models/necks/fpn.py#L10
        type='FPN',
        # The input channels, this is consistent with the output channels of backbone
        in_channels=[256, 512, 1024, 2048],
        # The output channels of each level of the pyramid feature map
        out_channels=256,
        # The number of output scales
        num_outs=5,
        # the initialization of specific layer. For more details, please refer to
        # https://mmdetection.readthedocs.io/en/latest/tutorials/init_cfg.html
        init_cfg=[
            # initialize lateral_convs layer with Caffe2Xavier
            dict(type='Caffe2Xavier',
                 override=dict(type='Caffe2Xavier', name='lateral_convs')),
            # initialize fpn_convs layer with Caffe2Xavier
            dict(type='Caffe2Xavier',
                 override=dict(type='Caffe2Xavier', name='fpn_convs'))
        ]),
    rpn_head=dict(
        # The type of RPN head is 'RPNHead'. For more details, please refer to
        # https://github.com/open-mmlab/mmdetection/blob/master/mmdet/models/dense_heads/rpn_head.py#L12
        type='RPNHead',
        # The input channels of each input feature map,
        # this is consistent with the output channels of neck
        in_channels=256,
        # Feature channels of convolutional layers in the head.
        feat_channels=256,
        anchor_generator=dict(  # The config of anchor generator
            # Most of methods use AnchorGenerator, For more details, please refer to
            # https://github.com/open-mmlab/mmdetection/blob/master/mmdet/core/anchor/anchor_generator.py#L10
            type='AnchorGenerator',
            # Basic scale of the anchor, the area of the anchor in one position
            # of a feature map will be scale * base_sizes
            scales=[8],
            # The ratio between height and width.
            ratios=[0.5, 1.0, 2.0],
            # The strides of the anchor generator. This is consistent with the FPN
            # feature strides. The strides will be taken as base_sizes if base_sizes is not set.
            strides=[4, 8, 16, 32, 64]),
        bbox_coder=dict(  # Config of box coder to encode and decode the boxes during training and testing
            # Type of box coder. 'DeltaXYWHBBoxCoder' is applied for most of methods. For more details refer to
            # https://github.com/open-mmlab/mmdetection/blob/master/mmdet/core/bbox/coder/delta_xywh_bbox_coder.py#L9
            type='DeltaXYWHBBoxCoder',
            # The target means used to encode and decode boxes
            target_means=[0.0, 0.0, 0.0, 0.0],
            # The standard variance used to encode and decode boxes
            target_stds=[1.0, 1.0, 1.0, 1.0]),
        # Config of loss function for the classification branch
        loss_cls=dict(
            # Type of loss for classification branch.
            type='CrossEntropyLoss',
            # RPN usually perform two-class classification,
            # so it usually uses sigmoid function.
            use_sigmoid=True,
            # Loss weight of the classification branch.
            loss_weight=1.0),
        # Config of loss function for the regression branch.
        loss_bbox=dict(
            # Type of loss, we also support many IoU Losses and smooth L1-loss. For implementation refer to
            # https://github.com/open-mmlab/mmdetection/blob/master/mmdet/models/losses/smooth_l1_loss.py#L56
            type='L1Loss',
            # Loss weight of the regression branch.
            loss_weight=1.0)),
    roi_head=dict(
        # Type of the RoI head, for more details refer to
        # https://github.com/open-mmlab/mmdetection/blob/master/mmdet/models/roi_heads/standard_roi_head.py#L10
        type='StandardRoIHead',
        # RoI feature extractor for bbox regression.
        bbox_roi_extractor=dict(
            # Type of the RoI feature extractor. For more details refer to
            # https://github.com/open-mmlab/mmdetection/blob/master/mmdet/models/roi_heads/roi_extractors/single_level.py#L10
            type='SingleRoIExtractor',
            roi_layer=dict(  # Config of RoI Layer
                # Type of RoI Layer, for more details refer to
                # https://github.com/open-mmlab/mmdetection/blob/master/mmdet/ops/roi_align/roi_align.py#L79
                type='RoIAlign',
                output_size=7,  # The output size of feature maps.
                # Sampling ratio when extracting the RoI features.
                # 0 means adaptive ratio.
                sampling_ratio=0),
            # output channels of the extracted feature.
            out_channels=256,
            # Strides of multi-scale feature maps. It should be consistent to the architecture of the backbone.
            featmap_strides=[4, 8, 16, 32]),
        bbox_head=dict(  # Config of box head in the RoIHead.
            # Type of the bbox head, for more details refer to
            # https://github.com/open-mmlab/mmdetection/blob/master/mmdet/models/roi_heads/bbox_heads/convfc_bbox_head.py#L177
            type='CosineSimBBoxHead',
            # Input channels for bbox head. This is consistent with the out_channels in roi_extractor
            in_channels=256,
            # Output feature channels of FC layers.
            fc_out_channels=1024,
            roi_feat_size=7,  # Size of RoI features
            num_classes=80,  # Number of classes for classification
            bbox_coder=dict(  # Box coder used in the second stage.
                # Type of box coder. 'DeltaXYWHBBoxCoder' is applied for most of methods.
                type='DeltaXYWHBBoxCoder',
                # Means used to encode and decode box
                target_means=[0.0, 0.0, 0.0, 0.0],
                # Standard variance for encoding and decoding. It is smaller since
                # the boxes are more accurate. [0.1, 0.1, 0.2, 0.2] is a conventional setting.
                target_stds=[0.1, 0.1, 0.2, 0.2]),
            reg_class_agnostic=False,  # Whether the regression is class agnostic.
            loss_cls=dict(  # Config of loss function for the classification branch
                # Type of loss for classification branch, we also support FocalLoss etc.
                type='CrossEntropyLoss',
                use_sigmoid=False,  # Whether to use sigmoid.
                loss_weight=1.0),  # Loss weight of the classification branch.
            loss_bbox=dict(  # Config of loss function for the regression branch.
                # Type of loss, we also support many IoU Losses and smooth L1-loss, etc.
                type='L1Loss',
                # Loss weight of the regression branch.
                loss_weight=1.0),
            # the initialization of specific layer. For more details, please refer to
            # https://mmdetection.readthedocs.io/en/latest/tutorials/init_cfg.html
            init_cfg=[
                # initialize shared_fcs layer with Caffe2Xavier
                dict(type='Caffe2Xavier',
                     override=dict(type='Caffe2Xavier', name='shared_fcs')),
                # initialize fc_cls layer with Normal
                dict(type='Normal',
                     override=dict(type='Normal', name='fc_cls', std=0.01)),
                # initialize fc_cls layer with Normal
                dict(type='Normal',
                     override=dict(type='Normal', name='fc_reg', std=0.001))
            ],
            # number of shared fc layers
            num_shared_fcs=2)),
    train_cfg=dict(
        rpn=dict(  # Training config of rpn
            assigner=dict(  # Config of assigner
                # Type of assigner. For more details, please refer to
                # https://github.com/open-mmlab/mmdetection/blob/master/mmdet/core/bbox/assigners/max_iou_assigner.py#L10
                type='MaxIoUAssigner',
                pos_iou_thr=0.7,  # IoU >= threshold 0.7 will be taken as positive samples
                neg_iou_thr=0.3,  # IoU < threshold 0.3 will be taken as negative samples
                min_pos_iou=0.3,  # The minimal IoU threshold to take boxes as positive samples
                # Whether to match the boxes under low quality (see API doc for more details).
                match_low_quality=True,
                ignore_iof_thr=-1),  # IoF threshold for ignoring bboxes
            sampler=dict(  # Config of positive/negative sampler
                # Type of sampler. For more details, please refer to
                # https://github.com/open-mmlab/mmdetection/blob/master/mmdet/core/bbox/samplers/random_sampler.py#L8
                type='RandomSampler',
                num=256,  # Number of samples
                pos_fraction=0.5,  # The ratio of positive samples in the total samples.
                # The upper bound of negative samples based on the number of positive samples.
                neg_pos_ub=-1,
                # Whether add GT as proposals after sampling.
                add_gt_as_proposals=False),
            # The border allowed after padding for valid anchors.
            allowed_border=-1,
            # The weight of positive samples during training.
            pos_weight=-1,
            debug=False),  # Whether to set the debug mode
        rpn_proposal=dict(  # The config to generate proposals during training
            nms_pre=2000,  # The number of boxes before NMS
            max_per_img=1000,  # The number of boxes to be kept after NMS.
            nms=dict(  # Config of NMS
                type='nms',  # Type of NMS
                iou_threshold=0.7),  # NMS threshold
            min_bbox_size=0),  # The allowed minimal box size
        rcnn=dict(  # The config for the roi heads.
            assigner=dict(  # Config of assigner for second stage, this is different for that in rpn
                # Type of assigner, MaxIoUAssigner is used for all roi_heads for now. For more details, please refer to
                # https://github.com/open-mmlab/mmdetection/blob/master/mmdet/core/bbox/assigners/max_iou_assigner.py#L10 for more details.
                type='MaxIoUAssigner',
                pos_iou_thr=0.5,  # IoU >= threshold 0.5 will be taken as positive samples
                neg_iou_thr=0.5,  # IoU < threshold 0.5 will be taken as negative samples
                min_pos_iou=0.5,  # The minimal IoU threshold to take boxes as positive samples
                # Whether to match the boxes under low quality (see API doc for more details).
                match_low_quality=False,
                ignore_iof_thr=-1),  # IoF threshold for ignoring bboxes
            sampler=dict(
                # Type of sampler, PseudoSampler and other samplers are also supported. For more details, please refer to
                # https://github.com/open-mmlab/mmdetection/blob/master/mmdet/core/bbox/samplers/random_sampler.py#L8
                type='RandomSampler',
                num=512,  # Number of samples
                pos_fraction=0.25,  # The ratio of positive samples in the total samples.
                # The upper bound of negative samples based on the number of positive samples.
                neg_pos_ub=-1,
                # Whether add GT as proposals after sampling.
                add_gt_as_proposals=True),
            # The weight of positive samples during training.
            pos_weight=-1,
            # Whether to set the debug mode
            debug=False)),
    test_cfg=dict(  # Config for testing hyperparameters for rpn and rcnn
        rpn=dict(  # The config to generate proposals during testing
            # The number of boxes before NMS
            nms_pre=1000,
            # The number of boxes to be kept after NMS.
            max_per_img=1000,
            # Config of NMS
            nms=dict(type='nms', iou_threshold=0.7),
            # The allowed minimal box size
            min_bbox_size=0),
        rcnn=dict(  # The config for the roi heads.
            score_thr=0.05,  # Threshold to filter out boxes
            # Config of NMS in the second stage
            nms=dict(type='nms', iou_threshold=0.5),
            # Max number of detections of each image
            max_per_img=100)),
    # parameters with the prefix listed in frozen_parameters will be frozen
    frozen_parameters=[
        'backbone', 'neck', 'rpn_head', 'roi_head.bbox_head.shared_fcs'
    ])
# Config to set the checkpoint hook, Refer to
# https://github.com/open-mmlab/mmcv/blob/master/mmcv/runner/hooks/checkpoint.py for implementation.
checkpoint_config = dict(interval=80000)
# The logger used to record the training process.
log_config = dict(interval=50, hooks=[dict(type='TextLoggerHook')])
custom_hooks = [dict(type='NumClassCheckHook')]  # cumstomize hook
dist_params = dict(backend='nccl')  # parameters to setup distributed training, the port can also be set.
log_level = 'INFO'  # the output level of the log.
# use base training model as model initialization.
load_from = 'work_dirs/tfa_r101_fpn_coco_base-training/base_model_random_init_bbox_head.pth'
# workflow for runner. [('train', 1)] means there is only one workflow and the workflow named 'train' is executed once.
workflow = [('train', 1)]
use_infinite_sampler = True  # whether to use infinite sampler
seed = 0  # random seed
教程 2:添加新数据集
1、通过重新组织数据来自定义数据集
1、 Load annotations from file
ann_file与 mmdet 中用于加载单个数据集的配置不同,我们使用ann_cfg来支持复杂的少量镜头设置。
从数据集的常规加载注释ann_file。
ann_cfg = [dict(type='ann_file', ann_file='path/to/ann_file'), ...]
对于FewShotVOCDataset,我们还支持从ann_file中加载特定的类在ann_classes。
dict(type='ann_file', ann_file='path/to/ann_file', ann_classes=['dog', 'cat'])
loading annotation from a json file saved by a dataset.
ann_cfg = [dict(type='saved_dataset', ann_file='path/to/ann_file'), ...]
要保存数据集,我们可以save_dataset=True在配置文件中设置,数据集将保存为${WORK_DIR}/{TIMESTAMP}_saved_data.json
dataset=dict(type='FewShotVOCDataset', save_dataset=True, ...)
2、从预定义基准加载注释
要加载这些预定义的数据分割,需要将数据集的类型设置为 FewShotVOCDefaultDataset或FewShotCocoDefaultDataset。我们为每种方法提供每个重现检查点的数据分割。在配置文件中,我们可以使用method和setting来确定要加载哪个数据分割。
dataset = dict(
        type='FewShotVOCDefaultDataset',
        ann_cfg=[dict(method='TFA', setting='SPLIT1_1SHOT')]
)

3、在运行时从另一个数据集加载注释
In few shot setting, we can use FewShotVOCCopyDataset or FewShotCocoCopyDataset to copy a dataset from other dataset during runtime for some special cases, such as copying online random sampled support set for model initialization before evaluation. It needs user to modify code in mmfewshot.detection.apis. More details can refer to mmfewshot/detection/apis/train.py. Here is an example of config:
在少样本设置中,我们可以使用FewShotVOCCopyDataset或FewShotCocoCopyDataset在运行时从其他数据集复制数据集以用于某些特殊情况。例如:在评估之前复制在线随机采样支持集进行模型初始化。它需要用户修改 mmfewshot.detection.apis中的代码。更多详细信息可以参考 mmfewshot/detection/apis/train.py。以下是配置示例:
dataset = dict(
        type='FewShotVOCCopyDataset',
        ann_cfg=[dict(data_infos=FewShotVOCDataset.data_infos)])
4、使用预定义的类别划分
The predefined class splits are supported in datasets. For VOC, we support [ALL_CLASSES_SPLIT1,ALL_CLASSES_SPLIT2, ALL_CLASSES_SPLIT3, NOVEL_CLASSES_SPLIT1, NOVEL_CLASSES_SPLIT2, NOVEL_CLASSES_SPLIT3, BASE_CLASSES_SPLIT1, BASE_CLASSES_SPLIT2, BASE_CLASSES_SPLIT3]. For COCO, we support [ALL_CLASSES, NOVEL_CLASSES, BASE_CLASSES]
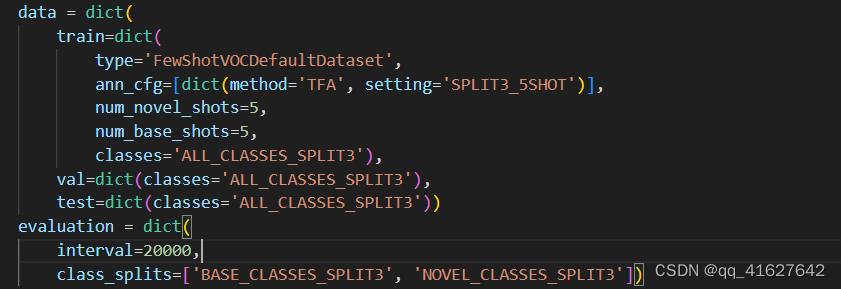
data = dict(
    train=dict(type='FewShotVOCDataset', classes='ALL_CLASSES_SPLIT1'),
    val=dict(type='FewShotVOCDataset', classes='ALL_CLASSES_SPLIT1'),
    test=dict(type='FewShotVOCDataset', classes='ALL_CLASSES_SPLIT1'))
另外,类别划分可用于报告不同类别划分的评估结果。以下是配置示例:
evaluation = dict(class_splits=['BASE_CLASSES_SPLIT1', 'NOVEL_CLASSES_SPLIT1'])
5、自定义注释数量
对于 FewShotDataset,我们支持两种方式来过滤多余的注释。
ann_shot_filter:使用字典指定类,以及加载注释文件时对应的最大实例数。例如,我们只想要 10 个 dog 实例和 5 个 person 实例,而其他类的实例保持不变:
dataset=dict(type='FewShotVOCDataset',
             ann_shot_filter=dict(dog=10, person=5),
             ...)
num_novel_shots和num_base_shots:使用预定义的类拆分来指示相应的最大实例数。例如,我们只希望每个新类有 1 个实例,基类有 3 个实例:
dataset=dict(
    type='FewShotVOCDataset',
    num_novel_shots=1,
    num_base_shots=2,
    ...)
6、自定义注释的组织
我们还支持将注释拆分为实例,即每个图像只有一个实例,并且图像可以重复。
dataset=dict(
    type='FewShotVOCDataset',
    instance_wise=True,
    ...)
7、自定义管道
为了支持单个数据集中的不同管道,我们可以使用multi_pipelines。在配置文件中,multi_pipelines使用键的名称来指示特定的管道。以下是配置示例
multi_pipelines = dict(
    query=[
        dict(type='LoadImageFromFile'),
        dict(type='LoadAnnotations', with_bbox=True),
        dict(type='Resize', img_scale=(1000, 600), keep_ratio=True),
        dict(type='RandomFlip', flip_ratio=0.5),
        dict(type='Normalize', **img_norm_cfg),
        dict(type='DefaultFormatBundle'),
        dict(type='Collect', keys=['img', 'gt_bboxes', 'gt_labels'])
    ],
    support=[
        dict(type='LoadImageFromFile'),
        dict(type='LoadAnnotations', with_bbox=True),
        dict(type='Normalize', **img_norm_cfg),
        dict(type='GenerateMask', target_size=(224, 224)),
        dict(type='RandomFlip', flip_ratio=0.0),
        dict(type='DefaultFormatBundle'),
        dict(type='Collect', keys=['img', 'gt_bboxes', 'gt_labels'])
    ])
train=dict(
    type='NWayKShotDataset',
    dataset=dict(
        type='FewShotCocoDataset',
        ...
        multi_pipelines=train_multi_pipelines))
使用时multi_pipelines,我们需要指定管道名称来 prepare_train_img获取图像。例如
dataset.prepare_train_img(self, idx, 'query')
2、自定义新的数据集包装器
1、创建新的数据集包装器(dataset wrapper)
我们可以在 mmfewshot/detection/datasets/dataset_wrappers.py 中创建一个新的数据集包装器来定制采样逻辑。目前有:
class MyDatasetWrapper:
    def __init__(self, dataset, support_dataset=None, args_a, args_b, ...):
        # query_dataset and support_dataset can use same dataset
        self.query_dataset = dataset
        self.support_dataset = support_dataset
        if support_dataset is None:
            self.support_dataset = dataset
        ...

    def __getitem__(self, idx):
        ...
        query_data = self.query_dataset.prepare_train_img(idx, 'query')
        # customize sampling logic
        support_idxes = ...
        support_data = [
            self.support_dataset.prepare_train_img(idx, 'support')
            for idx in support_idxes
        ]
        return {'query_data': query_data, 'support_data': support_data}
2、更新数据集生成器
我们需要在 mmfewshot/detection/datasets/builder.py 中添加构建代码来定制数据集包装器。
def build_dataset(cfg, default_args=None):
    if isinstance(cfg, (list, tuple)):
        dataset = ConcatDataset([build_dataset(c, default_args) for c in cfg])
    ...
    elif cfg['type'] == 'MyDatasetWrapper':
        dataset = MyDatasetWrapper(
            build_dataset(cfg['dataset'], default_args),
            build_dataset(cfg['support_dataset'], default_args) if cfg.get('support_dataset', False) else None,
            # pass customize arguments
            args_a=cfg['args_a'],
            args_b=cfg['args_b'],
            ...)
    else:
        dataset = build_from_cfg(cfg, DATASETS, default_args)

    return dataset
3、更新数据加载器构建器
当自定义数据集包装器返回 Tensor 列表时,我们需要在 mmfewshot/detection/datasets/builder.py 中添加 dataloader 的构建代码。我们可以用它multi_pipeline_collate_fn来处理这种情况。
def build_dataset(cfg, default_args=None):
    ...
    if isinstance(dataset, MyDatasetWrapper):
      from mmfewshot.utils import multi_pipeline_collate_fn
      # `multi_pipeline_collate_fn` are designed to handle
      # the data with list[list[DataContainer]]
      data_loader = DataLoader(
          dataset,
          batch_size=batch_size,
          sampler=sampler,
          num_workers=num_workers,
          collate_fn=partial(
              multi_pipeline_collate_fn, samples_per_gpu=samples_per_gpu),
          pin_memory=False,
          worker_init_fn=init_fn,
          **kwargs)
    ...
4、更新模型中的参数
forward函数中的参数名称需要与自定义数据集包装器一致。
class MyDetector(BaseDetector):
    ...
    def forward(self, query_data, support_data, ...):
5、在配置中使用自定义数据集包装器
然后在配置中,MyDatasetWrapper你可以按如下方式修改配置,
dataset_A_train = dict(
        type='MyDatasetWrapper',
        args_a=None,
        args_b=None,
        dataset=dict(  # This is the original config of Dataset_A
            type='Dataset_A',
            ...
            multi_pipelines=train_multi_pipelines
        ),
        support_dataset=None
    )
3、自定义数据加载器包装器
1、创建新的数据加载器包装器
我们可以在 mmfewshot/detection/datasets/dataloader_wrappers.py 中创建一个新的数据集包装器来定制采样逻辑。
class MyDataloader:
    def __init__(self, query_data_loader, support_data_loader):
        self.dataset = query_data_loader.dataset
        self.sampler = query_data_loader.sampler
        self.query_data_loader = query_data_loader
        self.support_data_loader = support_data_loader

    def __iter__(self):
        self.query_iter = iter(self.query_data_loader)
        self.support_iter = iter(self.support_data_loader)
        return self

    def __next__(self):
        query_data = self.query_iter.next()
        support_data = self.support_iter.next()
        return {'query_data': query_data, 'support_data': support_data}

    def __len__(self) -> int:
        return len(self.query_data_loader)
2、更新数据加载器构建器
我们需要在 mmfewshot/detection/datasets/builder.py 中为我们的自定义数据集包装器添加构建代码。
def build_dataloader(dataset, ...):
    if isinstance(dataset, MyDataset):
        ...
        query_data_loader = DataLoader(...)
        support_data_loader = DataLoader(...)
        # wrap two dataloaders with dataloader wrapper
        data_loader = MyDataloader(
            query_data_loader=query_data_loader,
            support_data_loader=support_data_loader)

    return dataset
教程 3:自定义模型
我们基本上将模型组件分为 5 种类型,与 mmdet 相同。
主干:通常是一个FCN网络,用于提取特征图,例如ResNet,MobileNet。
颈部:脊柱和头部之间的部分,例如 FPN、PAFPN。
head:用于特定任务的组件,例如bbox预测和mask预测。
roi extractor:从特征图中提取RoI特征的部分,例如RoI Align。
loss:头部中用于计算损失的组件,例如FocalLoss、L1Loss、GHMLoss。
开发新组件
添加新的骨干
教程 4:自定义运行时设置
1、自定义优化设置
自定义Pytorch支持的优化器
我们已经支持使用 PyTorch 实现的所有优化器,只需要修改optimizer配置文件的字段即可。比如你想使用ADAM(注意性能会下降很多),可以这样修改。
optimizer = dict(type='Adam', lr=0.0003, weight_decay=0.0001)
定制自行实现的优化器
1. 定义新的优化器
定制的优化器可以定义如下。
假设您要添加一个名为MyOptimizer 的优化器,其参数为a、b和c。您需要创建一个名为mmfewshot/detection/core/optimizer 的新目录。然后在文件中实现新的优化器,例如mmfewshot/detection/core/optimizer/my_optimizer.py:
from .registry import OPTIMIZERS
from torch.optim import Optimizer


@OPTIMIZERS.register_module()
class MyOptimizer(Optimizer):

    def __init__(self, a, b, c)
2. 将优化器添加到注册表
修改一下mmfewshot/detection/core/optimizer/init.py就可以导入了。
应该导入新定义的模块,mmfewshot/detection/core/optimizer/init.py以便注册表找到新模块并添加它:
from .my_optimizer import MyOptimizer
custom_imports在配置中使用手动导入
custom_imports = dict(imports=['mmfewshot.detection.core.optimizer.my_optimizer'], allow_failed_imports=False)
模块mmfewshot.detection.core.optimizer.my_optimizer将在程序开始时导入,然后自动注册类。请注意,只应导入 MyOptimizer包含该类的包。不能直接导MyOptimizermmfewshot.detection.core.optimizer.my_optimizer.MyOptimizer
3. 在配置文件中指定优化器
然后你就可以MyOptimizer在optimizer配置文件的字段中使用了。在配置中,优化器由字段定义,optimizer如下所示:
optimizer = dict(type='MyOptimizer', a=a_value, b=b_value, c=c_value)
定义优化器构造函数
某些模型可能有一些针对优化的参数设置,例如 BatchNorm 层的权重衰减。用户可以通过自定义优化器构造函数来进行这些细粒度的参数调整。
from mmcv.utils import build_from_cfg

from mmcv.runner.optimizer import OPTIMIZER_BUILDERS, OPTIMIZERS
from mmfewshot.utils import get_root_logger
from .my_optimizer import MyOptimizer


@OPTIMIZER_BUILDERS.register_module()
class MyOptimizerConstructor(object):

    def __init__(self, optimizer_cfg, paramwise_cfg=None):

    def __call__(self, model):

        return my_optimizer
默认的优化器构造函数在这里实现,它也可以作为新优化器构造函数的模板。
其他设置
优化器未实现的技巧应通过优化器构造函数(例如,设置参数学习率)或钩子来实现。我们列出了一些可以稳定训练或加速训练的常见设置。欢迎创建 PR、issue 以获取更多设置。
使用梯度剪辑来稳定训练:有些模型需要使用梯度剪辑来剪辑梯度以稳定训练过程。示例如下:
optimizer_config = dict(grad_clip=dict(max_norm=35, norm_type=2))
使用动量调度加速模型收敛:我们支持动量调度器根据学习率修改模型的动量,从而使模型以更快的方式收敛。动量调度器通常与 LR 调度器一起使用,例如,在 3D 检测中使用以下配置来加速收敛。有关更多详细信息,请参考CyclicLrUpdater和CyclicMomentumUpdater的实现。
lr_config = dict(
    policy='cyclic',
    target_ratio=(10, 1e-4),
    cyclic_times=1,
    step_ratio_up=0.4,
)
momentum_config = dict(
    policy='cyclic',
    target_ratio=(0.85 / 0.95, 1),
    cyclic_times=1,
    step_ratio_up=0.4,
)
2、定制训练计划
默认情况下,我们使用Step学习率with 1x schedule,这在 MMCV 中调用StepLRHook。我们支持许多其他学习率计划,例如CosineAnnealing and Poly schedule。以下是一些示例:
Poly schedule:
lr_config = dict(policy='poly', power=0.9, min_lr=1e-4, by_epoch=False)
ConsineAnnealing schedule
lr_config = dict(
    policy='CosineAnnealing',
    warmup='linear',
    warmup_iters=1000,
    warmup_ratio=1.0 / 10,
    min_lr_ratio=1e-5)
3、修改默认运行时挂钩
有一些常见的钩子没有通过custom_hooks注册,它们是
log_config
checkpoint_config
evaluation
lr_config
optimizer_config
momentum_config
在这些钩子中,只有 logger 钩子具有VERY_LOW优先级,其他钩子的优先级为NORMAL。上面的教程已经介绍了如何修改optimizer_config、momentum_config和lr_config。这里我们揭示了如何使用log_config、checkpoint_config和evaluation。
检查点配置
MMCV 运行器将使用CheckpointHook来初始化checkpoint_config。
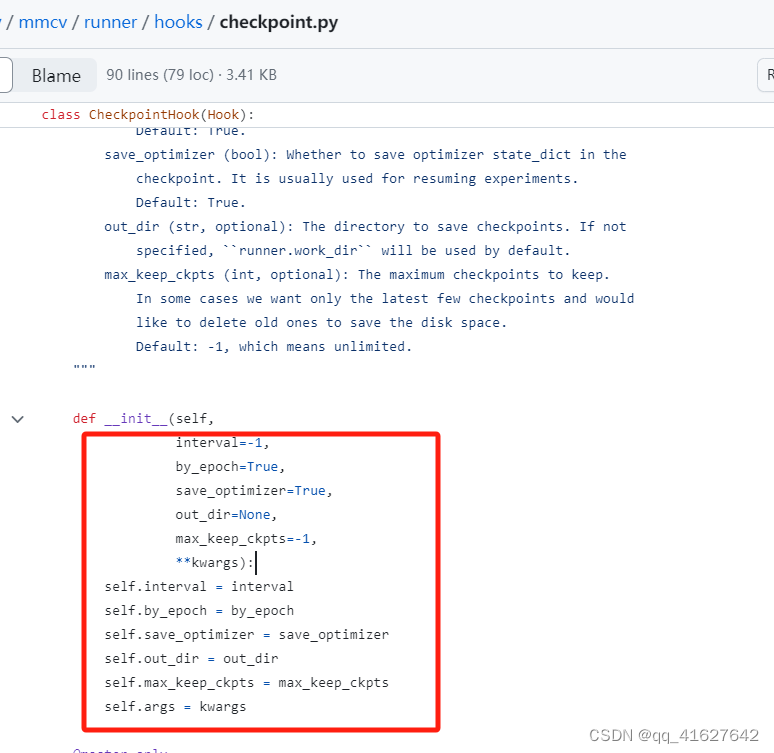
checkpoint_config = dict(interval=1)
用户可以设置max_keep_ckpts只保存少量检查点,或者决定是否存储优化器的状态字典save_optimizer。
日志配置
logger hook封装log_config了多个 并允许设置间隔。现在 MMCV 支持WandbLoggerHook、MlflowLoggerHook和TensorboardLoggerHook。
log_config = dict(
    interval=50,
    hooks=[
        dict(type='TextLoggerHook'),
        dict(type='TensorboardLoggerHook')
    ])
评估配置
EvalHook的配置evaluation将用于初始化。除了密钥之外interval,其他参数(例如)metric将传递给dataset.evaluate()
evaluation = dict(interval=1, metric='bbox')
![AGI 之 【Hugging Face】 的【零<span style='color:red;'>样本</span>和<span style='color:red;'>少</span><span style='color:red;'>样本</span><span style='color:red;'>学习</span>】之<span style='color:red;'>二</span> [零<span style='color:red;'>样本</span><span style='color:red;'>学习</span>] / [ <span style='color:red;'>少</span><span style='color:red;'>样本</span><span style='color:red;'>学习</span> ] 的简单整理](https://i-blog.csdnimg.cn/direct/56f6c0b77975450b9041f971acaf4a39.jpeg)


![[集成学习]基于python的Stacking分类模型的客户购买意愿分类预测](https://i-blog.csdnimg.cn/direct/fbdfd8f871f54e8fad2f0f1499b28838.png)