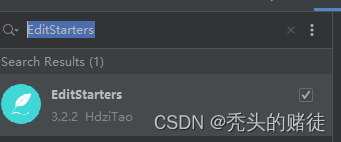
详细内容见官方文档Common Application Properties

使用application.yaml进行简单配置
第一步:创建WebDemo
创建一个SpringBoot的WebDemo,创建WebDemo具体步骤—>如何创建一个SpringBoot的WebDemo】笔记方法二使用Spring Initializr创建一个Spring Boot项目
按照上述链接笔记中的步骤创建好WebDemo后测试正常运行后再进行下面的步骤,
此时项目的默认端口号应该为8080
第二步:创建application.yaml配置文件
操作步骤: 选中resources文件夹—>鼠标右键—>选择New—>file—>application.yaml


注意:
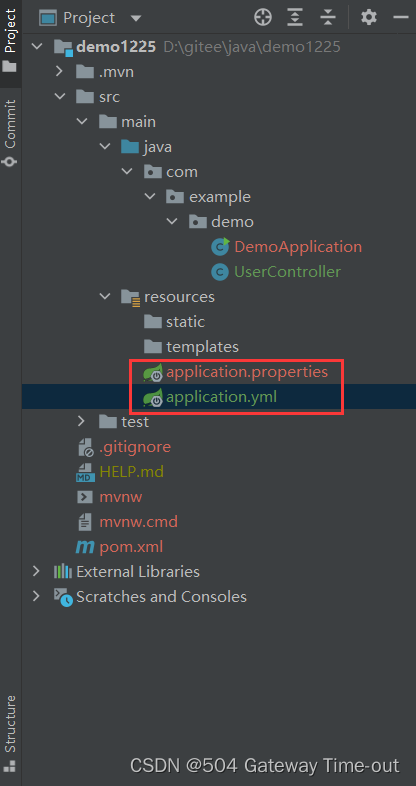
此时的项目中是有两个配置文件的,application.properties和application.yaml到底那个生效呢?都生效吗?只有其中一个生效?
第三步:验证自己创建的yaml文件是否生效
使用application.yaml配置项目的端口号.因为端口号默认是8080,现在我们通过yaml文件修改端口号来验证配置是否生效。
在application.yaml文件中添加配置
修改项目端口号
server:
  port: 8088
如下图所示,此时application.properties和application.yaml中的内容,application.properties中什么都没有,application.yaml中配置了端口号8088

测试:
- 启动SpringBoot项目
- 在浏览器访问127.0.0.1:8088/hello
具体测试步骤见如何创建一个SpringBoot的WebDemo】笔记 方法二使用Spring Initializr创建一个Spring Boot项目 的测试部分
经测试发现,浏览器访问127.0.0.1:8088/hello,成功得到了响应,说明使用yaml配置文件修改端口号配置成功,项目的端口号不再是默认的8080了

思考:如果application.properties和application.yaml中都配置了端口号到底那个生效呢?
测试:两种配置文件都配置端口号,测试到底那个生效
application.properties
server.port=8099
application.yaml
server:
  port: 8088

两个配置文件我们都配置端口号后重启项目,浏览器分别访问127.0.0.1:8088/hello

127.0.0.1:8099/hello

结论
发现8099端口可以访问,application.properties优先级是高于application.yaml的
第四步:使用application.yaml配置文件给实体类注入属性值
具体步骤:
- ① 创建实体类Student
- ②在application.yaml中配置Student的属性值
① 创建实体类Student
在org.example.springweb_hello下创建文件夹pojo,在pojo中创建Student类和Pet类
Student类
package org.example.springweb_hello.pojo;

import org.springframework.boot.context.properties.ConfigurationProperties;
import org.springframework.stereotype.Component;

import java.util.Date;
import java.util.List;
import java.util.Map;
import java.util.Set;
//使用注解@ConfigurationProperties(prefix = "student"),与yaml文件中student的属性值进行绑定
@ConfigurationProperties(prefix = "student")
@Component//@Component将该类注入到IOC容器中
public class Student {
    private String userName;
    private Boolean flage;
    private Date birth;
    private Integer age;
    private Pet favoritePet;
    private String[] interests;
    private List<String> animal;
    private Map<String, Object> score;
    private Set<Double> salarys;
    private Map<String, List<Pet>> allPets;

    public String getUserName() {
        return userName;
    }

    public void setUserName(String userName) {
        this.userName = userName;
    }

    public Boolean getFlage() {
        return flage;
    }

    public void setFlage(Boolean flage) {
        this.flage = flage;
    }

    public Date getBirth() {
        return birth;
    }

    public void setBirth(Date birth) {
        this.birth = birth;
    }

    public Integer getAge() {
        return age;
    }

    public void setAge(Integer age) {
        this.age = age;
    }

    public Pet getFavoritePet() {
        return favoritePet;
    }

    public void setFavoritePet(Pet favoritePet) {
        this.favoritePet = favoritePet;
    }

    public String[] getInterests() {
        return interests;
    }

    public void setInterests(String[] interests) {
        this.interests = interests;
    }

    public List<String> getAnimal() {
        return animal;
    }

    public void setAnimal(List<String> animal) {
        this.animal = animal;
    }

    public Map<String, Object> getScore() {
        return score;
    }

    public void setScore(Map<String, Object> score) {
        this.score = score;
    }

    public Set<Double> getSalarys() {
        return salarys;
    }

    public void setSalarys(Set<Double> salarys) {
        this.salarys = salarys;
    }

    public Map<String, List<Pet>> getAllPets() {
        return allPets;
    }

    public void setAllPets(Map<String, List<Pet>> allPets) {
        this.allPets = allPets;
    }
}
Pet类
package org.example.springweb_hello.pojo;

import org.springframework.stereotype.Component;

@Component//@Component将该类注入到IOC容器中
public class Pet {
    private String name;
    private Double weight;


    public String getName() {
        return name;
    }

    public void setName(String name) {
        this.name = name;
    }

    public Double getWeight() {
        return weight;
    }

    public void setWeight(Double weight) {
        this.weight = weight;
    }
}
②在application.yaml中配置Student的属性值
application.yaml中的配置如下所示
# 用yaml表示student对象
student:
  userName: jiekki
  flage: false
  birth: 2019/12/12 20:12:33
  age: 18
#  favoritePet对象类型,可以用这种形式
#  favoritePet:
#    name: tomcat
#    weight: 23.4
#  favoritePet对象类型,也能用这种形式
  favoritePet: { name: hotdog,weight: 38.9}
#    数组interests可以用这种形式
#  interests:
#    - 篮球
#    - 游泳
#    - 唱歌
#数组interests也能用这种形式 interests: [ 篮球,跳舞 ]
  interests: [ 篮球,跳舞 ]
#  集合animal可以用这种形式
#  animal:
#    - jerry
#    - mario
#    - tom
#  集合animal也能用这种形式animal: [jerry,mario,tom,cxk]
  animal: [jerry,mario,tom,cxk]
  score:
    english:
      first: 30
      second: 40
      third: 50
    math: [ 131,140,148 ]
    chinese: { first: 128,second: 136 }
  salarys: [ 3999,4999.98,5999.99 ]
  allPets:
    sick:
      - { name: tom }
      - { name: jerry,weight: 47 }
    health: [ { name: mario,weight: 47 } ]

server:
  port: 8088
测试:
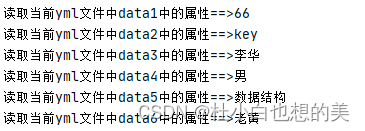
测试目标:浏览器向127.0.0.1:8088/hello发送请求,将Student对象作为响应返回
测试步骤:
测试结果:浏览器拿到了student数据
- 编写HelloController
package org.example.springweb_hello.controller;
import org.example.springweb_hello.pojo.Student;
import org.springframework.beans.factory.annotation.Autowired;
import org.springframework.web.bind.annotation.GetMapping;
import org.springframework.web.bind.annotation.RestController;
@RestController
public class HelloController {
    @Autowired//将IOC容器中的student对象注入进来
    Student student;
    @GetMapping("/hello")
    public Student hello(){
        return student;//返回student对象
    }
}
- 浏览器发送请求

思考:如果在application.properties中也配置student的属性,这两个配置文件那个生效?

application.properties
student.userName=lihua
student.age=39
student.flage=true
重启项目—>浏览器重启发送请求127.0.0.1:8088/hello

结论:
发现application.properties优先级是高于application.yaml的,application.properties中的配置是优先生效的,application.properties中存在的配置先生效,如果application.properties中没有就去找application.yaml中的配置