1、文件的三种状态

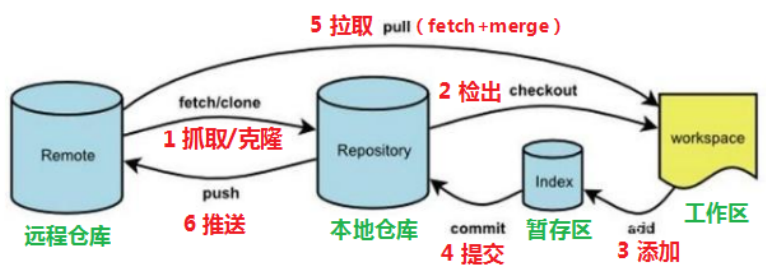
git目录: Git 保存项目元数据和对象数据库的地方,这是Git最重要的部分,也是从其他计算机克隆仓库时要复制的内容。
工作目录: 项目某个版本的单次检出,这些文件从仓库中检出,供以后使用和修改。
暂存区: 暂存区是一个文件,一般位于Git目录中。它保存了下次要提交到本地仓库内容的相关信息。有时它也被称为索引。
在git中,文件可以处于以下3种状态:
- 已提交(committed):表示数据已经被安全地存入本地代码仓库了。
- 已修改(modified):表示已经改动了文件,但是还没有提交到代码仓库。
- 已暂存(staged):表示对已修改的文件当前版本做了标识,并将其加入到下次要提交的快照中。
2、Ubuntu安装Git
sudo apt-get install git-all
3、用户身份
安装好Git后的第一件事就是设置用户名和电子邮件地址:
git config --golbal user.name "用户名"
git config --golbal user.email "邮箱"
4、获取Git仓库
建立Git仓库的方法主要有两种。
第一种是把现有的项目或者目录导入到Git中。
第二种是从服务器上克隆现有的Git仓库
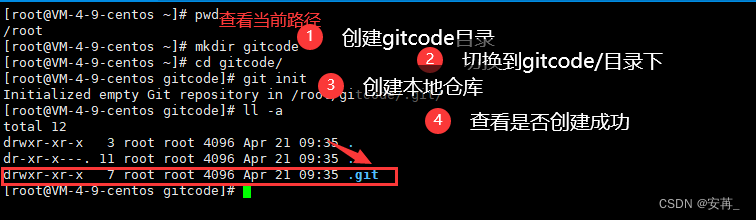
4.1、在现有目录中初始化Git仓库
要想在Git中对现有项目进行跟踪管理,只需在项目目录中执行 git init,
然后用 git add命令将文件加到待提交队列(暂存区),
最后用 git commit命令将文件提交到仓库。
我本地的目录是 git_repository,执行流程如下:
~/git_repository$ git init
Initialized empty Git repository in /home/ubuntu/git_repository/.git/
~/git_repository$ touch show_bytes.cpp
~/git_repository$ ls -l
total 0
-rw-rw-r-- 1 ubuntu ubuntu 0 Jul 16 21:01 show_bytes.cpp
~/git_repository$ git add *.cpp
~/git_repository$ git status
On branch master

No commits yet

Changes to be committed:
  (use "git rm --cached <file>..." to unstage)
        new file:   show_bytes.cpp

~/git_repository$ git commit -m "first commit!"
~/git_repository$ git status
On branch master
nothing to commit, working tree clean
4.2、克隆现有仓库
克隆现有仓库使用的是 git clone 命令:
git clone [url]
url格式:仓库所属用户@仓库所在服务器的IP : 仓库路径
例:git@127.0.0.1 : /home/ubuntu/git_repository/first.git
5、在Git中记录变更
现在已经有了仓库,下一步是对仓库中的项目做一些修改。
5.1、查看当前文件状态
看当前文件状态是用的命令是 git status。
在克隆仓库后立即执行 git status命令,会有如下输出:
$ git status
On branch master
nothing to commit, working tree clean
表示还没有向仓库提交任何文件。
5.2、暂存已修改的文件
我的仓库里原来有个空文件show_bytes.cpp,我修改了这个文件,再次执行git status:
$ git status
...
Changes not staged for commit:
  (use "git add <file>..." to update what will be committed)
  (use "git restore <file>..." to discard changes in working directory)
        modified:   show_bytes.cpp

no changes added to commit (use "git add" and/or "git commit -a")
Changes not staged for commit 模块列出了修改但未暂存的文件show_bytes.cpp。
下面将show_bytes.cpp加入到暂存区,再次执行git status。
$ git add show_bytes.cpp
ubuntu@VM-8-6-ubuntu:~/git_test/csapp$ git status
...
Changes to be committed:
  (use "git restore --staged <file>..." to unstage)
        modified:   show_bytes.cpp
Changes not staged for commit 的提示没有了。
Changes to be committed 模块列出的将要提交到本地仓库的文件列表。
5.3、 提交变更
下面将暂存的文件提交到本地仓库:
$ git commit -m "修改show_bytes.cpp"
[master 6ef9f85] 修改show_bytes.cpp
 1 file changed, 21 insertions(+)

$ git status
...
nothing to commit, working tree clean
根据提示信息可知,现在工作目录没有文件需要提交了。
如果嫌每次都要执行git add 命令太麻烦,可以使用git commit -a命令跳过暂存区,直接将所有已跟踪的文件提交到本地仓库。
6、移除文件
要将已经跟踪的文件删除,要使用 git rm命令。
如果要将已暂存的文件删除,需要加 -f选项。
下面我新建了一个文件test_rm.cpp,并将其加入暂存区。
然后将其删除。
$ touch test_rm.cpp
$ git add test_rm.cpp
$ git status
...
Changes to be committed:
  (use "git restore --staged <file>..." to unstage)
        new file:   test_rm.cpp

$ git rm -f test_rm.cpp
rm 'test_rm.cpp'
$ git status
...
nothing to commit, working tree clean
如果使用shell的rm命令删除文件,而不是用git rm命令,
那么再次执行 git status时,还会看到这个文件。
$ touch test_rm.cpp
$ git add test_rm.cpp
$ rm -f test_rm.cpp
$ git status
...
Changes to be committed:
  (use "git restore --staged <file>..." to unstage)
        new file:   test_rm.cpp
...
7、远程仓库
7.1、显示远程仓库
显示远程仓库使用 git remove命令
$ git remote
origin
需要显示远程仓库路径的话,要加 -v选项
$ git remote -v
origin  git@******:********.git (fetch)
7.2、 添加远程仓库
添加远程仓库使用 git remote add命令:
git remote add [别名] [url]
7.3、从远程仓库获取数据
从远程仓库获取数据 使用 git fetch命令
git fetch [retome-name]
retome-name 就是 git remote返回的结果
7.4、将数据推送到远程服务器
将数据推送到远程服务器使用 git push命令
git push [retome-name] [branch-name]