Linux的线程
在计算机科学和软件工程中,多线程编程是一项关键技能,尤其在当今多核处理器和高并发应用程序的背景下显得尤为重要。本文将全面探讨Linux环境下的线程编程,涵盖基本概念、线程创建与管理、线程同步、性能优化以及实际应用,通过详细的C++示例代码帮助读者深入理解并掌握这一技术。
1. 引言
线程的基本概念和重要性
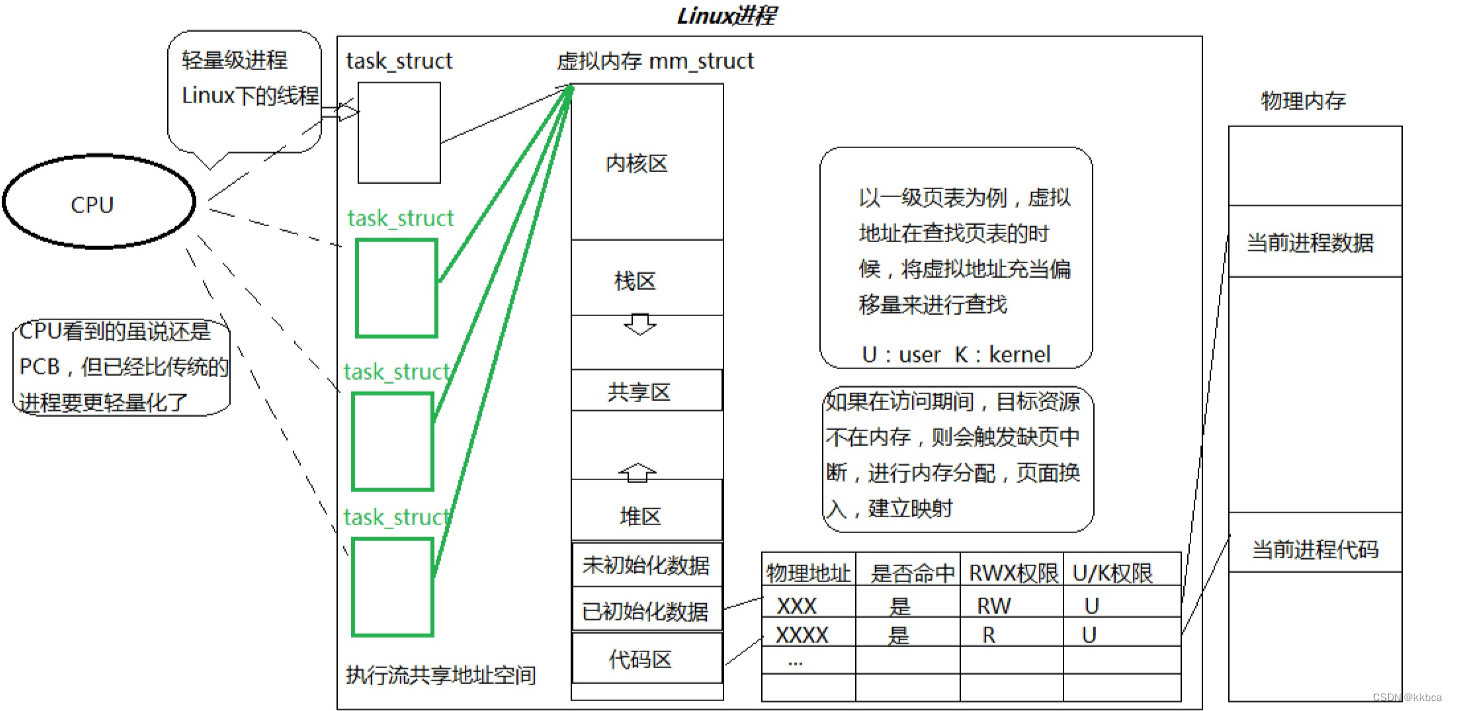
线程是操作系统能够进行调度的最小单位,与进程不同的是,线程共享同一进程的资源,包括内存空间、文件描述符等。多线程编程能够充分利用多核处理器的并行能力,提高程序的运行效率和响应速度,是现代软件开发中不可或缺的一部分。
Linux环境下的线程编程优势
Linux作为开源操作系统,提供了丰富的线程支持和强大的多任务调度能力。开发者可以利用Linux提供的POSIX线程库(pthread)或者C++11标准库中的 头文件来实现高效的线程管理和同步操作,适用于各种复杂的应用场景。
2. 基础概念
线程与进程的区别和联系
线程是进程的一部分,一个进程可以包含多个线程,它们共享相同的地址空间和其他资源。线程之间的通信和数据共享更为高效,但也更容易出现数据竞争和同步问题。
用户级线程与内核级线程
在Linux中,线程可以分为用户级线程(ULTs)和内核级线程(KLTs):
用户级线程: 完全由用户程序管理,不需要操作系统内核支持。轻量级,快速创建和管理,但不能充分利用多核处理器的并行能力。
内核级线程: 由操作系统内核支持和管理,能够充分利用操作系统的多任务调度功能,更适合于多核处理器上的并行计算。
3. 线程创建与启动
使用POSIX线程库(pthread)
POSIX线程库是Linux系统中标准的线程库,提供了丰富的线程操作函数,能够实现线程的创建、启动、同步和销毁等操作。以下是一个简单的例子:
#include <iostream>
#include <pthread.h>

void* threadFunction(void* arg) {
    int thread_id = *((int*)arg);
    std::cout << "Thread ID: " << thread_id << " is running." << std::endl;
    return nullptr;
}

int main() {
    pthread_t thread_id;
    int thread_param = 1;

    // 创建线程
    pthread_create(&thread_id, nullptr, threadFunction, (void*)&thread_param);

    // 等待线程结束
    pthread_join(thread_id, nullptr);

    std::cout << "Main thread exits." << std::endl;
    return 0;
}
使用C++11标准库中的 头文件
C++11引入了原生线程支持,提供了头文件来实现线程的创建和管理,使用起来更加简洁和直观:
#include <iostream>
#include <thread>

void threadFunction(int thread_id) {
    std::cout << "Thread ID: " << thread_id << " is running." << std::endl;
}

int main() {
    int thread_param = 1;

    // 创建线程
    std::thread t(threadFunction, thread_param);

    // 等待线程结束
    t.join();

    std::cout << "Main thread exits." << std::endl;
    return 0;
}
4. 线程管理
线程ID和属性管理
在创建线程时,可以设置线程的属性和优先级,以及获取线程的唯一标识符(ID)进行管理。
#include <iostream>
#include <thread>

void threadFunction() {
    std::cout << "Thread ID: " << std::this_thread::get_id() << " is running." << std::endl;
}

int main() {
    std::thread t(threadFunction);

    // 获取线程ID
    std::cout << "Thread ID: " << t.get_id() << std::endl;

    // 等待线程结束
    t.join();

    std::cout << "Main thread exits." << std::endl;
    return 0;
}
线程的生命周期管理
线程包括创建、运行、阻塞、唤醒和终止等状态,开发者需要合理管理线程的生命周期,确保线程安全和资源释放的有效性。当涉及线程的生命周期管理时,确保线程在正确的时间创建、运行、终止和释放资源至关重要。以下是如何在C++中使用线程实现基本的生命周期管理的示例代码:
#include <iostream>
#include <thread>
#include <chrono>

void threadFunction() {
    std::cout << "Thread started." << std::endl;

    // 模拟线程执行一些任务
    std::this_thread::sleep_for(std::chrono::seconds(2));

    std::cout << "Thread completed." << std::endl;
}

int main() {
    std::cout << "Main thread started." << std::endl;

    // 创建线程
    std::thread t(threadFunction);

    // 等待线程执行完毕
    if (t.joinable()) {
        t.join();
    }

    std::cout << "Main thread completed." << std::endl;
    return 0;
}
5. 线程同步与互斥
互斥锁(Mutex)和条件变量(Condition Variable)
互斥锁用于保护临界区,防止多个线程同时访问共享资源,条件变量则用于线程间的条件通知和等待。
#include <iostream>
#include <thread>
#include <mutex>
#include <condition_variable>

std::mutex mtx;
std::condition_variable cv;
bool ready = false;

void workerThread() {
    std::unique_lock<std::mutex> lock(mtx);
    while (!ready) {
        cv.wait(lock);
    }
    std::cout << "Worker thread is processing." << std::endl;
}

int main() {
    std::thread worker(workerThread);

    // 主线程工作...

    {
        std::lock_guard<std::mutex> lock(mtx);
        ready = true;
    }
    cv.notify_one();

    worker.join();

    std::cout << "Main thread exits." << std::endl;
    return 0;
}
信号量(Semaphore)和读写锁(ReadWrite Lock)
信号量用于控制对共享资源的访问数量,读写锁则允许多个线程同时读取共享数据,但只允许一个线程进行写操作。例如:
#include <iostream>
#include <thread>
#include <mutex>
#include <condition_variable>

class Semaphore {
public:
    Semaphore(int count = 1) : count_(count) {}

    void wait() {
        std::unique_lock<std::mutex> lock(mutex_);
        while (count_ == 0) {
            condition_.wait(lock);
        }
        count_--;
    }

    void post() {
        std::unique_lock<std::mutex> lock(mutex_);
        count_++;
        condition_.notify_one();
    }

private:
    std::mutex mutex_;
    std::condition_variable condition_;
    int count_;
};

Semaphore sem(2); // 设置信号量初始计数为2

void workerThread(int id) {
    sem.wait(); // 等待信号量
    std::cout << "Thread " << id << " is working." << std::endl;
    std::this_thread::sleep_for(std::chrono::seconds(2));
    sem.post(); // 释放信号量
}

int main() {
    std::thread t1(workerThread, 1);
    std::thread t2(workerThread, 2);
    std::thread t3(workerThread, 3);

    t1.join();
    t2.join();
    t3.join();

    return 0;
}
6. 高级线程同步
线程安全的数据结构
设计和实现线程安全的数据结构是多线程编程中的重要问题,可以通过互斥锁、原子操作等手段来保证数据的一致性和安全性。
线程池的实现与应用
线程池是管理和复用线程的一种机制,能够减少线程创建和销毁的开销,提升程序的性能和资源利用率。以下是一个简单的线程池实现示例:
#include <iostream>
#include <thread>
#include <vector>
#include <queue>
#include <mutex>
#include <condition_variable>

class ThreadPool {
public:
    ThreadPool(size_t num_threads) : stop(false) {
        for (size_t i = 0; i < num_threads; ++i) {
            threads.emplace_back([this] {
                while (true) {
                    std::function<void()> task;
                    {
                        std::unique_lock<std::mutex> lock(queue_mutex);
                        condition.wait(lock, [this] { return stop || !tasks.empty(); });
                        if (stop && tasks.empty()) return;
                        task = std::move(tasks.front());
                        tasks.pop();
                    }
                    task();
                }
            });
        }
    }

    template <class F>
    void enqueue(F&& f) {
        {
            std::unique_lock<std::mutex> lock(queue_mutex);
            tasks.emplace(std::forward<F>(f));
        }
        condition.notify_one();
    }

    ~ThreadPool() {
        {
            std::unique_lock<std::mutex> lock(queue_mutex);
            stop = true;
        }
        condition.notify_all();
        for (std::thread& worker : threads) {
            worker.join();
        }
    }

private:
    std
好了,今天的分享到这里就结束了,感谢大家的支持!