目录:
Spring Boot 整合 “Servlet三大组件” :

作者简介 :一只大皮卡丘,计算机专业学生,正在努力学习、努力敲代码中! 让我们一起继续努力学习!
该文章参考学习教材为:
《Spring Boot企业级开发教程》 黑马程序员 / 编著
文章以课本知识点 + 代码为主线,结合自己看书学习过程中的理解和感悟 ,最终成就了该文章文章用于本人学习使用 , 同时希望能帮助大家。
欢迎大家点赞👍 收藏⭐ 关注💖哦!!!(侵权可联系我,进行删除,如果雷同,纯属巧合)
- 进行 Servlet开发时,通常首先自定义Servlet 、Filter ( 过滤器 )、Listener ( 监听器 ) 三大组件,然后在文件 web.xml 中进行配置,而 Spring Boot 使用的是 内嵌式Servlet容器,没有提供外部配置文件 web.xml ,那么Spring Boot是如何整合Servlet的相关组件呢?
- Spring Boot提供 了 ① 组件注册 和 ② 路径扫描两种方式整合Servlet三大组件 ( Servlet 、Filter、Listener ),接下来将对分别对这
两种整合方式进行详细讲解。
1. 使用 “组件注册” 的方式 “整合Servlet三大组件” ( 实际操作为 : 创建自定义的"三大组件"对象 + 结合刚创建"的自定义组件对象"来 将 XxxRegistrationBean对象 通过”配置类“的方式加入到 IOC容器中 )
- 在 Spring Boot中,使用 组件注册 方式 整合内嵌Servlet容器的 Servlet、Filter、Listener三大组件时,只需将这些 自定义组件 ( 即为自定义的“Servlet三大对象” ) 通过 ServletRegistrationBean、FilterRegistrationBean、ServletListenerRegistrationBean类 注册 到 容器 中即可。
使用 “组件注册” 方式 “整合Servlet”
使用 “组件注册” 方式 “整合Servlet” :
具体操作为 :
① 自定义一个Servlet对象 ( 该对象用于 ServletRegistrationBean对象中 )
② 通过 配置类的方式将ServletRegistrationBean对象 加入到IOC容器中,通过以上操作即实现了 SpringBoot中整合 “Servlet”。
MyServlet.java :
package com.myh.chapter_11.config;

import jakarta.servlet.ServletException;
import jakarta.servlet.http.HttpServlet;
import jakarta.servlet.http.HttpServletRequest;
import jakarta.servlet.http.HttpServletResponse;
import org.springframework.stereotype.Component;

import java.io.IOException;

/**
 *  SpringBoot中通过“注册组件”的方式来整合Servlet三大组件
 *  即通过创建XxxRegistrationBean对象并将其加入到IOC容器中的方式来在SpringBoot中整合Servlet的三大组件
 */
@Component //加入到IOC容器中
public class MyServlet extends HttpServlet { //

    /*
     doGet()方法
    */
    @Override
    protected void doGet(HttpServletRequest request, HttpServletResponse response) throws ServletException, IOException {
        this.doPost(request, response);
    }

    /*
      dopost方法
     */
    @Override
    protected void doPost(HttpServletRequest request, HttpServletResponse response) throws ServletException, IOException {
        //当url访问该Servlet中的doPost()方法会执行方法体中的代码
        //客户端(如浏览器)向Servlet发送请求并收到响应时,它会看到响应的内容是 "hello MyServlet" 这个字符串。
        response.getWriter().write("hello MyServlet");
    }
}
ServletConfig.java :
package com.myh.chapter_11.config;

import org.springframework.beans.factory.annotation.Autowired;
import org.springframework.boot.web.servlet.ServletRegistrationBean;
import org.springframework.context.annotation.Bean;
import org.springframework.context.annotation.Configuration;

@Configuration //将该类标记为"配置类"
public class ServletConfig { //Serlvet配置类

    @Autowired
    private MyServlet myServlet;

    @Bean //将给方法的返回值对象加入到IOC容器中
    //在SpringBoot中注册XxxRegistrationBean组件/对象
    public ServletRegistrationBean getServlet() {
        /*
          /myServlet 这个请求映射到对应的Servlet对象上
         */
        ServletRegistrationBean servletRegistrationBean =
                new ServletRegistrationBean(myServlet,"/myServlet");
        return servletRegistrationBean;
    }
}
启动项目进行测试。项目启动成功后,在浏览器上访问 http://localhost:8080/mySerlvet , 效果如下图所示 :
从 上图可以看出,浏览器能访问/MyServlet并正常显示数据,说明SpringBoot 成功整合Servlet组件。


使用 “组件注册” 方式 “整合Filter / 过滤器”
使用 “组件注册” 方式 “整合Filter” :
具体操作为 :
① 自定义一个Filter对象 ( 该对象用于 ServletRegistrationBean对象 中 )
② 通过 配置类的方式将FilterRegistrationBean对象 加入到IOC容器中 ,通过以上操作即实现了 SpringBoot中整合 “Filter”。
MyFilter.java :
package com.myh.chapter_11.config;

import jakarta.servlet.*;
import org.springframework.stereotype.Component;

import java.io.IOException;

@Component //加入到IOC容器中
public class MyFilter implements Filter { //实现 Filter/过滤器接口

    @Override
    public void init(FilterConfig filterConfig) throws ServletException {
        Filter.super.init(filterConfig);
    }

    /**
     *  doFilter()方法在“请求处理之前”被执行,就是一个url请求,想到达doFilter()方法,再到达对应的Servlet组件的方法
     */
    @Override
    public void doFilter(ServletRequest servletRequest, ServletResponse servletResponse, FilterChain filterChain) throws IOException, ServletException {
        //对url请求进行过滤,url请求先在doFilter()方法中拦截,如被放行,才会接着去执行Servlet中的方法
        System.out.println("hello MyFilter");

        //将请求和响应对象传递给过滤器链中的下一个实体,这个实体可以是一个过滤器,或者是最终的Servlet或JSP页面
        filterChain.doFilter(servletRequest, servletResponse);
    }

    @Override
    public void destroy() {
        Filter.super.destroy();
    } //自定义“过滤器”/Filter类

}
ServletConfig.java :
package com.myh.chapter_11.config; import org.springframework.beans.factory.annotation.Autowired; import org.springframework.boot.web.servlet.FilterRegistrationBean; import org.springframework.boot.web.servlet.ServletRegistrationBean; import org.springframework.context.annotation.Bean; import org.springframework.context.annotation.Configuration; import java.util.Arrays; @Configuration //将该类标记为"配置类" public class ServletConfig { //Serlvet配置类 @Autowired private MyFilter myFilter; @Bean public FilterRegistrationBean getFilter() { //将Filter组件加入到IOC容器中 FilterRegistrationBean filterRegistrationBean = new FilterRegistrationBean(myFilter); //设置过滤器要过滤的url路径 filterRegistrationBean.setUrlPatterns(Arrays.asList("/toLoginPage","/myFilter")); return filterRegistrationBean; } }上述代码中,使用 组件注册 方式 注册自定义 的 MyFilter类。在 getFilter( MyFilter filter ) 方法中,使 setUrlPatterns(Arrays.asList(“/toLoginPage”,“/myFilter”)) 方法定义了 过滤的请求路径 为 “/toLoginPage”和“/myFilter’”。
启动项目,项目启动成功后,在浏览器上访问 http://localhost:8080/myFilter 查看 控制台打印效果(由于没有编写对应路径的请求处理方法,所以浏览器会出现404错误页面,这里 重点关注控制台即可),具体如下图所示 :
从上图可以看出,控制台中打印了自定义Filter中的输出语句 “hello MyFilter”,这说明 SpringBoot整合自定义Filter组件成功。


使用 “组件注册” 方式 “整合Listener / 监听器”
使用 “组件注册” 方式 “整合Listener” :
具体操作为 :
① 自定义一个Listener对象 ( 该对象用于 ServletListenerRegistrationBean对象 中 )
② 通过 配置类的方式将 ServletListenerRegistrationBean对象 加入到IOC容器中 ,通过以上操作即 实现了 SpringBoot中整合 “Listener”。
MyListener.java :
package com.myh.chapter_11.config; import jakarta.servlet.ServletContextEvent; import jakarta.servlet.ServletContextListener; import org.springframework.stereotype.Component; @Component public class MyListener implements ServletContextListener { //自定义的“监听器”/Listener 对象 /* * contextInitialized()方法是Web应用程序启动时被执行。 * 该方法的主要用途是对系统的全局变量、配置参数等进行初始化,确保系统在正常运行之前处于一个良好的状态 */ @Override public void contextInitialized(ServletContextEvent sce) { //该方法子啊web应用程序启动时被执行 System.out.println("contextInitialized....."); } /** * contextDestroyed()方法在web应用程序的"生命周期结束"时/ web应用程序“销毁”时被执行 */ @Override public void contextDestroyed(ServletContextEvent sce) { //该方法在web应用程序的"生命周期结束"时被执行 System.out.println("contextInitialized....."); } }需要说明的是,Servlet容器提供了很多 Listener 接口,例如 ServletRequestListener、HtpSessionListener、ServletContextListener 等,我们在自定义 Listener类时要根据自身需求选择实现对应接口。
ServletConfig.java :
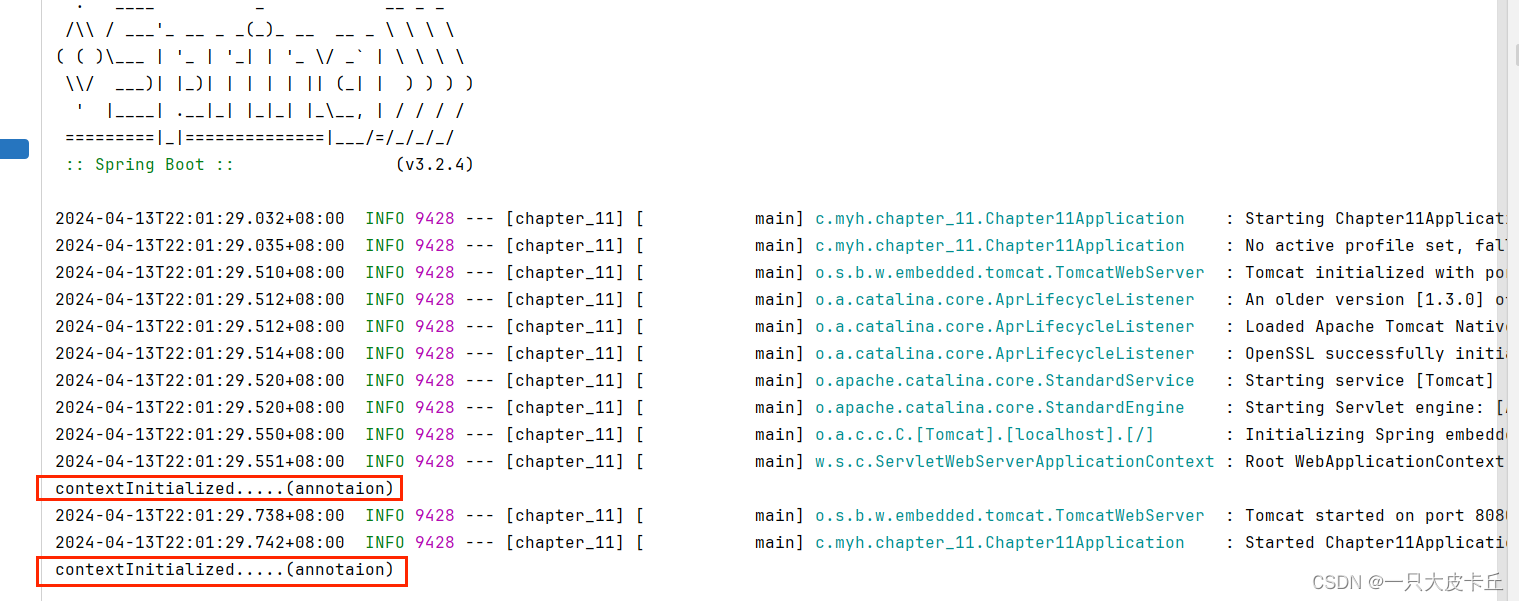
package com.myh.chapter_11.config; import org.springframework.beans.factory.annotation.Autowired; import org.springframework.boot.web.servlet.FilterRegistrationBean; import org.springframework.boot.web.servlet.ServletRegistrationBean; import org.springframework.context.annotation.Bean; import org.springframework.context.annotation.Configuration; import java.util.Arrays; @Configuration //将该类标记为"配置类" public class ServletConfig { //Serlvet配置类 @Autowired private MyListener myListener; @Bean public ServletListenerRegistrationBean getListener() { ServletListenerRegistrationBean servletListenerRegistrationBean = new ServletListenerRegistrationBean(myListener); return servletListenerRegistrationBean; } }完成自定义Listener组件注册后 启动项目,项目启动成功后查看控制合打印效果,效果 如下图所示。程序启动成功后,控制台会打印出 自定义Listener组件 中定义的输出语句 : contextInitialized…
单击 IDEA 中的 Exit 按钮 关闭当前项目(注意,如果直接单击红色按钮会强制关闭程序,浏览器就无法打印关闭监听信息),再次查看控制合打印效果,效果 如下图所示 ,程序成功关闭后,控制台打印出了自定义Listener组件中定义的输出语句 : contextInitialized… 通过效果演示。
通过上面的代码和运行截图展示 :说明了 Spring Boot整合自定义Listener 组件成功。
注意点 :
如果我们将自定义的 Servlet组件配置类 : ServletConfig 全部注释并重启项目后,自定义的 Servlet、Filter、Listener组件 “仍然生效”。
出现这种情况的 主要原因 是:
嵌入式Servlet容器 对 Servlet、Filter 、Listener 组件 进行 了 自动化识别和配置,而自定义的Servlet、Filter、Listener都
继承/实现 了对应的 类/接口,同时自定义的Servlet、Filter、Listener组件都使用了 @Component注解 ,这些组件/对象会被自动扫描为Spring组件。
ServletRegistrationBean、FilterRegistrationBean、ServletListenerRegistrationBean 这些组件组装配置的 根本目的 是对一些 请求路径 和 参数进行 初始化设置和组装 。假设没有组件注册类,那么自定义Servlet虽然生效,无法确定 是哪个访问路径生效。 自定义的Filter会对所有的请求都进行过滤,不会出现选择性过滤的情况。 而自定义的Listener则没有太大影响,因为定制该组件基本不需要设置什么参数。


2. 使用 “路径扫描” 的方式 “整合Servlet三大组件” ( 就是通过 “注解” 的方式来"整合Servlet三大组件" )
在Spring Boot中,除了使用“组件注册”的方式来"整合Servlet三大组件" ,还可以使用 “路径扫描” 的方式 整合 内嵌式 Servlet容器 的 Servlet、Filter、Listener 三大组件时。
使用 “路径扫描" 的方式"整合Servlet三大组件” 具体操作 为:
第一步、 在自定义的 Servlet、Filter、Listener 类上 分别添加 : @WebServlet( )注解 、@WebFilter( )注解、@WebListener( )注解 。
第二步、在 项目主程序启动类上使用@ServletComponentScan注解 开启“组件扫描” / “注解扫描” 即可。
使用 “路径扫描 / 注解” 方式 “整合Servlet”
创建项目 :
MyServlet.Java :
package com.myh.chapter_11.config;

import jakarta.servlet.ServletException;
import jakarta.servlet.annotation.WebServlet;
import jakarta.servlet.http.HttpServlet;
import jakarta.servlet.http.HttpServletRequest;
import jakarta.servlet.http.HttpServletResponse;
import org.springframework.stereotype.Component;

import java.io.IOException;

//通过注解的方式来在SpringBoot中“整合Servlet” ( 就是通过注解的方式来SpringBoot中能使用Servlet )
//将 /annotationMyServlet请求映射到该Servlet类中
@WebServlet("/annotationMyServlet")
public class MyServlet extends HttpServlet {

    /*
     doGet()方法
    */
    @Override
    protected void doGet(HttpServletRequest request, HttpServletResponse response) throws ServletException, IOException {
        this.doPost(request, response);
    }

    /*
      dopost方法
     */
    @Override
    protected void doPost(HttpServletRequest request, HttpServletResponse response) throws ServletException, IOException {
        //当url访问该Servlet中的doPost()方法会执行方法体中的代码
        //客户端(如浏览器)向Servlet发送请求并收到响应时,它会看到响应的内容是 "hello MyServlet" 这个字符串。
        response.getWriter().write("hello MyServlet(annotaion)");
    }
}
Chapter11Application.Java ( 项目主程序启动类 ):
package com.myh.chapter_11; import org.springframework.boot.SpringApplication; import org.springframework.boot.autoconfigure.SpringBootApplication; import org.springframework.boot.web.servlet.ServletComponentScan; @SpringBootApplication @ServletComponentScan //开启基于"注解方式"的"Servlet组件扫描"支持 ( 让整合Servlet的三大组件的注解生效 ) public class Chapter11Application { public static void main(String[] args) { SpringApplication.run(Chapter11Application.class, args); } }启动项目后,访问http://localhost:8080/annotationMyServlet ,效果如下所示 ,表示用”路径扫描“的方式 成功整合了Servlet。


使用 “路径扫描 / 注解” 方式 “整合Filter”
创建项目 :
MyFilter.Java :
package com.myh.chapter_11.config;

import jakarta.servlet.*;
import jakarta.servlet.annotation.WebFilter;
import org.springframework.stereotype.Component;

import java.io.IOException;

//通过注解的方式来在SpringBoot中“整合Filter” ( 就是通过注解的方式来SpringBoot中能使用Filter )
//将 /annotationMyFilter 和 /annotationLogin 请求映射到该 该Filter(过滤器)类中
@WebFilter(value = {"/annotationMyFilter","/annotationLogin"})
public class MyFilter implements Filter { //实现 Filter/过滤器接口

    @Override
    public void init(FilterConfig filterConfig) throws ServletException {
        Filter.super.init(filterConfig);
    }

    /**
     *  doFilter()方法在“请求处理之前”被执行,就是一个url请求,想到达doFilter()方法,再到达对应的Servlet组件的方法
     */
    @Override
    public void doFilter(ServletRequest servletRequest, ServletResponse servletResponse, FilterChain filterChain) throws IOException, ServletException {
        //对url请求进行过滤,url请求先在doFilter()方法中拦截,如被放行,才会接着去执行Servlet中的方法
        System.out.println("hello MyFilter(annotaion)");

        //将请求和响应对象传递给过滤器链中的下一个实体,这个实体可以是一个过滤器,或者是最终的Servlet或JSP页面
        filterChain.doFilter(servletRequest, servletResponse);
    }

    @Override
    public void destroy() {
        Filter.super.destroy();
    } //自定义“过滤器”/Filter类

}
Chapter11Application.Java ( 项目主程序启动类 ):
package com.myh.chapter_11; import org.springframework.boot.SpringApplication; import org.springframework.boot.autoconfigure.SpringBootApplication; import org.springframework.boot.web.servlet.ServletComponentScan; @SpringBootApplication @ServletComponentScan //开启基于"注解方式"的"Servlet组件扫描"支持 ( 让整合Servlet的三大组件的注解生效 ) public class Chapter11Application { public static void main(String[] args) { SpringApplication.run(Chapter11Application.class, args); } }启动项目后,访问http://localhost:8080/annotationMyFilter ,效果如下所示 ,表示用”路径扫描“的方式 成功整合了Filter。


使用 “路径扫描 / 注解” 方式 “整合Listene”
创建项目 :
MyListener.Java :
package com.myh.chapter_11.config;

import jakarta.servlet.ServletContextEvent;
import jakarta.servlet.ServletContextListener;
import jakarta.servlet.annotation.WebListener;
import org.springframework.stereotype.Component;

//通过注解的方式来在SpringBoot中“整合Listener” ( 就是通过注解的方式来SpringBoot中能使用Listener )
//在web应用程序启动时会执行 contextInitialized()方法 , web应用程序结束/销毁后会执行contextDestroyed()方法
@WebListener
public class MyListener implements ServletContextListener { //自定义的“监听器”/Listener 对象


    /*
     * contextInitialized()方法是Web应用程序启动时被执行。
     * 该方法的主要用途是对系统的全局变量、配置参数等进行初始化,确保系统在正常运行之前处于一个良好的状态
     */
    @Override
    public void contextInitialized(ServletContextEvent sce) { //该方法子啊web应用程序启动时被执行
        System.out.println("contextInitialized.....(annotaion)");
    }


    /**
     *  contextDestroyed()方法在web应用程序的"生命周期结束"时/ web应用程序“销毁”时被执行
     */
    @Override
    public void contextDestroyed(ServletContextEvent sce) { //该方法在web应用程序的"生命周期结束"时被执行
        System.out.println("contextInitialized.....(annotaion)");
    }
}
Chapter11Application.Java ( 项目主程序启动类 ):
package com.myh.chapter_11; import org.springframework.boot.SpringApplication; import org.springframework.boot.autoconfigure.SpringBootApplication; import org.springframework.boot.web.servlet.ServletComponentScan; @SpringBootApplication @ServletComponentScan //开启基于"注解方式"的"Servlet组件扫描"支持 ( 让整合Servlet的三大组件的注解生效 ) public class Chapter11Application { public static void main(String[] args) { SpringApplication.run(Chapter11Application.class, args); } }启动项目后,访问http://localhost:8080/annotationMyFilter ,效果如下所示 ,表示用”路径扫描“的方式 成功整合了Listene。