第一个 Angular 项目 - 添加路由
前置项目是 第一个 Angular 项目 - 添加服务,之前的切换页面使用的是 ngIf 对渲染的组件进行判断,从而完成渲染。这一步的打算是添加路由,同时添加 edit recipe 的功能(同样通过路由实现)
用到的内容为:
配置基础路由
这里修改的文件有以下文件:
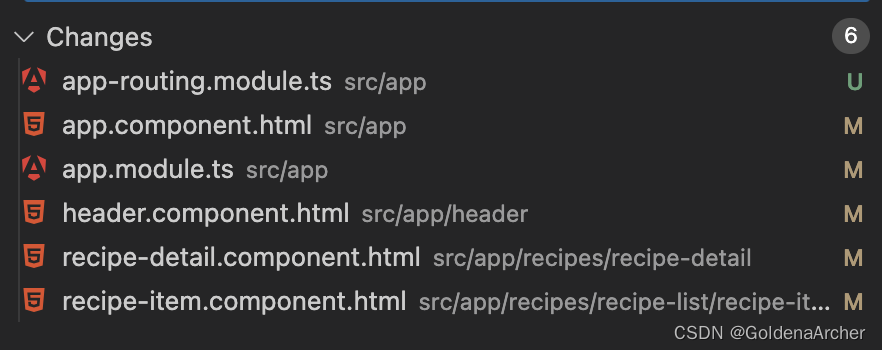
其中:
- header
- recipe-details
- recipe-item
三个 HTML Template 修改的内容为删除 a 标签中的 href 属性,并添加 style="cursor: pointer" 维持原本的样式,这里不多赘述
其他修改如下:
app-routing
const appRoutes: Routes = [
  { path: '', redirectTo: '/recipes', pathMatch: 'full' },
  { path: 'recipes', component: RecipesComponent },
  { path: 'shopping-list', component: ShoppingListComponent },
];

@NgModule({
  imports: [RouterModule.forRoot(appRoutes)],
  exports: [RouterModule],
})
export class AppRoutingModule {}
这里主要的修改在 routing 两篇笔记中都提过,最低层次的配置需求需要包含路径和对应的组件,
redirectTo中使用pathMatch因为 Angular 的路由是通过前缀匹配的,如果不添加这个属性,那么从首页登陆就会 infinite loop,从而报错app V 层
删除原本的
ngIf部分,替换为<router-outlet></router-outlet>app module
imports中新增AppRoutingModule
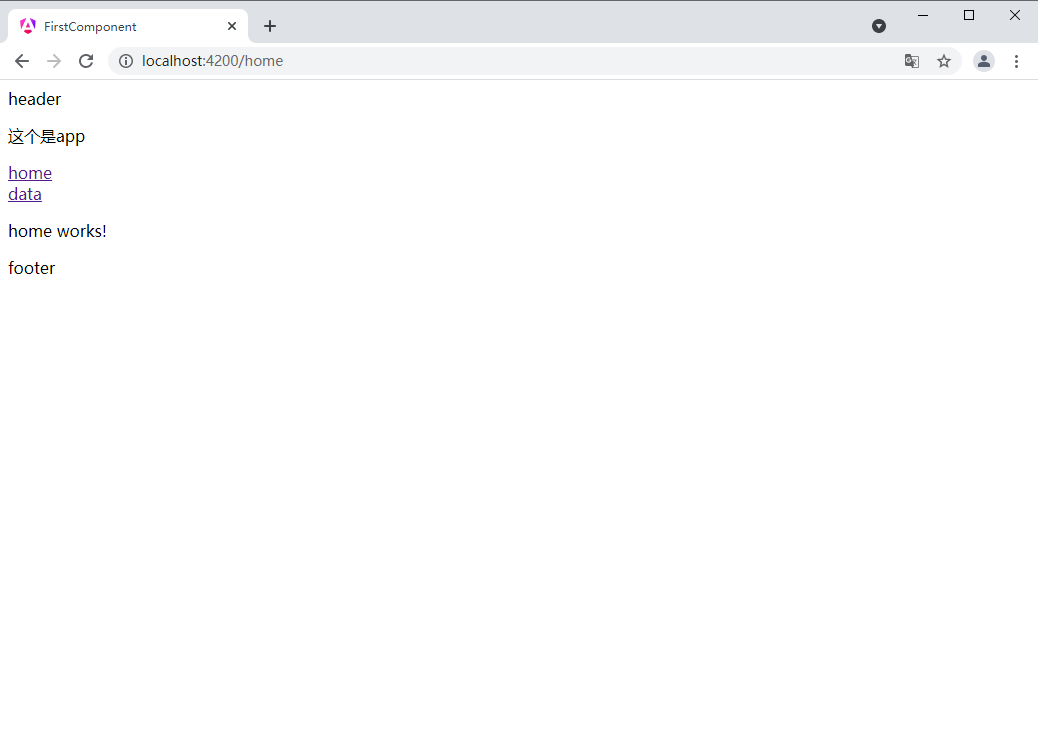
实现后效果如下:

添加子路由
设置如下:
const appRoutes: Routes = [
  {
    path: 'recipes',
    component: RecipesComponent,
    children: [
      { path: '', component: RecipeStartComponent },
      { path: 'new', component: RecipeEditComponent },
      { path: ':id', component: RecipeDetailComponent },
      { path: ':id/edit', component: RecipeEditComponent },
    ],
  },
];
实现后效果如下:

这里基本上没什么特别难的,唯一需要注意的就是 :id 和 new 的顺序。:id 也算是一个 wildcard,它会将所有的参数都默认为变量名为 id 的值,并且传到 Params 里去
修改获取 recipe
这里是 recipe details 的实现,修改如下:
export class RecipeDetailComponent implements OnInit {
  recipeId: string;
  activeRecipe: Recipe;

  constructor(
    private ingredientService: IngredientService,
    private recipeService: RecipeService,
    private activatedRouter: ActivatedRoute
  ) {}

  ngOnInit(): void {
    this.activatedRouter.params.subscribe((params: Params) => {
      this.recipeId = params.id;
      this.activeRecipe = this.recipeService.getRecipeById(this.recipeId);
    });
  }
}
service 中的实现就是返回 array 中的数据就是了,这里实现不多赘述
其他需要做的地方就是 recipe-list 中传值的 onSelect,以及对应的数据传输(@Input & @Output)
动态拼接路由
当前项目还是一个 dummy 项目,所以没法做到直接从 recipe 中获取 id,所以这里要做的就是从 ngFor 中将 index 传到下一个组件,并且在下一个组件中获取 id:
recipe list 修改:
<app-recipe-item
  *ngFor="let recipe of recipes; let i = index"
  [recipe]="recipe"
  [id]="i + 1"
></app-recipe-item>
recipe item 修改:
<a
  style="cursor: pointer"
  [routerLink]="[id]"
  routerLinkActive="active"
  class="list-group-item clearfix"
></a>
对应的 @Input 绑定就不实现了,这部分内容在 [Angular 基础] - 自定义事件 & 自定义属性 中;ngFor 的复习在 [Angular 基础] - 指令(directives)
此时的实现如下:

可以看到和之前的实现基本没有变化,除了 URL 路径的变动
edit recipe 实现
具体的功能会等到学完表单再实现,不过这里通过 ngOnInit 简单的判断一下当前页面是新建页面还是编辑页面:
@Component({
  selector: 'app-recipe-edit',
  templateUrl: './recipe-edit.component.html',
  styleUrl: './recipe-edit.component.css',
})
export class RecipeEditComponent implements OnInit {
  id: number;
  editMode = false;

  constructor(private route: ActivatedRoute) {}

  ngOnInit() {
    this.route.params.subscribe((params: Params) => {
      this.id = +params.id;
      this.editMode = isNaN(this.id);
    });
  }
}
这里的逻辑处理相对而言比较暴力,简单的说就是如果传进来的参数不是 new——有 new 走不进 :id——并且无法转成数字,那么就肯定不是编辑模式,这种情况下默认转为新建模式。
具体的逻辑处理可以写很细,这里只是大致实现一下
new 和 edit 的路由实现
这个部分比较简单,Angular 似乎对 routerLink 得绑定没什么限制,注意一下绝对路径/相对路径就能实现了:

⚠️:另一个实现方式是绑定 onclick handler,随后通过 this.router.navigate 进行实现。二者都可以,鉴于现在并没有什么复杂的逻辑需求,我就直接绑定 routerLink 了

![[<span style='color:red;'>Angular</span>] 笔记 19:<span style='color:red;'>路</span><span style='color:red;'>由</span>参数](https://img-blog.csdnimg.cn/direct/3a0ec47eb8d846639330f1877bdb22d4.png)

![[<span style='color:red;'>Angular</span> 基础] - routing <span style='color:red;'>路</span><span style='color:red;'>由</span>(下)](https://img-blog.csdnimg.cn/direct/bc5f89dee8f44b1d9b36faef464ab99b.png)