前言:
本篇重点介绍AE(Auto-Encoder) 自编码器。这是深度学习的一个核心模型.
自编码网络是一种基于无监督学习方法的生成类模型,自编码最大特征输出等于输入
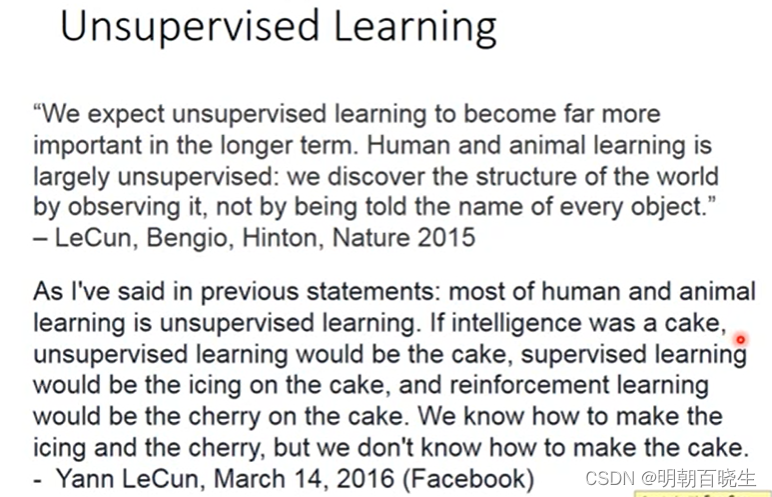
Yann LeCun&Bengio, Hinton 对无监督学习的看法.
目录:
AE 模型原理
De-noising auto-encoder
文字检索应用例子(Text Retrieval)
影像相似度比较例子 Similar Image Search
- CNN-AE
Pytorch 例子
堆叠自编码网络(Stacked Autoencoders)
一 AE模型原理
1.1 模型简介

AE 编码集主要由两个部分组成:
编码器(Encoder): 输入 向量 , 输出向量 O
解码器(Decoder): 输入向量 O, 输出向量
模型跟DNN 基本一致
1.2 损失函数
使用均方差作为损失函数
loss = mse_loss(,
)
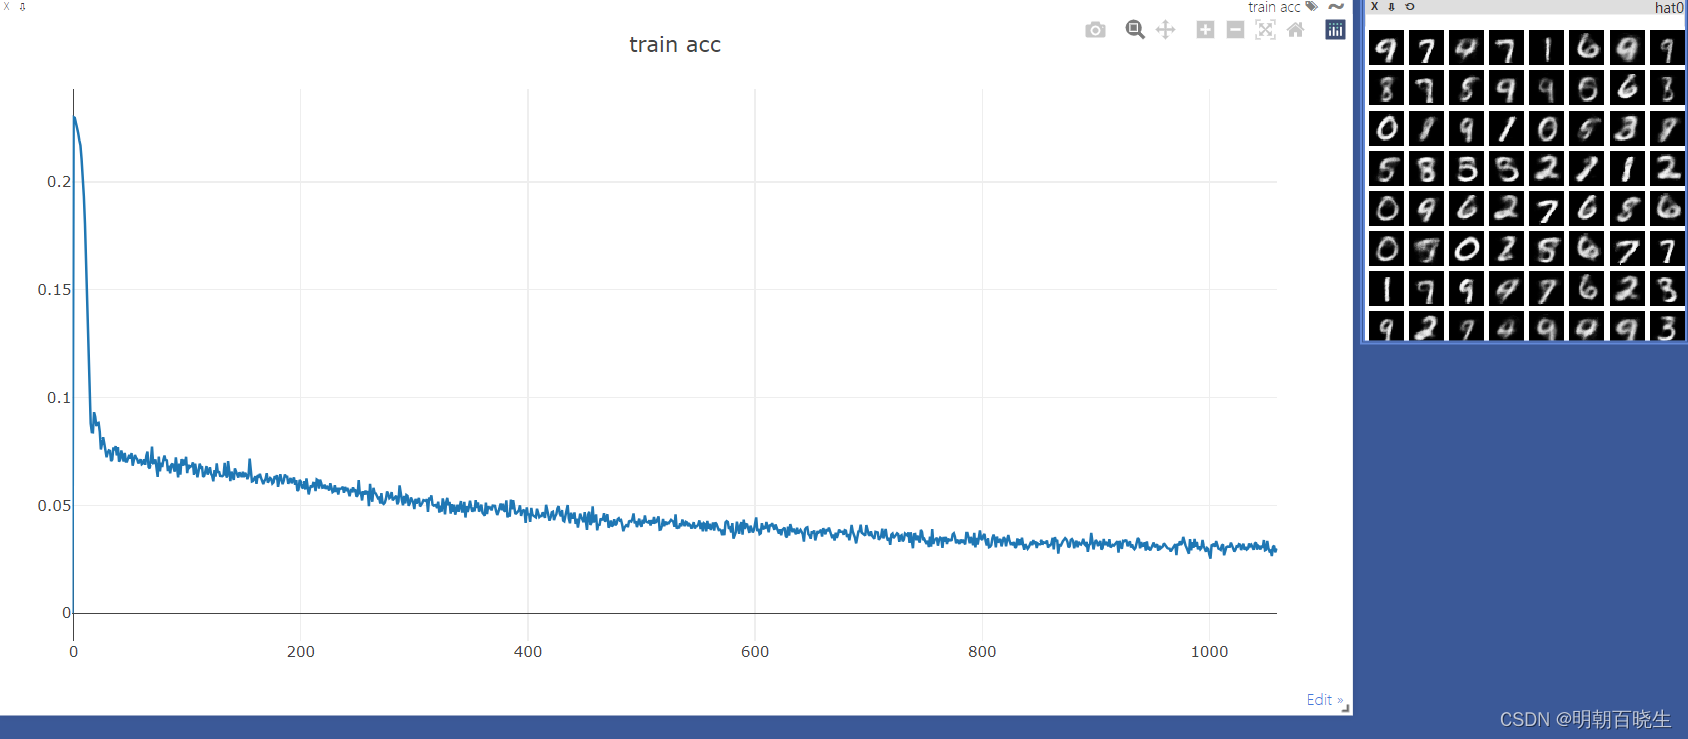
1.3 手写数字识别效果图
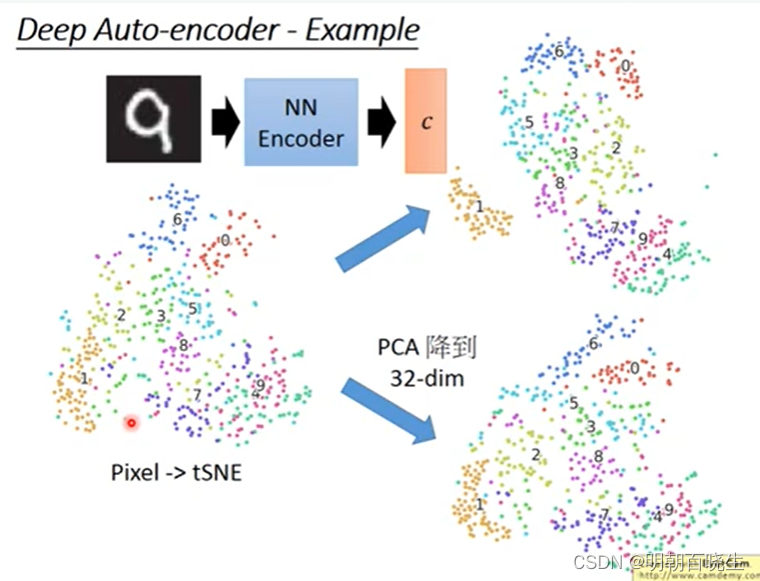
在手写数字识别中,相对t-SNE,PCA等模型,AE 有更好的效果.
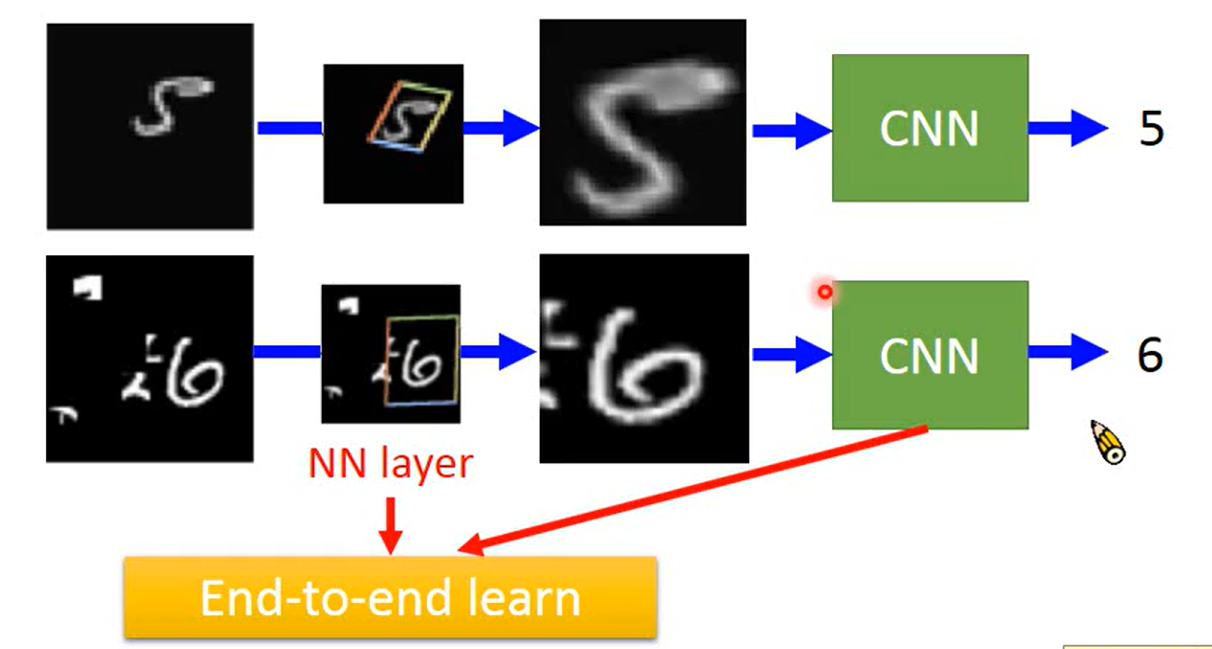
二 De-noising auto-encoder
Vincent在2008年的论文中提出了AutoEncoder的改良版——DAE
"Extracting and Composing Robust Features","提取,编码出具有鲁棒性的特征"
人类具有认知被阻挡的破损图像能力,此源于我们高等的联想记忆感受机能。
我们能以多种形式去记忆(比如图像、声音,甚至如上图的词根记忆法),所以即便是数据破损丢失,我们也能回想起来,所以在输入中即使加入了噪声也不会影响模型的性能,只会使得鲁棒性更强.
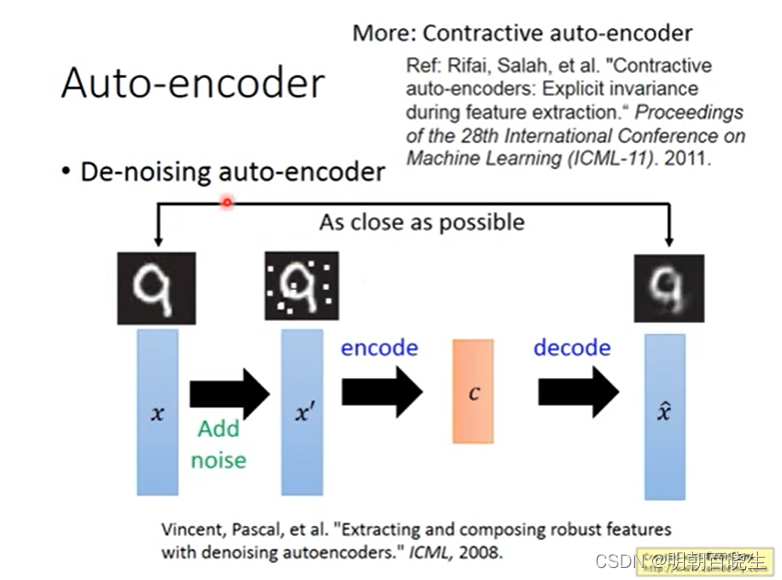
2.1 流程:
输入:
向量
step1: 增加噪声:
方案1:
以一定概率分布(通常使用二项分布)去擦除原始矩阵,即每个值都随机置0.
方案2:
以一定的概率(高斯分布)产生噪声n,针对输入向量x,得到
step2:
经过AE 编码器,重构出
2.2 损失函数
loss = mse_loss(,
)
三 文字检索应用例子(Text Retrieval)
3.1 传统方案
最初的Bag-of-words ,也叫做“词袋”,在信息检索中,Bag-of-words model假定对于一个文本,忽略其词序和语法,句法,将其仅仅看做是一个词集合,或者说是词的一个组合,文本中每个词的出现都是独立的,不依赖于其他词是否出现。
例子:
应用于文本的BoW简单实例
文章1 John likes to watch movies. Mary likes too.
文章2 John also likes to watch football games.
step1 建立词典
1 |
2 |
3 |
4 |
5 |
6 |
7 |
8 |
9 |
10 |
John |
likes |
to |
watch |
movies |
also |
football |
games |
mary |
too |
step2 文章词向量表示
文章1:向量a= [1, 2, 1, 1, 1, 0, 0, 0, 1, 1]
文章2:文章b = [1, 1, 1, 1, 0, 1, 1, 1, 0, 0]
step3 文章相似度
3.2 Auto-Encoder 方案

文章1: 先通过AE 编码器进行降维得到向量a
文章2: 先通过AE 编码器进行降维得到向量b
然后通过 a,b 计算向量之间的余弦相似度
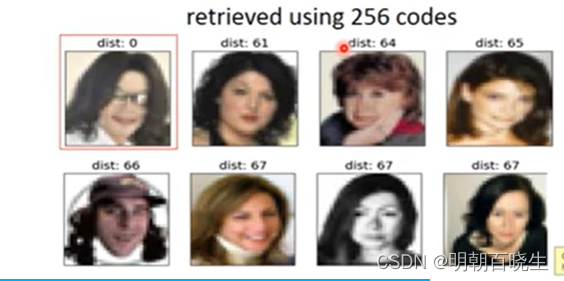
四 影像相似度比较例子 Similar Image Search
4.1 传统方案
传统的图像算法: 一般用 感知哈希算法(Perceptual Hash,PHash) 深度学习里面人脸识别算法,提取特征后然后算相似度

4.2 Auto-Encoder

step1: 通过AE 编码器对输入向量x 进行降维,得到code1,code2
step2: 计算code1,code2 之间的余弦相似度
五 CNN-AE
AE 编码器除了使用DNN模型外,还可以使用CNN 模型.如下图所示。
相对CNN 主要区别是两个模块:
Deconvolution 反卷积
Unpooling 反池化

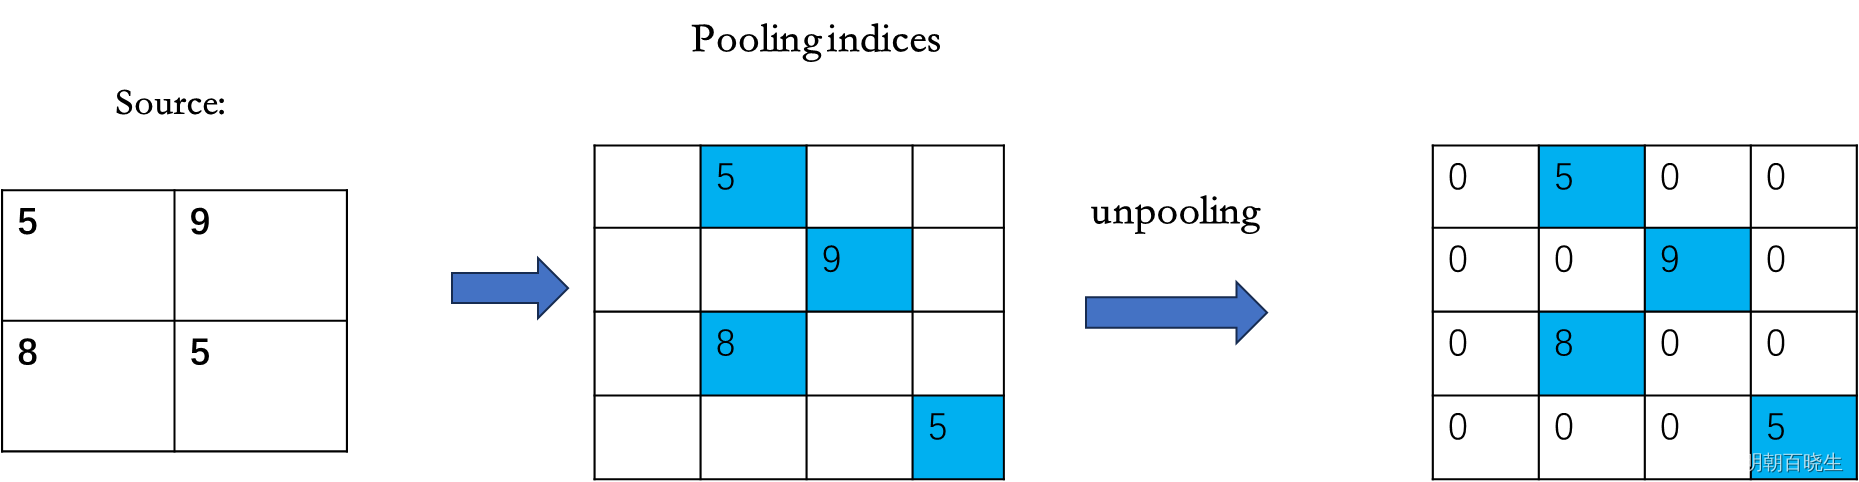
5.1 Unpooling 反池化
是MaxPooling 的反过程
MaxPooling:

Unpooling
5.2 Deconvolution 反卷积
卷积操作:
图像A 经过卷积核,得到特征图B
原图像尺寸为h ,卷积核 k, padding=p , stride =s ,
输出特征图尺寸:
反卷积:
已知特征图尺寸o, 使用相同的卷积核: k,p,s
输出原图像尺寸:
# -*- coding: utf-8 -*-
"""
Created on Tue Feb 20 14:18:59 2024

@author: chengxf2
"""

import torch


def conv2d():
    '''

·· 输入:
       batch_size,一个batch中样本的个数 3
       channels,通道数,RGB 图为3,灰度图为1
       height, 图片的高 5
       width_1, 图片的宽 5
    卷积核:
        channels,通道数,和上面保持一致,也就是当前层的深度 1
        output ,输出的深度 4【需要4个filter】
        kernel_size: 卷积核大小
        stride: 步长
        padding:填充系数
    '''

    x = torch.randn(3,1,24,24)
    conv = torch.nn.Conv2d(in_channels=1, out_channels=4, kernel_size=2, stride=2,padding=1)
    res = conv(x)

    print("\n 卷积输出",res.shape)
    return res

def  deConv(x):
     '''

      in_channels(int):输入张量的通道数
      out_channels(int):输出张量的通道数
      kernel_size(int or tuple):卷积核大小
      stride(int or tuple,optional):卷积步长,决定上采样的倍数
      padding(int or tuple, optional):对输入图像进行padding,输入图像尺寸增加2*padding
      output_padding(int or tuple, optional):对输出图像进行padding,输出图像尺寸增加padding
      groups:分组卷积(必须能够整除in_channels和out_channels)
      bias:是否加上偏置
      dilation:卷积核之间的采样距离(即空洞卷积)
      padding_mode(str):padding的类型
      另外,对于可以传入tuple的参数,tuple[0]是在height维度上,tuple[1]是在width维度上

    '''

     conv = torch.nn.ConvTranspose2d(in_channels=4, out_channels=1, kernel_size=2,stride=2,padding=1)
     out =conv(x)
     print("\n 反卷积 输出",out.shape)


if __name__ == "__main__":

    res = conv2d()
    deConv(res)
六 AE PyTorch 例子
两个模块
main.py
autoEncoder.py
5.1 autoEncoder.py
# -*- coding: utf-8 -*-
"""
Created on Tue Feb 20 14:44:21 2024

@author: chengxf2
"""

import torch
import torch.nn  as nn

class AE(nn.Module):

    def __init__(self):
        super(AE,self).__init__()
        #编码器
        self.encoder = nn.Sequential(nn.Linear(in_features=784, out_features=256),
                                     nn.ReLU(),
                                     nn.Linear(in_features=256, out_features=128),
                                     nn.ReLU(),
                                     nn.Linear(in_features=128, out_features=64),
                                     nn.ReLU(),
                                     nn.Linear(in_features=64, out_features=16),
                                     nn.ReLU()
                                     )
        #解码器
        self.decoder = nn.Sequential(nn.Linear(in_features=16, out_features=64),
                                     nn.ReLU(),
                                     nn.Linear(in_features=64, out_features=128),
                                     nn.ReLU(),
                                     nn.Linear(in_features=128, out_features=256),
                                     nn.ReLU(),
                                     nn.Linear(in_features=256, out_features=784),
                                     nn.Sigmoid()
                                     )

    def forward(self, x):
        batch, channel,width,height = x.shape

        x = x.view(-1, 28*28)
        #low dimensional vector
        a = self.encoder(x)
        #print("\n a.shape ",a.shape)

        hatX = self.decoder(a)

        hatX = hatX.view(batch,channel,width,height)

        return hatX
5.2 main.py
# -*- coding: utf-8 -*-
"""
Created on Tue Feb 20 15:01:54 2024

@author: chengxf2
"""


import torch
from torch.utils.data import DataLoader
from torchvision import transforms, datasets
import time
from torch import optim,nn
from autoEncoder  import AE
import visdom


def main():

   batchNum = 64
   lr = 1e-3
   epochs = 20
   device = torch.device("cuda:0" if torch.cuda.is_available() else "cpu")
   torch.manual_seed(1234)
   viz = visdom.Visdom()
   viz.line([0],[-1],win='train_loss',opts =dict(title='train acc'))


   tf= transforms.Compose([ transforms.ToTensor()])
   mnist_train = datasets.MNIST('mnist',True,transform= tf,download=True)
   train_data = DataLoader(mnist_train, batch_size=batchNum, shuffle=True)

   mnist_test = datasets.MNIST('mnist',False,transform= tf,download=True)
   test_data = DataLoader(mnist_test, batch_size=batchNum, shuffle=True)
   global_step =0


   model =AE().to(device)
   criteon = nn.MSELoss().to(device) #损失函数
   optimizer = optim.Adam(model.parameters(),lr=lr) #梯度更新规则

   print("\n ----main-----")
   for epoch in range(epochs):

       start = time.perf_counter()
       for step ,(x,y) in enumerate(train_data):
           #[b,1,28,28]
           x = x.to(device)
           #print("\n x shape",x.shape)
           x_hat = model(x)
           #print("\n xHat",x_hat.shape)
           loss = criteon(x_hat, x)

           #backprop
           optimizer.zero_grad()
           loss.backward()
           optimizer.step()
           viz.line(Y=[loss.item()],X=[global_step],win='train_loss',update='append')
           global_step +=1


       end = time.perf_counter()
       interval = end - start
       print("\n 每轮训练时间 :",int(interval))
       print(epoch, 'loss:',loss.item())

       x,target = iter(test_data).next()
       x = x.to(device)
       with torch.no_grad():
           x_hat = model(x)

       tip = 'hat'+str(epoch)
       #print(x[0])
       print("\n ----")
       #print(x_hat[0])
       #viz.images(x,nrow=8, win='x',opts=dict(title='x'))
       viz.images(x_hat,nrow=8, win='x_hat',opts=dict(title=tip))


if __name__ == '__main__':

    main()
六 Stacked Autoencoders
Bengio等人在2007年的 Greedy Layer-Wise Training of Deep Networks 中,
仿照stacked RBM构成的DBN,提出Stacked AutoEncoder.
堆叠式自编码器通过将多个自编码器连接在一起来构建一个深层的神经网络结构。每个自编码器的隐藏层都作为下一个自编码器的输入层,逐层堆叠在一起。这种堆叠的方式使得每个自编码器都可以学习到更高级别的数据特征表示。
堆叠式自编码器的训练过程分为两个阶段。
1,每个自编码器都被独立地训练以学习到数据的低维表示。
2 使用已训练好的自编码器来初始化下一个自编码器的编码器部分,然后再次进行训练,以学习到更高级别的特征表示。
这个过程可以重复多次,以构建更深层次的堆叠式自编码器.
建议看一下这个代码:AutoEncoder: 堆栈自动编码器 Stacked_AutoEncoder - 知乎
简答的说先训练出一个AE, 把该AE 的隐藏层作为下个AE 的输入,
反复迭代训练
参考:
16: Unsupervised Learning - Auto-encoder_哔哩哔哩_bilibili
浅析Bag-of-words及Bag-of-features原理_bag of words-CSDN博客
![【PyTorch][chapter <span style='color:red;'>14</span>][<span style='color:red;'>李</span><span style='color:red;'>宏</span><span style='color:red;'>毅</span><span style='color:red;'>深度</span><span style='color:red;'>学习</span>][Word Embedding]](https://img-blog.csdnimg.cn/direct/5d5a1acff154468da6daaf888c495130.png)


![[word] 如何使用Excel制作简单的流程图 #媒体#微信#学习方法](https://img-blog.csdnimg.cn/img_convert/8a2c04ada6330fdcb5c5b89617e29c3b.jpeg)