一、seamlessClone函数的用法
翻译
https://www.learnopencv.com/seamless-cloning-using-opencv-python-cpp/
def seamlessClone(src, dst, mask, p, flags, blend=None): # real signature unknown; restored from __doc__
    """
    seamlessClone(src, dst, mask, p, flags[, blend]) -> blend
    .   @brief Image editing tasks concern either global changes (color/intensity corrections, filters,
    .   deformations) or local changes concerned to a selection. Here we are interested in achieving local
    .   changes, ones that are restricted to a region manually selected (ROI), in a seamless and effortless
    .   manner. The extent of the changes ranges from slight distortions to complete replacement by novel
    .   content @cite PM03 .
    .
    .   @param src Input 8-bit 3-channel image.
    .   @param dst Input 8-bit 3-channel image.
    .   @param mask Input 8-bit 1 or 3-channel image.
    .   @param p Point in dst image where object is placed.
    .   @param blend Output image with the same size and type as dst.
    .   @param flags Cloning method that could be cv::NORMAL_CLONE, cv::MIXED_CLONE or cv::MONOCHROME_TRANSFER
    """
    pass
Python: cv.NORMAL_CLONE
将具有复杂轮廓的对象插入新背景,也就是说不保留dst 图像的texture细节,目标区域的梯度只由源图像决定。
Python: cv.MIXED_CLONE
基于宽松选择的混合无缝克隆,保留des图像的texture 细节。目标区域的梯度是由原图像和目的图像的组合计算出来(计算dominat gradient)。
Python: cv.MONOCHROME_TRANSFER
不保留src图像的颜色细节,只有src图像的质地,颜色和目标图像一样,可以用来进行皮肤质地填充
二、两张图像融合代码
import cv2
import numpy as np

# Read images : src image will be cloned into dst
im = cv2.imread("wolf_2.jpg")
obj= cv2.imread('wolf_1.jpg')

# Create an all white mask
mask = 255 * np.ones(obj.shape, obj.dtype)

# The location of the center of the src in the dst
width, height, channels = im.shape
center = (height/2, width/2)


# Seamlessly clone src into dst and put the results in output
normal_clone = cv2.seamlessClone(obj, im, mask, center, cv2.NORMAL_CLONE)
mixed_clone = cv2.seamlessClone(obj, im, mask, center, cv2.MIXED_CLONE)

# Write results
cv2.imwrite("opencv-normal-clone-example.jpg", normal_clone)
cv2.imwrite("opencv-mixed-clone-example.jpg", mixed_clone)
三、踩坑记录
错误1:
normal_clone = cv2.seamlessClone(obj, im, mask, center, cv2.NORMAL_CLONE)
cv2.error: OpenCV(4.7.0) :-1: error: (-5:Bad argument) in function 'seamlessClone'

error提示索引为1的参数类型错误,即center = (height/2, width/2)
通过打印发现center数据类型为float
改为center = (height//2, width//2)或者center = (int(height/2), int(width/2))
错误2:
error: (-215:Assertion failed) 0 <= roi.x && 0 <= roi.width && roi.x + roi.width <= m.cols && 0 <= roi.y && 0 <= roi.height && roi.y + roi.height <= m.rows in function 'cv::Mat::Mat'

图像的obj区域超过了im图像的尺寸,即roi.x + roi.width > m.cols && roi.y + roi.height > m.rows
解决办法:
判断obj区域尺寸是否在im图像内,调换两张图的融合顺序或者缩放到合适的尺寸
四、修改后完整代码
# 注意修改路径!
import cv2
import numpy as np
# Read images : src image will be cloned into dst
im = cv2.imread("wolf_1.jpg")
obj= cv2.imread('wolf_2.jpg')
#进行图片尺寸变更,obj的尺寸小于im尺寸
obj=cv2.resize(obj,(obj.shape[0]//4,obj.shape[1]//4),interpolation=cv2.INTER_LINEAR)
# Create an all white mask
mask = 255 * np.ones(obj.shape, obj.dtype)
# The location of the center of the src in the dst
width, height, channels = im.shape
#小图融合位置
center = (height//2, width//2)
# Seamlessly clone src into dst and put the results in output
normal_clone = cv2.seamlessClone(obj, im, mask, center, cv2.NORMAL_CLONE)
mixed_clone = cv2.seamlessClone(obj, im, mask, center, cv2.MIXED_CLONE)
# Write results
cv2.imwrite("opencv-normal-clone-example.jpg", normal_clone)
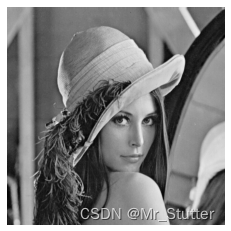
cv2.imwrite("opencv-mixed-clone-example.jpg", mixed_clone)五、图例

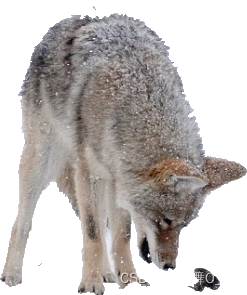
wolf_1.jpg wolf_2.jpg


opencv-mixed-clone-example.jpg opencv-normal-clone-example.jpg
参考地址:
Opencv python: seamlessClone泊松融合 (我把Lena变成了彼岸花怪/(ㄒoㄒ)/~~)_opencv-python cv.seamlessclone-CSDN博客


![【洛谷 P8780】[蓝桥杯 2022 省 B] 刷题统计 题解(贪心算法+模拟+四则运算)](https://img-blog.csdnimg.cn/direct/84fee96765994b4fbca0ff4f054b93f5.png)