跟着尚硅谷学springboot3
0.配置application语法
表示复杂对象person
@Component
@ConfigurationProperties(prefix = "person")
public class Person {

    private String name;
    private Integer age;
    private Date birthday;
    private Child chlid;
    private List<Dog> dogs;
    private Map<String,Cat> cats;
}
public class Child {

    private String name;
    private Integer age;
    private Date birthday;
    private List<String> text;
}
public class Dog {

    private String name;
    private Integer age;
}
public class Cat {

    private String name;
    private Integer age;
}
properties写法
person.name=张三
person.age=18
person.birthday=2022/01/01 00:01:01
person.like=true
person.child.name=李四
person.child.age=18
person.child.birthday=2023/02/02 02:02:02
person.child.text[0]=aaa
person.child.text[1]=bbb
person.dogs[0].name=小红
person.dogs[0].age=3
person.dogs[1].name=小橙
person.dogs[1].age=5
person.cats.cat1.name=小绿//cat1是key
person.cats.cat1.age=2
person.cats.cat2.name=小蓝
person.cats.cat2.age=7
yml写法
person:
  name: 张三
  age: 18
  birthday: 2023/12/12 12:12:12
  like: true
  child:
    name: 李四
    age: 19
    birthday: 2023/01/01
#    text: ["aaa","bbb"]
    text:
      - aaa
      - bbb
  dogs:
    - name: 小黑
      age: 12
    - name: 小白
      age: 5
  cats:
#    cat1: {name: 小蓝,age: 2}
    cat1:
      name: 小蓝
      age: 2
    cat2:
      name: 小红
      age: 3
细节:
yml中birthDay推荐写成birth-day- 文本
‘张三 \n’ 单引号不会转义
"李四 \n"双引号会转义 - 大文本
|开头,大文本写在下层,保留文本格式,换行符正确显示
>开头,大文本写在下层,折叠换行符 - 多文档合并
使用---可以把多个yaml文档合并在一个文档中,每个文档区依然认为内容独立
1.web场景
1.1. 自动装配
- 整合web场景
 		<dependency>
            <groupId>org.springframework.boot</groupId>
            <artifactId>spring-boot-starter-web</artifactId>
        </dependency>
- 引入了
autoconfigure功能 @EnableAutoConfiguration注解使用@Import(AutoConfigurationImportSelector.class)批量导入组件- 加载
META-INF/spring/org.springframework.boot.autoconfigure.AutoConfiguration.imports
文件中配置的所有组件 - 所有配置如下:
org.springframework.boot.autoconfigure.web.client.RestClientAutoConfiguration
org.springframework.boot.autoconfigure.web.client.RestTemplateAutoConfiguration
org.springframework.boot.autoconfigure.web.embedded.EmbeddedWebServerFactoryCustomizerAutoConfiguration
# =======响应式web场景
org.springframework.boot.autoconfigure.web.reactive.HttpHandlerAutoConfiguration
org.springframework.boot.autoconfigure.web.reactive.ReactiveMultipartAutoConfiguration
org.springframework.boot.autoconfigure.web.reactive.ReactiveWebServerFactoryAutoConfiguration
org.springframework.boot.autoconfigure.web.reactive.WebFluxAutoConfiguration
org.springframework.boot.autoconfigure.web.reactive.WebSessionIdResolverAutoConfiguration
org.springframework.boot.autoconfigure.web.reactive.error.ErrorWebFluxAutoConfiguration
org.springframework.boot.autoconfigure.web.reactive.function.client.ClientHttpConnectorAutoConfiguration
org.springframework.boot.autoconfigure.web.reactive.function.client.WebClientAutoConfiguration
#=========
org.springframework.boot.autoconfigure.web.servlet.DispatcherServletAutoConfiguration
org.springframework.boot.autoconfigure.web.servlet.ServletWebServerFactoryAutoConfiguration
org.springframework.boot.autoconfigure.web.servlet.error.ErrorMvcAutoConfiguration
org.springframework.boot.autoconfigure.web.servlet.HttpEncodingAutoConfiguration
org.springframework.boot.autoconfigure.web.servlet.MultipartAutoConfiguration
org.springframework.boot.autoconfigure.web.servlet.WebMvcAutoConfiguration
org.springframework.boot.autoconfigure.websocket.reactive.WebSocketReactiveAutoConfiguration
org.springframework.boot.autoconfigure.websocket.servlet.WebSocketServletAutoConfiguration
org.springframework.boot.autoconfigure.websocket.servlet.WebSocketMessagingAutoConfiguration
org.springframework.boot.autoconfigure.webservices.WebServicesAutoConfiguration
org.springframework.boot.autoconfigure.webservices.client.WebServiceTemplateAutoConfiguration
- 绑定了配置文件的一堆配置项
- SpringMVC的所有配置
spring.mvc - Web场景通用配置
spring.web - 文件上传配置
spring.servlet.multipart - 服务器的配置
server:比如:编码方式
1.2.默认配置
默认配置:
- 包含了
ContentNegotiatingViewResolver和BeanNameViewResolver组件,方便视图解析 - 默认的静态资源处理机制: 静态资源放在
static文件夹下即可直接访问 - 自动注册了
Converter,GenericConverter,Formatter组件,适配常见的数据类型转换和格式化需求 - 支持
HttpMessageConverters可以方便返回json等数据类型 - 注册
MessageCodesResolver,方便国际化及错误消息处理 - 支持静态
index.html - 自动使用
ConfigurableWebBindinglnitializer,实现消息处理、数据绑定、类型转化等功能
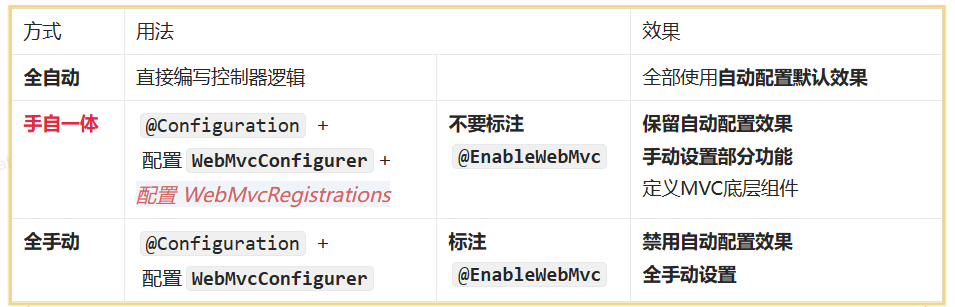
重要:
- 如果想保持boot mv的默认配置,并且自定义更多的mvc配置,如: interceptors,formatters,view controllers 等。可以使用
@Configuration注解添加一个WebMvcConfigurer类型的配置类并不要标注@EnableWebMvc(这个会使自动配置失效) - 如果想保持bootmvc的默认配置,但要自定义核心组件实例,比如:
RequestMappingHandlerMapping,RequestMappingHandlerAdapterExceptionHandlerExceptionResolver,给容器中放一个WebMvcRegistrations组件即 - 如果想全面接管Spring MVC,
@Configuration标注一个配置类,并加上@EnableWebMvc注解,实现WebMvcConfiqurer接口
2. 静态资源
2.0.WebMvcAutoConfiguration原理
2.0.1.生效条件
@AutoConfiguration(
    after = {
   DispatcherServletAutoConfiguration.class, TaskExecutionAutoConfiguration.class, ValidationAutoConfiguration.class}
)//在这些配置之后
@ConditionalOnWebApplication(
    type = Type.SERVLET
)//是web应用就生效,类型SERVLET
@ConditionalOnClass({
   Servlet.class, DispatcherServlet.class, WebMvcConfigurer.class})//有这些类生效
@ConditionalOnMissingBean({
   WebMvcConfigurationSupport.class})//没有bean生效,默认没有
@AutoConfigureOrder(-2147483638)
@ImportRuntimeHints({
   WebResourcesRuntimeHints.class})
public class WebMvcAutoConfiguration {
2.0.2.效果
1.放了两个Filter:
HiddenHttpMethodFilter;页面表单提交Rest请求(GET、POST、PUT、DELETE)FormContentFilter: 表单内容Fiter,GET (数据放URL后面)、POST (数据放请求体)请求可以携带数据,PUT、DELETE的请求体数据会被忽略
2.给容器中放了 webMvcConfigurer 组件;给SpringMVC添加各种定制功能
- 所有的功能会和配置文件绑定
- WebMvcProperties:
spring.mvc配置文件 - WebProperties:
spring.web配置文件
  @Configuration(
        proxyBeanMethods = false
    )
    @Import({
   WebMvcAutoConfiguration.EnableWebMvcConfiguration.class})
    @EnableConfigurationProperties({
   WebMvcProperties.class, WebProperties.class})
    @Order(0)
    public static class WebMvcAutoConfigurationAdapter implements WebMvcConfigurer, ServletContextAware {
2.0.3.WebMvcConfigurer接口
提供了配置SpringMVC底层的所有组件
public interface WebMvcConfigurer {

    default void configurePathMatch(PathMatchConfigurer configurer) {

    }//路径匹配

    default void configureContentNegotiation(ContentNegotiationConfigurer configurer) {

    }//内容协商

    default void configureAsyncSupport(AsyncSupportConfigurer configurer) {

    }//异步支持

    default void configureDefaultServletHandling(DefaultServletHandlerConfigurer configurer) {

    }//默认请求,默认接受:/

    default void addFormatters(FormatterRegistry registry) {

    }//格式化器

    default void addInterceptors(InterceptorRegistry registry) {

    }//拦截器

    default void addResourceHandlers(ResourceHandlerRegistry registry) {

    }//添加资源处理器:处理静态资源规则

    default void addCorsMappings(CorsRegistry registry) {

    }//跨域

    default void addViewControllers(ViewControllerRegistry registry) {

    }//视图控制器:

    default void configureViewResolvers(ViewResolverRegistry registry) {

    }//视图解析

    default void addArgumentResolvers(List<HandlerMethodArgumentResolver> resolvers) {

    }//参数解析器

    default void addReturnValueHandlers(List<HandlerMethodReturnValueHandler> handlers) {

    }//返回值处理器

    default void configureMessageConverters(List<HttpMessageConverter<?>> converters) {

    }//消息转换器

    default void extendMessageConverters(List<HttpMessageConverter<?>> converters) {

    }//扩展:消息转换

    default void configureHandlerExceptionResolvers(List<HandlerExceptionResolver> resolvers) {

    }//配置异常解析器

    default void extendHandlerExceptionResolvers(List<HandlerExceptionResolver> resolvers) {

    }//扩展:异常解析器

    @Nullable
    default Validator getValidator() {

        return null;
    }

    @Nullable
    default MessageCodesResolver getMessageCodesResolver() {

        return null;
    }
}
2.0.4.静态资源规则
public void addResourceHandlers(ResourceHandlerRegistry registry) {

            if (!this.resourceProperties.isAddMappings()) {

                logger.debug("Default resource handling disabled");
            } else {

                this.addResourceHandler(registry, this.mvcProperties.getWebjarsPathPattern(), "classpath:/META-INF/resources/webjars/");
                this.addResourceHandler(registry, this.mvcProperties.getStaticPathPattern(), (registration) -> {

                    registration.addResourceLocations(this.resourceProperties.getStaticLocations());
                    if (this.servletContext != null) {

                        ServletContextResource resource = new ServletContextResource(this.servletContext, "/");
                        registration.addResourceLocations(new Resource[]{
   resource});
                    }

                });
            }
        }
- 规则一: 访问:
/webjars/**路径就去classpath:/META-INF/resources/webjars/下找资源 - 规则二:访问:
/**路径就去静态资源默认的四个位置找资源
"classpath:/META-INF/resources/","classpath:/resources/","classpath:/static/","classpath:/public/"
- 规则三:静态资源默认都有缓存规则的设置
- 所有缓存的设置,直接通过配置文件:
spring.web - CachePeriod 缓存周期,多久不用找服务器要新的。默认没有,以S为单位
- CacheControl:http缓存
- UseLastModified:是否使用最后一次修改。配合HTTP Cache规则
 registration.setCachePeriod(this.getSeconds(this.resourceProperties.getCache().getPeriod()));
 registration.setCacheControl(this.resourceProperties.getCache().getCachecontrol().toHttpCacheControl());
 registration.setUseLastModified(this.resourceProperties.getCache().isUseLastModified());
4.EnableWebMvcConfiguration
//springBoot 给容器中放 webMvcConfigurationSupport 组件。
//我们如果自己放了 webMvcConfigurationSupport 组件,Boot的webMvcAutoConfiguration都会失效。
  @Configuration(
        proxyBeanMethods = false
    )
    @EnableConfigurationProperties({
   WebProperties.class})
    public static class EnableWebMvcConfiguration extends DelegatingWebMvcConfiguration implements ResourceLoaderAware {
2.0.5.为什们容器中放一个WebMvcConfigurer就能配置底层行为
- WebMvcAutoConfiguration 是一个自动配置类,它里面有一个
EnablewebMvcConfiguration EnableWebMvcConfiguration继承与DelegatingwebMvcConfiguration,这两个都生效DelegatingWebMvcConfiguration利用DI把容器中所有WebMvcConfigurer注入进来- 别人调用
DelegatingWebMvcConfiguration的方法配置底层规则,而它调用所有WebMvcConfigurer的配置底层方法。
2.1.默认规则
2.1.1.静态资源映射
静态资源映射规则在 WebMvcAutoConfiguration 中进行了定义:
/webjars/**的所有路径资源都在classpath:/META-INF/resources/webjars//**的所有路径资源都在classpath:/META-INF/resources/、classpath:/resources/、classpath:/static/、classpath:/public/- 所有静态资源都定义了缓存规则。[浏览器访问过一次,就会缓存一段时间],但此功能参数无默认值
a.period:缓存间隔。默认 0S;
b.cacheControl: 缓存控制。默认无:
c.useLastModified: 是否使用lastModified头。默认false;
2.1.2.静态资源缓存
如前面所述
1.所有静态资源都定义了缓存规则。[浏览器访问过一次,就会缓存一段时间],但此功能参数无默认值
a.period:缓存间隔。默认 OS
b.cacheControl: 缓存控制。 默认无
c.useLastModified: 是否使用lastModified头。 默认 false
2.1.3.欢迎页
欢迎页规则在WebMvcAutoConfiguration中进行了定义:
1.在静态资源目录下找index.html
2.没有就在templates下找index模板页
2.1.4.Favicon
在静态资源目录下找favicon.ico
2.1.5.缓存实验
#1、spring.web;
#1.配置国际化的区域信息
#2.静态资源策略(开启、处理链、缓存)
#开启静态资源映射规则
spring.web.resources.add-mappings=true
#设置缓存
#spring.web.resources.cache.period=3600
##缓存详细合并项控制,覆盖period配置:
## 浏览器第一次请求服务器,服务器告诉浏览器此资源缓存7200秒,7200秒以内的所有此资源访问不用发给服务器请求,7200秒以后发请求给服务器
spring.web.resources.cache.cachecontrol.max-age=7200
#使用资源 last-modified 时间,来对比服务器和浏览器的资源是否相同没有变化。相同返回 304
spring.web.resources.cache.use-last-modified=true
2.2.自定义静态资源规则
2.2.1.配置方式
spring.mvc :静态资源访问前缀路径
spring.web
- 静态资源目录
- 静态资源缓存策略
2.2.2.代码方式
容器中只要有一个 WebMvcConfigurer 组件。配置的底层行为都会生效。
@EnableWebMvc 禁用boot的默认配置
@Configuration
public class MyConfig implements WebMvcConfigurer {

    //静态资源
    @Override
    public void addResourceHandlers(ResourceHandlerRegistry registry) {

        //保留
        WebMvcConfigurer.super.addResourceHandlers(registry);
        //自己配置规则
        registry.addResourceHandler("/static/**")
                .addResourceLocations("classpath:/a/","classpath:/b/")
                .setCacheControl(CacheControl.maxAge(7200, TimeUnit.SECONDS));
    }
}
3.路径匹配
Spring5.3之后加入了更多的请求路径匹配的实现策略;
以前只支持 AntPathMatcher 策略,现在提供了 PathPatternParser策略。并且可以让我们指定到底使用那种策略。
3.1.Ant 风格路径用法
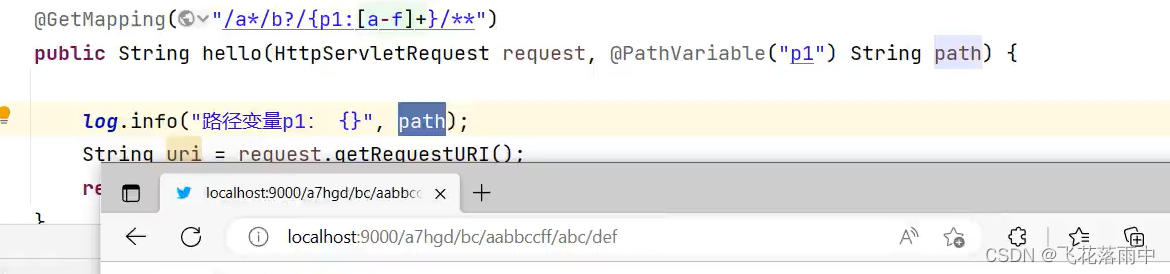
Ant风格的路径模式语法具有以下规则:
*表示任意数量的字符。?表示任意一个字符。**表示任意数量的目录。{}:表示一个命名的模式占位符[]表示字符集合,例如[a-z]表示小写字母。
例如:
*.html匹配任意名称,扩展名为.html的文件。/folder1/*/*java匹配在folder1目录下的任意两级目录下的.java文件。/folder2/**/*jsp匹配在folder2目录下任意目录深度的.jsp文件。/type]/id;.html匹配任意文件名为{id}.html,在任意命名的{type}目录下的文件。
注意:Ant风格的路径模式语法中的特殊字符需要转义,如:- 要匹配文件路径中的星号,则需要转义为
\\* - 要匹配文件路径中的问号,则需要转义为
\\?
3.2.模式切换
AntPathMatcher 与 PathPatternParser
PathPatternParser在jmh 基准测试下,有6~8 倍吞吐量提升,降低30%~40%空间分配率PathPatternParser兼容AntPathMatcher语法,并支持更多类型的路径模式PathPatternParser"**"多段匹配的支持仅允许在模式末尾使用
默认使用PathPatternParser
需要修改成ant风格
spring.mvc.pathmatch.matching-strategy=ant_path_matcher
4.内容协商
一套系统适配多端数据返回

4.1.多端内容适配
4.1.1. 默认规则
- SpringBoot 多端内容适配
- 1.1.基于请求头内容协商:(默认开启)
客户端向服务端发送请求,携带HTTP标准的Accept请求头
1.1.1.Accept:application/json、text/xml、text/yaml
1.1.2.服务端根据客户端请求头期望的数据类型进行动态返回 - 1.2.基于请求参数内容协商:(需要开启)
1.2.1.发送请求GET /projects/spring-boot?format=json
1.2.2.配到@GetMapping("/projects/spring-boot")
1.2.3.根据参数协商,优先返回json类型数据[需要开启参数匹配设置]
1.2.4.发送请求GET /projects/spring-boot?format=xml,优先返回xml类型数据
4.1.2.效果演示(返回json和xml)
请求同一个接口,可以返回json和xml不同格式数据(@RestController默认返回json)
- 引入支持xml内容依赖
<dependency>
	<groupId>com.fasterxml.jackson.dataformat</groupId>
	<artifactId>jackson-dataformat-xml</artifactId>
</dependency>
- 注解
@JacksonXmIRootElement //可以写出为xml文档 - 开启基于请求参数的内容协商
#开启基于请求参数的协商功能,默认名format
spring.mvc.contentnegotiation.favor-parameter=true
#设置请求参数名,默认名format
spring.mvc.contentnegotiation.parameter-name=type
4.2.自定义内容返回
4.2.1.增加yaml返回支持
- 导入依赖
		<dependency>
           <groupId>com.fasterxml.jackson.dataformat</groupId>
           <artifactId>jackson-dataformat-yaml</artifactId>
       </dependency>
- 编写配置
#新增一种媒体类型
spring.mvc.contentnegotiation.media-types.yaml=text/yaml
- 使用方法
    @Test
    void test() throws JsonProcessingException {

        Person person = new Person();
        person.setName("张三");
        person.setAge(18);
        YAMLFactory yamlFactory = new YAMLFactory().disable(YAMLGenerator.Feature.WRITE_DOC_START_MARKER);
        ObjectMapper mapper = new ObjectMapper(yamlFactory);
        String s = mapper.writeValueAsString(person);
        System.out.println(s);
    }
- 增加
HttpMessageConverter组件,专门负责把对象写出为yaml格式- 重写
WebMvcConfigurer接口中的extendMessageConverters方法
@Override //配置一个能把对象转为yaml的messageConverter
public void extendMessageConverters(List<HttpMessageConverter<?>> converters) {

    WebMvcConfigurer.super.extendMessageConverters(converters);
    converters.add(new MyYamlHttpMessageConverter());
}
自定义我的HttpMessageConverter
public class MyYamlHttpMessageConverter extends AbstractHttpMessageConverter<Object>{ private ObjectMapper mapper = null; public MyYamlHttpMessageConverter() { //告诉SpringBoot这个MessageConverter支持哪种媒体类型 super(new MediaType("text", "yaml", Charset.forName("UTF-8"))); YAMLFactory yamlFactory = new YAMLFactory().disable(YAMLGenerator.Feature.WRITE_DOC_START_MARKER); this.mapper = new ObjectMapper(yamlFactory); } @Override protected boolean supports(Class<?> clazz) { //只要是对象类型就支持 return true; } @Override //@RequestBody protected Object readInternal(Class<?> clazz, HttpInputMessage inputMessage) throws IOException, HttpMessageNotReadableException { return null; } @Override//@ResponseBody 把对象写出去 protected void writeInternal(Object methodReturnValue, HttpOutputMessage outputMessage) throws IOException, HttpMessageNotWritableException { //try-with 自动关流 try (OutputStream outputStream = outputMessage.getBody()){ this.mapper.writeValue(outputStream,methodReturnValue); } } } - 重写
4.2.2.如何增加其他
- 配置媒体类型支持:
spring.mvc.contentnegotiation.media-types.yaml=text/yaml - 编写对应的HttpMessageConverter,自定义
- 把HttpMessageConverter加入到底层,重写
WebMvcConfigurer接口中的extendMessageConverters方法
4.3.内容协商原理-HttpMessageConverter
HttpMessageConverter 怎么工作?何时工作?
定制 HttpMessageConverter来实现多端内容协商
编写 WebMvcConfigurer 提供的 configureMessageConverters 底层,修改底层的MessageCohverter
4.3.1.@ResponseBody 由 HttpMessageConverter 处理
标注了@ResponseBody 的返回值将会由支持它的HttpMessageConverter写给浏览器
- 如果controller方法的返回值标注了@ResponseBody注解
a.请求进来先来到
DispatcherServlet的doDispatch()进行处理b.找到一个
HandlerAdapter适配器。利用适配器执行目标方法c.
RequestMappingHandlerAdapter来执行,调用invokeHandlerMethod()来执行目标方法d.目标方法执行之前,准备好两个东西
  1.HandlerMethodArgumentResolver:参数解析器,确定目标方法每个参数值
  2.HandlerMethodReturnValueHandler: 返回值处理器,确定目标方法的返回值该怎么处理
e.
RequestMappingHandlerAdapter里面的invokeAndHandle()真正执行目标方法f.目标方法执行完成,会返回返回值对象
g.找到一个合适的返回值处理器
HandlerMethodReturnValueHandlerh.最终找到
RequestResponseBodyMethodProcessor能处理标注了@ResponseBody注解的方法- i.RequestResponseBodyMethodProcessor调用writewithMessageConverters利用MessageConverter把返回值写出去
HttpMessageConverter会先进行内容协商
遍历所有的
MessageConverter看谁支持这种内容类型的数据默认 MessageConverter 有以下:

最终因为要
json所以MappingJackson2HttpMessageConverter支持写出jsonjackson用
0bjectMapper把对象写出去
4.3.2.WebMvcAutoConfiguration 提供几种默认 HttpMessagonverters
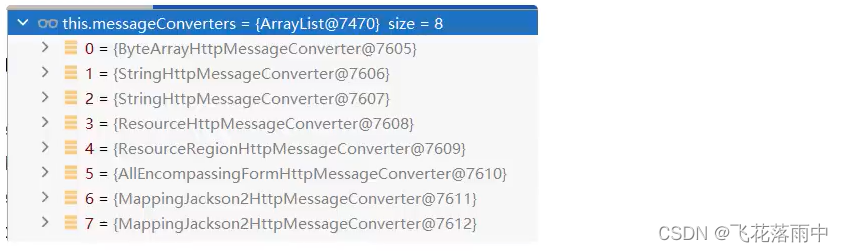
EnableWebMvcConfiguration通过addDefaultHttpMessageConverters添加了默认的MessageConv erter;如下:ByteArrayHttpMessageConverter: 支持字节数据读写StringHttpMessageConverter:支持字符串读写ResourceHttpMessageConverter:支持资源读写ResourceRegionHttpMessageConverter:支持分区资源写出AllEncompassingFormHttpMessageConverter:支持表单xml/json读写MappingJackson2HttpMessageConverter:支持请求响应体Json读写
默认8个:
系统提供默认的MessageConverter功能有限,仅用于json或者普通返回数据。额外增加新的内容协商功能,必须增加新的HttpMessageConverter
4.4.WebMvcConfigurationSupport
提供了很多的默认设置
判断系统中是否有相应的类: 如果有,就加入相应的HttpMessageConverter
 static {

        ClassLoader classLoader = WebMvcConfigurationSupport.class.getClassLoader();
        romePresent = ClassUtils.isPresent("com.rometools.rome.feed.WireFeed", classLoader);
        jaxb2Present = ClassUtils.isPresent("jakarta.xml.bind.Binder", classLoader);
        jackson2Present = ClassUtils.isPresent("com.fasterxml.jackson.databind.ObjectMapper", classLoader) && ClassUtils.isPresent("com.fasterxml.jackson.core.JsonGenerator", classLoader);
        jackson2XmlPresent = ClassUtils.isPresent("com.fasterxml.jackson.dataformat.xml.XmlMapper", classLoader);
        jackson2SmilePresent = ClassUtils.isPresent("com.fasterxml.jackson.dataformat.smile.SmileFactory", classLoader);
        jackson2CborPresent = ClassUtils.isPresent("com.fasterxml.jackson.dataformat.cbor.CBORFactory", classLoader);
        gsonPresent = ClassUtils.isPresent("com.google.gson.Gson", classLoader);
        jsonbPresent = ClassUtils.isPresent("jakarta.json.bind.Jsonb", classLoader);
        kotlinSerializationCborPresent = ClassUtils.isPresent("kotlinx.serialization.cbor.Cbor", classLoader);
        kotlinSerializationJsonPresent = ClassUtils.isPresent("kotlinx.serialization.json.Json", classLoader);
        kotlinSerializationProtobufPresent = ClassUtils.isPresent("kotlinx.serialization.protobuf.ProtoBuf", classLoader);
    }
5.模版引擎
- 由于SpringBoot 使用了嵌入式Servlet容器。所以JSP 默认是不能使用的。
- 如果需要服务端页面渲染,优先考虑使用
模板引擎
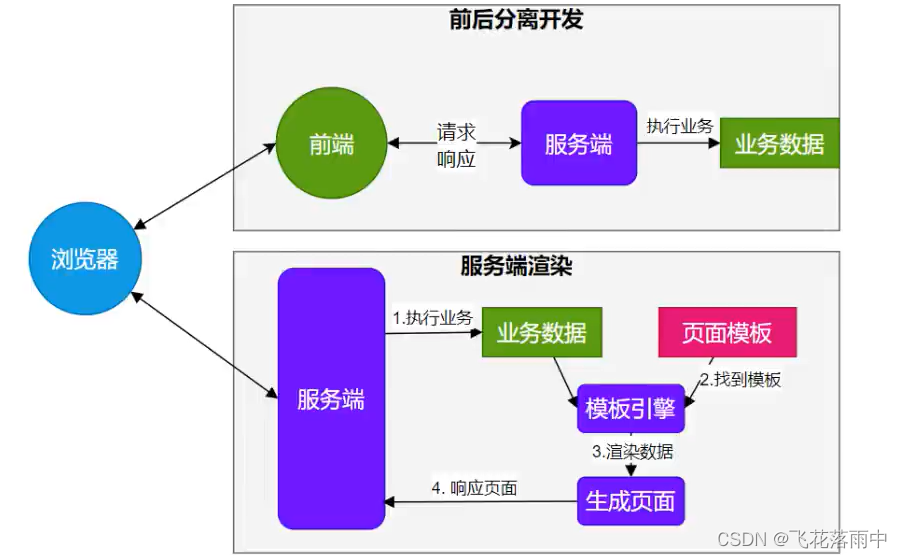
模板引擎页面默认放在src/main/resources/templates
SpringBoot包含以下模板引擎的自动配置 - FreeMarker
- Groovy
- Thymeleaf
- Mustache
Thymeleaf官网
<!DOCTYPE html>

<html xmlns:th="http://www.thymeleaf.org">

  <head>
    <title>Good Thymes Virtual Grocery</title>
    <meta http-equiv="Content-Type" content="text/html; charset=UTF-8" />
    <link rel="stylesheet" type="text/css" media="all"
          href="../../css/gtvg.css" th:href="@{/css/gtvg.css}" />
  </head>

  <body>

    <p th:text="#{home.welcome}">Welcome to our grocery store!</p>

  </body>

</html>
5.1Thymeleaf整合
<dependency>
    <groupId>org.springframework.boot</groupId>
    <artifactId>spring-boot-starter-thymeleaf</artifactId>
</dependency>
自动配置原理
- 开启了
org.springframework.boot.autoconfigure.thymeleaf.ThymeleafAutoConfiguration自动配置 - 属性绑定在
ThymeleafProperties中,对应配置文件spring.thymeleaf内容 - 所有的模板页面默认在
classpath:/templates文件夹下 - 默认效果
a.所有的模板页面在classpath:/templates/下面找
b.找后缀名为.html的页面
使用示例
//@RestController //前后端分离
@Controller //适配 服务端渲染 前后端不分离模式
public class WelcomeController {

    @GetMapping("/well")
    public String  hello(@RequestParam("name")String name, Model model){

        //模板的逻辑视图名
        //物理视图 = 前缀 + 逻辑视图名 + 后缀
        //真实地址 = classpath:/templates/welcome.html
        //把需要给页面共享的数据放在model中
        model.addAttribute("msg",name);
        return "welcome";
    }
}
<!DOCTYPE html>
<html lang="en">
<head>
    <meta charset="UTF-8">
    <title>Title</title>
</head>
<body>
<h1>哈哈:<span th:text="${msg}"></span></h1>
</body>
</html>
5.2 Thymeleaf基础语法
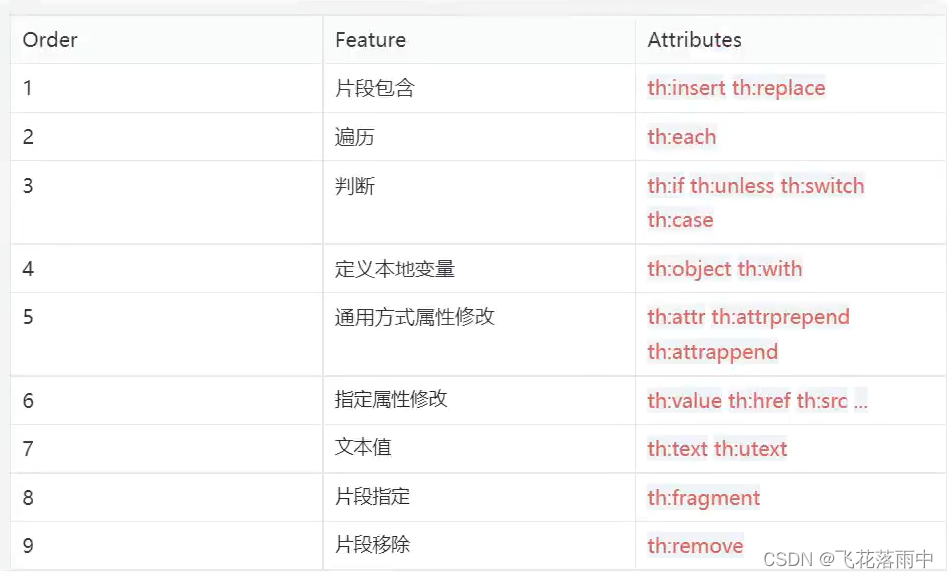
5.2.1 核心用法
th:xxx 动态渲染指定的 html 标属性值、或者th指令 (遍历、判断等)
th:text: 标签体内文本值渲染th:utext:不会转义,显示为html原本的样子
th:属性:标签指定属性染th:attr:标签任意属性渲染th:ifth:each ...: 其他th指令- 例如:
<p th:text="${content}">原内容</p>
<a th:href="${url]">登录</a>
<img src="../../images/gtvglogo.png"
th:attr="src=@{
   /images/gtvglogo.png},title=#{
   logo},alt=#{
   logo}”/>
表达式:用来动态取值
${}:变量取值;使用model共享给页面的值都直接用${}@{}:url 路径#{}:国际化消息~{}:片段引用*{}:变量选择:需要配合th:object绑定对象
系统工具&内置对象
param:请求参数对象session: session对象application:application对象#execInfo:模板执行信息#messages:国际化消息#uris: uri/url工具#conversions:类型转换工具#dates:日期工具,是java.uti.Date对象的工具类#calendars:#dates:类似,只不过是java.util.Calendar对象的工具类#temporals:JDK8+java.timeAPI工具类#numbers:数字操作工具#strings:字符串操作#objects:对象操作#bools: bool操作#arrays:array工具#lists: list工具#sets: set工具#maps:map工具#aggregates:集合聚合工具(sum、avg)#ids:id生成工具
5.2.2 语法示例
表达式:
- 变量取值:
${} - url 取值:
@{} - 国际化消息:
#{...} - 变量选择:
*{...} - 片段引用:~{…}
文本操作:
- 拼串:
+ - 文本拼接:
| The name is ${name} |
布尔操作:
- 二进制运算:
and ,or - 取反 :
! , not
比较运算:
- 比较:
>,<,>=,<=(gt,lt,ge,le) - 等值运算 :
==,!=(eq,ne)
条件运算:
- if-then:
(if)?(then) - if-then-else:
(if)?(then):(else) - default:
(value)?:(defaultValue)
5.3 属性设置
1.th:herf="@{/product/list}"
2.th:attr="class=${active}"
3.th:attr="src=@{/image/1.png},title=${logo},alt=#{logo}
4.th:checked="${user.active}"
5.4遍历
语法:th:each="元素名,迭代状态:${集合}"
<tr th:each="prod : ${prods}">
	<td th:text="${prod.nane}">Onions</td>
	<td th;text="${prod.price}">2.41</td>
	<td th:text="${prod.instock}? #{true} : #{false}">yes</td>
</tr>
<tr th:each="prod,iterstat : ${prods}" th:class="${iterstat.odd}? 'odd'">
	<td th:text="${prod.name]">Onions</td>
	<td th:text="sprod.pricel">2.41</td>
	<td th:text="${prod.instock}? #{true} : #{false}">yes</td>
</tr>
iterStat 有以下属性
- index:当前遍历元素的索引,从0开始。
- cqunt:当前遍历元素的索引,从1开始
- size:需要遍历元素的总数量
- current:当前正在遍历的元素对象
- even/odd:是否偶数/奇数行
- first:是否第一个元素
- last:是否最后一个元素
使用示例
@JacksonXmlRootElement //可以写成为xml文档
@Data
@NoArgsConstructor
@AllArgsConstructor
public class People {

    private Long id;
    private String userName;
    private String email;
    private Integer age;
    private String role;
}
@Controller //适配 服务端渲染 前后端不分离模式
public class WelcomeController {

   @GetMapping("/list")
    public String  list(Model model){

        List<People> peoples = Arrays.asList(new People(1L,"张三1","1@qq.com",1,"pm"),
                new People(2L,"张三2","2@qq.com",2,"admin"),
                new People(3L,"张三3","3@qq.com",3,"hr")
        );
        model.addAttribute("peoples",peoples);

        return "list";
    }
}
list.html bootstrap文档
<!DOCTYPE html>
<html lang="en" xmlns:th="http://www.thymeleaf.org">
<head>
    <meta charset="UTF-8">
    <title>列表</title>
    <link href="https://cdn.jsdelivr.net/npm/bootstrap@5.3.0-alpha1/dist/css/bootstrap.min.css" rel="stylesheet" integrity="sha384-GLhlTQ8iRABdZLl6O3oVMWSktQOp6b7In1Zl3/Jr59b6EGGoI1aFkw7cmDA6j6gD" crossorigin="anonymous">
</head>
<body>
<table class="table">
    <thead>
    <tr>
        <th scope="col">ID</th>
        <th scope="col">名字</th>
        <th scope="col">邮箱</th>
        <th scope="col">年龄</th>
        <th scope="col">角色</th>
        <th scope="col">状态信息</th>
    </tr>
    </thead>
    <tbody>


    <tr th:each="people,state:${peoples}">
        <th scope="row" th:text="${people.id}">1</th>
        <td th:text="${people.userName}">Mark</td>
        <td >[[${people.email}]]</td>
        <td >[[${people.age}]]</td>
        <td th:text="${people.role}">Mark</td>
        <td>
            index:[[${state.index}]] <br/>
            count:[[${state.count}]] <br/>
            size:[[${state.size}]] <br/>
            current:[[${state.current}]] <br/>
            event(true)/odd(false):[[${state.even}]] <br/>
        </td>

    </tr>

    </tbody>
</table>
<script src="https://cdn.jsdelivr.net/npm/bootstrap@5.3.0-alpha1/dist/js/bootstrap.bundle.min.js" integrity="sha384-/mhDoLbDldZc3qpsJHpLogda//BVZbgYuw6kof4u2FrCedxOtgRZDTHgHUhOCVim" crossorigin="anonymous"></script>
</body>
</html>
5.5判断
th:if th:switch
<td th:if="${#strings.isEmpty(people.email)}" th:text="'联系我'"></td>
        <td th:if="${not #strings.isEmpty(people.email)}" th:text="${people.email}"></td>
        <td th:if="${people.age}>2" th:text="|${people.age} /满月了|"></td>
        <td th:if="${people.age}<=2" th:text="|${people.age} /没满月|"></td>
        <td th:switch="${people.role}">
            <button th:case="'admin'" type="button" class="btn btn-primary">管理员</button>
            <button th:case="'pm'" type="button" class="btn btn-secondary">经理</button>
            <button th:case="'hr'" type="button" class="btn btn-success">人事</button>
        </td>
5.6属性优先级
5.7 行内写法
 <td >[[${people.email}]]</td>
        <td >[[${people.age}]]</td>
        <td th:text="${people.role}">Mark</td>
        <td>
            index:[[${state.index}]] <br/>
            count:[[${state.count}]] <br/>
            size:[[${state.size}]] <br/>
            current:[[${state.current}]] <br/>
            event(true)/odd(false):[[${state.even}]] <br/>
        </td>
5.8 变量选择
*{}:变量选择:需要配合th:object绑定对象
<div th:object="${session.user}">
<p>Name:<span th:text="*{firstName}">Sebastian</span>.</p>
<p>Surname: <span th:text="*{lastilame}">Pepper</span>.</p>
<p>Nationality: <span th:text="*{nationality}">Saturn</span>.</p>
</div>
等同于
<div>
<p>Name: <span th:text="${session.user.firstName}">Sebastian</span>.</p>
<p>Surname: <span th:text="${session.user.lastName}">Pepper</span>.</p><p>Nationality: <span th:text="${session.user.nationality}">Saturn</span>.</p>
</div>
5.9 模板布局
- 定义模板:
th:fragment - 引用模板
~{templatename::selector} - 插入模板:
th:insert、th:replace
<div th:insert="~{templatename::selector}"></div>
<div th:replace="~{templatename::selector}"></div>
5.10devtools
		<dependency>
            <groupId>org.springframework.boot</groupId>
            <artifactId>spring-boot-devtools</artifactId>
        </dependency>
修改页面后 ctrl+F9刷新效果
注意:java代码的修改,如果 devtools 热启动了,可能会引起一些bug,难以排查
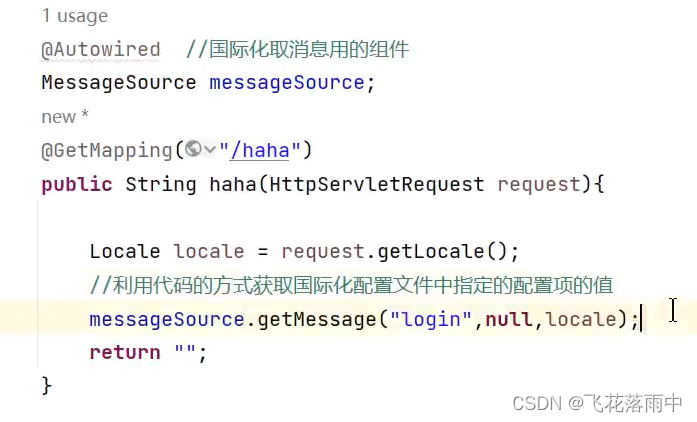
6.国际化
国际化的自动配置参照 MessageSourceAutoConfiguration
实现步骤:
- Spring Boot 在类路径根下查找
messages资源绑定文件。文件名为:messages.properties - 多语言可以定义多个消息文件,命名为
messages_区域代码.properties。如:
- messages.properties:默认
- messageszh CN.properties:中文环境
- messagesen US.properties :英语环境
- 在程序中可以自动注入
MessageSource组件,获取国际化的配置项值 - 在页面中可以使用表达式
#{}获取国际化的配置项值
代码获取国际化配置的值
7.错误处理
7.1 默认机制
错误处理的自动配置都在 ErrorMvcAutoConfiguration 中,两大核心机制:
- SpringBoot 会
自适应处理错误,响应页面或JSON数据 SpringMVC的错误处理机制依然保留,MVC处理不了,才会交给boot进行处理
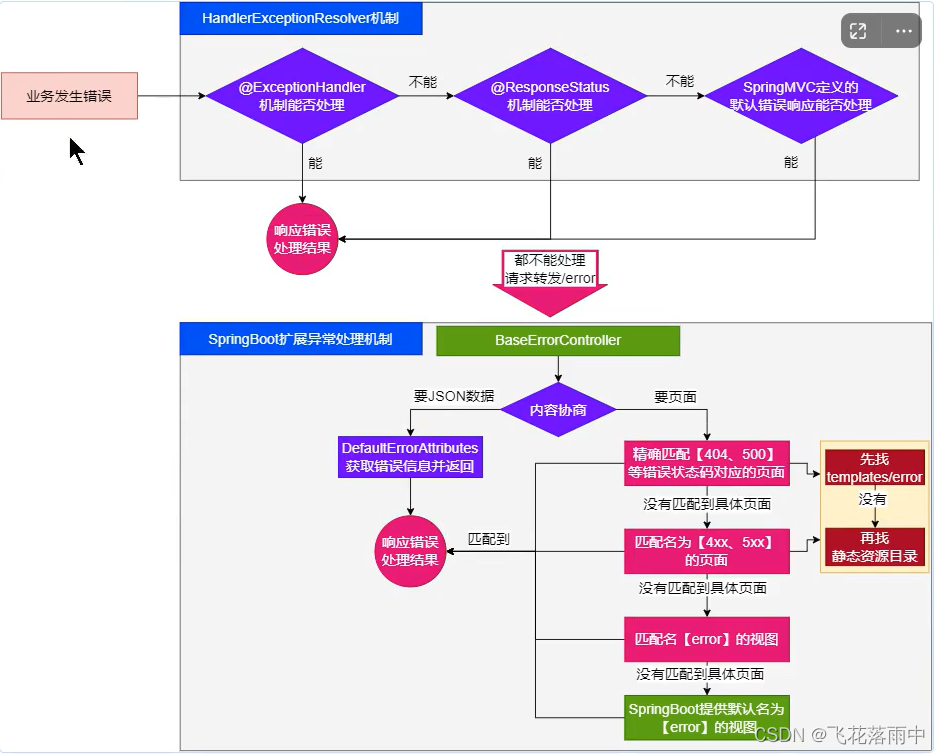
- 发生错误以后,转发给/error路径,SpringBoot在底层写好一个
BasicErrorController的组件,专门处理这个请求
   @RequestMapping(
        produces = {
   "text/html"}
    )
    public ModelAndView errorHtml(HttpServletRequest request, HttpServletResponse response) {

        HttpStatus status = this.getStatus(request);
        Map<String, Object> model = Collections.unmodifiableMap(this.getErrorAttributes(request, this.getErrorAttributeOptions(request, MediaType.TEXT_HTML)));
        response.setStatus(status.value());
        ModelAndView modelAndView = this.resolveErrorView(request, response, status, model);
        return modelAndView != null ? modelAndView : new ModelAndView("error", model);
    }

    @RequestMapping
    public ResponseEntity<Map<String, Object>> error(HttpServletRequest request) {

        HttpStatus status = this.getStatus(request);
        if (status == HttpStatus.NO_CONTENT) {

            return new ResponseEntity(status);
        } else {

            Map<String, Object> body = this.getErrorAttributes(request, this.getErrorAttributeOptions(request, MediaType.ALL));
            return new ResponseEntity(body, status);
        }
    }
- 错误页面解析
//1、解析自定义的错误的视图地址
  ModelAndView modelAndView = this.resolveErrorView(request, response, status, model);
  //2、如果解析不到错误页面的地址,默认的错误页就是 error
  return modelAndView != null ? modelAndView : new ModelAndView("error", model);
容器中专门有一个错误视图解析器
@Bean
        @ConditionalOnBean({
   DispatcherServlet.class})
        @ConditionalOnMissingBean({
   ErrorViewResolver.class})
        DefaultErrorViewResolver conventionErrorViewResolver() {

            return new DefaultErrorViewResolver(this.applicationContext, this.resources);
        }
SpringBoot解析自定义错误页的默认规则
 public ModelAndView resolveErrorView(HttpServletRequest request, HttpStatus status, Map<String, Object> model) {

        ModelAndView modelAndView = this.resolve(String.valueOf(status.value()), model);
        if (modelAndView == null && SERIES_VIEWS.containsKey(status.series())) {

            modelAndView = this.resolve((String)SERIES_VIEWS.get(status.series()), model);
        }

        return modelAndView;
    }

    private ModelAndView resolve(String viewName, Map<String, Object> model) {

        String errorViewName = "error/" + viewName;
        TemplateAvailabilityProvider provider = this.templateAvailabilityProviders.getProvider(errorViewName, this.applicationContext);
        return provider != null ? new ModelAndView(errorViewName, model) : this.resolveResource(errorViewName, model);
    }

    private ModelAndView resolveResource(String viewName, Map<String, Object> model) {

        String[] var3 = this.resources.getStaticLocations();
        int var4 = var3.length;

        for(int var5 = 0; var5 < var4; ++var5) {

            String location = var3[var5];

            try {

                Resource resource = this.applicationContext.getResource(location);
                resource = resource.createRelative(viewName + ".html");
                if (resource.exists()) {

                    return new ModelAndView(new DefaultErrorViewResolver.HtmlResourceView(resource), model);
                }
            } catch (Exception var8) {

            }
        }

        return null;
    }
容器中有一个默认的名为error的view,默认白页功能。
 @Bean(
            name = {
   "error"}
        )
        @ConditionalOnMissingBean(
            name = {
   "error"}
        )
        public View defaultErrorView() {

            return this.defaultErrorView;
        }
@Bean
    @ConditionalOnMissingBean(
        value = {
   ErrorAttributes.class},
        search = SearchStrategy.CURRENT
    )
public DefaultErrorAttributes errorAttributes() {

        return new DefaultErrorAttributes();
    }
规则:
- 解析一个错误页
- 如果发生了500、404、503、403 这些错误
- 如果有模板引擎,默认在
classpath:/templates/error/精确码.html - 如果没有模板引擎,在静态资源文件夹下找
精确码.html
- 如果有模板引擎,默认在
- 如果匹配不到
精确码.html些精确的错误页,就去找5xx.html、4xx.html,模糊匹配,- 如果有模板引擎,默认在
classpath:/templates/error/5xx.html - 如果没有模板引擎,在静态资源文件夹下找
5xx.html
- 如果有模板引擎,默认在
- 如果模板引擎路径 templates下有 error.html 页面,就直接渲染
7.2 自定义错误响应
- 自定义json响应
使用@ControllerAdvice + @ExceptionHandler进行统一异常处理 - 根据boot的错误页面规则,自定义页面模板
7.3 最佳实战
- 前后分离
- 后台发生的所有错误,
@ControllerAdvice + @ExceptionHandler进行统一异常处理
- 后台发生的所有错误,
- 服务端页面渲染
- 不可预知的一些,HTTP码表示的服务器或客户端错误
- 给
classpath:/templates/error/下面,放常用精确的错误码页面。500.html,404.html - 给
classpath:/templates/error/下面,放通用模糊匹配的错误码页面。5xx.html,4xx.html
- 给
- 发生业务错误
- 核心业务,每一种错误,都应该代码控制,跳转到自己定制的错误页
- 通用业务,
classpath:/templates/error.html页面,显示错误信息
- 不可预知的一些,HTTP码表示的服务器或客户端错误
8.嵌入式容器
Servlet容器:管理、运行Servlet组件 (Servlet、Filter、 Listener) 的环境,一般指服务器
8.1.自动配置原理
- SpringBoot 默认嵌入Tomcat作为Servlet容器
- 自动配类是
ServletWebServerFactoryAutoConfigurationEmbeddedWebServerFactoryCustomizerAutoConfiguration - 自动配置类开始分析功能。
xxxxAutoConfiguration
@AutoConfiguration(
    after = {
   SslAutoConfiguration.class}
)
@AutoConfigureOrder(-2147483648)
@ConditionalOnClass({
   ServletRequest.class})
@ConditionalOnWebApplication(
    type = Type.SERVLET
)
@EnableConfigurationProperties({
   ServerProperties.class})
@Import({
   ServletWebServerFactoryAutoConfiguration.BeanPostProcessorsRegistrar.class, EmbeddedTomcat.class, EmbeddedJetty.class, EmbeddedUndertow.class})
public class ServletWebServerFactoryAutoConfiguration {
原理:
ServletWebServerFactoryAutoConfiguration自动配置了嵌入式容器场景- 绑定了
ServerProperties配置类,所有和服务器有关的配置server ServletWebServerFactoryAutoConfiguration导入了嵌入式的三大服务器Tomcat、Jetty、Undertow- 导入 Tomcat、Jetty、 Undertow 都有条件注解。系统中有这个类才行(也就是导了包)
- 默认 Tomcat 配置生效。给容器中放
TomcatServletWebServerFactory
 @Configuration(
    proxyBeanMethods = false
)
@ConditionalOnClass({
     Servlet.class, Tomcat.class, UpgradeProtocol.class})
@ConditionalOnMissingBean(
    value = {
     ServletWebServerFactory.class},
    search = SearchStrategy.CURRENT
)
static class EmbeddedTomcat {

    EmbeddedTomcat() {

    }

    @Bean
    TomcatServletWebServerFactory tomcatServletWebServerFactory(ObjectProvider<TomcatConnectorCustomizer> connectorCustomizers, ObjectProvider<TomcatContextCustomizer> contextCustomizers, ObjectProvider<TomcatProtocolHandlerCustomizer<?>> protocolHandlerCustomizers) {

        TomcatServletWebServerFactory factory = new TomcatServletWebServerFactory();
        factory.getTomcatConnectorCustomizers().addAll(connectorCustomizers.orderedStream().toList());
        factory.getTomcatContextCustomizers().addAll(contextCustomizers.orderedStream().toList());
        factory.getTomcatProtocolHandlerCustomizers().addAll(protocolHandlerCustomizers.orderedStream().toList());
        return factory;
    }
}
- 都给容器中 ServletWebServerFactory 放了一个 web服务器工厂(造web服务器的)
- web服务器工厂都有一个功能,
getWebServer获取web服务
	@Override
	public WebServer getWebServer(ServletContextInitializer... initializers) {

		if (this.disableMBeanRegistry) {

			Registry.disableRegistry();
		}
		Tomcat tomcat = new Tomcat();
		File baseDir = (this.baseDirectory != null) ? this.baseDirectory : createTempDir("tomcat");
		tomcat.setBaseDir(baseDir.getAbsolutePath());
		for (LifecycleListener listener : this.serverLifecycleListeners) {

			tomcat.getServer().addLifecycleListener(listener);
		}
		Connector connector = new Connector(this.protocol);
		connector.setThrowOnFailure(true);
		tomcat.getService().addConnector(connector);
		customizeConnector(connector);
		tomcat.setConnector(connector);
		tomcat.getHost().setAutoDeploy(false);
		configureEngine(tomcat.getEngine());
		for (Connector additionalConnector : this.additionalTomcatConnectors) {

			tomcat.getService().addConnector(additionalConnector);
		}
		prepareContext(tomcat.getHost(), initializers);
		return getTomcatWebServer(tomcat);
	}
- TomcatServletWebServerFactory 创建了tomcat
ServletWebServerFactory 什么时候会创建 webServer出来。
ServletWebServerApplicationContextioc容器,启动的时候会调用创建web服务器
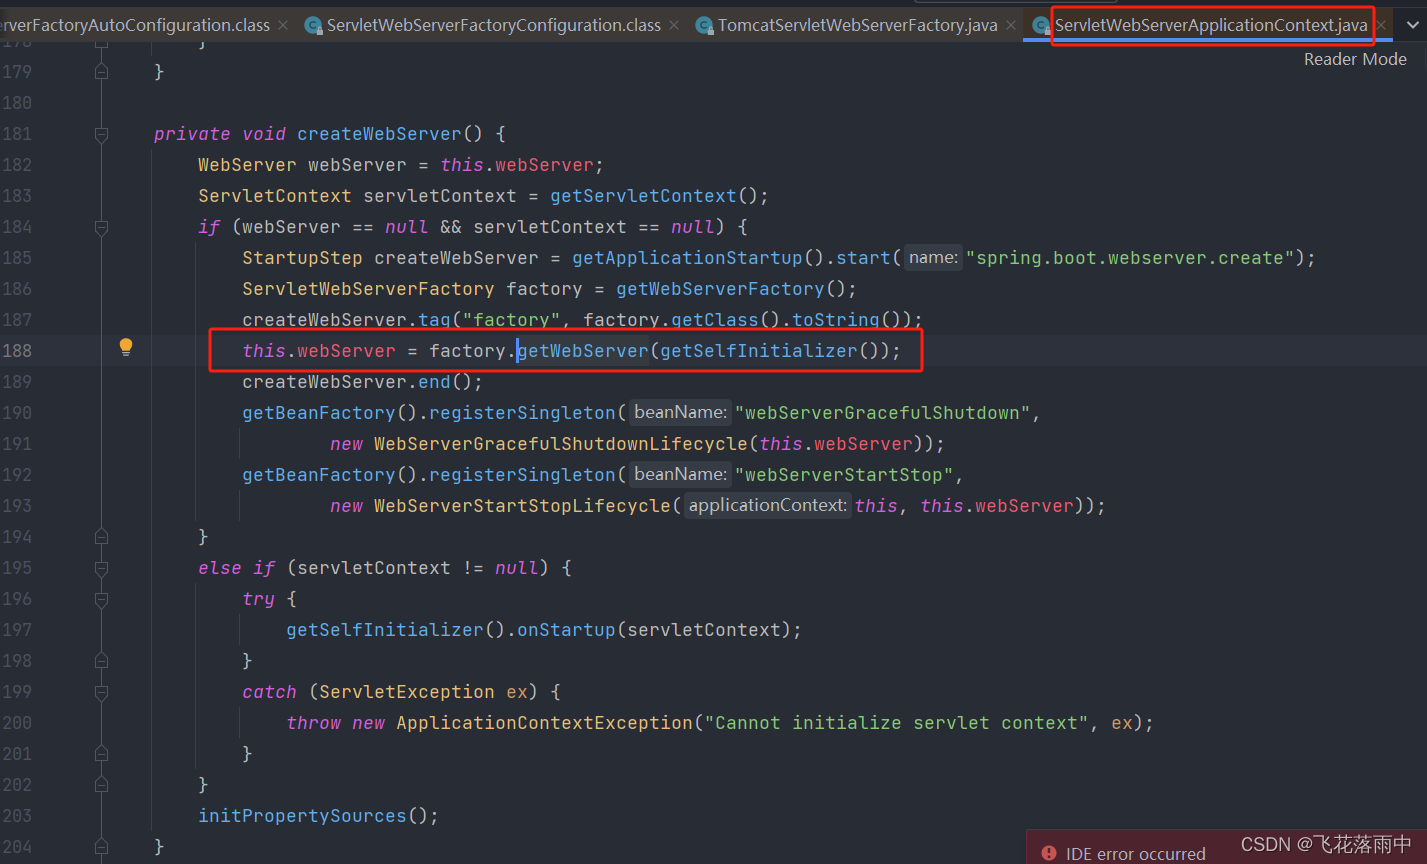
Spring**容器刷新(启动)**的时候,会预留一个时机,刷新子容器。 onRefresh()
@Override
	protected void onRefresh() {

		super.onRefresh();
		try {

			createWebServer();
		}
		catch (Throwable ex) {

			throw new ApplicationContextException("Unable to start web server", ex);
		}
	}
- refresh()容器刷新十二大步的刷新子容器会调用 onRefresh();
用法:
- 修改server下的相关配置就可以修改服务器参数
- 通过给容器中放一个
ServletwebServerFactory,来禁用掉SpringBoot默认放的服务器T厂,实现自定义嵌入任意服务器。
9.全面接管SpringMVC
- SpringBoot 默认配置好了 SpringMVC的所有常用特性
- 如果我们需要全面接管SpringMVC的所有配置并禁用默认配置,仅需要编写一个
webMvcConfigurer配置类,并标注@EnableWebMvc即可 - 全手动模式
@EnableWebMvc: 禁用默认配置WebMvcConfigurer组件: 定义MVC的底层行为
9.1 WebMvcAutoConfiguration 自动配置了那些规则
SpringMVC自动配置场景给我们配置了如下所有默认行为
9.1.1 WebMvcAutoConfiguration web场景的自动配置类
- 支持RESTful的filter: HiddenHttpMethodFilter
- 支持非POST请求,请求体携带数据: FormContentFilter
- 导入
EnableWebMvcConfiguration:RequestMappingHandlerAdapterwelcomePageHandlerMapping: 欢迎页功能支持(模板引擎目录、静态资源目录放index.html),项目访问/就默认展示这个页面RequestMappingHandlerMapping:找每个请求由谁处理的映射关系ExceptionHandlerExceptionResolver:默认的异常解析器LocaleResolver:国际化解析器ThemeResolver:主题解析器FlashMapManager:临时数据共享FormattingConversionService:数据格式化、类型转化Validator:数据校验JSR303提供的数据校验功能WebBindingInitializer:请求参数的封装与绑定ContentNegotiationManager:内容协商管理器
WebMvcAutoConfigurationAdapter配置生效,它是一个WebMvcConfigurer,定义mvc底层组件.- 定义好
WebMvcConfigurer底层组件默认功能 - 视图解析器:
InternalResourceViewResolver - 视图解析器:
BeanNameViewResolver视图名 (controller方法的返回值字符串)就是组件名 - 内容协商解析器:
ContentNegotiatingViewResolver - 请求上下文过滤器:
RequestContextFilter:任意位置直接获取当前请求
- 定义好
//当前请求路径
        ServletRequestAttributes attributes = (ServletRequestAttributes) RequestContextHolder.getRequestAttributes();
        //任意位置随时通过RequestContextHolder 获取当前请求和响应的信息
        HttpServletRequest request = attributes.getRequest();
        HttpServletResponse response = attributes.getResponse();

        StringBuffer requestURL = request.getRequestURL();
- 静态资源链规则
- `ProblemDetailsExceptionHandler`:错误详情.
	- SpringMVC内部场景异常被它捕获
- 定义了MVC默认的底层行为:
WebMvcConfigurer
9.1.2 @EnableWebMvc禁用默认行为
@EnableWebMvc给容器中导入DelegatingWebMvcConfiguration组件,他是WebMvcConfigurationSupportWebMvcAutoConfiguration有一个核心的条件注解,@Conditional0nMissingBean(WebMvcConfigurationSupport.class),容器中没有 WebMvcConfipurationSupport , WebMvcAutoConfiguration 才生效.@EnableWebMvc导入WebMvcConfigurationSupport导致WebMvcAutoonfiguration失效。导致禁用了默认行为
9.1.3 WebMvcConfigurer 功能
public interface WebMvcConfigurer {

	//路径配:自定义URL路径匹配。可以自动为所有路径加上指定前缀,比如 /api
    default void configurePathMatch(PathMatchConfigurer configurer) {

    }
//内容协商:支持多种数据格式返回。需要配合支持这种类型的HttpMessageConverter
    default void configureContentNegotiation(ContentNegotiationConfigurer configurer) {

    }
	//异步支持:
    default void configureAsyncSupport(AsyncSupportConfigurer configurer) {

    }
	//默认Servlet:可以覆盖 Tomcat的DefaultServlet。让DispatcherServlet拦截/
    default void configureDefaultServletHandling(DefaultServletHandlerConfigurer configurer) {

    }
	//功能:格式化器:支持属性上@NumberFormat和@DatetimeFormat的数据类型转换
	//默认:GenericConversionService
    default void addFormatters(FormatterRegistry registry) {

    }

	//拦截器:拦截收到的所有请求
    default void addInterceptors(InterceptorRegistry registry) {

    }
	//静态资源处理:静态资原路径映射、缓存控制
	//ResourceHandlerRegistry
    default void addResourceHandlers(ResourceHandlerRegistry registry) {

    }
	// 跨域
    default void addCorsMappings(CorsRegistry registry) {

    }
	// 视映射:直接将请求路径与物理视图映射用于无java业务逻辑的直接视图页渲染
    default void addViewControllers(ViewControllerRegistry registry) {

    }

	//视图解析器:逻辑视图转为物理视图
	//ViewResolverComposite
    default void configureViewResolvers(ViewResolverRegistry registry) {

    }
 	//参数解析器:
    default void addArgumentResolvers(List<HandlerMethodArgumentResolver> resolvers) {

    }
    // 返回值解析器:
    default void addReturnValueHandlers(List<HandlerMethodReturnValueHandler> handlers) {

    }
//消息转换器:标注@ResponseBody的返回值会利用MessageConverter直接写出去
// 8 个,支持byte,string,multipart,resource,json
    default void configureMessageConverters(List<HttpMessageConverter<?>> converters) {

    }

    default void extendMessageConverters(List<HttpMessageConverter<?>> converters) {

    }
	// 异常处理器:
    default void configureHandlerExceptionResolvers(List<HandlerExceptionResolver> resolvers) {

    }

    default void extendHandlerExceptionResolvers(List<HandlerExceptionResolver> resolvers) {

    }

	//功能:数据校验:校验Controller 上使用@Valid标注的参数合法性。需要导入starter-validator
    @Nullable
    default Validator getValidator() {

        return null;
    }

		//消息码解析器:国际化使用
    @Nullable
    default MessageCodesResolver getMessageCodesResolver() {

        return null;
    }
}
10.最佳实践(三种方式 两种模式)
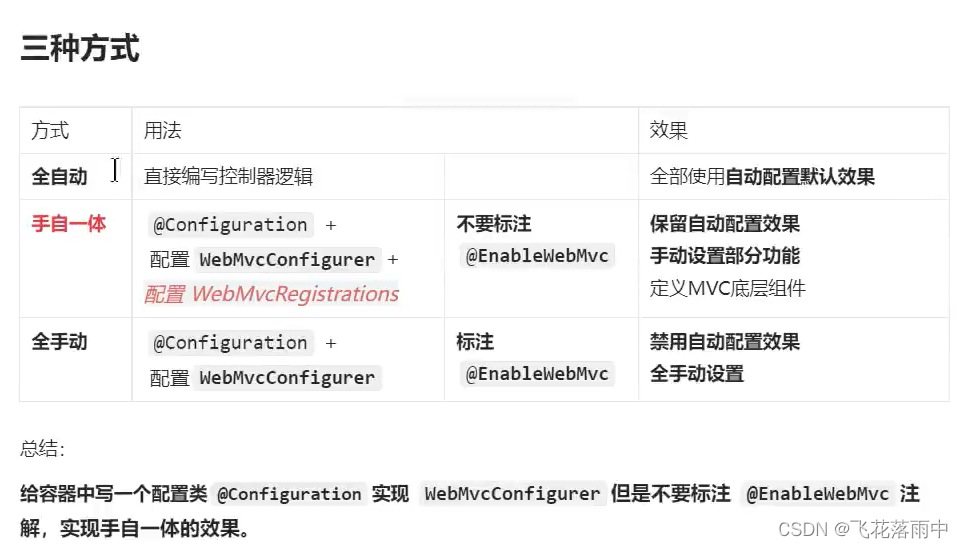
两种模式
1、前后分离模式: @RestController 响应JSON数据
2、前后不分离模式: @Controller + Thymeleaf模板引擎
11.web新特性
11.1 Problemdetails
    @Configuration(
        proxyBeanMethods = false
    )
    @ConditionalOnProperty(
        prefix = "spring.mvc.problemdetails",
        name = {
   "enabled"},
        havingValue = "true"
    )
    static class ProblemDetailsErrorHandlingConfiguration {

        ProblemDetailsErrorHandlingConfiguration() {

        }

        @Bean
        @ConditionalOnMissingBean({
   ResponseEntityExceptionHandler.class})
        @Order(0)
        ProblemDetailsExceptionHandler problemDetailsExceptionHandler() {

            return new ProblemDetailsExceptionHandler();
        }
    }
1.ProblemDetailsExceptionHandler 是一个 @ControllerAdvice 集中处理系统异常
2.处理以下异常。如果系统出现以下异常,会被SpringBoot支持以 RFC7807 规范方式返回错误数据
  @ExceptionHandler({
   HttpRequestMethodNotSupportedException.class, HttpMediaTypeNotSupportedException.class, HttpMediaTypeNotAcceptableException.class, MissingPathVariableException.class, MissingServletRequestParameterException.class, MissingServletRequestPartException.class, ServletRequestBindingException.class, MethodArgumentNotValidException.class, HandlerMethodValidationException.class, NoHandlerFoundException.class, NoResourceFoundException.class, AsyncRequestTimeoutException.class, ErrorResponseException.class, MaxUploadSizeExceededException.class, ConversionNotSupportedException.class, TypeMismatchException.class, HttpMessageNotReadableException.class, HttpMessageNotWritableException.class, MethodValidationException.class, BindException.class})
    @Nullable
    public final ResponseEntity<Object> handleException(Exception ex, WebRequest request) throws Exception {

        if (ex instanceof HttpRequestMethodNotSupportedException) {

            HttpRequestMethodNotSupportedException subEx = (HttpRequestMethodNotSupportedException)ex;
            return this.handleHttpRequestMethodNotSupported(subEx, subEx.getHeaders(), subEx.getStatusCode(), request);
        } else if (ex instanceof HttpMediaTypeNotSupportedException) {

            HttpMediaTypeNotSupportedException subEx = (HttpMediaTypeNotSupportedException)ex;
            return this.handleHttpMediaTypeNotSupported(subEx, subEx.getHeaders(), subEx.getStatusCode(), request);
        } else if (ex instanceof HttpMediaTypeNotAcceptableException) {

            HttpMediaTypeNotAcceptableException subEx = (HttpMediaTypeNotAcceptableException)ex;
            return this.handleHttpMediaTypeNotAcceptable(subEx, subEx.getHeaders(), subEx.getStatusCode(), request);
        } else if (ex instanceof MissingPathVariableException) {

            MissingPathVariableException subEx = (MissingPathVariableException)ex;
            return this.handleMissingPathVariable(subEx, subEx.getHeaders(), subEx.getStatusCode(), request);
        } else if (ex instanceof MissingServletRequestParameterException) {

            MissingServletRequestParameterException subEx = (MissingServletRequestParameterException)ex;
            return this.handleMissingServletRequestParameter(subEx, subEx.getHeaders(), subEx.getStatusCode(), request);
        } else if (ex instanceof MissingServletRequestPartException) {

            MissingServletRequestPartException subEx = (MissingServletRequestPartException)ex;
            return this.handleMissingServletRequestPart(subEx, subEx.getHeaders(), subEx.getStatusCode(), request);
        } else if (ex instanceof ServletRequestBindingException) {

            ServletRequestBindingException subEx = (ServletRequestBindingException)ex;
            return this.handleServletRequestBindingException(subEx, subEx.getHeaders(), subEx.getStatusCode(), request);
        } else if (ex instanceof MethodArgumentNotValidException) {

            MethodArgumentNotValidException subEx = (MethodArgumentNotValidException)ex;
            return this.handleMethodArgumentNotValid(subEx, subEx.getHeaders(), subEx.getStatusCode(), request);
        } else if (ex instanceof HandlerMethodValidationException) {

            HandlerMethodValidationException subEx = (HandlerMethodValidationException)ex;
            return this.handleHandlerMethodValidationException(subEx, subEx.getHeaders(), subEx.getStatusCode(), request);
        } else if (ex instanceof NoHandlerFoundException) {

            NoHandlerFoundException subEx = (NoHandlerFoundException)ex;
            return this.handleNoHandlerFoundException(subEx, subEx.getHeaders(), subEx.getStatusCode(), request);
        } else if (ex instanceof NoResourceFoundException) {

            NoResourceFoundException subEx = (NoResourceFoundException)ex;
            return this.handleNoResourceFoundException(subEx, subEx.getHeaders(), subEx.getStatusCode(), request);
        } else if (ex instanceof AsyncRequestTimeoutException) {

            AsyncRequestTimeoutException subEx = (AsyncRequestTimeoutException)ex;
            return this.handleAsyncRequestTimeoutException(subEx, subEx.getHeaders(), subEx.getStatusCode(), request);
        } else if (ex instanceof ErrorResponseException) {

            ErrorResponseException subEx = (ErrorResponseException)ex;
            return this.handleErrorResponseException(subEx, subEx.getHeaders(), subEx.getStatusCode(), request);
        } else if (ex instanceof MaxUploadSizeExceededException) {

            MaxUploadSizeExceededException subEx = (MaxUploadSizeExceededException)ex;
            return this.handleMaxUploadSizeExceededException(subEx, subEx.getHeaders(), subEx.getStatusCode(), request);
        } else {

            HttpHeaders headers = new HttpHeaders();
            if (ex instanceof ConversionNotSupportedException) {

                ConversionNotSupportedException theEx = (ConversionNotSupportedException)ex;
                return this.handleConversionNotSupported(theEx, headers, HttpStatus.INTERNAL_SERVER_ERROR, request);
            } else if (ex instanceof TypeMismatchException) {

                TypeMismatchException theEx = (TypeMismatchException)ex;
                return this.handleTypeMismatch(theEx, headers, HttpStatus.BAD_REQUEST, request);
            } else if (ex instanceof HttpMessageNotReadableException) {

                HttpMessageNotReadableException theEx = (HttpMessageNotReadableException)ex;
                return this.handleHttpMessageNotReadable(theEx, headers, HttpStatus.BAD_REQUEST, request);
            } else if (ex instanceof HttpMessageNotWritableException) {

                HttpMessageNotWritableException theEx = (HttpMessageNotWritableException)ex;
                return this.handleHttpMessageNotWritable(theEx, headers, HttpStatus.INTERNAL_SERVER_ERROR, request);
            } else if (ex instanceof MethodValidationException) {

                MethodValidationException subEx = (MethodValidationException)ex;
                return this.handleMethodValidationException(subEx, headers, HttpStatus.INTERNAL_SERVER_ERROR, request);
            } else if (ex instanceof BindException) {

                BindException theEx = (BindException)ex;
                return this.handleBindException(theEx, headers, HttpStatus.BAD_REQUEST, request);
            } else {

                throw ex;
            }
        }
    }
默认关闭: spring.mvc.problemdetails.enabled=true
开启后:Content-Type:application/problem+json
11.2 函数式web
SpringMvc 5.2以后 允许我们使用函数式的方式,定义Web的请求处理流程
函数式接口
web请求处理方式
- @Controller + @RequestMapping:耦合式(路由、业务耦合)
- 函数式Web分离式(路由、业务分离)
函数式Web示例
- 1、给容器中放一个Bean:类型是 RouterFunction
- 2、每个业务准备一个自己的handler
@Configuration
public class WebFunctionConfig {

    /**
     * 函数式web
     * 1、给容器中放一个Bean:类型是 RouterFunction<ServerResponse>
     * 2、每个业务准备一个自己的handler
     *  核心四大对象
     * 1、RouterFunction:定义路由信息。发什么请求,谁来处理
     * 2、RequestPredicate:定义请求:请求谓语。请求方式(GET、POST)、请求参数
     * 3、ServerRequest:封装请求完整数据
     * 4、ServerResponse:封装响收完整数据
     */
    @Bean
     public RouterFunction<ServerResponse> userRouter(UserBizHandler userBizHandler /* 自动注入*/){

          return RouterFunctions.route() //开始定义路由信息
                 .GET("/user/{id}", RequestPredicates.accept(MediaType.ALL),userBizHandler ::getUser)
                 .GET("/users",userBizHandler ::getUsers)
                 .POST("/user",RequestPredicates.accept(MediaType.APPLICATION_JSON),userBizHandler ::getUser)
                 .PUT("/user/{id}",RequestPredicates.accept(MediaType.APPLICATION_JSON),userBizHandler ::getUser)
                 .DELETE("/user/{id}",userBizHandler ::getUser)
                 .build();

     }
}
@Service
public class UserBizHandler {

    //查询指定用户id
    public ServerResponse getUser(ServerRequest request) throws Exception{

        String id = request.pathVariable("id");//获取id
        //业务处理 Mapper查询数据库
        People people = new People(1L,"66","123@qq.com",12,"admin");
        //构造响应
        return ServerResponse
                .ok()
                .body(people);
    }
     //查询所有用户
    public ServerResponse getUsers(ServerRequest request) throws Exception {

        List<People> peoples = Arrays.asList(new People(1L, "66", "123@qq.com", 12, "admin"),
                new People(2L, "77", "1456@qq.com", 13, "admin"));
        return ServerResponse
                .ok()
                .body(peoples);//body中的对象就是@ResponseBody 利用HttpMessageConverter 写出为json
    }
}