WebMvcAutoConfiguration原理
1. 生效条件
@AutoConfiguration(after = {
    DispatcherServletAutoConfiguration.class, TaskExecutionAutoConfiguration.class,
		ValidationAutoConfiguration.class }) //在这些自动配置之后
@ConditionalOnWebApplication(type = Type.SERVLET) //如果是web应用就生效,类型SERVLET、REACTIVE 响应式web
@ConditionalOnClass({
    Servlet.class, DispatcherServlet.class, WebMvcConfigurer.class })
@ConditionalOnMissingBean(WebMvcConfigurationSupport.class) //容器中没有这个Bean,才生效。默认就是没有
@AutoConfigureOrder(Ordered.HIGHEST_PRECEDENCE + 10)//优先级
@ImportRuntimeHints(WebResourcesRuntimeHints.class)
public class WebMvcAutoConfiguration {

}
2. 效果
- 放了两个Filter:
- a. HiddenHttpMethodFilter;页面表单提交Rest请求(GET、POST、PUT、DELETE)
- b. FormContentFilter: 表单内容Filter,GET(数据放URL后面)、POST(数据放请求体)请求可以携带数据,PUT、DELETE 的请求体数据会被忽略
- 给容器中放了WebMvcConfigurer组件;给SpringMVC添加各种定制功能
- a. 所有的功能最终会和配置文件进行绑定
- b. WebMvcProperties: spring.mvc配置文件
- c. WebProperties: spring.web配置文件
	@Configuration(proxyBeanMethods = false)
	@Import(EnableWebMvcConfiguration.class) //额外导入了其他配置
	@EnableConfigurationProperties({
    WebMvcProperties.class, WebProperties.class })
	@Order(0)
	public static class WebMvcAutoConfigurationAdapter implements WebMvcConfigurer, ServletContextAware{


    }
3. WebMvcConfigurer接口
提供了配置SpringMVC底层的所有组件入口

4. 静态资源规则源码
@Override
public void addResourceHandlers(ResourceHandlerRegistry registry) {

    if (!this.resourceProperties.isAddMappings()) {

        logger.debug("Default resource handling disabled");
        return;
    }
    //1、
    addResourceHandler(registry, this.mvcProperties.getWebjarsPathPattern(),
            "classpath:/META-INF/resources/webjars/");
    addResourceHandler(registry, this.mvcProperties.getStaticPathPattern(), (registration) -> {

        registration.addResourceLocations(this.resourceProperties.getStaticLocations());
        if (this.servletContext != null) {

            ServletContextResource resource = new ServletContextResource(this.servletContext, SERVLET_LOCATION);
            registration.addResourceLocations(resource);
        }
    });
}
- 规则一:访问: /webjars/**路径就去 classpath:/META-INF/resources/webjars/下找资源.
- a. maven 导入依赖
- b.
- 规则二:访问: /**路径就去 静态资源默认的四个位置找资源
- a. classpath:/META-INF/resources/
- b. classpath:/resources/
- c. classpath:/static/
- d. classpath:/public/
- 规则三:静态资源默认都有缓存规则的设置
- a. 所有缓存的设置,直接通过配置文件: spring.web
- b. cachePeriod: 缓存周期; 多久不用找服务器要新的。 默认没有,以s为单位
- c. cacheControl: HTTP缓存控制;https://developer.mozilla.org/zh-CN/docs/Web/HTTP/Caching
- d. useLastModified:是否使用最后一次修改。配合HTTP Cache规则
如果浏览器访问了一个静态资源 index.js,如果服务这个资源没有发生变化,下次访问的时候就可以直接让浏览器用自己缓存中的东西,而不用给服务器发请求。
registration.setCachePeriod(getSeconds(this.resourceProperties.getCache().getPeriod()));
registration.setCacheControl(this.resourceProperties.getCache().getCachecontrol().toHttpCacheControl());
registration.setUseLastModified(this.resourceProperties.getCache().isUseLastModified());
5. EnableWebMvcConfiguration 源码
//SpringBoot 给容器中放 WebMvcConfigurationSupport 组件。
//我们如果自己放了 WebMvcConfigurationSupport 组件,Boot的WebMvcAutoConfiguration都会失效。
@Configuration(proxyBeanMethods = false)
@EnableConfigurationProperties(WebProperties.class)
public static class EnableWebMvcConfiguration extends DelegatingWebMvcConfiguration implements ResourceLoaderAware
{


}
- HandlerMapping: 根据请求路径 /a 找那个handler能处理请求
a. WelcomePageHandlerMapping:
ⅰ. 访问 /**路径下的所有请求,都在以前四个静态资源路径下找,欢迎页也一样
ⅱ. 找index.html:只要静态资源的位置有一个 index.html页面,项目启动默认访问
6. 为什么容器中放一个WebMvcConfigurer就能配置底层行为
- WebMvcAutoConfiguration 是一个自动配置类,它里面有一个 EnableWebMvcConfiguration
- EnableWebMvcConfiguration继承与 DelegatingWebMvcConfiguration,这两个都生效
- DelegatingWebMvcConfiguration利用 DI 把容器中 所有 WebMvcConfigurer 注入进来
- 别人调用
DelegatingWebMvcConfiguration的方法配置底层规则,而它调用所有 WebMvcConfigurer的配置底层方法。
7. WebMvcConfigurationSupport
提供了很多的默认设置。
判断系统中是否有相应的类:如果有,就加入相应的HttpMessageConverter
jackson2Present = ClassUtils.isPresent("com.fasterxml.jackson.databind.ObjectMapper", classLoader) &&
				ClassUtils.isPresent("com.fasterxml.jackson.core.JsonGenerator", classLoader);
jackson2XmlPresent = ClassUtils.isPresent("com.fasterxml.jackson.dataformat.xml.XmlMapper", classLoader);
jackson2SmilePresent = ClassUtils.isPresent("com.fasterxml.jackson.dataformat.smile.SmileFactory", classLoader);
Web场景
1. 自动配置
1、整合web场景
        <dependency>
            <groupId>org.springframework.boot</groupId>
            <artifactId>spring-boot-starter-web</artifactId>
        </dependency>
2、引入了 autoconfigure功能
3、@EnableAutoConfiguration注解使用@Import(AutoConfigurationImportSelector.class)批量导入组件
4、加载 META-INF/spring/org.springframework.boot.autoconfigure.AutoConfiguration.imports 文件中配置的所有组件
5、所有自动配置类如下
org.springframework.boot.autoconfigure.web.client.RestTemplateAutoConfiguration
org.springframework.boot.autoconfigure.web.embedded.EmbeddedWebServerFactoryCustomizerAutoConfiguration
====以下是响应式web场景和现在的没关系======
org.springframework.boot.autoconfigure.web.reactive.HttpHandlerAutoConfiguration
org.springframework.boot.autoconfigure.web.reactive.ReactiveMultipartAutoConfiguration
org.springframework.boot.autoconfigure.web.reactive.ReactiveWebServerFactoryAutoConfiguration
org.springframework.boot.autoconfigure.web.reactive.WebFluxAutoConfiguration
org.springframework.boot.autoconfigure.web.reactive.WebSessionIdResolverAutoConfiguration
org.springframework.boot.autoconfigure.web.reactive.error.ErrorWebFluxAutoConfiguration
org.springframework.boot.autoconfigure.web.reactive.function.client.ClientHttpConnectorAutoConfiguration
org.springframework.boot.autoconfigure.web.reactive.function.client.WebClientAutoConfiguration
================以上没关系=================
org.springframework.boot.autoconfigure.web.servlet.DispatcherServletAutoConfiguration
org.springframework.boot.autoconfigure.web.servlet.ServletWebServerFactoryAutoConfiguration
org.springframework.boot.autoconfigure.web.servlet.error.ErrorMvcAutoConfiguration
org.springframework.boot.autoconfigure.web.servlet.HttpEncodingAutoConfiguration
org.springframework.boot.autoconfigure.web.servlet.MultipartAutoConfiguration
org.springframework.boot.autoconfigure.web.servlet.WebMvcAutoConfiguration
6、绑定了配置文件的一堆配置项
● 1、SpringMVC的所有配置 spring.mvc
● 2、Web场景通用配置 spring.web
● 3、文件上传配置 spring.servlet.multipart
● 4、服务器的配置 server: 比如:编码方式
2. 静态资源
静态资源映射
静态资源映射规则在 WebMvcAutoConfiguration 中进行了定义:
/webjars/**的所有路径 资源都在classpath:/META-INF/resources/webjars//**的所有路径 资源都在classpath:/META-INF/resources/、classpath:/resources/、classpath:/static/、classpath:/public/- 所有静态资源都定义了缓存规则。【浏览器访问过一次,就会缓存一段时间】,但此功能参数无默认值
a.period: 缓存间隔。 默认 0S;
b.cacheControl:缓存控制。 默认无;
c.useLastModified:是否使用lastModified头。 默认 false;
静态资源缓存
如前面所述
- 所有静态资源都定义了缓存规则。【浏览器访问过一次,就会缓存一段时间】,但此功能参数无默认值
- a. period: 缓存间隔。 默认 0S;
- b. cacheControl:缓存控制。 默认无;
- c. useLastModified:是否使用lastModified头。 默认 false;
欢迎页
欢迎页规则在 WebMvcAutoConfiguration 中进行了定义:
- 在静态资源目录下找 index.html
- 没有就在 templates下找index模板页
Favicon
1.在静态资源目录下找 favicon.ico
缓存实验
server.port=9000

#1、spring.web:
# 1.配置国际化的区域信息
# 2.静态资源策略(开启、处理链、缓存)

#开启静态资源映射规则
spring.web.resources.add-mappings=true

#设置缓存
#spring.web.resources.cache.period=3600
##缓存详细合并项控制,覆盖period配置:
## 浏览器第一次请求服务器,服务器告诉浏览器此资源缓存7200秒,7200秒以内的所有此资源访问不用发给服务器请求,7200秒以后发请求给服务器
spring.web.resources.cache.cachecontrol.max-age=7200
#使用资源 last-modified 时间,来对比服务器和浏览器的资源是否相同没有变化。相同返回 304
spring.web.resources.cache.use-last-modified=true
自定义静态资源规则
自定义静态资源路径、自定义缓存规则
1. 配置方式
spring.mvc: 静态资源访问前缀路径
spring.web:
● 静态资源目录
● 静态资源缓存策略
#1、spring.web:
# 1.配置国际化的区域信息
# 2.静态资源策略(开启、处理链、缓存)

#开启静态资源映射规则
spring.web.resources.add-mappings=true

#设置缓存
spring.web.resources.cache.period=3600
##缓存详细合并项控制,覆盖period配置:
## 浏览器第一次请求服务器,服务器告诉浏览器此资源缓存7200秒,7200秒以内的所有此资源访问不用发给服务器请求,7200秒以后发请求给服务器
spring.web.resources.cache.cachecontrol.max-age=7200
## 共享缓存
spring.web.resources.cache.cachecontrol.cache-public=true
#使用资源 last-modified 时间,来对比服务器和浏览器的资源是否相同没有变化。相同返回 304
spring.web.resources.cache.use-last-modified=true

#自定义静态资源文件夹位置
spring.web.resources.static-locations=classpath:/a/,classpath:/b/,classpath:/static/

#2、 spring.mvc
## 2.1. 自定义webjars路径前缀
spring.mvc.webjars-path-pattern=/wj/**
## 2.2. 静态资源访问路径前缀
spring.mvc.static-path-pattern=/static/**
2. 代码方式
● 容器中只要有一个 WebMvcConfigurer 组件。配置的底层行为都会生效
● @EnableWebMvc //禁用boot的默认配置
@Configuration //这是一个配置类
public class MyConfig implements WebMvcConfigurer {


    @Override
    public void addResourceHandlers(ResourceHandlerRegistry registry) {

        //保留以前规则
        //自己写新的规则。
        registry.addResourceHandler("/static/**")
                .addResourceLocations("classpath:/a/","classpath:/b/")
                .setCacheControl(CacheControl.maxAge(1180, TimeUnit.SECONDS));
    }
}
@Configuration //这是一个配置类,给容器中放一个 WebMvcConfigurer 组件,就能自定义底层
public class MyConfig  /*implements WebMvcConfigurer*/ {


    @Bean
    public WebMvcConfigurer webMvcConfigurer(){

        return new WebMvcConfigurer() {

            @Override
            public void addResourceHandlers(ResourceHandlerRegistry registry) {

                registry.addResourceHandler("/static/**")
                        .addResourceLocations("classpath:/a/", "classpath:/b/")
                        .setCacheControl(CacheControl.maxAge(1180, TimeUnit.SECONDS));
            }
        };
    }

}
3. 路径匹配
Spring5.3 之后加入了更多的请求路径匹配的实现策略;
以前只支持 AntPathMatcher 策略, 现在提供了 PathPatternParser 策略。并且可以让我们指定到底使用那种策略。
1. Ant风格路径用法
Ant 风格的路径模式语法具有以下规则:
● :表示任意数量的字符。
● ?:表示任意一个字符。
● **:表示任意数量的目录。
● {}:表示一个命名的模式占位符。
● []:表示字符集合,例如[a-z]表示小写字母。
例如:
● .html 匹配任意名称,扩展名为.html的文件。
● /folder1//.java 匹配在folder1目录下的任意两级目录下的.java文件。
● /folder2/**/.jsp 匹配在folder2目录下任意目录深度的.jsp文件。
● /{type}/{id}.html 匹配任意文件名为{id}.html,在任意命名的{type}目录下的文件。
注意:Ant 风格的路径模式语法中的特殊字符需要转义,如:
● 要匹配文件路径中的星号,则需要转义为\。
● 要匹配文件路径中的问号,则需要转义为\?。
2. 模式切换
● PathPatternParser 在 jmh 基准测试下,有 6~8 倍吞吐量提升,降低 30%~40%空间分配率
● PathPatternParser 兼容 AntPathMatcher语法,并支持更多类型的路径模式
●PathPatternParser “**” 多段匹配的支持仅允许在模式末尾使用
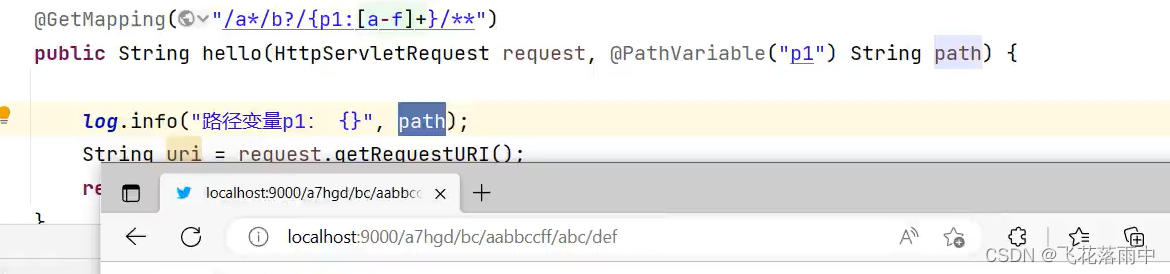
    @GetMapping("/a*/b?/{p1:[a-f]+}")
    public String hello(HttpServletRequest request,
                        @PathVariable("p1") String path) {


        log.info("路径变量p1: {}", path);
        //获取请求路径
        String uri = request.getRequestURI();
        return uri;
    }
总结:
● 使用默认的路径匹配规则,是由 PathPatternParser 提供的
● 如果路径中间需要有 **,替换成ant风格路径
# 改变路径匹配策略:
# ant_path_matcher 老版策略;
# path_pattern_parser 新版策略;
spring.mvc.pathmatch.matching-strategy=ant_path_matcher
内容协商
一套系统适配多端数据返回
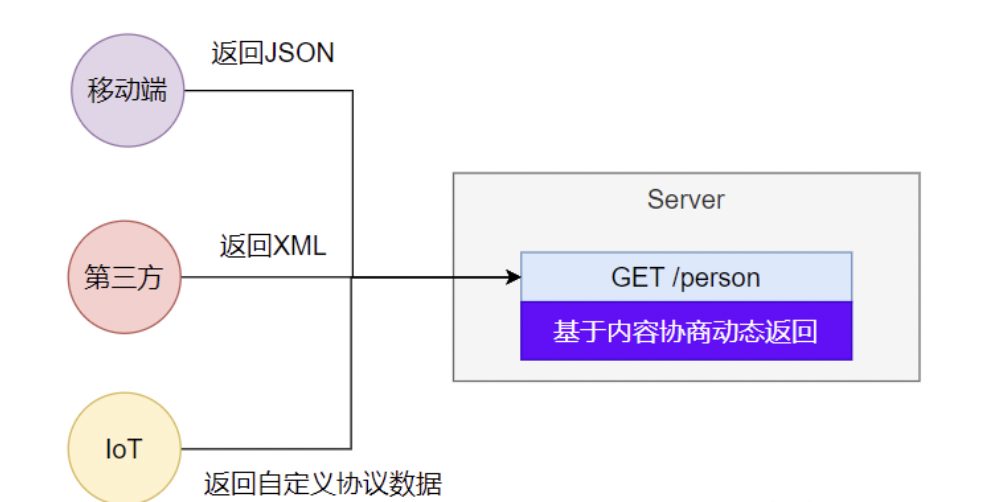
1. 多端内容适配
1. 默认规则
- SpringBoot 多端内容适配。
1.1. 基于请求头内容协商:(默认开启)- 1.1.1. 客户端向服务端发送请求,携带HTTP标准的Accept请求头。
- 1.1.1.1. Accept: application/json、text/xml、text/yaml
- 1.1.1.2. 服务端根据客户端请求头期望的数据类型进行动态返回
- 1.1.1. 客户端向服务端发送请求,携带HTTP标准的Accept请求头。
1.2. 基于请求参数内容协商:(需要开启)
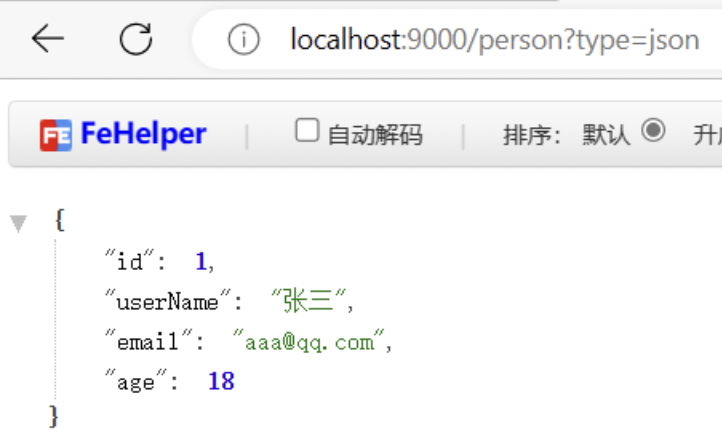
1.2.1. 发送请求 GET /projects/spring-boot?format=json
1.2.2. 匹配到 @GetMapping(“/projects/spring-boot”)
1.2.3. 根据参数协商,优先返回 json 类型数据【需要开启参数匹配设置】
1.2.4. 发送请求 GET /projects/spring-boot?format=xml,优先返回 xml 类型数据
2. 效果演示
请求同一个接口,可以返回json和xml不同格式数据
1.引入支持写出xml内容依赖
<dependency>
    <groupId>com.fasterxml.jackson.dataformat</groupId>
    <artifactId>jackson-dataformat-xml</artifactId>
</dependency>
2.标注注解
@JacksonXmlRootElement  // 可以写出为xml文档
@Data
public class Person {

    private Long id;
    private String userName;
    private String email;
    private Integer age;
}
3.开启基于请求参数的内容协商
# 开启基于请求参数的内容协商功能。 默认参数名:format。 默认此功能不开启
spring.mvc.contentnegotiation.favor-parameter=true
# 指定内容协商时使用的参数名。默认是 format
spring.mvc.contentnegotiation.parameter-name=type
4.效果

配置协商规则与支持类型
1.修改内容协商方式
#使用参数进行内容协商
spring.mvc.contentnegotiation.favor-parameter=true
#自定义参数名,默认为format
spring.mvc.contentnegotiation.parameter-name=myparam
2.大多数 MediaType 都是开箱即用的。也可以自定义内容类型,如
spring.mvc.contentnegotiation.media-types.yaml=text/yaml
自定义内容返回
1. 增加yaml返回支持
导入依赖
<dependency>
    <groupId>com.fasterxml.jackson.dataformat</groupId>
    <artifactId>jackson-dataformat-yaml</artifactId>
</dependency>
把对象写出成YAML
    public static void main(String[] args) throws JsonProcessingException {

        Person person = new Person();
        person.setId(1L);
        person.setUserName("张三");
        person.setEmail("aaa@qq.com");
        person.setAge(18);

        YAMLFactory factory = new YAMLFactory().disable(YAMLGenerator.Feature.WRITE_DOC_START_MARKER);
        ObjectMapper mapper = new ObjectMapper(factory);

        String s = mapper.writeValueAsString(person);
        System.out.println(s);
    }
编写配置
#新增一种媒体类型
spring.mvc.contentnegotiation.media-types.yaml=text/yaml
增加HttpMessageConverter组件,专门负责把对象写出为yaml格式
    @Bean
    public WebMvcConfigurer webMvcConfigurer(){

        return new WebMvcConfigurer() {

            @Override //配置一个能把对象转为yaml的messageConverter
            public void configureMessageConverters(List<HttpMessageConverter<?>> converters) {

                converters.add(new MyYamlHttpMessageConverter());
            }
        };
    }
2. 思考:如何增加其他
● 配置媒体类型支持:
○ spring.mvc.contentnegotiation.media-types.yaml=text/yaml
● 编写对应的HttpMessageConverter,要告诉Boot这个支持的媒体类型
○ 按照3的示例
● 把MessageConverter组件加入到底层
○ 容器中放一个WebMvcConfigurer 组件,并配置底层的MessageConverter
3. HttpMessageConverter的示例写法
public class MyYamlHttpMessageConverter extends AbstractHttpMessageConverter<Object> {


    private ObjectMapper objectMapper = null; //把对象转成yaml

    public MyYamlHttpMessageConverter(){

        //告诉SpringBoot这个MessageConverter支持哪种媒体类型  //媒体类型
        super(new MediaType("text", "yaml", Charset.forName("UTF-8")));
        YAMLFactory factory = new YAMLFactory()
                .disable(YAMLGenerator.Feature.WRITE_DOC_START_MARKER);
        this.objectMapper = new ObjectMapper(factory);
    }

    @Override
    protected boolean supports(Class<?> clazz) {

        //只要是对象类型,不是基本类型
        return true;
    }

    @Override  //@RequestBody
    protected Object readInternal(Class<?> clazz, HttpInputMessage inputMessage) throws IOException, HttpMessageNotReadableException {

        return null;
    }

    @Override //@ResponseBody 把对象怎么写出去
    protected void writeInternal(Object methodReturnValue, HttpOutputMessage outputMessage) throws IOException, HttpMessageNotWritableException {


        //try-with写法,自动关流
        try(OutputStream os = outputMessage.getBody()){

            this.objectMapper.writeValue(os,methodReturnValue);
        }

    }
}
内容协商原理-HttpMessageConverter
● HttpMessageConverter 怎么工作?合适工作?
● 定制 HttpMessageConverter 来实现多端内容协商
● 编写WebMvcConfigurer提供的configureMessageConverters底层,修改底层的MessageConverter
1. @ResponseBody由HttpMessageConverter处理
标注了@ResponseBody的返回值 将会由支持它的 HttpMessageConverter写给浏览器
- 如果controller方法的返回值标注了 @ResponseBody 注解
1.1. 请求进来先来到DispatcherServlet的doDispatch()进行处理
1.2. 找到一个 HandlerAdapter 适配器。利用适配器执行目标方法
1.3. RequestMappingHandlerAdapter来执行,调用invokeHandlerMethod()来执行目标方法
1.4. 目标方法执行之前,准备好两个东西
1.4.1. HandlerMethodArgumentResolver:参数解析器,确定目标方法每个参数值
1.4.2. HandlerMethodReturnValueHandler:返回值处理器,确定目标方法的返回值改怎么处理
1.5. RequestMappingHandlerAdapter 里面的invokeAndHandle()真正执行目标方法
1.6. 目标方法执行完成,会返回返回值对象
1.7. 找到一个合适的返回值处理器 HandlerMethodReturnValueHandler
1.8. 最终找到 RequestResponseBodyMethodProcessor能处理 标注了 @ResponseBody注解的方法
1.9. RequestResponseBodyMethodProcessor 调用writeWithMessageConverters ,利用MessageConverter把返回值写出去
上面解释:@ResponseBody由HttpMessageConverter处理
2. HttpMessageConverter 会先进行内容协商
2.1. 遍历所有的MessageConverter看谁支持这种内容类型的数据
2.2. 最终因为要json所以MappingJackson2HttpMessageConverter支持写出json
2.3. jackson用ObjectMapper把对象写出去
2. WebMvcAutoConfiguration提供几种默认HttpMessageConverters
● EnableWebMvcConfiguration通过 addDefaultHttpMessageConverters添加了默认的MessageConverter;如下:
○ ByteArrayHttpMessageConverter: 支持字节数据读写
○ StringHttpMessageConverter: 支持字符串读写
○ ResourceHttpMessageConverter:支持资源读写
○ ResourceRegionHttpMessageConverter: 支持分区资源写出
○ AllEncompassingFormHttpMessageConverter:支持表单xml/json读写
○ MappingJackson2HttpMessageConverter: 支持请求响应体Json读写
模板引擎
● 由于 SpringBoot 使用了嵌入式 Servlet 容器。所以 JSP 默认是不能使用的。
● 如果需要服务端页面渲染,优先考虑使用 模板引擎。

模板引擎页面默认放在 src/main/resources/templates
SpringBoot 包含以下模板引擎的自动配置
- FreeMarker
- Groovy
- Thymeleaf
- Mustache
Thymeleaf官网:https://www.thymeleaf.org/
<!DOCTYPE html>
<html xmlns:th="http://www.thymeleaf.org">
<head>
	<title>Good Thymes Virtual Grocery</title>
	<meta http-equiv="Content-Type" content="text/html; charset=UTF-8" />
	<link rel="stylesheet" type="text/css" media="all" th:href="@{/css/gtvg.css}" />
</head>
<body>
	<p th:text="#{home.welcome}">Welcome to our grocery store!</p>
</body
</html>
1. Thymeleaf整合
<dependency>
    <groupId>org.springframework.boot</groupId>
    <artifactId>spring-boot-starter-thymeleaf</artifactId>
</dependency>
自动配置原理
- 开启了 org.springframework.boot.autoconfigure.thymeleaf.ThymeleafAutoConfiguration 自动配置
- 属性绑定在 ThymeleafProperties 中,对应配置文件 spring.thymeleaf 内容
- 所有的模板页面默认在 classpath:/templates文件夹下
- 默认效果
a. 所有的模板页面在 classpath:/templates/下面找
b. 找后缀名为.html的页面
国际化
国际化的自动配置参照MessageSourceAutoConfiguration
实现步骤:
- Spring Boot 在类路径根下查找messages资源绑定文件。文件名为:messages.properties
- 多语言可以定义多个消息文件,命名为messages_区域代码.properties。如:
a. messages.properties:默认
b. messages_zh_CN.properties:中文环境
c. messages_en_US.properties:英语环境 - 在程序中可以自动注入 MessageSource组件,获取国际化的配置项值
- 在页面中可以使用表达式 #{}获取国际化的配置项值
    @Autowired  //国际化取消息用的组件
    MessageSource messageSource;
    @GetMapping("/haha")
    public String haha(HttpServletRequest request){


        Locale locale = request.getLocale();
        //利用代码的方式获取国际化配置文件中指定的配置项的值
        String login = messageSource.getMessage("login", null, locale);
        return login;
    }
错误处理
1. 默认机制
错误处理的自动配置都在ErrorMvcAutoConfiguration中,两大核心机制:
● 1. SpringBoot 会自适应处理错误,响应页面或JSON数据
● 2. SpringMVC的错误处理机制依然保留,MVC处理不了,才会交给boot进行处理

- 发生错误以后,转发给/error路径,SpringBoot在底层写好一个 BasicErrorController的组件,专门处理这个请求
	@RequestMapping(produces = MediaType.TEXT_HTML_VALUE) //返回HTML
	public ModelAndView errorHtml(HttpServletRequest request, HttpServletResponse response) {

		HttpStatus status = getStatus(request);
		Map<String, Object> model = Collections
			.unmodifiableMap(getErrorAttributes(request, getErrorAttributeOptions(request, MediaType.TEXT_HTML)));
		response.setStatus(status.value());
		ModelAndView modelAndView = resolveErrorView(request, response, status, model);
		return (modelAndView != null) ? modelAndView : new ModelAndView("error", model);
	}

	@RequestMapping  //返回 ResponseEntity, JSON
	public ResponseEntity<Map<String, Object>> error(HttpServletRequest request) {

		HttpStatus status = getStatus(request);
		if (status == HttpStatus.NO_CONTENT) {

			return new ResponseEntity<>(status);
		}
		Map<String, Object> body = getErrorAttributes(request, getErrorAttributeOptions(request, MediaType.ALL));
		return new ResponseEntity<>(body, status);
	}
错误页面是这么解析到的
//1、解析错误的自定义视图地址
ModelAndView modelAndView = resolveErrorView(request, response, status, model);
//2、如果解析不到错误页面的地址,默认的错误页就是 error
return (modelAndView != null) ? modelAndView : new ModelAndView("error", model);
容器中专门有一个错误视图解析器
@Bean
@ConditionalOnBean(DispatcherServlet.class)
@ConditionalOnMissingBean(ErrorViewResolver.class)
DefaultErrorViewResolver conventionErrorViewResolver() {

    return new DefaultErrorViewResolver(this.applicationContext, this.resources);
}
SpringBoot解析自定义错误页的默认规则
	@Override
	public ModelAndView resolveErrorView(HttpServletRequest request, HttpStatus status, Map<String, Object> model) {

		ModelAndView modelAndView = resolve(String.valueOf(status.value()), model);
		if (modelAndView == null && SERIES_VIEWS.containsKey(status.series())) {

			modelAndView = resolve(SERIES_VIEWS.get(status.series()), model);
		}
		return modelAndView;
	}

	private ModelAndView resolve(String viewName, Map<String, Object> model) {

		String errorViewName = "error/" + viewName;
		TemplateAvailabilityProvider provider = this.templateAvailabilityProviders.getProvider(errorViewName,
				this.applicationContext);
		if (provider != null) {

			return new ModelAndView(errorViewName, model);
		}
		return resolveResource(errorViewName, model);
	}

	private ModelAndView resolveResource(String viewName, Map<String, Object> model) {

		for (String location : this.resources.getStaticLocations()) {

			try {

				Resource resource = this.applicationContext.getResource(location);
				resource = resource.createRelative(viewName + ".html");
				if (resource.exists()) {

					return new ModelAndView(new HtmlResourceView(resource), model);
				}
			}
			catch (Exception ex) {

			}
		}
		return null;
	}
容器中有一个默认的名为 error 的 view; 提供了默认白页功能
@Bean(name = "error")
@ConditionalOnMissingBean(name = "error")
public View defaultErrorView() {

    return this.defaultErrorView;
}
封装了JSON格式的错误信息
	@Bean
	@ConditionalOnMissingBean(value = ErrorAttributes.class, search = SearchStrategy.CURRENT)
	public DefaultErrorAttributes errorAttributes() {

		return new DefaultErrorAttributes();
	}
2. 自定义错误响应
1. 自定义json响应
使用@ControllerAdvice + @ExceptionHandler 进行统一异常处理
2. 自定义页面响应
根据boot的错误页面规则,自定义页面模板
3. 最佳实战
● 前后分离
○ 后台发生的所有错误,@ControllerAdvice + @ExceptionHandler进行统一异常处理。
● 服务端页面渲染
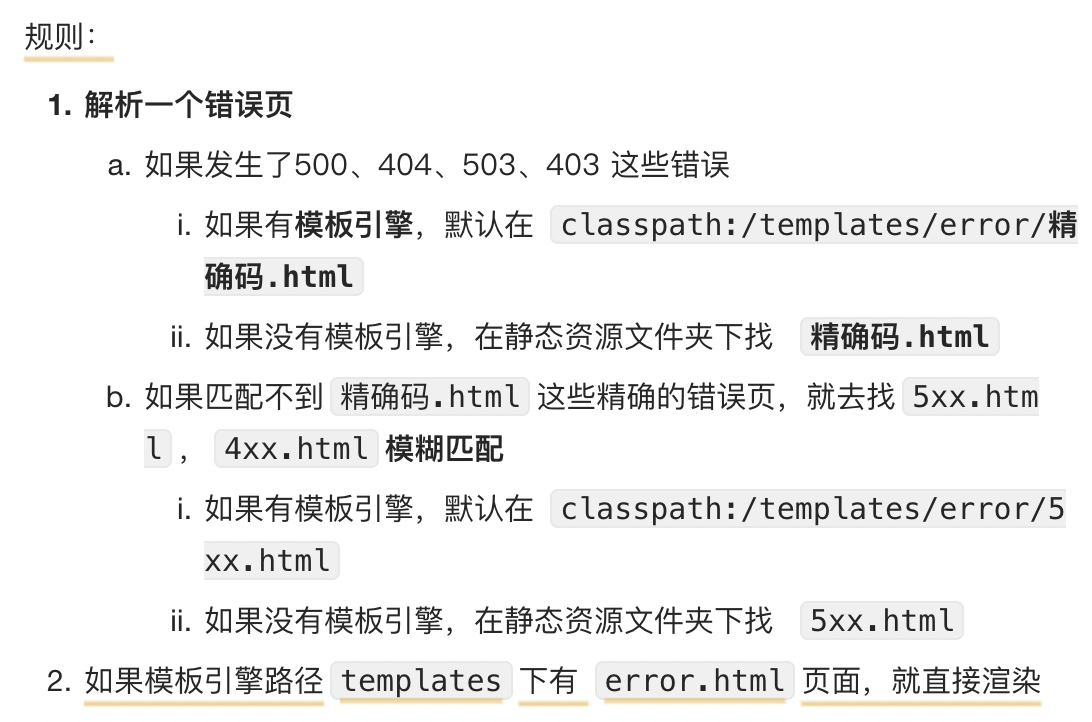
○ 不可预知的一些,HTTP码表示的服务器或客户端错误
■ 给classpath:/templates/error/下面,放常用精确的错误码页面。500.html,404.html
■ 给classpath:/templates/error/下面,放通用模糊匹配的错误码页面。 5xx.html,4xx.html
○ 发生业务错误
■ 核心业务,每一种错误,都应该代码控制,跳转到自己定制的错误页。
■ 通用业务,classpath:/templates/error.html页面,显示错误信息。
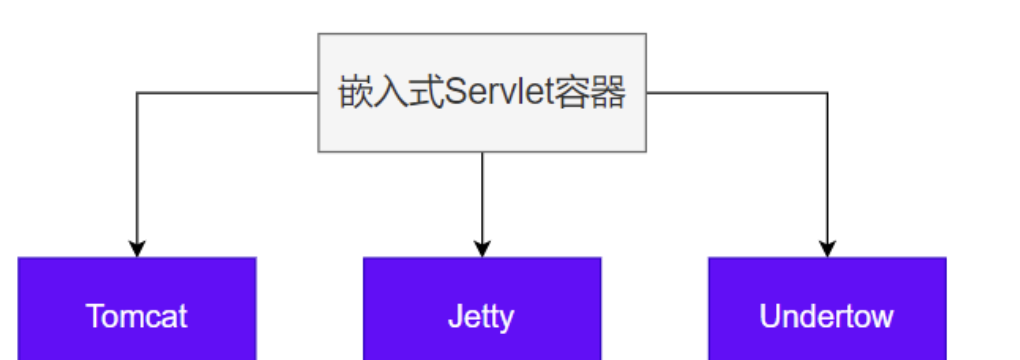
嵌入式容器
Servlet容器:管理、运行Servlet组件(Servlet、Filter、Listener)的环境,一般指服务器
1. 自动配置原理
● SpringBoot 默认嵌入Tomcat作为Servlet容器。
● 自动配置类是ServletWebServerFactoryAutoConfiguration,EmbeddedWebServerFactoryCustomizerAutoConfiguration
● 自动配置类开始分析功能。xxxxAutoConfiguration
@AutoConfiguration
@AutoConfigureOrder(Ordered.HIGHEST_PRECEDENCE)
@ConditionalOnClass(ServletRequest.class)
@ConditionalOnWebApplication(type = Type.SERVLET)
@EnableConfigurationProperties(ServerProperties.class)
@Import({
    ServletWebServerFactoryAutoConfiguration.BeanPostProcessorsRegistrar.class,
		ServletWebServerFactoryConfiguration.EmbeddedTomcat.class,
		ServletWebServerFactoryConfiguration.EmbeddedJetty.class,
		ServletWebServerFactoryConfiguration.EmbeddedUndertow.class })
public class ServletWebServerFactoryAutoConfiguration {


}
- ServletWebServerFactoryAutoConfiguration 自动配置了嵌入式容器场景
- 绑定了ServerProperties配置类,所有和服务器有关的配置 server
- ServletWebServerFactoryAutoConfiguration 导入了 嵌入式的三大服务器 Tomcat、Jetty、Undertow
a. 导入 Tomcat、Jetty、Undertow 都有条件注解。系统中有这个类才行(也就是导了包)
b. 默认 Tomcat配置生效。给容器中放 TomcatServletWebServerFactory
c. 都给容器中 ServletWebServerFactory放了一个 web服务器工厂(造web服务器的)
d. web服务器工厂 都有一个功能,getWebServer获取web服务器
e. TomcatServletWebServerFactory 创建了 tomcat。 - ServletWebServerFactory 什么时候会创建 webServer出来。
- ServletWebServerApplicationContextioc容器,启动的时候会调用创建web服务器
- Spring容器刷新(启动)的时候,会预留一个时机,刷新子容器。onRefresh()
- refresh() 容器刷新 十二大步的刷新子容器会调用 onRefresh();
	@Override
	protected void onRefresh() {

		super.onRefresh();
		try {

			createWebServer();
		}
		catch (Throwable ex) {

			throw new ApplicationContextException("Unable to start web server", ex);
		}
	}
Web场景的Spring容器启动,在onRefresh的时候,会调用创建web服务器的方法。
Web服务器的创建是通过WebServerFactory搞定的。容器中又会根据导了什么包条件注解,启动相关的 服务器配置,默认EmbeddedTomcat会给容器中放一个 TomcatServletWebServerFactory,导致项目启动,自动创建出Tomcat。
2. 自定义
切换服务器;
<properties>
    <servlet-api.version>3.1.0</servlet-api.version>
</properties>
<dependency>
    <groupId>org.springframework.boot</groupId>
    <artifactId>spring-boot-starter-web</artifactId>
    <exclusions>
        <!-- Exclude the Tomcat dependency -->
        <exclusion>
            <groupId>org.springframework.boot</groupId>
            <artifactId>spring-boot-starter-tomcat</artifactId>
        </exclusion>
    </exclusions>
</dependency>
<!-- Use Jetty instead -->
<dependency>
    <groupId>org.springframework.boot</groupId>
    <artifactId>spring-boot-starter-jetty</artifactId>
</dependency>
3. 最佳实践
用法:
● 修改server下的相关配置就可以修改服务器参数
● 通过给容器中放一个ServletWebServerFactory,来禁用掉SpringBoot默认放的服务器工厂,实现自定义嵌入任意服务器。
接管SpringMVC
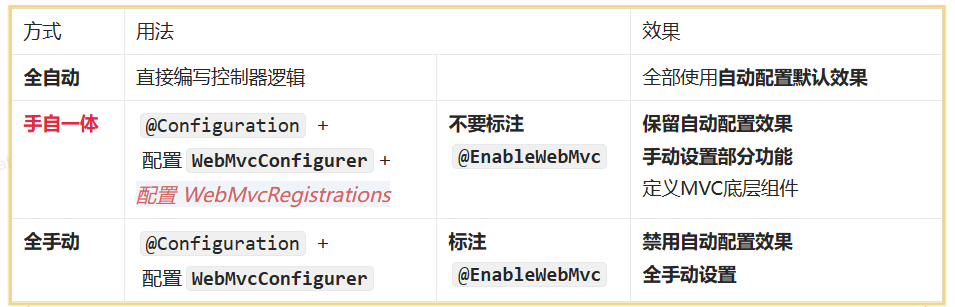
● SpringBoot 默认配置好了 SpringMVC 的所有常用特性。
● 如果我们需要全面接管SpringMVC的所有配置并禁用默认配置,仅需要编写一个WebMvcConfigurer配置类,并标注 @EnableWebMvc 即可
● 全手动模式
○ @EnableWebMvc : 禁用默认配置
○ WebMvcConfigurer组件:定义MVC的底层行为
1. WebMvcAutoConfiguration 到底自动配置了哪些规则
SpringMVC自动配置场景给我们配置了如下所有默认行为
- WebMvcAutoConfigurationweb场景的自动配置类
1.1. 支持RESTful的filter:HiddenHttpMethodFilter
1.2. 支持非POST请求,请求体携带数据:FormContentFilter
1.3. 导入EnableWebMvcConfiguration:
1.3.1. RequestMappingHandlerAdapter
1.3.2. WelcomePageHandlerMapping: 欢迎页功能支持(模板引擎目录、静态资源目录放index.html),项目访问/ 就默认展示这个页面.
1.3.3. RequestMappingHandlerMapping:找每个请求由谁处理的映射关系
1.3.4. ExceptionHandlerExceptionResolver:默认的异常解析器
1.3.5. LocaleResolver:国际化解析器
1.3.6. ThemeResolver:主题解析器
1.3.7. FlashMapManager:临时数据共享
1.3.8. FormattingConversionService: 数据格式化 、类型转化
1.3.9. Validator: 数据校验JSR303提供的数据校验功能
1.3.10. WebBindingInitializer:请求参数的封装与绑定
1.3.11. ContentNegotiationManager:内容协商管理器
1.4. WebMvcAutoConfigurationAdapter配置生效,它是一个WebMvcConfigurer,定义mvc底层组件
1.4.1. 定义好 WebMvcConfigurer 底层组件默认功能;所有功能详见列表
1.4.2. 视图解析器:InternalResourceViewResolver
1.4.3. 视图解析器:BeanNameViewResolver,视图名(controller方法的返回值字符串)就是组件名
1.4.4. 内容协商解析器:ContentNegotiatingViewResolver
1.4.5. 请求上下文过滤器:RequestContextFilter: 任意位置直接获取当前请求
1.4.6. 静态资源链规则
1.4.7. ProblemDetailsExceptionHandler:错误详情
1.4.7.1. SpringMVC内部场景异常被它捕获:
1.5. 定义了MVC默认的底层行为: WebMvcConfigurer
2. @EnableWebMvc 禁用默认行为
- @EnableWebMvc给容器中导入 DelegatingWebMvcConfiguration组件,
他是 WebMvcConfigurationSupport - WebMvcAutoConfiguration有一个核心的条件注解, @ConditionalOnMissingBean(WebMvcConfigurationSupport.class),容器中没有WebMvcConfigurationSupport,WebMvcAutoConfiguration才生效.
- @EnableWebMvc 导入 WebMvcConfigurationSupport 导致 WebMvcAutoConfiguration 失效。导致禁用了默认行为
● @EnableWebMVC 禁用了 Mvc的自动配置
● WebMvcConfigurer 定义SpringMVC底层组件的功能类
最佳实践
SpringBoot 已经默认配置好了Web开发场景常用功能。我们直接使用即可。
三种方式

总结:
给容器中写一个配置类@Configuration实现 WebMvcConfigurer但是不要标注 @EnableWebMvc注解,实现手自一体的效果。
两种模式
1、前后分离模式: @RestController 响应JSON数据
2、前后不分离模式:@Controller + Thymeleaf模板引擎