Flet是基于Python实现的Flutter图形界面GUI。除了使用Python,具备美观、简洁、易用,还有Flutter本身的跨平台(安卓、iOS、Win、Mac、Web)、高性能、有后盾的特点。下面是0.18版官方TODO APP教程,为了准确,保持了中英双语,请对照食用。
Create To-Do app in Python with Flet
使用Flet在Python中创建待办事项应用程序
In this tutorial we will show you, step-by-step, how to create a ToDo web app in Python using Flet framework and then share it on the internet. The app is a single-file console program of just 180 lines (formatted!) of Python code, yet it is a multi-session, modern single-page application with rich, responsive UI:
在本教程中,我们将逐步向您展示如何使用Flet框架在Python中创建ToDo web应用程序,然后在互联网上共享。该应用程序是一个只有180行(格式化!)Python代码的单文件控制台程序,但它是一个多会话、现代的单页应用程序,具有丰富、响应迅速的UI:
You can see the live demo here.
你可以在这里看到现场演示。
We chose a ToDo app for the tutorial, because it covers all of the basic concepts you would need to create any web app: building a page layout, adding controls, handling events, displaying and editing lists, making reusable UI components, and deployment options.
我们为教程选择了ToDo应用程序,因为它涵盖了创建任何web应用程序所需的所有基本概念:构建页面布局、添加控件、处理事件、显示和编辑列表、制作可重复使用的UI组件以及部署选项。
The tutorial consists of the following steps:
本教程包括以下步骤:
Getting started with Flet Flet入门
Adding page controls and handling events 添加页面控件和处理事件
View, edit and delete list items 查看、编辑和删除列表项
Filtering list items 筛选列表项
Final touches 最后的润色
Deploying the app 部署应用程序
Getting started with Flet Flet入门
To write a Flet web app you don’t need to know HTML, CSS or JavaScript, but you do need a basic knowledge of Python and object-oriented programming.
要编写Flet web应用程序,您不需要了解HTML、CSS或JavaScript,但您确实需要Python和面向对象编程的基本知识。
Flet requires Python 3.8 or above. To create a web app in Python with Flet, you need to install flet module first:
Flet需要Python 3.8或更高版本。要使用Flet在Python中创建web应用程序,您需要首先安装Flet模块:
pip install flet
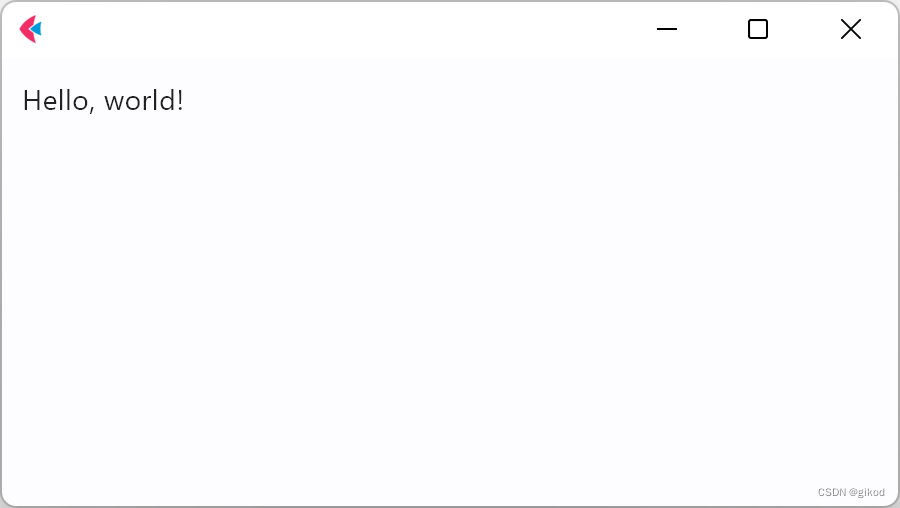
To start, let’s create a simple hello-world app.
首先,让我们创建一个简单的helloworld应用程序。
Create hello.py with the following contents:使用以下内容创建hello.py:
import flet as ft

def main(page: ft.Page):
    page.add(ft.Text(value="Hello, world!"))

ft.app(target=main)
Run this app and you will see a new window with a greeting:
运行此应用程序,您将看到一个带有问候语的新窗口:
Adding page controls and handling events
添加页面控件和处理事件
Now we’re ready to create a multi-user ToDo app.
现在,我们准备创建一个多用户ToDo应用程序。
To start, we’ll need a TextField for entering a task name, and an “+” FloatingActionButton with an event handler that will display a Checkbox with a new task.
首先,我们需要一个用于输入任务名称的TextField,以及一个带有事件处理程序的“+”FloatingActionButton,该事件处理程序将显示带有新任务的复选框。
Create todo.py with the following contents:创建包含以下内容的todo.py:
import flet as ft

def main(page: ft.Page):
    def add_clicked(e):
        page.add(ft.Checkbox(label=new_task.value))
        new_task.value = ""
        page.update()

    new_task = ft.TextField(hint_text="Whats needs to be done?")

    page.add(new_task, ft.FloatingActionButton(icon=ft.icons.ADD, on_click=add_clicked))

ft.app(target=main)
Run the app and you should see a page like this:
运行应用程序,您应该会看到这样的页面:

Page layout页面布局
Now let’s make the app look nice! We want the entire app to be at the top center of the page, taking up 600 px width. The TextField and the “+” button should be aligned horizontally, and take up full app width:
现在让我们让应用程序看起来很好看!我们希望整个应用程序位于页面的顶部中心,占据600像素的宽度。TextField和“+”按钮应水平对齐,并占据整个应用程序宽度:
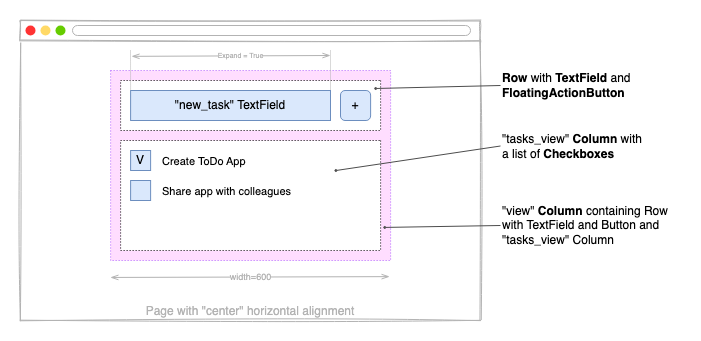
Row is a control that is used to lay its children controls out horizontally on a page. Column is a control that is used to lay its children controls out vertically on a page.
行是一个控件,用于在页面上水平放置其子控件。列是一个控件,用于在页面上垂直放置其子控件。
Replace todo.py contents with the following:将todo.py内容替换为以下内容:
import flet as ft


def main(page: ft.Page):
    def add_clicked(e):
        tasks_view.controls.append(ft.Checkbox(label=new_task.value))
        new_task.value = ""
        view.update()

    new_task = ft.TextField(hint_text="Whats needs to be done?", expand=True)
    tasks_view = ft.Column()
    view=ft.Column(
        width=600,
        controls=[
            ft.Row(
                controls=[
                    new_task,
                    ft.FloatingActionButton(icon=ft.icons.ADD, on_click=add_clicked),
                ],
            ),
            tasks_view,
        ],
    )

    page.horizontal_alignment = ft.CrossAxisAlignment.CENTER
    page.add(view)

ft.app(target=main)
Run the app and you should see a page like this:
运行应用程序,您应该会看到这样的页面:

Reusable UI components可重用的UI组件
While we could continue writing our app in the main function, the best practice would be to create a reusable UI component. Imagine you are working on an app header, a side menu, or UI that will be a part of a larger project. Even if you can’t think of such uses right now, we still recommend creating all your web apps with composability and reusability in mind.
虽然我们可以继续在主功能中编写应用程序,但最佳实践是创建一个可重用的UI组件。想象一下,你正在处理一个应用程序标题、侧菜单或UI,这将是一个更大项目的一部分。即使您现在还想不出这样的用途,我们仍然建议您在创建所有web应用程序时考虑到可组合性和可重用性。
To make a reusable ToDo app component, we are going to encapsulate its state and presentation logic in a separate class:
为了制作一个可重复使用的ToDo应用程序组件,我们将把它的状态和表示逻辑封装在一个单独的类中:
import flet as ft

class TodoApp(ft.UserControl):
    def build(self):
        self.new_task = ft.TextField(hint_text="Whats needs to be done?", expand=True)
        self.tasks = ft.Column()

        # application's root control (i.e. "view") containing all other controls
        return ft.Column(
            width=600,
            controls=[
                ft.Row(
                    controls=[
                        self.new_task,
                        ft.FloatingActionButton(icon=ft.icons.ADD, on_click=self.add_clicked),
                    ],
                ),
                self.tasks,
            ],
        )

    def add_clicked(self, e):
        self.tasks.controls.append(ft.Checkbox(label=self.new_task.value))
        self.new_task.value = ""
        self.update()


def main(page: ft.Page):
    page.title = "ToDo App"
    page.horizontal_alignment = ft.CrossAxisAlignment.CENTER
    page.update()

    # create application instance
    todo = TodoApp()

    # add application's root control to the page
    page.add(todo)

ft.app(target=main)
NOTE 提示
Try adding two TodoApp components to the page:尝试在页面中添加两个TodoApp组件:
# create application instance
app1 = TodoApp()
app2 = TodoApp()

# add application's root control to the page
page.add(app1, app2)
View, edit and delete list items
查看、编辑和删除列表项
In the previous step, we created a basic ToDo app with task items shown as checkboxes. Let’s improve the app by adding “Edit” and “Delete” buttons next to a task name. The “Edit” button will switch a task item to edit mode.
在上一步中,我们创建了一个基本的ToDo应用程序,其中任务项显示为复选框。让我们通过在任务名称旁边添加“编辑”和“删除”按钮来改进应用程序。“编辑”按钮将任务项目切换到编辑模式。

Each task item is represented by two rows: display_view row with Checkbox, “Edit” and “Delete” buttons and edit_view row with TextField and “Save” button. view column serves as a container for both display_view and edit_view rows.
每个任务项由两行表示:带有复选框、“编辑”和“删除”按钮的display_view行,以及带有TextField和“保存”按钮的Edit_view列。view列充当display_view和edit_view行的容器。
Before this step, the code was short enough to be fully included in the tutorial. Going forward, we will be highlighting only the changes introduced in a step.
在此步骤之前,代码足够短,可以完全包含在教程中。展望未来,我们将只强调一步中引入的变化。
Copy the entire code for this step from here. Below we will explain the changes we’ve done to implement view, edit, and delete tasks.
从这里复制此步骤的全部代码。下面我们将解释我们为实现查看、编辑和删除任务所做的更改。
To encapsulate task item views and actions, we introduced a new Task class:
为了封装任务项视图和操作,我们引入了一个新的task类:
class Task(ft.UserControl):
    def __init__(self, task_name):
        super().__init__()
        self.task_name = task_name

    def build(self):
        self.display_task = ft.Checkbox(value=False, label=self.task_name)
        self.edit_name = ft.TextField(expand=1)

        self.display_view = ft.Row(
            alignment=ft.MainAxisAlignment.SPACE_BETWEEN,
            vertical_alignment=ft.CrossAxisAlignment.CENTER,
            controls=[
                self.display_task,
                ft.Row(
                    spacing=0,
                    controls=[
                        ft.IconButton(
                            icon=ft.icons.CREATE_OUTLINED,
                            tooltip="Edit To-Do",
                            on_click=self.edit_clicked,
                        ),
                        ft.IconButton(
                            ft.icons.DELETE_OUTLINE,
                            tooltip="Delete To-Do",
                            on_click=self.delete_clicked,
                        ),
                    ],
                ),
            ],
        )

        self.edit_view = ft.Row(
            visible=False,
            alignment=ft.MainAxisAlignment.SPACE_BETWEEN,
            vertical_alignment=ft.CrossAxisAlignment.CENTER,
            controls=[
                self.edit_name,
                ft.IconButton(
                    icon=ft.icons.DONE_OUTLINE_OUTLINED,
                    icon_color=ft.colors.GREEN,
                    tooltip="Update To-Do",
                    on_click=self.save_clicked,
                ),
            ],
        )
        return ft.Column(controls=[self.display_view, self.edit_view])

    def edit_clicked(self, e):
        self.edit_name.value = self.display_task.label
        self.display_view.visible = False
        self.edit_view.visible = True
        self.update()

    def save_clicked(self, e):
        self.display_task.label = self.edit_name.value
        self.display_view.visible = True
        self.edit_view.visible = False
        self.update()
Additionally, we changed TodoApp class to create and hold Task instances when the “Add” button is clicked:
此外,我们还更改了TodoApp类,以便在单击“添加”按钮时创建并保留Task实例:
class TodoApp(ft.UserControl):
    def build(self):
        self.new_task = ft.TextField(hint_text="Whats needs to be done?", expand=True)
        self.tasks = ft.Column()
        # ...

    def add_clicked(self, e):
        task = Task(self.new_task.value, self.task_delete)
        self.tasks.controls.append(task)
        self.new_task.value = ""
        self.update()
For “Delete” task operation, we implemented task_delete() method in TodoApp class which accepts task control instance as a parameter:
对于“Delete”任务操作,我们在TodoApp类中实现了task_Delete()方法,该方法接受任务控制实例作为参数:
class TodoApp(ft.UserControl):
    # ...
    def task_delete(self, task):
        self.tasks.controls.remove(task)
        self.update()
Then, we passed a reference to task_delete method into Task constructor and called it on “Delete” button event handler:
然后,我们将对task_delete方法的引用传递到task构造函数中,并在“delete”按钮事件处理程序上调用它:
class Task(ft.UserControl):
    def __init__(self, task_name, task_delete):
        super().__init__()
        self.task_name = task_name
        self.task_delete = task_delete

        # ...

    def delete_clicked(self, e):
        self.task_delete(self)
Run the app and try to edit and delete tasks:
运行应用程序并尝试编辑和删除任务:

Filtering list items筛选列表项
We already have a functional ToDo app where we can create, edit, and delete tasks. To be even more productive, we want to be able to filter tasks by their status.
我们已经有了一个功能强大的ToDo应用程序,可以在其中创建、编辑和删除任务。为了提高工作效率,我们希望能够根据任务的状态筛选任务。
Copy the entire code for this step from here. Below we will explain the changes we’ve done to implement filtering.
从这里复制此步骤的全部代码。下面我们将解释我们为实现过滤所做的更改。
Tabs control is used to display filter:选项卡控件用于显示筛选器:
# ...

class TodoApp(ft.UserControl):
    def __init__(self):
        self.tasks = []
        self.new_task = ft.TextField(hint_text="Whats needs to be done?", expand=True)
        self.tasks = ft.Column()

        self.filter = ft.Tabs(
            selected_index=0,
            on_change=self.tabs_changed,
            tabs=[ft.Tab(text="all"), ft.Tab(text="active"), ft.Tab(text="completed")],
        )

        self.view = ft.Column(
            width=600,
            controls=[
                ft.Row(
                    controls=[
                        self.new_task,
                        ft.FloatingActionButton(icon=ft.icons.ADD, on_click=self.add_clicked),
                    ],
                ),
                ft.Column(
                    spacing=25,
                    controls=[
                        self.filter,
                        self.tasks,
                    ],
                ),
            ],
        )
To display different lists of tasks depending on their statuses, we could maintain three lists with “All”, “Active” and “Completed” tasks. We, however, chose an easier approach where we maintain the same list and only change a task’s visibility depending on its status.
为了根据任务的状态显示不同的任务列表,我们可以维护三个列表,分别为“全部”、“活动”和“已完成”任务。然而,我们选择了一种更简单的方法,即维护相同的列表,只根据任务的状态更改任务的可见性。
In TodoApp class we overrided update() method which iterates through all the tasks and updates their visible property depending on the status of the task:
在TodoApp类中,我们重写了update()方法,该方法迭代所有任务,并根据任务的状态更新其可见属性:
class TodoApp(ft.UserControl):

    # ...

    def update(self):
        status = self.filter.tabs[self.filter.selected_index].text
        for task in self.tasks.controls:
            task.visible = (
                status == "all"
                or (status == "active" and task.completed == False)
                or (status == "completed" and task.completed)
            )
        super().update()
Filtering should occur when we click on a tab or change a task status. TodoApp.update() method is called when Tabs selected value is changed or Task item checkbox is clicked:
当我们单击选项卡或更改任务状态时,应该进行筛选。TodoApp.update()方法在Tabs所选值发生更改或单击Task项复选框时调用:
class TodoApp(ft.UserControl):

    # ...

    def tabs_changed(self, e):
        self.update()

class Task(ft.UserControl):
    def __init__(self, task_name, task_status_change, task_delete):
        super().__init__()
        self.completed = False
        self.task_name = task_name
        self.task_status_change = task_status_change
        self.task_delete = task_delete

    def build(self):
        self.display_task = ft.Checkbox(
            value=False, label=self.task_name, on_change=self.status_changed
        )
        # ...

    def status_changed(self, e):
        self.completed = self.display_task.value
        self.task_status_change(self)
Run the app and try filtering tasks by clicking on the tabs:
运行应用程序并尝试通过单击选项卡筛选任务:

Final touches最后的润色
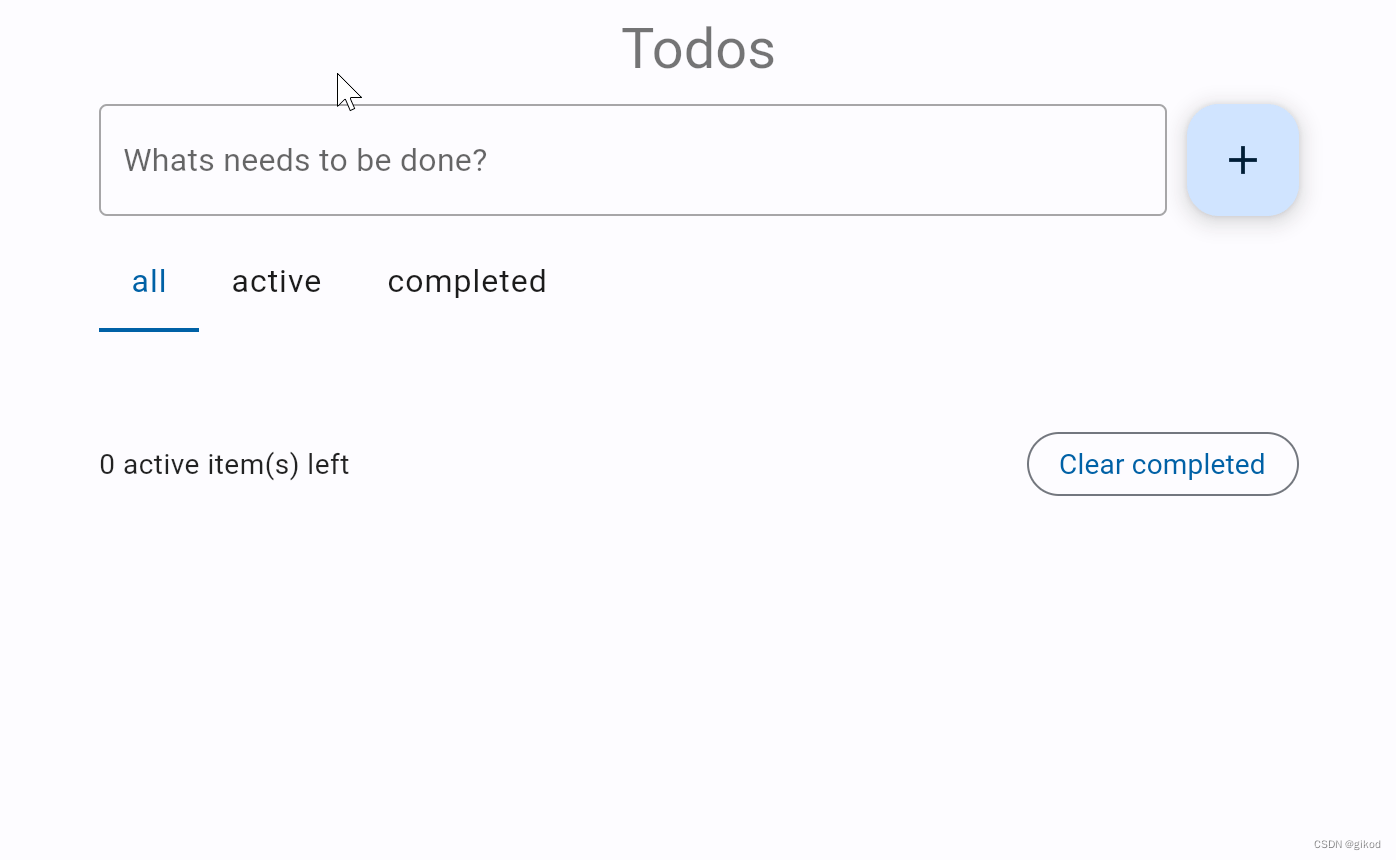
Our Todo app is almost complete now. As a final touch, we will add a footer (Column control) displaying the number of incomplete tasks (Text control) and a “Clear completed” button.
我们的Todo应用程序现在几乎完成了。最后,我们将添加一个页脚(列控件),显示未完成任务的数量(文本控件)和一个“清除已完成”按钮。
Copy the entire code for this step from here. Below we highlighted the changes we’ve done to implement the footer:
从这里复制此步骤的全部代码。下面我们重点介绍了我们为实现页脚所做的更改:
class TodoApp():
    def __init__(self):
        # ...

        self.items_left = ft.Text("0 items left")

        self.view = ft.Column(
            width=600,
            controls=[
                ft.Row([ ft.Text(value="Todos", style="headlineMedium")], alignment=ft.MainAxisAlignment.CENTER),
                ft.Row(
                    controls=[
                        self.new_task,
                        ft.FloatingActionButton(icon=ft.icons.ADD, on_click=self.add_clicked),
                    ],
                ),
                ft.Column(
                    spacing=25,
                    controls=[
                        self.filter,
                        self.tasks,
                        ft.Row(
                            alignment=ft.MainAxisAlignment.SPACE_BETWEEN,
                            vertical_alignment=ft.CrossAxisAlignment.CENTER,
                            controls=[
                                self.items_left,
                                ft.OutlinedButton(
                                    text="Clear completed", on_click=self.clear_clicked
                                ),
                            ],
                        ),
                    ],
                ),
            ],
        )

    # ...

    def clear_clicked(self, e):
        for task in self.tasks.controls[:]:
            if task.completed:
                self.task_delete(task)

    def update(self):
        status = self.filter.tabs[self.filter.selected_index].text
        count = 0
        for task in self.tasks.controls:
            task.visible = (
                status == "all"
                or (status == "active" and task.completed == False)
                or (status == "completed" and task.completed)
            )
            if not task.completed:
                count += 1
        self.items_left.value = f"{
     count} active item(s) left"
        super().update()
Run the app:运行应用程序:

Deploying the app部署应用程序
Congratulations! You have created your first Python app with Flet, and it looks awesome!
祝贺你已经用Flet创建了你的第一个Python应用程序,它看起来很棒!
Now it’s time to share your app with the world!
现在是时候与全世界分享您的应用程序了!
Follow these instructions to deploy your Flet app as a web app to Fly.io or Replit.
按照以下说明将Flet应用程序作为web应用程序部署到Fly.io或Replit。
Summary总结
In this tutorial, you have learnt how to:在本教程中,您已经学会了如何:
Create a simple Flet app;创建一个简单的Flet应用程序;
Work with Reusable UI components;使用可重用的UI组件;
Design UI layout using Column and Row controls;使用列和行控件设计UI布局;
Work with lists: view, edit and delete items, filtering;
使用列表:查看、编辑和删除项目,过滤;
Deploy your Flet app to the web;将Flet应用程序部署到网络;
For further reading you can explore controls and examples repository.
为了进一步阅读,您可以浏览控件和示例存储库。
We would love to hear your feedback! Please drop us an email, join the discussion on Discord, follow on Twitter.
我们很乐意听取您的反馈!请给我们发电子邮件,加入Discord上的讨论,在Twitter上关注。


![Flask+Bootstrap4案例[有源码]](https://img-blog.csdnimg.cn/direct/4321a8938fe24f0cae90bb2a3c461614.png#pic_center)