跨服务上传文件,嘿嘿,来一篇实用性高的,本篇将主要完成在Feign中上传文件到另一个微服务中。步骤如下:
我们需要在服务提供者和服务消费者的项目中添加相应的依赖:
对于服务提供者的项目,你需要添加Spring Boot的Web依赖和Spring Cloud的Feign依赖。在pom.xml文件中添加以下依赖:
<dependencies>
    <!-- Spring Boot Web -->
    <dependency>
        <groupId>org.springframework.boot</groupId>
        <artifactId>spring-boot-starter-web</artifactId>
    </dependency>

    <!-- Spring Cloud Feign -->
    <dependency>
        <groupId>org.springframework.cloud</groupId>
        <artifactId>spring-cloud-starter-openfeign</artifactId>
    </dependency>
</dependencies>
对于服务消费者的项目,除了上述的依赖外,还需要添加Feign的文件上传支持依赖。在pom.xml文件中添加以下依赖:
<dependencies>
    <!-- Spring Boot Web -->
    <dependency>
        <groupId>org.springframework.boot</groupId>
        <artifactId>spring-boot-starter-web</artifactId>
    </dependency>

    <!-- Spring Cloud Feign -->
    <dependency>
        <groupId>org.springframework.cloud</groupId>
        <artifactId>spring-cloud-starter-openfeign</artifactId>
    </dependency>

        <!-- Feign 文件上传支持 -->
        <dependency>
            <groupId>io.github.openfeign.form</groupId>
            <artifactId>feign-form</artifactId>
            <version>3.8.0</version>
        </dependency>
</dependencies>
注意,Feign的文件上传支持依赖是feign-form,需要指定相应的版本号。
正式开始
在服务提供者的微服务中,创建一个接收文件上传的接口。可以使用@RequestParam(“file”) MultipartFile file来接收文件参数。
@PostMapping("/upload")
void uploadFile(@RequestParam("file") MultipartFile file);
在服务消费者的微服务中,创建一个Feign接口,并使用@FeignClient注解标记它。在接口中定义上传文件的方法,使用@PostMapping注解,并指定上传文件的路径。
@FeignClient(name = "file-service")
public interface FileServiceClient {


    @PostMapping("/upload")
    void uploadFile(@RequestParam("file") MultipartFile file);
}
在服务消费者的微服务中,配置Feign的文件上传支持。在配置类中添加@Configuration注解,并创建一个FeignClientConfig类,使用@Bean注解配置Encoder和Decoder。
@Configuration
public class FeignClientConfig {


    @Bean
    public Encoder feignFormEncoder() {

        return new SpringFormEncoder();
    }

    @Bean
    public Decoder feignDecoder() {

        return new ResponseEntityDecoder(new SpringDecoder(feignHttpMessageConverter()));
    }

    private ObjectFactory<HttpMessageConverters> feignHttpMessageConverter() {

        final HttpMessageConverters httpMessageConverters = new HttpMessageConverters(new FormHttpMessageConverter());
        return () -> httpMessageConverters;
    }
}
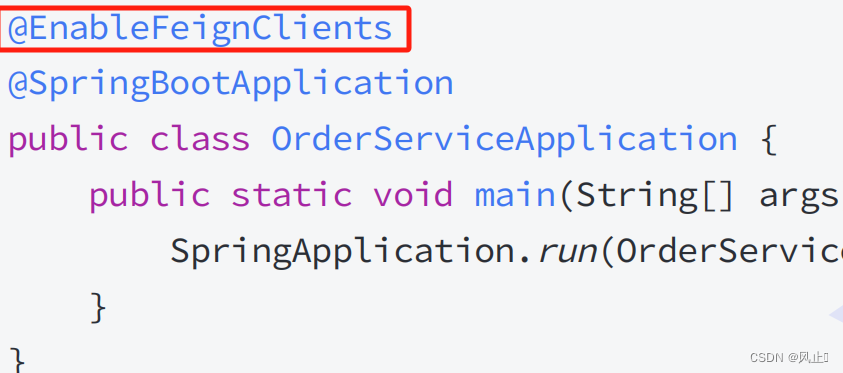
在服务消费者的微服务中,使用@EnableFeignClients注解启用Feign客户端,并在需要上传文件的地方注入FileServiceClient接口,调用uploadFile方法即可完成文件上传。
@SpringBootApplication
@EnableFeignClients
public class ConsumerApplication {


    @Autowired
    private FileServiceClient fileServiceClient;

    public static void main(String[] args) {

        SpringApplication.run(ConsumerApplication.class, args);
    }

    public void uploadFile(MultipartFile file) {

        fileServiceClient.uploadFile(file);
    }
}
这样,通过Feign客户端调用uploadFile方法时,会将文件作为参数上传到服务提供者的微服务中。注意,需要确保服务提供者和服务消费者的微服务都引入了相应的依赖,并且配置正确。
在以上代码中,我们已经定义了Feign客户端接口FileServiceClient,并在服务消费者的代码中注入了该接口。现在,我们只需要在服务消费者的代码中调用FileServiceClient的uploadFile方法,即可完成文件上传。
假设我们要上传的文件是一个MultipartFile对象,可以按照以下方式完成文件上传:
@Autowired
private FileServiceClient fileServiceClient;

public void uploadFile(MultipartFile file) {

    fileServiceClient.uploadFile(file);
}
在调用uploadFile方法时,Feign会将MultipartFile对象转换为multipart/form-data格式,并将其作为请求体发送到服务提供者的微服务中。服务提供者的微服务会接收到文件,并进行相应的处理。
需要注意的是,Feign默认使用的是application/json格式进行请求和响应的序列化和反序列化。如果要使用multipart/form-data格式进行文件上传,需要在服务消费者的代码中配置Feign的文件上传支持。
前端界面:
在网页中实现文件上传,可以使用HTML的<form>元素和<input type="file">元素来创建一个文件上传表单。然后,通过JavaScript和AJAX将文件发送到服务端。
<!DOCTYPE html>
<html>
<head>
    <title>文件上传</title>
</head>
<body>
    <h1>文件上传</h1>
    <form id="uploadForm" enctype="multipart/form-data">
        <input type="file" name="file" id="fileInput">
        <button type="submit">上传</button>
    </form>

    <div id="message"></div>

    <script>
        document.getElementById("uploadForm").addEventListener("submit", function(event) {

            event.preventDefault(); // 阻止表单默认提交行为

            var fileInput = document.getElementById("fileInput");
            var file = fileInput.files[0]; // 获取选择的文件

            var formData = new FormData();
            formData.append("file", file); // 将文件添加到FormData对象中

            var xhr = new XMLHttpRequest();
            xhr.open("POST", "/upload"); // 设置请求方法和URL
            xhr.onload = function() {

                if (xhr.status === 200) {

                    document.getElementById("message").textContent = "文件上传成功!";
                } else {

                    document.getElementById("message").textContent = "文件上传失败!";
                }
            };
            xhr.send(formData); // 发送请求
        });
    </script>
</body>
</html>
要通过localhost:端口号直接访问HTML页面,需要在Spring Boot应用程序中添加一个控制器,将HTML页面映射到一个URL路径上。
我的HTML页面名为upload.html,并且位于src/main/resources/static目录下。
@Controller
public class UploadController {

    @GetMapping("/")
    public String index() {

        return "upload.html";
    }
}
在上述代码中,我们创建了一个名为UploadController的控制器,并使用@GetMapping注解将/路径映射到upload.html页面。当用户访问localhost:端口号时,将自动跳转到upload.html页面。
需要注意的是,为了使Spring Boot能够正确地处理静态资源,你需要在application.properties文件中添加以下配置:
spring.mvc.static-path-pattern=/static/**
这将告诉Spring Boot将所有以/static/开头的URL路径映射到src/main/resources/static目录下的静态资源。因此,你需要将upload.html文件放置在src/main/resources/static目录下。
至此,文件上传的大概框架就搭建好了,可以去练练手了