【基于C++与OpenCV实现魔方图像识别和还原算法】魔方色块识别
文章目录
我们要能使摄像头读取魔方的颜色,需要分为两个部分:
获取魔方六个颜色面的HSV值,使得需要识别的颜色可以在画面中能被唯一分割出来。
划定区域,使得魔方的颜色可以更为精准和统一化的识别,再回传给主程序
注意:这篇博客给出的是一个实现思路和完整的代码示例,但并不能适配每一个魔方的颜色,具体的操作还需要读者进一步完善。
1. 通过阈值过滤目标颜色的HSV值
在这个模块中,我们将获取魔方六面颜色的HSV阈值。
1.1 HSV颜色空间
HSV颜色空间是一种基于人类视觉感知的颜色表示方法:
- Hue(色相):表示颜色的种类,取值范围为0到179。
- Saturation(饱和度):表示颜色的纯度,取值范围为0到255。
- Value(亮度):表示颜色的明度,取值范围为0到255。
相比于RGB颜色空间,HSV颜色空间更容易用于颜色过滤和分割,因为不同颜色的色相值是相对独立的。
1.2 代码逻辑
- 读取图片:从指定路径读取图片。
- 颜色转换:将图片从BGR颜色空间转换为HSV颜色空间。
- 阈值设置:根据预设的颜色阈值或用户调节的阈值,设置HSV范围。
- 颜色过滤:使用
inRange函数,根据设置的HSV范围过滤出目标颜色区域,生成一个二值掩码(mask)。 - 显示结果:显示原始图片和过滤后的掩码图像。
- 打印结果:记录结果,方便下一步使用
注意:选择图片识别是为了静态好掌控,也可以选择相机画面进行筛选颜色,方法是一样的
1.3 核心步骤
完整的示例代码在文末,可拷贝到本地进行测验,记录自己的魔方HSV值
- 读取和转换图片
// 图片路径
string path = "Resources/" + colors[PIC_INT] + ".jpg";
img = imread(path);				// 读取图片
// 转换色域变为HSV颜色 -> 存储为imgHSV
cvtColor(img, imgHSV, COLOR_BGR2HSV);
- 设置HSV阈值
// 通常为 0 0 0
// 179 255 255
// 也可以自行设置初始值,之后会调节的,所以没有关系
Scalar lower(hmin, smin, vmin);
Scalar upper(hmax, smax, vmax);
- 颜色过滤并显示
// 根据设置的lower和upper值对imgHSV进行遮罩->存储到mask图像中
inRange(imgHSV, lower, upper, mask);
// 比较展示
imshow("Image", img);
imshow(MASK_TITEL, mask);

- 具体的颜色调节器
	// 设置一个窗口(640 x 200),控制这些值的大小
	namedWindow("Trackbars", (640, 200));
	createTrackbar("Hue Min", "Trackbars", &hmin, 179);
	createTrackbar("Hue Max", "Trackbars", &hmax, 179);
	createTrackbar("Sat Min", "Trackbars", &smin, 255);
	createTrackbar("Sat Max", "Trackbars", &smax, 255);
	createTrackbar("Val Min", "Trackbars", &vmin, 255);
	createTrackbar("Val Max", "Trackbars", &vmax, 255);

	// 拖动flag将打印当前筛选的hsv值
	createTrackbar("print vals", "Trackbars", &flag, 2);		// 切换检测图片
	createTrackbar("pic ", "Trackbars", &PIC_INT, 5);			// 标注当前检测什么颜色
	createTrackbar("cur color", "Trackbars", &COLOR_INT, 5);	// 从map中取出新的hsv值组合
	createTrackbar("setup check color", "Trackbars", &check, 1);

2. 在画面上勾勒识别到的魔方颜色并标注
在这个模块中,我们将打开摄像头,根据上面获取到的HSV值,选中魔方图像色块的颜色,勾勒轮廓展示,同样是验证一下我们获取值的正确性。
2.1 原理
颜色空间转换:将图像从BGR颜色空间转换为HSV颜色空间,以便更容易分离和检测特定颜色。
颜色过滤:根据预定义的HSV阈值过滤出目标颜色区域,生成一个二值掩码。
轮廓检测:在二值掩码图像中检测轮廓,以确定颜色区域的边界。
轮廓绘制和标记:在原始图像上绘制检测到的轮廓,并在轮廓区域内标记颜色名称。
2.2 实现步骤
1、定义HSV阈值和颜色映射
myColors存储了六种颜色的HSV阈值。myColorValues存储了这些颜色在BGR颜色空间中的表示,用于绘制轮廓。colorMap和colors用于将颜色索引映射到颜色名称。
// 六色的hmin, hmax, smin, smax, vmin, vmax
vector<vector<int>> myColors = { ... };
// 标准的BGR红、蓝、白、黄、橙、绿的值
vector<Scalar> myColorValues = { ... };
// 颜色索引和名称的映射
unordered_map<int, string> colorMap = { ... };
unordered_map<int, string> colors = { ... };
2、获取轮廓函数
getContours()函数用于在二值图像中查找轮廓,计算轮廓的面积和周长,逼近轮廓多边形,并在原图上绘制轮廓和标记颜色名称。
// imgDil是进行遮罩后的图像,
// objectType 标注当前是在识别那个颜色
void getContours(Mat imgDil, string objectType) {
    vector<vector<Point>> contours;
	vector<Vec4i> hierarchy;
   /**
	* findContours()用于在二值图像中查找轮廓
	* contours 将存储找到的轮廓,每个轮廓都是一个包含一系列点的向量
	* hierarchy 用于存储轮廓之间的关系,即层次结构信息
	* mode(检测模式):  RETR_EXTERNAL -- 》 表示只检测最外层轮廓。
	* method(检测方式): CHAIN_APPROX_SIMPLE  --》 表示对轮廓中的冗余点进行压缩,只保留端点
	*/
    findContours(imgDil, contours, hierarchy, RETR_EXTERNAL, CHAIN_APPROX_SIMPLE);


    for (int i = 0; i < contours.size(); i++) {
        // 计算该轮廓的面积
        int area = contourArea(contours[i]);

        // 过于小块的分割不计入判断
        // 如果为红色则除外(因为识别精度问题,后续会说明)
        if (objectType == "Red" || area > 1000) {
            // arcLength()  用于计算轮廓的周长,true表示轮廓是封闭的
            float peri = arcLength(contours[i], true);

            // 对轮廓根据一定精度进行逼近,可以想象以下微积分
			// approxPolyDp(src, dst, precision, bool) bool表示轮廓是否为封闭的
			// precision表示逼近精度,是原始轮廓周长的百分比,越小表示逼近越精细
            approxPolyDP(contours[i], conPoly[i], 0.002 * peri, true);

            // 勾勒魔方色块的轮廓
            drawContours(img, conPoly, i, Scalar(255, 0, 255), 2);
            // 标记颜色
            putText(img, objectType, { boundRect[i].x, boundRect[i].y - 5 }, FONT_HERSHEY_PLAIN, 1, Scalar(0, 69, 255), 2);
        }
    }
}
3、颜色检测函数
findColor()函数将图像从BGR转换为HSV颜色空间,并对每种预定义颜色进行过滤。使用
inRange()函数生成二值掩码,并通过getContours()函数检测轮廓和绘制结果。
void findColor(Mat img) {
    Mat imgHSV;
    cvtColor(img, imgHSV, COLOR_BGR2HSV);

    // 定义的六种颜色将会被识别
    for (int i = 0; i < myColors.size(); i++) {
        Scalar lower(myColors[i][0], myColors[i][2], myColors[i][4]);
        Scalar upper(myColors[i][1], myColors[i][3], myColors[i][5]);
        Mat mask;

        // 识别出来的颜色,将会是白色块,其余是黑色
        inRange(imgHSV, lower, upper, mask);
        Mat maskTemp;
        // 高斯模糊,进行降噪,增强轮廓检测的稳定性
        GaussianBlur(mask, maskTemp, Size(3, 3), 3, 0);

        // 在原图中勾勒获取识别的色块
        getContours(maskTemp, colorMap[i]);
    }
}
4、主函数
打开摄像头,并在循环中逐帧读取视频内容。
调用
findColor()函数检测颜色并绘制结果。
void main() {
    VideoCapture cap(0);
    while (true) {
        cap.read(img);
        findColor(img);
        imshow("Image", img);
        waitKey(1);
    }
}


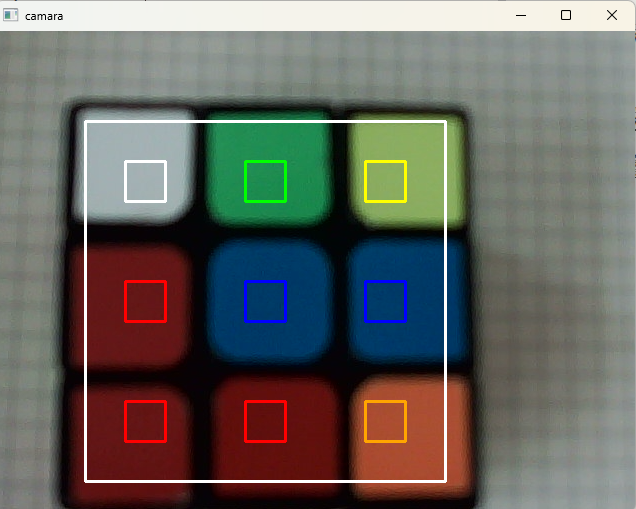
2.3 改进
从画面中我们可以看出,这种识别结果的精度存在一些问题,尤其是红色和橙色本身颜色比较接近,会使得识别有一定偏差。
所以我进行了一下改进。
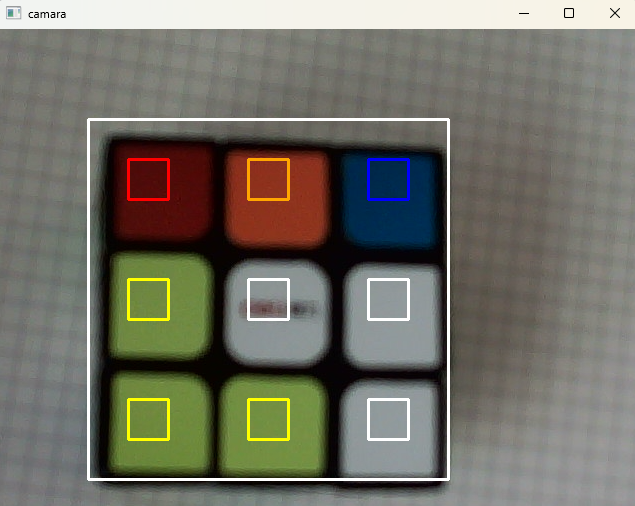
- 在摄像画面中标出一个固定的矩形识别框,在识别框的九个点位上再划定识别的点位。
- 将点位中的图像剪裁出来,进行识别
// 識別框
// 在img绘制一个矩形
// args: 左上角,右下角,颜色,线条厚度
rectangle(img, Frame[0], Frame[1], WHITE, 2);

...

// img是原始画面,根据Rect进行原始图像进行剪裁
// 处理剪裁后的图像,接着2.2的步骤
Rect roi(ninePoints[i][0],ninePoints[i][1]);
divCube = img(roi);
cvtColor(divCube, divHSV, COLOR_BGR2HSV);

完整代码
- ColorPickDemo.cpp (获取需要识别的颜色HSV值)
#include<opencv2/imgcodecs.hpp>
#include<opencv2/highgui.hpp>
#include<opencv2/imgproc.hpp>
#include<iostream>
#include<unordered_map>

using namespace cv;
using namespace std;


// 获取六色HSV值
// Color Detection  ///

Mat imgHSV, mask;
int hmin = 0, smin = 0, vmin = 0;
int hmax = 179, smax = 255, vmax = 255;

//VideoCapture cap(0);			// 如果要使用摄像头,需要打开这行注释
Mat img;
int flag = 0;
int COLOR_INT = 0;
int cur_color = 0;
int PIC_INT = 2;
int check = 1;

unordered_map<int, string> colors = { {0,"white"},{1,"yellow"},
									{2,"blue"},{3,"red"},
									{4,"green"},{5,"orange"} };

// 给出了一个预先准备好的HSV值
vector<vector<int>> myColors = { {63, 179,0, 148,108, 255},  // white
								{18, 51,56, 179,91, 255},	   // yellow
								{ 98, 136,109, 255,35, 113},		// blue
								{ 0, 0,177, 255,61, 129},		// red
								{ 58, 86,85, 255,29, 255},		// green
								{  2, 29,105, 199,72, 255}   // orange
};

void setHSV(int i) {
	hmin = myColors[i][0];
	hmax = myColors[i][1];
	smin = myColors[i][2];
	smax = myColors[i][3];
	vmin = myColors[i][4];
	vmax = myColors[i][5];
}

void print_cur_color() {
	// 当前筛选的值为
	cout << "[ cur_dev_color is: " << colors[COLOR_INT] << " ]" << endl;
}

void upgradeHSV(vector<int> newColors)
{
	myColors[COLOR_INT] = newColors;
}

void main() {

	// 设置一个窗口(640 x 200),控制这些值的大小
	namedWindow("Trackbars", (640, 200));
	createTrackbar("Hue Min", "Trackbars", &hmin, 179);
	createTrackbar("Hue Max", "Trackbars", &hmax, 179);
	createTrackbar("Sat Min", "Trackbars", &smin, 255);
	createTrackbar("Sat Max", "Trackbars", &smax, 255);
	createTrackbar("Val Min", "Trackbars", &vmin, 255);
	createTrackbar("Val Max", "Trackbars", &vmax, 255);
	createTrackbar("print vals", "Trackbars", &flag, 2);				// 拖动flag将打印当前筛选的hsv值
	createTrackbar("pic ", "Trackbars", &PIC_INT, 5);					// 切换检测图片
	createTrackbar("cur color", "Trackbars", &COLOR_INT, 5);			// 标注检测什么颜色
	createTrackbar("setup check color", "Trackbars", &check, 1);		// 从map中取出新的hsv值组合

	// 扫描图片获取
	while (true)
	{
		// 获取当前图片,这是图片的路径
		string path = "Resources/" + colors[PIC_INT] + ".jpg";
		// 代表当前检测什么颜色,为之后打印做准备
		string MASK_TITEL = colors[COLOR_INT];
		img = imread(path);

		// 判断图片是否读取成功
		if (img.empty()) {
			cout << "warning" << endl;
			cout << endl;
		}
		cvtColor(img, imgHSV, COLOR_BGR2HSV);  // 二值圖像

		// 這裏進行一個 值的設定
		if (check == 1)
		{
			setHSV(COLOR_INT);
			cout << "please change check to 0, are u ok ?  ";
			check = 0;
		}

		Scalar lower(hmin, smin, vmin);
		Scalar upper(hmax, smax, vmax);

		inRange(imgHSV, lower, upper, mask);		// 根據值進行遮罩
		//cout << "HSV is : " << hmin << ", " << hmax << "," << smin << ", " << smax << "," << vmin << ", " << vmax << endl;

		imshow("Image", img);
		imshow(MASK_TITEL, mask);
		waitKey(1);

		if (flag == 1)
		{
			cout << endl;
			cout << colors[COLOR_INT] << endl;
			cout << "HSV is : " << hmin << ", " << hmax << "," << smin << ", " << smax << "," << vmin << ", " << vmax << endl;
			vector<int> newHSV = { hmin, hmax, smin, smax, vmin, vmax };
			upgradeHSV(newHSV);
			int c;
			// 調整flag = 0, 切換需要檢測的顔色
			cout << "please turn flag to 0, and change the new check color, are you ok ?:";
			flag = 0;
			COLOR_INT++;
			if (COLOR_INT > 5)
				COLOR_INT = 0;
		}
	}

	// 摄像头款(需要适配,暂时无适配)
	//while (true) {
	//	cap.read(img);		// 将此时画面给予img

	//	cvtColor(img, imgHSV, COLOR_BGR2HSV);

	//	Scalar lower(hmin, smin, vmin);
	//	Scalar upper(hmax, smax, vmax);

	//	inRange(imgHSV, lower, upper, mask);	// 获取二值图

	//	if (flag == 1) {
	//		cout << "【" << colors[COLOR_INT] << " 】" << endl;
	//		cout << "HSV is " << hmin << ", " << hmax << "," << smin << ", " << smax << "," << vmin << ", " << vmax << endl;
	//	}

	//	imshow("Image", img);
	//	imshow("Image Mask", mask);

	//	waitKey(1);
	//}

}
- getCubeInofs.cpp (勾勒魔方颜色demo代码)
#include<opencv2/imgcodecs.hpp>
#include<opencv2/highgui.hpp>
#include<opencv2/imgproc.hpp>
#include<iostream>
#include<unordered_map>

using namespace cv;
using namespace std;

// Webcam  ///
// hmin, hmax, smin, smax, vmin, vmax
vector<vector<int>> myColors = { {63, 179,0, 148,108, 255},  // white
								{18, 51,56, 179,91, 255},	   // yellow
								{ 98, 136,109, 255,35, 113},		// blue
								{ 0, 0,177, 255,61, 129},		// red
								{ 58, 86,85, 255,29, 255},		// green
								{  2, 29,105, 199,72, 255}   // orange
};

vector<Scalar> myColorValues = { {255, 255, 255},		// white
								{0, 255, 255},			// yellow   need
								{255, 0, 0},			// blue
								{0, 0, 255},			// red		need
								{0, 255, 0},			// green	a little need
								{0, 165, 255},			// orange  must need
	// blue
};
unordered_map<int, string> colorMap = { {0, "White"},{1,"Yellow"},{2,"blue"} ,{3,"Red"},{4,"Green"},{5,"Orange"} };
Mat img;// 用于处理图像数据

int PIC_INT = 0;
int check = 1;

unordered_map<int, string> colors = { {0,"white"},{1,"yellow"},
									{2,"blue"},{3,"red"} ,
	{4,"green"},{5,"orange"} };

void getContours(Mat imgDil, string objectType) {
	vector<vector<Point>> contours;
	vector<Vec4i> hierarchy;

	/**
	* findContours()用于在二值图像中查找轮廓
	* contours 将存储找到的轮廓,每个轮廓都是一个包含一系列点的向量
	* hierarchy 用于存储轮廓之间的关系,即层次结构信息
	* mode(检测模式):  RETR_EXTERNAL -- 》 表示只检测最外层轮廓。
	* method(检测方式): CHAIN_APPROX_SIMPLE  --》 表示对轮廓中的冗余点进行压缩,只保留端点
	*/
	findContours(imgDil, contours, hierarchy, RETR_EXTERNAL, CHAIN_APPROX_SIMPLE);

	// 根据contours在img中勾勒轮廓
	// args: pic, outlines, 勾勒范围(-1表示所有), line_color, line_thin
	//drawContours(img, contours, -1, Scalar(255, 0, 255),2);

	for (int i = 0; i < contours.size(); i++) {
		// 计算该轮廓的面积
		int area = contourArea(contours[i]);
		//cout << area << endl;

		vector<vector<Point>> conPoly(contours.size());
		vector<Rect> boundRect(contours.size());
		if (objectType == "Red" || area > 1000)
		{
			// arcLength()  用于计算轮廓的周长,true表示轮廓是封闭的
			float peri = arcLength(contours[i], true);

			// 对轮廓根据一定精度进行逼近,可以想象以下微积分
			// approxPolyDp(src, dst, precision, bool) bool表示轮廓是否为封闭的
			// precision表示逼近精度,是原始轮廓周长的百分比,越小表示逼近越精细
			approxPolyDP(contours[i], conPoly[i], 0.002 * peri, true);
			// boundingRect返回一个Rect对象,表示一个矩形,一个根据所给的轮廓能完全包围的矩形
			boundRect[i] = boundingRect(conPoly[i]);
			 勾勒魔方色块的轮廓
			drawContours(img, conPoly, i, Scalar(255, 0, 255), 2);

			// 获取每个轮廓矩形的坐标

			// 标记颜色
			putText(img, objectType, { boundRect[i].x, boundRect[i].y - 5 }, FONT_HERSHEY_PLAIN, 1, Scalar(0, 69, 255), 2);
		}
	}
}


void findColor(Mat img)
{
	Mat imgHSV;
	cvtColor(img, imgHSV, COLOR_BGR2HSV);

	// 定义的六种颜色将会被识别
	for (int i = 0; i < myColors.size(); i++) {
		Scalar lower(myColors[i][0], myColors[i][2], myColors[i][4]);
		Scalar upper(myColors[i][1], myColors[i][3], myColors[i][5]);
		Mat mask;
		// 识别出来的颜色,将会是白色块,其余是黑色
		inRange(imgHSV, lower, upper, mask);

		Mat maskTemp;
		GaussianBlur(mask, maskTemp, Size(3, 3), 3, 0);
		//if (i == 3) {
		//	imshow("origin", img);
		//	imshow("before", mask);
		//	imshow("after", maskTemp);
		//	waitKey(1);
		//}

		// 在原图中勾勒获取识别的色块
		getContours(maskTemp, colorMap[i]);
	}
}


// 检验颜色
void main() {
	// 使用相机ID 打开摄像头,如果只有一个摄像头,输入0即可
	VideoCapture cap(0);
	//namedWindow("Trackbars", (640, 200));
	//createTrackbar("pic ", "Trackbars", &PIC_INT, 5);		// 第幾張圖片

	while (true) {
		cap.read(img);		// 將會逐幀讀取視頻里的内容,然后存储到img对象中
		//string path = "Resources/" + colors[PIC_INT] + ".jpg";
		//img = imread(path);
		findColor(img);

		imshow("Image", img);
		waitKey(1);			// 每帧暂停1毫秒
	}
}
- CubeFrameReco.cpp(改进后代码)
#include<opencv2/imgcodecs.hpp>
#include<opencv2/highgui.hpp>
#include<opencv2/imgproc.hpp>
#include<iostream>
#include<unordered_map>

using namespace cv;
using namespace std;

// Webcam  ///
// hmin, hmax, smin, smax, vmin, vmax
vector<vector<int>> myColors = { {63, 179,0, 148,108, 255},  // white
								{18, 51,56, 179,91, 255},	   // yellow
								{ 98, 136,109, 255,35, 113},		// blue
								{ 0, 0,177, 255,61, 129},		// red
								{ 58, 86,85, 255,29, 255},		// green
								{  2, 29,105, 199,72, 255}   // orange
};

vector<Scalar> myColorValues = { {255, 255, 255},		// white
								{0, 255, 255},			// yellow   need
								{255, 0, 0},			// blue
								{0, 0, 255},			// red		need
								{0, 255, 0},			// green	a little need
								{0, 165, 255},			// orange  must need
	// blue
};
unordered_map<int, string> colorMap = { {0, "White"},{1,"Yellow"},{2,"blue"} ,{3,"Red"},{4,"Green"},{5,"Orange"} };
Mat img;// 用于处理图像数据

int PIC_INT = 0;
int check = 1;

unordered_map<int, string> colors = { {0,"white"},{1,"yellow"},
									{2,"blue"},{3,"red"} ,
	{4,"green"},{5,"orange"} };

void getContours(Mat imgDil, string objectType) {
	vector<vector<Point>> contours;
	vector<Vec4i> hierarchy;

	/**
	* findContours()用于在二值图像中查找轮廓
	* contours 将存储找到的轮廓,每个轮廓都是一个包含一系列点的向量
	* hierarchy 用于存储轮廓之间的关系,即层次结构信息
	* mode(检测模式):  RETR_EXTERNAL -- 》 表示只检测最外层轮廓。
	* method(检测方式): CHAIN_APPROX_SIMPLE  --》 表示对轮廓中的冗余点进行压缩,只保留端点
	*/
	findContours(imgDil, contours, hierarchy, RETR_EXTERNAL, CHAIN_APPROX_SIMPLE);

	// 根据contours在img中勾勒轮廓
	// args: pic, outlines, 勾勒范围(-1表示所有), line_color, line_thin
	//drawContours(img, contours, -1, Scalar(255, 0, 255),2);

	for (int i = 0; i < contours.size(); i++) {
		// 计算该轮廓的面积
		int area = contourArea(contours[i]);
		//cout << area << endl;

		vector<vector<Point>> conPoly(contours.size());
		vector<Rect> boundRect(contours.size());
		if (objectType == "Red" || area > 1000)
		{
			// arcLength()  用于计算轮廓的周长,true表示轮廓是封闭的
			float peri = arcLength(contours[i], true);

			// 对轮廓根据一定精度进行逼近,可以想象以下微积分
			// approxPolyDp(src, dst, precision, bool) bool表示轮廓是否为封闭的
			// precision表示逼近精度,是原始轮廓周长的百分比,越小表示逼近越精细
			approxPolyDP(contours[i], conPoly[i], 0.002 * peri, true);
			// boundingRect返回一个Rect对象,表示一个矩形,一个根据所给的轮廓能完全包围的矩形
			boundRect[i] = boundingRect(conPoly[i]);
			 勾勒魔方色块的轮廓
			drawContours(img, conPoly, i, Scalar(255, 0, 255), 2);

			// 获取每个轮廓矩形的坐标

			// 标记颜色
			putText(img, objectType, { boundRect[i].x, boundRect[i].y - 5 }, FONT_HERSHEY_PLAIN, 1, Scalar(0, 69, 255), 2);
		}
	}
}


void findColor(Mat img)
{
	Mat imgHSV;
	cvtColor(img, imgHSV, COLOR_BGR2HSV);

	// 定义的六种颜色将会被识别
	for (int i = 0; i < myColors.size(); i++) {
		Scalar lower(myColors[i][0], myColors[i][2], myColors[i][4]);
		Scalar upper(myColors[i][1], myColors[i][3], myColors[i][5]);
		Mat mask;
		// 识别出来的颜色,将会是白色块,其余是黑色
		inRange(imgHSV, lower, upper, mask);

		Mat maskTemp;
		GaussianBlur(mask, maskTemp, Size(3, 3), 3, 0);
		//if (i == 3) {
		//	imshow("origin", img);
		//	imshow("before", mask);
		//	imshow("after", maskTemp);
		//	waitKey(1);
		//}

		// 在原图中勾勒获取识别的色块
		getContours(maskTemp, colorMap[i]);
	}
}


// 检验颜色
void main() {
	// 使用相机ID 打开摄像头,如果只有一个摄像头,输入0即可
	VideoCapture cap(0);
	//namedWindow("Trackbars", (640, 200));
	//createTrackbar("pic ", "Trackbars", &PIC_INT, 5);		// 第幾張圖片

	while (true) {
		cap.read(img);		// 將會逐幀讀取視頻里的内容,然后存储到img对象中
		//string path = "Resources/" + colors[PIC_INT] + ".jpg";
		//img = imread(path);
		findColor(img);

		imshow("Image", img);
		waitKey(1);			// 每帧暂停1毫秒
	}
}
完整QT项目可上github下载:https://github.com/Rdjroot/CubeSolver-Cpp/tree/version_1.0