一、引言
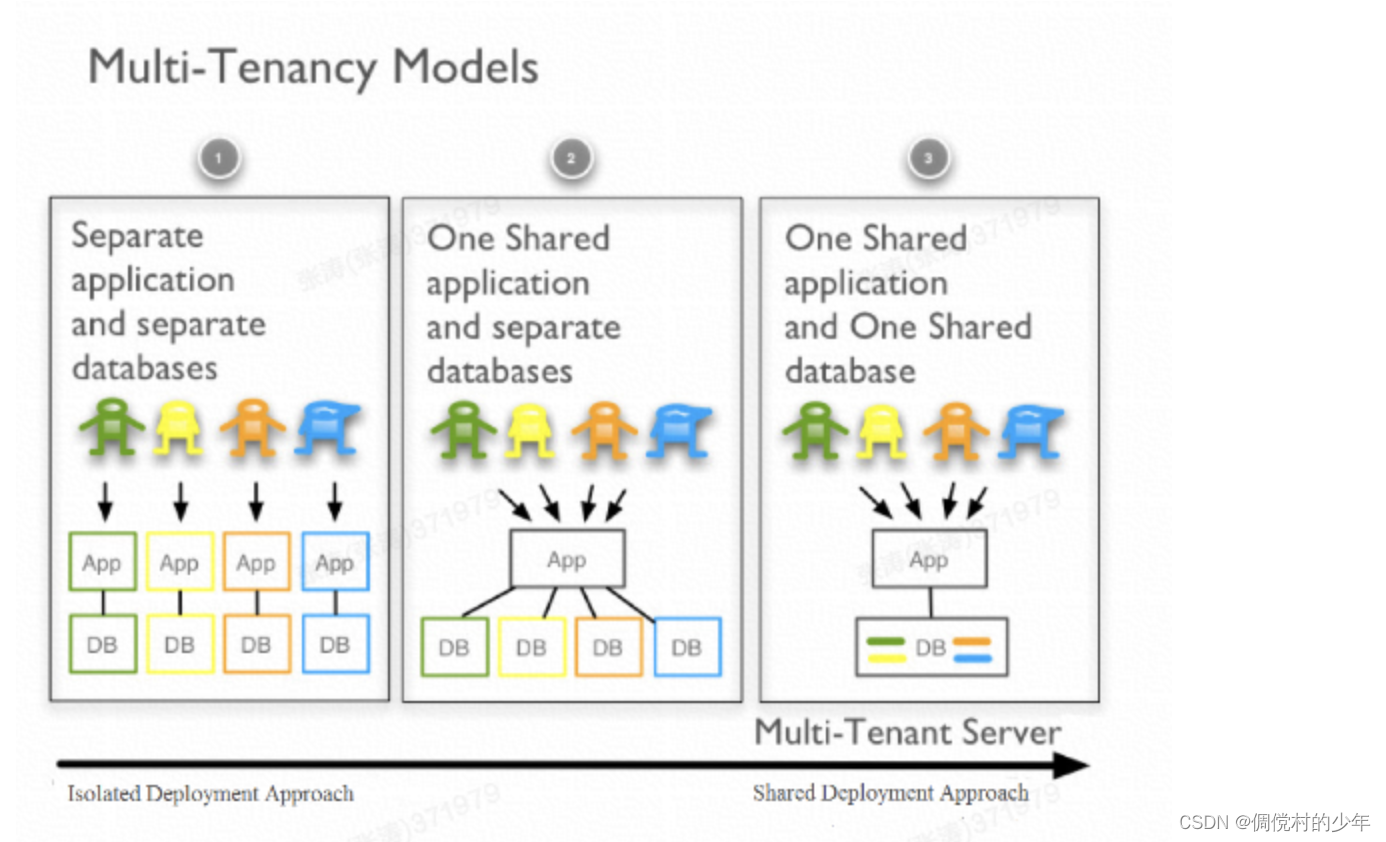
在如今的软件开发中,多租户(Multi-Tenancy)应用已经变得越来越常见。多租户是一种软件架构技术,它允许一个应用程序实例为多个租户提供服务。每个租户都有自己的数据和配置,但应用程序实例是共享的。而在我们的Spring Boot + MyBatis Plus环境中,我们可以利用动态数据源来实现多租户分库。
二、实现原理
SpringBoot + MyBatisPlus 动态数据源实现多租户分库的原理主要是通过切换不同的数据库连接来实现。对于每个租户,应用程序会使用一个独立的数据库连接,这样每个租户就拥有了自己的数据隔离空间。具体来说,当我们创建一个新的租户时,我们同时也为这个租户创建一个新的数据库连接。这些数据库连接被存储在一个数据源工厂中,我们可以根据租户的ID或者其他唯一标识符来获取对应的数据库连接。当一个租户需要访问其数据时,我们从数据源工厂中获取该租户对应的数据库连接,然后使用这个连接来执行数据库操作。
三、引入依赖
在pom.xml文件中引入下述相关的依赖:
<?xml version="1.0" encoding="UTF-8"?>
<project xmlns="http://maven.apache.org/POM/4.0.0" xmlns:xsi="http://www.w3.org/2001/XMLSchema-instance"
		 xsi:schemaLocation="http://maven.apache.org/POM/4.0.0 https://maven.apache.org/xsd/maven-4.0.0.xsd">
	<modelVersion>4.0.0</modelVersion>
	<parent>
		<groupId>org.springframework.boot</groupId>
		<artifactId>spring-boot-starter-parent</artifactId>
		<version>2.1.3.RELEASE</version>
		<relativePath/> <!-- lookup parent from repository -->
	</parent>
	<groupId>com.bc</groupId>
	<artifactId>demo</artifactId>
	<version>0.0.1-SNAPSHOT</version>
	<name>demo</name>
	<description>Demo project for Spring Boot</description>
	<properties>
		<java.version>1.8</java.version>
	</properties>

	<dependencies>
		<dependency>
			<groupId>org.springframework.boot</groupId>
			<artifactId>spring-boot-starter-web</artifactId>
		</dependency>

		<dependency>
			<groupId>org.hibernate</groupId>
			<artifactId>hibernate-validator</artifactId>
			<version>6.0.1.Final</version>
		</dependency>

		<dependency>
			<groupId>org.springframework.boot</groupId>
			<artifactId>spring-boot-starter-test</artifactId>
			<scope>test</scope>
		</dependency>

		<dependency>
			<groupId>org.projectlombok</groupId>
			<artifactId>lombok</artifactId>
			<version>1.18.0</version>
			<scope>provided</scope>
		</dependency>

		<dependency>
			<groupId>cn.hutool</groupId>
			<artifactId>hutool-all</artifactId>
			<version>5.8.25</version>
		</dependency>

		<dependency>
			<groupId>com.baomidou</groupId>
			<artifactId>mybatis-plus-boot-starter</artifactId>
			<version>3.5.3.1</version>
		</dependency>

		<dependency>
			<groupId>mysql</groupId>
			<artifactId>mysql-connector-java</artifactId>
			<version>8.0.33</version>
		</dependency>
	</dependencies>

	<build>
		<plugins>
			<plugin>
				<groupId>org.springframework.boot</groupId>
				<artifactId>spring-boot-maven-plugin</artifactId>
			</plugin>
		</plugins>
	</build>

</project>
四、配置yml
在application.yml文件中添加下述配置:
server:
  port: 10086

spring:
  application:
    name: demo
  datasource:
    url: jdbc:mysql://127.0.0.1:3306/demo?useUnicode=true&characterEncoding=utf8&serverTimezone=UTC
    username: root
    password: 123456
    driver-class-name: com.mysql.cj.jdbc.Driver
    type: com.zaxxer.hikari.HikariDataSource
mybatis:
  mapper-locations: classpath:mapper/*.xml

mybatis-plus:
  configuration:
    log-impl: org.apache.ibatis.logging.stdout.StdOutImpl
五、数据准备
在demo库中新建一张名为“tenant_datasource”的表,用于存储多租户的数据源配置信息:
CREATE TABLE `tenant_datasource` (
  `tenant_id` varchar(50) NOT NULL,
  `url` varchar(255) DEFAULT NULL,
  `username` varchar(50) DEFAULT NULL,
  `password` varchar(50) DEFAULT NULL,
  PRIMARY KEY (`tenant_id`)
) ENGINE=InnoDB DEFAULT CHARSET=utf8;然后执行下述SQL往“tenant_datasource”表中插入一些测试数据:
insert into `tenant_datasource` (`tenant_id`, `url`, `username`, `password`) values('tenant1','jdbc:mysql://localhost:3306/tenant1_db','root','123456');
insert into `tenant_datasource` (`tenant_id`, `url`, `username`, `password`) values('tenant2','jdbc:mysql://localhost:3306/tenant2_db','root','123456');在tenant1_db库中新建一张名为“user”的表,用于存储多租户1的用户信息:
CREATE TABLE `user` (
  `id` int(11) NOT NULL AUTO_INCREMENT,
  `user_name` varchar(10) NOT NULL,
  `sex` tinyint(4) NOT NULL,
  PRIMARY KEY (`id`)
) ENGINE=InnoDB DEFAULT CHARSET=utf8;然后执行下述SQL往tenant1_db库在的“user”表中插入一些测试数据:
insert into `user` (`id`, `user_name`, `sex`) values('1','范闲','1');在tenant2_db库中新建一张名为“user”的表,用于存储多租户2的用户信息:
CREATE TABLE `user` (
  `id` int(11) NOT NULL AUTO_INCREMENT,
  `user_name` varchar(10) NOT NULL,
  `sex` tinyint(4) NOT NULL,
  PRIMARY KEY (`id`)
) ENGINE=InnoDB DEFAULT CHARSET=utf8;然后执行下述SQL往tenant2_db库在的“user”表中插入一些测试数据:
insert into `user` (`id`, `user_name`, `sex`) values('1','海棠朵朵','0');六、编写实体类
import com.baomidou.mybatisplus.annotation.IdType;
import com.baomidou.mybatisplus.annotation.TableField;
import com.baomidou.mybatisplus.annotation.TableId;
import com.baomidou.mybatisplus.annotation.TableName;
import lombok.Data;

@TableName("user")
@Data
public class User {

    @TableId(type = IdType.AUTO)
    private Integer id;

    @TableField(value = "user_name")
    private String userName;

    @TableField(value = "sex")
    private Integer sex;
}
import com.baomidou.mybatisplus.annotation.IdType;
import com.baomidou.mybatisplus.annotation.TableField;
import com.baomidou.mybatisplus.annotation.TableId;
import com.baomidou.mybatisplus.annotation.TableName;
import lombok.Data;
import org.springframework.boot.jdbc.DataSourceBuilder;
import javax.sql.DataSource;
@Data
@TableName("tenant_datasource")
public class TenantDataSource {
@TableId(type = IdType.INPUT)
private String tenantId;
@TableField(value = "url")
private String url;
@TableField(value = "username")
private String username;
@TableField(value = "password")
private String password;
public DataSource createDataSource() {
return DataSourceBuilder.create()
.url(this.url)
.username(this.username)
.password(this.password)
.build();
}
}七、编写默认数据源配置类
import lombok.Data;
import org.springframework.boot.context.properties.ConfigurationProperties;
import org.springframework.stereotype.Component;

@Data
@Component
@ConfigurationProperties(prefix = "spring.datasource")
public class DynamicDataSourceProperties {

    private String url;

    private String username;

    private String password;
}
八、构建Mapper接口和xml文件
import com.baomidou.mybatisplus.core.mapper.BaseMapper;
import com.example.demo.entity.User;
import org.springframework.stereotype.Repository;

@Repository
public interface UserMapper extends BaseMapper<User> {

}
import com.baomidou.mybatisplus.core.mapper.BaseMapper;
import com.example.demo.entity.TenantDataSource;
import org.springframework.stereotype.Repository;
@Repository
public interface TenantDataSourceMapper extends BaseMapper<TenantDataSource> {
}在启动类配置扫描路径@MapperScan("com.example.demo.mapper"):
import org.mybatis.spring.annotation.MapperScan;
import org.springframework.boot.SpringApplication;
import org.springframework.boot.autoconfigure.SpringBootApplication;

@MapperScan("com.example.demo.mapper")
@SpringBootApplication
public class DemoApplication {

	public static void main(String[] args) {
		SpringApplication.run(DemoApplication.class, args);
	}
}
九、编写业务实现类
import com.example.demo.entity.User;
import com.example.demo.mapper.UserMapper;
import org.springframework.beans.factory.annotation.Autowired;
import org.springframework.stereotype.Service;

@Service
public class UserService {

    @Autowired
    private UserMapper userMapper;

    public User getUserById(Long id) {
        User user = userMapper.selectById(id);
        return user;
    }
}
十、创建数据源管理器
import org.springframework.beans.factory.annotation.Autowired;
import org.springframework.boot.jdbc.DataSourceBuilder;
import org.springframework.stereotype.Component;

import javax.annotation.PostConstruct;
import javax.sql.DataSource;
import java.util.HashMap;
import java.util.Map;

/**
 * 创建数据源管理器
 */
@Component
public class DataSourceManager {

    @Autowired
    private DynamicDataSourceProperties dynamicDataSourceProperties;

    private final Map<String, DataSource> dataSources = new HashMap<>();

    @PostConstruct
    public void init() {
        // 根据配置创建数据源并加入管理器
        DataSource defaultDataSource = DataSourceBuilder.create()
                .url(dynamicDataSourceProperties.getUrl())
                .username(dynamicDataSourceProperties.getUsername())
                .password(dynamicDataSourceProperties.getPassword())
                .build();
        dataSources.put("default", defaultDataSource);
    }

    public void addDataSource(String tenantId, DataSource dataSource) {
        dataSources.put(tenantId, dataSource);
    }

    public DataSource getDataSource(String tenantId) {
        return dataSources.get(tenantId);
    }

    public Map<String, DataSource> getAllDataSources() {
        return dataSources;
    }

    /**
     * 判断是否包含数据源
     */
    public boolean containDataSourceKey(String key) {
        return dataSources.containsKey(key);
    }
}
十一、创建租户上下文
import lombok.extern.slf4j.Slf4j;

@Slf4j
public class TenantContext {

    // 使用ThreadLocal来存储当前线程的数据源名称(租户标识),保证多线程情况下,各自的数据源互不影响
    private static ThreadLocal<String> tenantId = ThreadLocal.withInitial(() -> "default");

    public static void setTenantId(String id) {
        tenantId.set(id);
        log.info("已切换到数据源:{}", id);
    }

    public static String getTenantId() {
        return tenantId.get();
    }

    public static void clear() {
        tenantId.remove();
        log.info("已切换回默认数据源");
    }
}
十二、创建动态数据源
创建一个动态数据源类,继承AbstractRoutingDataSource,用于动态切换数据源:
import lombok.Data;
import lombok.extern.slf4j.Slf4j;
import org.springframework.jdbc.datasource.lookup.AbstractRoutingDataSource;

@Slf4j
@Data
public class DynamicDataSource extends AbstractRoutingDataSource {

    /**
     * 如果希望所有数据源在启动配置时就加载好,这里通过设置数据源Key值来切换数据源
     *
     * @return
     */
    @Override
    protected Object determineCurrentLookupKey() {
        return TenantContext.getTenantId();
    }
}
十三、创建数据源配置
import org.springframework.beans.factory.annotation.Autowired;
import org.springframework.context.annotation.Bean;
import org.springframework.context.annotation.Configuration;
import org.springframework.jdbc.datasource.DataSourceTransactionManager;

import java.util.HashMap;
import java.util.Map;

/**
 * 创建数据源配置类,用于配置动态数据源
 */

@Configuration
public class DynamicDataSourceConfig {

    @Autowired
    private DataSourceManager dataSourceManager;

    @Bean
    public DynamicDataSource dynamicDataSource() {
        // 1、将数据源default设置为默认数据源
        DynamicDataSource dynamicDataSource = new DynamicDataSource();
        dynamicDataSource.setDefaultTargetDataSource(dataSourceManager.getDataSource("default"));
        // 2、获取初始化时所有的数据源,并设置目标数据源,必须为targetDataSources设置初始值,否则会报错
        Map<Object, Object> targetDataSources = new HashMap<>();
        targetDataSources.putAll(dataSourceManager.getAllDataSources());
        dynamicDataSource.setTargetDataSources(targetDataSources);
        return dynamicDataSource;
    }

    @Bean
    public DataSourceTransactionManager transactionManager(DynamicDataSource dynamicDataSource) {
        return new DataSourceTransactionManager(dynamicDataSource);
    }
}
十四、创建多租户数据源服务
创建多租户数据源服务类,用于初始化多租户数据源:
import com.example.demo.entity.TenantDataSource;
import com.example.demo.mapper.TenantDataSourceMapper;
import org.springframework.beans.factory.annotation.Autowired;
import org.springframework.stereotype.Service;

import javax.annotation.PostConstruct;
import java.util.HashMap;
import java.util.List;
import java.util.Map;

@Service
public class MultiTenantDataSourceService {

    @Autowired
    private DataSourceManager dataSourceManager;

    @Autowired
    private DynamicDataSource dynamicDataSource;

    @Autowired
    private TenantDataSourceMapper tenantDataSourceMapper;

    @PostConstruct
    public void initialize() {
        // 1、从默认的数据源中查询出所有的租户信息,然后覆盖DynamicDataSource中的targetDataSources属性
        Map<Object, Object> targetDataSources = new HashMap<>();
        List<TenantDataSource> tenantDataSources = tenantDataSourceMapper.selectList(null);
        for (TenantDataSource tenantDataSource : tenantDataSources) {
            dataSourceManager.addDataSource(tenantDataSource.getTenantId(), tenantDataSource.createDataSource());
        }
        targetDataSources.putAll(dataSourceManager.getAllDataSources());
        dynamicDataSource.setTargetDataSources(targetDataSources);
        // 2、必须执行此操作,才会重新初始化AbstractRoutingDataSource中的resolvedDataSources,也只有这样,动态切换数据源才会起效
        dynamicDataSource.afterPropertiesSet();
    }
}
十五、构建拦截器,并将其注册到InterceptorRegistry中
import cn.hutool.core.util.StrUtil;
import com.example.demo.config.DataSourceManager;
import com.example.demo.config.TenantContext;
import org.springframework.beans.factory.annotation.Autowired;
import org.springframework.context.annotation.Configuration;
import org.springframework.web.servlet.HandlerInterceptor;

import javax.servlet.http.HttpServletRequest;
import javax.servlet.http.HttpServletResponse;

@Configuration
public class AuthInterceptor implements HandlerInterceptor {

    @Autowired
    private DataSourceManager dataSourceManager;

    @Override
    public boolean preHandle(HttpServletRequest request, HttpServletResponse response, Object handler) {
        String tenantId = request.getHeader("tenantId");
        if (StrUtil.isNotBlank(tenantId) && dataSourceManager.containDataSourceKey(tenantId) && (!"default".equals(tenantId))) {
            TenantContext.setTenantId(tenantId);
            return true;
        }else{
            return false;
        }
    }

    @Override
    public void afterCompletion(HttpServletRequest request, HttpServletResponse response, Object handler, Exception ex) {
        TenantContext.clear();
    }
}
import com.example.demo.Interceptor.AuthInterceptor;
import org.springframework.beans.factory.annotation.Autowired;
import org.springframework.context.annotation.Configuration;
import org.springframework.web.servlet.config.annotation.InterceptorRegistry;
import org.springframework.web.servlet.config.annotation.WebMvcConfigurerAdapter;
@Configuration
public class WebConfig extends WebMvcConfigurerAdapter {
@Autowired
private AuthInterceptor authInterceptor;
@Override
public void addInterceptors(InterceptorRegistry registry) {
registry.addInterceptor(authInterceptor);
}
}十六、创建Controller
import com.example.demo.entity.User;
import com.example.demo.serivice.UserService;
import org.springframework.beans.factory.annotation.Autowired;
import org.springframework.web.bind.annotation.GetMapping;
import org.springframework.web.bind.annotation.PathVariable;
import org.springframework.web.bind.annotation.RestController;

@RestController
public class UserController {

    @Autowired
    private UserService userService;

    @GetMapping("/user/{userId}")
    public User getUser(@PathVariable Long userId) {
        return userService.getUserById(userId);
    }
}
十七、测试
启动应用程序,通过访问localhost:10086/user/{userId} 来测试多租户分库功能:
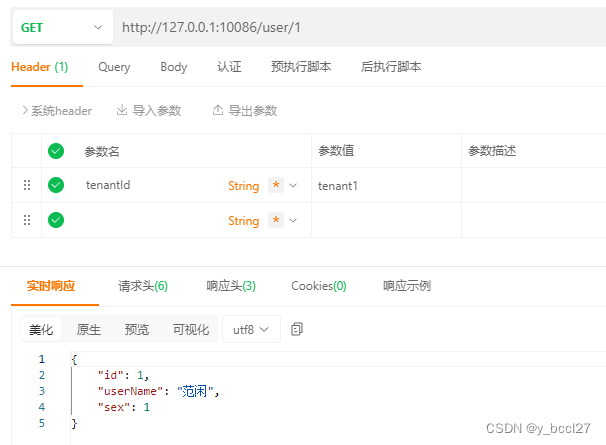
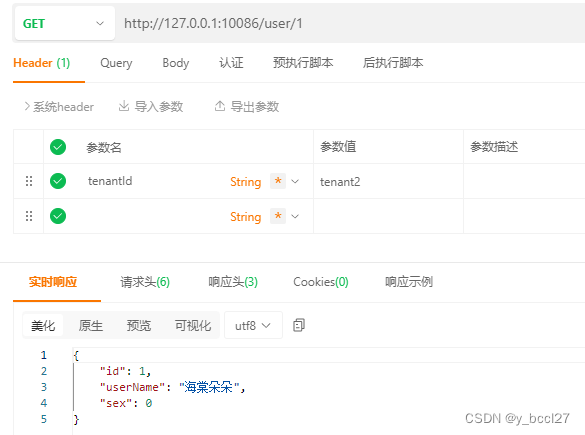
可以看到上述测试示例中,已经实现了不同的租户查询独立的数据库信息。
十八、适用场景
- 多租户系统开发:适用于多租户系统,每个租户有独立的数据库,通过动态数据源切换实现多租户数据隔离。
- 租户级数据隔离:当多个租户共享同一应用但需要数据隔离时,可以通过此模式实现。
- 灵活扩展:适用于系统需求可能动态扩展租户,每个租户有独立数据库的场景,不需修改系统架构。
十九、优点
- 数据隔离性强:每个租户有独立的数据库,数据隔离,保护租户数据安全。
- 性能优化:每个租户有独立的数据库,避免多租户共享同一数据库的性能瓶颈。
- 方便扩展:可以轻松实现动态增加新租户,每个租户有独立的数据库。
- 可维护性高:MyBatisPlus提供了便捷的操作数据库的功能,减少开发人员的工作量。
- 易用性强:Spring Boot集成MyBatisPlus,简化了配置和集成流程,提高开发效率。
二十、总结
Spring Boot与MyBatis Plus结合,通过动态数据源实现多租户分库,是一种高效、灵活、易维护的解决方案,适用于多租户系统的开发。可以有效地保护租户数据安全,提高系统性能,同时具有良好的可扩展性和可维护性。