1.检查是否有安装mysql数据库(如果有mysql或者mariadb数据库,则卸载)
[root@myhost ~]# rpm -qa |grep mysql
[root@myhost ~]# rpm -qa | grep mariadb
[root@myhost ~]# ll /etc/my.cnf
ls: 无法访问'/etc/my.cnf': No such file or directory
#如果有mysql或者mariadb数据库,则卸载
[root@myhost ~]# yum -y  remove `rpm -qa | grep mysql` 或者  yum -y  remove `rpm -qa | grep mariadb`
[root@myhost ~]# ll  /etc/my.cnf
ls: 无法访问'/etc/my.cnf': No such file or directory
[root@myhost ~]# rpm -qa |grep mysql 或者 rpm -qa | grep mariadb
2.下载并安装mysql官方的 yum repository
[root@myhost ~]# cd /home/tools/
[root@myhost tools]# wget https://dev.mysql.com/get/mysql80-community-release-el7-4.noarch.rpm
[root@myhost tools]# ll
总用量 28
-rw-r--r--. 1 root root 25820 4月  18 2018 mysql80-community-release-el7-4.noarch.rpm
3.rpm安装生成所需要的repo文件
[root@myhost tools]# ll /etc/yum.repos.d/
总用量 20
-rw-r--r--. 1 root root  941 11月 10 10:55 almalinux-ha.repo
-rw-r--r--. 1 root root  883 11月 10 10:55 almalinux-plus.repo
-rw-r--r--. 1 root root  961 11月 10 10:55 almalinux-powertools.repo
-rw-r--r--. 1 root root 2660 11月 10 10:55 almalinux.repo
-rw-r--r--. 1 root root 1022 11月 10 10:55 almalinux-resilientstorage.repo

[root@myhost tools]# rpm -ivh mysql80-community-release-el7-4.noarch.rpm
#执行完成后会在/etc/yum.repos.d/目录下生成两个repo文件: mysql-community.repo 和 mysql-community-source.repo

[root@myhost tools]# ll /etc/yum.repos.d/
总用量 28
-rw-r--r--. 1 root root  941 11月 10 10:55 almalinux-ha.repo
-rw-r--r--. 1 root root  883 11月 10 10:55 almalinux-plus.repo
-rw-r--r--. 1 root root  961 11月 10 10:55 almalinux-powertools.repo
-rw-r--r--. 1 root root 2660 11月 10 10:55 almalinux.repo
-rw-r--r--. 1 root root 1022 11月 10 10:55 almalinux-resilientstorage.repo
-rw-r--r--. 1 root root 1864 2月  22 2018 mysql-community.repo   ###新生成的repo文件###
-rw-r--r--. 1 root root 1885 2月  22 2018 mysql-community-source.repo    ###新生成的repo文件###
4.正式安装mysql服务器
[root@myhost tools]# yum install -y mysql-server

[root@myhost tools]#  rpm -qa |grep mysql
mysql-8.0.26-1.module_el8.4.0+2532+b8928c02.x86_64
mysql-common-8.0.26-1.module_el8.4.0+2532+b8928c02.x86_64
mysql-server-8.0.26-1.module_el8.4.0+2532+b8928c02.x86_64
mysql80-community-release-el7-1.noarch
mysql-errmsg-8.0.26-1.module_el8.4.0+2532+b8928c02.x86_64

至此,mysql服务器安装完毕!!!
5.查看mysql 8.0 数据库主配置文件
[root@myhost tools]# ll /etc/my.cnf
-rw-r--r--. 1 root root 202 12月  3 2020 /etc/my.cnf
[root@myhost tools]# cat /etc/my.cnf
#
# This group is read both both by the client and the server
# use it for options that affect everything
#
[client-server]

#
# include all files from the config directory
#
!includedir /etc/my.cnf.d   ##这里引入MySQL 8.0 数据库各个详细配置文件##

[root@myhost tools]# ll /etc/my.cnf.d
总用量 12
-rw-r--r--. 1 root root 295 12月  3 2020 client.cnf
-rw-r--r--. 1 root root 565 8月  24 2021 mysql-default-authentication-plugin.cnf
-rw-r--r--. 1 root root 612 9月  24 2021 mysql-server.cnf
服务端配置文件
[root@myhost tools]# cat /etc/my.cnf.d/mysql-server.cnf
#
# This group are read by MySQL server.
# Use it for options that only the server (but not clients) should see
#
# For advice on how to change settings please see
# http://dev.mysql.com/doc/refman/en/server-configuration-defaults.html

# Settings user and group are ignored when systemd is used.
# If you need to run mysqld under a different user or group,
# customize your systemd unit file for mysqld according to the
# instructions in http://fedoraproject.org/wiki/Systemd

[mysqld]
datadir=/var/lib/mysql
socket=/var/lib/mysql/mysql.sock
log-error=/var/log/mysql/mysqld.log
pid-file=/run/mysqld/mysqld.pid
#关闭ssl
ssl=0
6.启动mysql
### 启动mysql
[root@myhost tools]# systemctl start mysqld.service

### 查看MySQL运行状态
[root@myhost tools]# systemctl status mysqld.service
● mysqld.service - MySQL 8.0 database server
   Loaded: loaded (/usr/lib/systemd/system/mysqld.service; disabled; vendor preset: disabled)
   Active: active (running) since Thu 2022-05-05 03:07:44 EDT; 10s ago
  Process: 53994 ExecStartPost=/usr/libexec/mysql-check-upgrade (code=exited, status=0/SUCCESS)
  Process: 53862 ExecStartPre=/usr/libexec/mysql-prepare-db-dir mysqld.service (code=exited, status=0/SUCCESS)
  Process: 53837 ExecStartPre=/usr/libexec/mysql-check-socket (code=exited, status=0/SUCCESS)
 Main PID: 53947 (mysqld)
   Status: "Server is operational"
    Tasks: 38 (limit: 23508)
   Memory: 460.1M
   CGroup: /system.slice/mysqld.service
           └─53947 /usr/libexec/mysqld --basedir=/usr

5月 05 03:07:35 myhost systemd[1]: Starting MySQL 8.0 database server...
5月 05 03:07:35 myhost mysql-prepare-db-dir[53862]: Initializing MySQL database
5月 05 03:07:44 myhost systemd[1]: Started MySQL 8.0 database server.

### 将MySQL加入开机自启动
[root@myhost tools]# systemctl enable mysqld.service
Created symlink /etc/systemd/system/multi-user.target.wants/mysqld.service → /usr/lib/systemd/system/mysqld.service.
7.查看mysql的初始登录密码
当MySQL开始正常运行时,要想进入MySQL还得先找出此时root用户的密码,root用户的密码可以在MySQL日志文件中找出,前面安装MySQL时,服务端配置文件里面显示了MySQL的日志文件所在路径:log-error=/var/log/mysql/mysqld.log
[root@myhost tools]#  egrep -v "^#|^$"  /etc/my.cnf.d/mysql-server.cnf
[mysqld]
datadir=/var/lib/mysql
socket=/var/lib/mysql/mysql.sock
log-error=/var/log/mysql/mysqld.log
pid-file=/run/mysqld/mysqld.pid

[root@myhost tools]# grep "password" /var/log/mysql/mysqld.log
2022-05-05T07:07:39.174205Z 6 [Warning] [MY-010453] [Server] root@localhost is created with an empty password ! Please consider switching off the --initialize-insecure option.
根据日志中显示,此次安装mysql时没有设置root用户密码(即可以使用空密码进行登录)
8.登录mysql数据库
[root@myhost tools]# mysql -uroot -p
Enter password: #空密码#
Welcome to the MySQL monitor.  Commands end with ; or \g.
Your MySQL connection id is 8
Server version: 8.0.26 Source distribution

Copyright (c) 2000, 2021, Oracle and/or its affiliates.

Oracle is a registered trademark of Oracle Corporation and/or its
affiliates. Other names may be trademarks of their respective
owners.

Type 'help;' or '\h' for help. Type '\c' to clear the current input statement.

mysql>
mysql> select version();
+-----------+
| version() |
+-----------+
| 8.0.26    |
+-----------+
1 row in set (0.00 sec)

mysql>

此时不能做任何事情,因为MySQL默认必须修改密码之后才能操作数据库。
9.为root用户设置新密码
mysql> use mysql;
Reading table information for completion of table and column names
You can turn off this feature to get a quicker startup with -A

Database changed
mysql> select host,user from mysql.user;
+-----------+------------------+
| host      | user             |
+-----------+------------------+
| localhost | mysql.infoschema |
| localhost | mysql.session    |
| localhost | mysql.sys        |
| localhost | root             |
+-----------+------------------+

mysql> alter user 'root'@'localhost' identified with by '新密码';
ERROR 1064 (42000): You have an error in your SQL syntax; check the manual that corresponds to your MySQL server version for the right syntax to use near 'by  'yuki12#$'' at line 1
mysql> set password=password('新密码');
ERROR 1064 (42000): You have an error in your SQL syntax; check the manual that corresponds to your MySQL server version for the right syntax to use near 'password('yuki12#$')' at line 1
mysql> set authentication_string=password('新密码');  ### mysql的版本不一样,用户密码字段表示也不一样,这一点需要注意。
ERROR 1193 (HY000): Unknown system variable 'authentication_string';
mysql>
上面修改root账户密码失败,原因在于在MySQL 8.02前,修改mysql的root账户密码可以直接使用:
set password=password('新密码');
set authentication_string=password('新密码');
alter user 'root'@'localhost' identified with by '新密码';
但MySQL8.0开始以后,这样默认是不行的。因为之前版本的mysql,使用的密码认证插件是“mysql_native_password”,而现在使用的是“caching_sha2_password”,但是我们修改密码必须使用的认证插件是“mysql_native_password”,所以MySQL8.0之后的版本在修改密码时要在sql语句中申明修改密码认证插件。
mysql> select version();
+-----------+
| version() |
+-----------+
| 8.0.26    |
+-----------+
1 row in set (0.00 sec)

mysql> alter user 'root'@'localhost' identified with mysql_native_password by  '新密码';
Query OK, 0 rows affected (0.01 sec)

至此,成功修改root密码!!!

mysql> select host, user, password, plugin from user;
ERROR 1054 (42S22): Unknown column 'password' in 'field list'

mysql> select host, user, authentication_string, plugin from user;
+-----------+------------------+------------------------------------------------------------------------+-----------------------+
| host      | user             | authentication_string                                                  | plugin                |
+-----------+------------------+------------------------------------------------------------------------+-----------------------+
| localhost | mysql.infoschema | $A$005$THISISACOMBINATIONOFINVALIDSALTANDPASSWORDTHATMUSTNEVERBRBEUSED | caching_sha2_password |
| localhost | mysql.session    | $A$005$THISISACOMBINATIONOFINVALIDSALTANDPASSWORDTHATMUSTNEVERBRBEUSED | caching_sha2_password |
| localhost | mysql.sys        | $A$005$THISISACOMBINATIONOFINVALIDSALTANDPASSWORDTHATMUSTNEVERBRBEUSED | caching_sha2_password |
| localhost | root             | *1326652C75900CFF0EF7EF997D4D178B173CE182                              | mysql_native_password |
+-----------+------------------+------------------------------------------------------------------------+-----------------------+
4 rows in set (0.00 sec)
host:允许用户登录在哪个ip可以远程登录,%表示任意ip都可以远程登录mysql数据库;
user:当前数据库的用户名;
authentication_string:用户密码,在mysql 5.7.9以后废弃了password字段和password()函数;
plugin:密码加密方式;
我们看host和user两列,host和user中root对应的值为localhost,即root用户的访问权限为localhost,想把该用户的访问权限设置可远程连接,我们只需要把localhost更改为通配的%就可以了。上面的权限操作语句没有走通,这里就直接使用update语句来更改吧。
mysql> update user set host = "%" where user = "root";
Query OK, 1 row affected (0.01 sec)
Rows matched: 1  Changed: 1  Warnings: 0

mysql> flush privileges;
Query OK, 0 rows affected (0.01 sec)

mysql> select host, user, authentication_string, plugin from user;
+-----------+------------------+------------------------------------------------------------------------+-----------------------+
| host      | user             | authentication_string                                                  | plugin                |
+-----------+------------------+------------------------------------------------------------------------+-----------------------+
| %         | root             | *1326652C75900CFF0EF7EF997D4D178B173CE182                              | mysql_native_password |
| localhost | mysql.infoschema | $A$005$THISISACOMBINATIONOFINVALIDSALTANDPASSWORDTHATMUSTNEVERBRBEUSED | caching_sha2_password |
| localhost | mysql.session    | $A$005$THISISACOMBINATIONOFINVALIDSALTANDPASSWORDTHATMUSTNEVERBRBEUSED | caching_sha2_password |
| localhost | mysql.sys        | $A$005$THISISACOMBINATIONOFINVALIDSALTANDPASSWORDTHATMUSTNEVERBRBEUSED | caching_sha2_password |
+-----------+------------------+------------------------------------------------------------------------+-----------------------+
4 rows in set (0.00 sec)
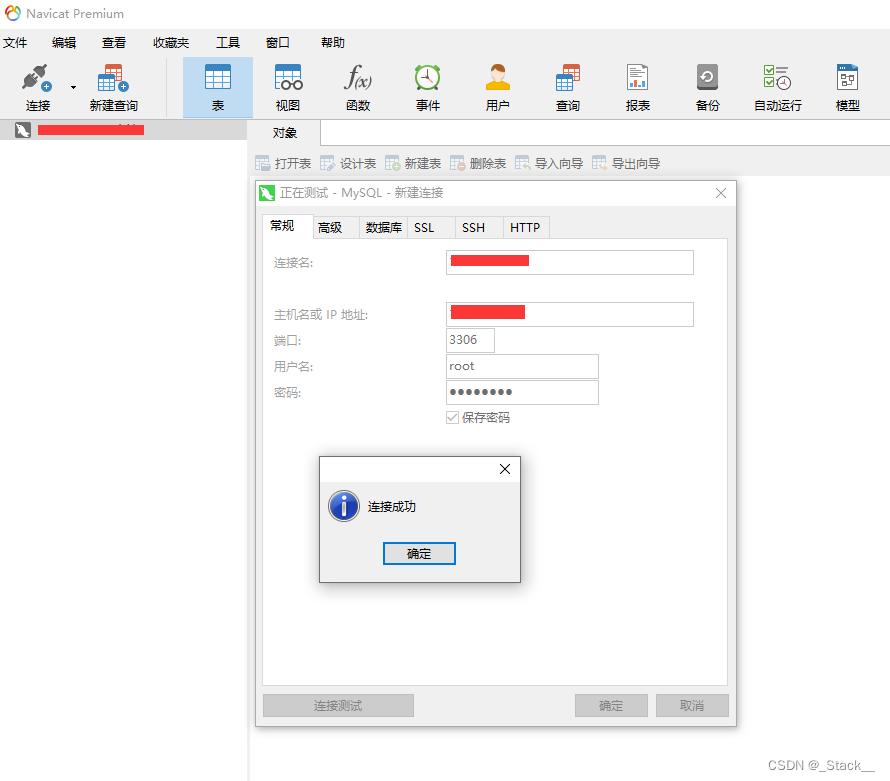
10.使用Navicat工具远程登录数据库(防火墙开启mysql端口的情况下)

以上报错原因在于我们在安装的mysql8.0.26数据库时没有在配置文件中设置密码认证方式,此版本mysql默认的密码加密方式是:caching_sha2_password,而现在很多客户端工具还不支持这种加密认证方式,连接测试的时候就会报错。解决办法如下:
[root@myhost ~]# vi /etc/my.cnf.d/mysql-server.cnf

#添加如下配置:default_authentication_plugin=mysql_native_password

[root@myhost ~]# systemctl restart mysqld.service


![[图解]SysML和EA建模住宅安全系统-14-黑盒系统规约](https://i-blog.csdnimg.cn/direct/4dca51a4839e4dbf9915ee3bd5e659bb.png)

![[14] CUDA_使用Opencv处理图像](https://img-blog.csdnimg.cn/direct/1b255ab0fd1b4af0aa97bc066df8f022.png)