Vue.js的基本概念和框架结构
Vue.js的基本概念
Vue实例
- Vue实例是通过
new Vue()创建的,它是Vue应用的核心。每个Vue应用都是由一个Vue实例开始的。 - 示例代码:
var app = new Vue({
  el: '#app',
  data: {
    message: 'Hello Vue!'
  }
});
- Vue实例是通过
数据绑定
- Vue.js提供了双向数据绑定的功能,通过数据绑定可以将DOM和Vue实例中的数据同步。
- 常见的数据绑定指令:
v-bind:绑定属性,例如绑定HTML属性或组件属性。v-model:用于表单控件,实现双向绑定。
指令
- Vue.js提供了一些内置的指令,用于在模板中绑定数据和操作DOM。
- 常见指令:
v-if:条件渲染。v-for:列表渲染。v-show:切换元素的显示状态。v-on:事件绑定。
计算属性
- 计算属性是基于响应式依赖进行缓存的属性,只有在相关响应式依赖发生改变时才会重新计算。
- 示例代码:
var app = new Vue({
  el: '#app',
  data: {
    firstName: 'John',
    lastName: 'Doe'
  },
  computed: {
    fullName: function() {
      return this.firstName + ' ' + this.lastName;
    }
  }
});
侦听属性
- 侦听属性用于监听数据的变化,并在变化时执行特定的操作。
- 示例代码:
var app = new Vue({
  el: '#app',
  data: {
    question: '',
    answer: 'I cannot give you an answer until you ask a question!'
  },
  watch: {
    question: function(newQuestion, oldQuestion) {
      this.answer = 'Waiting for you to stop typing...';
      this.getAnswer();
    }
  },
  methods: {
    getAnswer: _.debounce(function() {
      // 模拟API调用
      this.answer = 'Answer to your question.';
    }, 500)
  }
});
Vue.js的框架结构
模板(Template)
- Vue.js使用HTML模板语法声明式地将DOM绑定至底层的Vue实例数据。
- 模板中使用Mustache语法(双大括号)进行文本插值,可以使用指令和表达式。
实例(Instance)
- 每个Vue应用都是通过创建一个Vue实例开始的,通过
new Vue()构造函数创建。 - Vue实例挂载到一个DOM元素上,通常使用
el选项指定。
- 每个Vue应用都是通过创建一个Vue实例开始的,通过
组件(Component)
- 组件是Vue.js的核心概念,用于构建可复用的UI元素。
- 组件可以嵌套使用,形成组件树。
生命周期钩子(Lifecycle Hooks)
- Vue实例在创建过程中会经历一系列的初始化过程,称为生命周期。
- Vue提供了一些钩子函数,让开发者可以在不同的生命周期阶段执行代码,如
created、mounted、updated、destroyed等。
指令系统(Directives)
- Vue.js提供了一系列内置指令,用于在模板中操作DOM。
- 开发者也可以自定义指令,以实现更复杂的DOM操作。
响应式系统(Reactivity System)
- Vue.js的响应式系统是其核心特性之一,它能够自动追踪数据的变化并更新DOM。
- Vue通过
getter和setter实现数据的响应式。
单文件组件(Single File Components, SFC)
- 在Vue.js项目中,常常使用
.vue文件将HTML、JavaScript和CSS封装在一起。 - 单文件组件使得开发和维护复杂应用变得更加容易。
- 在Vue.js项目中,常常使用
Vue实例、模板语法、数据绑定
Vue组件基础
1. 什么是组件?
组件是Vue.js中可重用的独立模块,每个组件都有自己的模板、数据、逻辑和样式。组件可以嵌套使用,形成复杂的UI结构。
2. 创建组件
Vue组件可以通过两种方式创建:全局注册和局部注册。
全局注册
在Vue实例创建之前,使用Vue.component方法全局注册组件:
Vue.component('my-component', {
  template: '<div>A custom component!</div>'
});

new Vue({
  el: '#app'
});
局部注册
在Vue实例或另一个组件的components选项中注册组件:
var MyComponent = {
  template: '<div>A custom component!</div>'
};

new Vue({
  el: '#app',
  components: {
    'my-component': MyComponent
  }
});
3. 使用组件
注册好组件后,可以在模板中使用自定义标签来插入组件:
<div id="app">
  <my-component></my-component>
</div>
4. 组件的模板
组件的模板定义了组件的结构和内容,可以是简单的HTML,也可以包含Vue指令和绑定:
Vue.component('my-component', {
  template: `
    <div>
      <h2>{{ title }}</h2>
      <p>This is a custom component with a dynamic title.</p>
    </div>
  `,
  data: function() {
    return {
      title: 'Hello Vue Component!'
    };
  }
});
5. 组件的数据
每个组件都有自己独立的数据,组件的数据必须是一个函数,以确保每个组件实例有自己独立的数据空间:
Vue.component('my-component', {
  template: '<div>{{ message }}</div>',
  data: function() {
    return {
      message: 'Hello from the component!'
    };
  }
});
6. 组件的属性(Props)
组件可以通过props接收来自父组件的数据。props是一种数据传递机制,允许父组件向子组件传递数据:
Vue.component('child-component', {
  props: ['message'],
  template: '<div>{{ message }}</div>'
});

new Vue({
  el: '#app',
  data: {
    parentMessage: 'Hello from parent!'
  }
});
在模板中使用组件时,通过属性绑定props:
<div id="app">
  <child-component :message="parentMessage"></child-component>
</div>
7. 组件的事件(Events)
组件可以通过事件与父组件通信。子组件可以通过$emit方法触发自定义事件,父组件可以通过事件监听器捕获这些事件:
子组件触发事件
Vue.component('child-component', {
  template: '<button @click="sendMessage">Click me</button>',
  methods: {
    sendMessage: function() {
      this.$emit('message-sent', 'Hello from child!');
    }
  }
});
父组件监听事件
<div id="app">
  <child-component @message-sent="handleMessage"></child-component>
</div>
new Vue({
  el: '#app',
  methods: {
    handleMessage: function(message) {
      console.log(message); // 输出 'Hello from child!'
    }
  }
});
8. 插槽(Slots)
插槽允许组件在其模板中插入内容,从而增强了组件的灵活性。Vue提供了默认插槽和具名插槽两种类型。
默认插槽
Vue.component('my-component', {
  template: '<div><slot></slot></div>'
});
<div id="app">
  <my-component>
    <p>This content will be inserted into the slot.</p>
  </my-component>
</div>
具名插槽
Vue.component('my-component', {
  template: `
    <div>
      <header>
        <slot name="header"></slot>
      </header>
      <main>
        <slot></slot>
      </main>
      <footer>
        <slot name="footer"></slot>
      </footer>
    </div>
  `
});
<div id="app">
  <my-component>
    <template v-slot:header>
      <h1>Header Content</h1>
    </template>
    <p>Main Content</p>
    <template v-slot:footer>
      <p>Footer Content</p>
    </template>
  </my-component>
</div>
Vue的指令(v-if, v-for, v-bind, v-on等)
Vue.js提供了一些内置指令,这些指令是带有前缀v-的特殊属性,用于在模板中绑定数据、控制DOM元素的渲染、处理事件等。常用的指令包括v-if、v-for、v-bind、v-on等。下面将详细讲解这些指令的用法和示例。
1. 条件渲染指令(v-if)
v-if用于条件渲染元素。只有在表达式返回true时,元素才会被渲染。
示例:
<div id="app">
  <p v-if="isVisible">This is visible</p>
  <p v-else>This is hidden</p>
  <button @click="toggleVisibility">Toggle Visibility</button>
</div>

<script>
new Vue({
  el: '#app',
  data: {
    isVisible: true
  },
  methods: {
    toggleVisibility() {
      this.isVisible = !this.isVisible;
    }
  }
});
</script>
在这个例子中,点击按钮可以切换isVisible的值,从而控制段落的显示和隐藏。
2. 列表渲染指令(v-for)
v-for用于循环渲染一组元素或模板。它接收一个表达式,以遍历数组或对象。
示例:
<div id="app">
  <ul>
    <li v-for="item in items" :key="item.id">{{ item.text }}</li>
  </ul>
</div>

<script>
new Vue({
  el: '#app',
  data: {
    items: [
      { id: 1, text: 'Item 1' },
      { id: 2, text: 'Item 2' },
      { id: 3, text: 'Item 3' }
    ]
  }
});
</script>
在这个例子中,v-for指令遍历items数组,并渲染每个项目为一个<li>元素。
3. 属性绑定指令(v-bind)
v-bind用于动态绑定HTML属性、class、style等。可以简写为:。
示例:
<div id="app">
  <a v-bind:href="url">Link</a>
  <a :href="url">Shortened Link</a>
</div>

<script>
new Vue({
  el: '#app',
  data: {
    url: 'https://www.example.com'
  }
});
</script>
在这个例子中,v-bind和简写形式:动态绑定href属性到url数据。
4. 事件绑定指令(v-on)
v-on用于绑定事件监听器。可以简写为@。
示例:
<div id="app">
  <button v-on:click="sayHello">Click me</button>
  <button @click="sayHello">Shortened Click</button>
</div>

<script>
new Vue({
  el: '#app',
  methods: {
    sayHello() {
      alert('Hello, Vue.js!');
    }
  }
});
</script>
在这个例子中,v-on和简写形式@绑定click事件到sayHello方法。
5. 双向绑定指令(v-model)
v-model用于在表单控件元素上创建双向数据绑定。
示例:
<div id="app">
  <input v-model="message" placeholder="Edit me">
  <p>Message is: {{ message }}</p>
</div>

<script>
new Vue({
  el: '#app',
  data: {
    message: ''
  }
});
</script>
在这个例子中,v-model实现了输入框和message数据之间的双向绑定。
6. 显示/隐藏指令(v-show)
v-show用于根据条件展示或隐藏元素,但不会从DOM中移除元素,仅设置display样式。
示例:
<div id="app">
  <p v-show="isVisible">This is visible</p>
  <button @click="toggleVisibility">Toggle Visibility</button>
</div>

<script>
new Vue({
  el: '#app',
  data: {
    isVisible: true
  },
  methods: {
    toggleVisibility() {
      this.isVisible = !this.isVisible;
    }
  }
});
</script>
与v-if不同,v-show仅通过设置CSS的display属性来显示或隐藏元素。
7. 自定义指令
除了内置指令,Vue还允许开发者创建自定义指令。
示例:
<div id="app">
  <p v-highlight>This should be highlighted</p>
</div>

<script>
Vue.directive('highlight', {
  bind(el) {
    el.style.backgroundColor = 'yellow';
  }
});

new Vue({
  el: '#app'
});
</script>
在这个例子中,我们创建了一个自定义指令v-highlight,当绑定元素时,将背景颜色设置为黄色。
练习基础指令的使用
练习Vue.js基础指令的使用可以帮助你更好地掌握Vue.js的基本功能和用法。下面是一个综合示例,涵盖了v-if、v-for、v-bind、v-on、v-model和v-show指令的使用。
示例项目:一个简单的任务管理应用
我们将创建一个简单的任务管理应用,其中包含任务的添加、删除、显示/隐藏等功能。
项目结构
首先,确保你已经安装了Vue CLI,然后创建一个新的Vue项目:
vue create task-manager
cd task-manager
1. 初始化项目
打开项目根目录中的src/App.vue文件,清空默认内容并替换为以下代码:
<template>
  <div id="app">
    <h1>Task Manager</h1>
    <input v-model="newTask" placeholder="Add a new task" @keyup.enter="addTask">
    <button @click="addTask">Add Task</button>
    <button @click="toggleCompletedVisibility">
      {{ showCompleted ? 'Hide' : 'Show' }} Completed Tasks
    </button>

    <ul>
      <li v-for="(task, index) in filteredTasks" :key="task.id">
        <input type="checkbox" v-model="task.completed">
        <span :class="{ completed: task.completed }">{{ task.text }}</span>
        <button @click="removeTask(index)">Remove</button>
      </li>
    </ul>

    <p v-if="tasks.length === 0">No tasks available.</p>
  </div>
</template>

<script>
export default {
  data() {
    return {
      newTask: '',
      tasks: [],
      showCompleted: true
    };
  },
  computed: {
    filteredTasks() {
      if (this.showCompleted) {
        return this.tasks;
      }
      return this.tasks.filter(task => !task.completed);
    }
  },
  methods: {
    addTask() {
      if (this.newTask.trim() !== '') {
        this.tasks.push({ id: Date.now(), text: this.newTask, completed: false });
        this.newTask = '';
      }
    },
    removeTask(index) {
      this.tasks.splice(index, 1);
    },
    toggleCompletedVisibility() {
      this.showCompleted = !this.showCompleted;
    }
  }
};
</script>

<style>
.completed {
  text-decoration: line-through;
}
</style>
2. 详细解释每个指令的使用
条件渲染(v-if)
<p v-if="tasks.length === 0">No tasks available.</p>
当tasks数组为空时,显示提示信息"无任务"。
列表渲染(v-for)
<li v-for="(task, index) in filteredTasks" :key="task.id">
通过v-for指令遍历filteredTasks数组,并为每个任务生成一个<li>元素。使用:key绑定每个任务的唯一ID。
属性绑定(v-bind)
<span :class="{ completed: task.completed }">{{ task.text }}</span>
通过v-bind动态绑定class属性,使得已完成的任务应用completed样式。
事件绑定(v-on)
<button @click="addTask">Add Task</button>
<button @click="removeTask(index)">Remove</button>
通过v-on指令绑定click事件,点击按钮时调用相应的方法。可以使用简写形式@。
双向绑定(v-model)
<input v-model="newTask" placeholder="Add a new task" @keyup.enter="addTask">
通过v-model指令实现输入框与newTask数据的双向绑定,当输入框的内容变化时,newTask数据会同步更新。按下回车键时,调用addTask方法添加任务。
显示/隐藏(v-show)
<button @click="toggleCompletedVisibility">
  {{ showCompleted ? 'Hide' : 'Show' }} Completed Tasks
</button>
虽然在这个例子中没有直接使用v-show,但通过showCompleted的状态控制任务列表的过滤,间接实现了显示和隐藏已完成任务的功能。
3. 运行项目
在项目根目录下运行以下命令启动开发服务器:
npm run serve
打开浏览器访问http://localhost:8080,你将看到一个简单的任务管理应用。你可以添加任务、删除任务、显示或隐藏已完成的任务。
总结
通过这个综合示例,我们练习了Vue.js的基础指令v-if、v-for、v-bind、v-on、v-model和v-show。这些指令是Vue.js的核心功能,掌握它们可以帮助你更高效地开发动态和响应式的Web应用。
学习计算属性和侦听属性
在Vue.js中,计算属性和侦听属性是处理复杂逻辑和数据依赖的重要工具。它们可以帮助你在数据变化时自动更新视图,而无需手动操作DOM。下面是对计算属性和侦听属性的详细讲解。
计算属性(Computed Properties)
计算属性是基于其依赖的数据动态计算并缓存结果的属性。计算属性只有在依赖的数据发生变化时才会重新计算。
示例:
HTML模板
<div id="app">
  <p>Original message: {{ message }}</p>
  <p>Reversed message: {{ reversedMessage }}</p>
  <input v-model="message">
</div>
JavaScript代码
new Vue({
  el: '#app',
  data: {
    message: 'Hello, Vue!'
  },
  computed: {
    reversedMessage() {
      return this.message.split('').reverse().join('');
    }
  }
});
在这个例子中,reversedMessage是一个计算属性,它依赖于message数据。每当message发生变化时,reversedMessage也会自动更新。
侦听属性(Watchers)
侦听属性用于在数据变化时执行异步或开销较大的操作。侦听属性可以监听单个数据属性或复杂表达式。
示例:
HTML模板
<div id="app">
  <p>Question: <input v-model="question"></p>
  <p>Answer: {{ answer }}</p>
</div>
JavaScript代码
new Vue({
  el: '#app',
  data: {
    question: '',
    answer: 'I cannot give you an answer until you ask a question!'
  },
  watch: {
    question(newQuestion, oldQuestion) {
      this.answer = 'Waiting for you to stop typing...';
      this.debouncedGetAnswer();
    }
  },
  methods: {
    getAnswer() {
      if (this.question.indexOf('?') === -1) {
        this.answer = 'Questions usually contain a question mark.';
        return;
      }
      this.answer = 'Thinking...';
      setTimeout(() => {
        this.answer = 'I have an answer!';
      }, 2000);
    }
  },
  created() {
    this.debouncedGetAnswer = _.debounce(this.getAnswer, 500);
  }
});
在这个例子中,侦听属性question用于监听question数据的变化,并在变化时调用getAnswer方法。在getAnswer方法中,我们模拟了一个异步操作(例如API调用),并使用Lodash库的debounce方法来限制调用频率。
计算属性和侦听属性的区别
- 计算属性:用于基于现有数据计算出新的数据,具有缓存功能,只有在依赖的数据发生变化时才会重新计算。
- 侦听属性:用于在数据变化时执行特定的操作,适用于需要进行异步或开销较大的操作时。
综合示例
我们将结合计算属性和侦听属性,创建一个更复杂的示例。
HTML模板
<div id="app">
  <p>Message: <input v-model="message"></p>
  <p>Reversed Message: {{ reversedMessage }}</p>
  <p>Message Length: {{ messageLength }}</p>
  <p>Character Count: {{ charCount }}</p>
  <button @click="resetMessage">Reset</button>
</div>
JavaScript代码
new Vue({
  el: '#app',
  data: {
    message: 'Hello, Vue!',
    charCount: 0
  },
  computed: {
    reversedMessage() {
      return this.message.split('').reverse().join('');
    },
    messageLength() {
      return this.message.length;
    }
  },
  watch: {
    message(newMessage) {
      this.charCount = newMessage.length;
    }
  },
  methods: {
    resetMessage() {
      this.message = '';
    }
  }
});
在这个示例中,我们展示了计算属性和侦听属性的结合使用:
reversedMessage:计算属性,用于返回message的反转字符串。messageLength:计算属性,用于返回message的长度。charCount:侦听属性,用于监听message的变化并更新字符计数。
总结
- 计算属性:适用于基于现有数据计算新的数据,具有缓存特性,适合用于模板中的复杂逻辑。
- 侦听属性:适用于数据变化时需要执行的异步操作或高开销操作。
通过灵活使用计算属性和侦听属性,可以更高效地管理和响应数据变化,使得Vue.js应用更加动态和响应式。
Vue组件基础
Vue组件基础
Vue组件是Vue.js应用的基本构建块,能够提高代码的可复用性和可维护性。通过学习如何创建和使用Vue组件,可以更高效地开发复杂的应用程序。
1. 什么是组件?
组件是Vue.js中自定义的HTML元素,每个组件都有自己的模板、数据和逻辑。组件可以嵌套使用,形成复杂的UI结构。
2. 创建和注册组件
Vue组件可以通过两种方式创建:全局注册和局部注册。
全局注册
全局注册组件意味着它可以在任何Vue实例中使用。使用Vue.component方法全局注册组件:
Vue.component('my-component', {
  template: '<div>This is a custom component!</div>'
});

new Vue({
  el: '#app'
});
在HTML中使用这个组件:
<div id="app">
  <my-component></my-component>
</div>
局部注册
局部注册组件意味着它只能在注册它的Vue实例或组件中使用:
var MyComponent = {
  template: '<div>This is a locally registered component!</div>'
};

new Vue({
  el: '#app',
  components: {
    'my-component': MyComponent
  }
});
在HTML中使用这个组件:
<div id="app">
  <my-component></my-component>
</div>
3. 组件的基本结构
一个Vue组件通常包含模板、数据、方法和生命周期钩子。
模板
模板用于定义组件的HTML结构:
Vue.component('my-component', {
  template: `
    <div>
      <h2>{{ title }}</h2>
      <p>This is a custom component with a dynamic title.</p>
    </div>
  `,
  data() {
    return {
      title: 'Hello Vue Component!'
    };
  }
});
数据
组件的数据必须是一个函数,以确保每个组件实例都有独立的数据:
Vue.component('my-component', {
  template: '<div>{{ message }}</div>',
  data() {
    return {
      message: 'Hello from the component!'
    };
  }
});
方法
组件的方法用于定义组件的行为和逻辑:
Vue.component('my-component', {
  template: '<div><button @click="sayHello">Click me</button></div>',
  methods: {
    sayHello() {
      alert('Hello!');
    }
  }
});
4. 组件之间的通信
父组件向子组件传递数据(Props)
父组件通过props向子组件传递数据。子组件通过声明props接收这些数据:
Vue.component('child-component', {
  props: ['message'],
  template: '<div>{{ message }}</div>'
});

new Vue({
  el: '#app',
  data: {
    parentMessage: 'Hello from parent'
  }
});
在HTML中使用这个组件:
<div id="app">
  <child-component :message="parentMessage"></child-component>
</div>
子组件向父组件传递数据(Events)
子组件通过事件向父组件传递数据。子组件通过$emit方法触发自定义事件,父组件通过事件监听器捕获事件:
Vue.component('child-component', {
  template: '<button @click="sendMessage">Click me</button>',
  methods: {
    sendMessage() {
      this.$emit('message-sent', 'Hello from child!');
    }
  }
});

new Vue({
  el: '#app',
  data: {
    messageFromChild: ''
  },
  methods: {
    handleMessage(message) {
      this.messageFromChild = message;
    }
  }
});
在HTML中使用这个组件:
<div id="app">
  <child-component @message-sent="handleMessage"></child-component>
  <p>{{ messageFromChild }}</p>
</div>
5. 插槽(Slots)
插槽用于在组件中插入内容,增强了组件的灵活性。Vue提供了默认插槽和具名插槽两种类型。
默认插槽
Vue.component('my-component', {
  template: '<div><slot></slot></div>'
});

new Vue({
  el: '#app'
});
在HTML中使用这个组件:
<div id="app">
  <my-component>
    <p>This content will be inserted into the slot.</p>
  </my-component>
</div>
具名插槽
Vue.component('my-component', {
  template: `
    <div>
      <header>
        <slot name="header"></slot>
      </header>
      <main>
        <slot></slot>
      </main>
      <footer>
        <slot name="footer"></slot>
      </footer>
    </div>
  `
});

new Vue({
  el: '#app'
});
在HTML中使用这个组件:
<div id="app">
  <my-component>
    <template v-slot:header>
      <h1>Header Content</h1>
    </template>
    <p>Main Content</p>
    <template v-slot:footer>
      <p>Footer Content</p>
    </template>
  </my-component>
</div>
综合示例
下面是一个综合示例,展示了如何创建和使用组件,以及组件之间的通信。
父组件
<template>
  <div>
    <h1>Parent Component</h1>
    <p>Message from Child: {{ messageFromChild }}</p>
    <child-component :message="parentMessage" @message-sent="handleMessage"></child-component>
  </div>
</template>

<script>
import ChildComponent from './ChildComponent.vue';

export default {
  name: 'ParentComponent',
  components: {
    ChildComponent
  },
  data() {
    return {
      parentMessage: 'Hello from Parent!',
      messageFromChild: ''
    };
  },
  methods: {
    handleMessage(message) {
      this.messageFromChild = message;
    }
  }
};
</script>
子组件
<template>
  <div>
    <h2>Child Component</h2>
    <p>Message from Parent: {{ message }}</p>
    <button @click="sendMessage">Send Message to Parent</button>
  </div>
</template>

<script>
export default {
  name: 'ChildComponent',
  props: ['message'],
  methods: {
    sendMessage() {
      this.$emit('message-sent', 'Hello from Child!');
    }
  }
};
</script>
在这个示例中,我们创建了一个父组件和一个子组件。父组件向子组件传递一个message,子组件可以点击按钮向父组件发送一个消息。父组件接收到子组件的消息后,将其显示出来。
创建和使用简单的组件
创建和使用简单的组件是掌握Vue.js的基础。组件可以提高代码的可复用性和可维护性,使得应用程序结构更加清晰。下面是创建和使用简单组件的详细步骤和示例:
1. 创建一个简单的组件
全局注册组件
全局注册组件意味着组件可以在任何Vue实例中使用。
// 注册一个全局组件
Vue.component('my-component', {
  template: '<div>This is a simple component!</div>'
});

// 创建Vue实例
new Vue({
  el: '#app'
});
在HTML中使用这个组件:
<div id="app">
  <my-component></my-component>
</div>
局部注册组件
局部注册组件意味着组件只能在注册它的Vue实例或组件中使用。
// 创建一个组件对象
var MyComponent = {
  template: '<div>This is a locally registered component!</div>'
};

// 创建Vue实例并局部注册组件
new Vue({
  el: '#app',
  components: {
    'my-component': MyComponent
  }
});
在HTML中使用这个组件:
<div id="app">
  <my-component></my-component>
</div>
2. 组件的基本结构
一个Vue组件通常包含模板、数据和方法。
Vue.component('my-component', {
  template: `
    <div>
      <h1>{{ title }}</h1>
      <button @click="changeTitle">Change Title</button>
    </div>
  `,
  data: function() {
    return {
      title: 'Hello, Vue Component!'
    };
  },
  methods: {
    changeTitle: function() {
      this.title = 'Title Changed!';
    }
  }
});

new Vue({
  el: '#app'
});
在HTML中使用这个组件:
<div id="app">
  <my-component></my-component>
</div>
3. 组件间的通信
父组件向子组件传递数据(Props)
父组件可以通过props向子组件传递数据。
Vue.component('child-component', {
  props: ['message'],
  template: '<div>{{ message }}</div>'
});

new Vue({
  el: '#app',
  data: {
    parentMessage: 'Message from parent'
  }
});
在HTML中使用这个组件:
<div id="app">
  <child-component :message="parentMessage"></child-component>
</div>
子组件向父组件传递数据(Events)
子组件可以通过事件向父组件传递数据。
子组件触发事件
Vue.component('child-component', {
  template: '<button @click="sendMessage">Click me</button>',
  methods: {
    sendMessage: function() {
      this.$emit('message-sent', 'Hello from child!');
    }
  }
});
父组件监听事件
<div id="app">
  <child-component @message-sent="handleMessage"></child-component>
</div>
new Vue({
  el: '#app',
  methods: {
    handleMessage: function(message) {
      console.log(message); // 输出 'Hello from child!'
    }
  }
});
4. 使用插槽(Slots)
插槽允许父组件在子组件的模板中插入内容。
默认插槽
Vue.component('my-component', {
  template: '<div><slot></slot></div>'
});

new Vue({
  el: '#app'
});
在HTML中使用这个组件:
<div id="app">
  <my-component>
    <p>This content will be inserted into the slot.</p>
  </my-component>
</div>
具名插槽
Vue.component('my-component', {
  template: `
    <div>
      <header>
        <slot name="header"></slot>
      </header>
      <main>
        <slot></slot>
      </main>
      <footer>
        <slot name="footer"></slot>
      </footer>
    </div>
  `
});

new Vue({
  el: '#app'
});
在HTML中使用这个组件:
<div id="app">
  <my-component>
    <template v-slot:header>
      <h1>Header Content</h1>
    </template>
    <p>Main Content</p>
    <template v-slot:footer>
      <p>Footer Content</p>
    </template>
  </my-component>
</div>
5. 使用单文件组件(Single File Components, SFC)
单文件组件(SFC)是Vue.js的一种文件格式,扩展名为.vue,它将模板、脚本和样式封装在一个文件中。
MyComponent.vue
<template>
  <div>
    <h1>{{ title }}</h1>
    <button @click="changeTitle">Change Title</button>
  </div>
</template>

<script>
export default {
  data() {
    return {
      title: 'Hello, Vue Component!'
    };
  },
  methods: {
    changeTitle() {
      this.title = 'Title Changed!';
    }
  }
};
</script>

<style>
h1 {
  color: blue;
}
</style>
使用单文件组件
import Vue from 'vue';
import MyComponent from './MyComponent.vue';

new Vue({
  el: '#app',
  components: {
    'my-component': MyComponent
  }
});
在HTML中使用这个组件:
<div id="app">
  <my-component></my-component>
</div>
总结
通过以上内容,您可以创建和使用简单的Vue组件,并理解组件之间的基本通信方式。组件是Vue.js的重要特性,通过实践和练习,可以更好地掌握组件的使用,并在实际项目中灵活应用。
了解Vue CLI并创建一个简单的Vue项目
Vue CLI(Command Line Interface)是一个强大的工具,可以帮助你快速创建和管理Vue.js项目。它提供了丰富的脚手架和配置选项,使得开发Vue应用更加高效和规范。以下是详细的讲解,包括安装Vue CLI、创建和运行一个简单的Vue项目的步骤。
1. 安装Vue CLI
在安装Vue CLI之前,请确保已经安装了Node.js和npm(Node Package Manager)。你可以通过以下命令检查是否安装:
node -v
npm -v
如果没有安装Node.js,可以从Node.js官网下载并安装。
接下来,通过npm安装Vue CLI:
npm install -g @vue/cli
安装完成后,你可以通过以下命令验证是否安装成功:
vue --version
2. 创建一个新项目
使用Vue CLI创建一个新的Vue项目。首先,打开终端或命令行工具,导航到你希望存放项目的目录,然后运行以下命令:
vue create my-vue-project
my-vue-project是项目的名称,你可以根据需要更改。
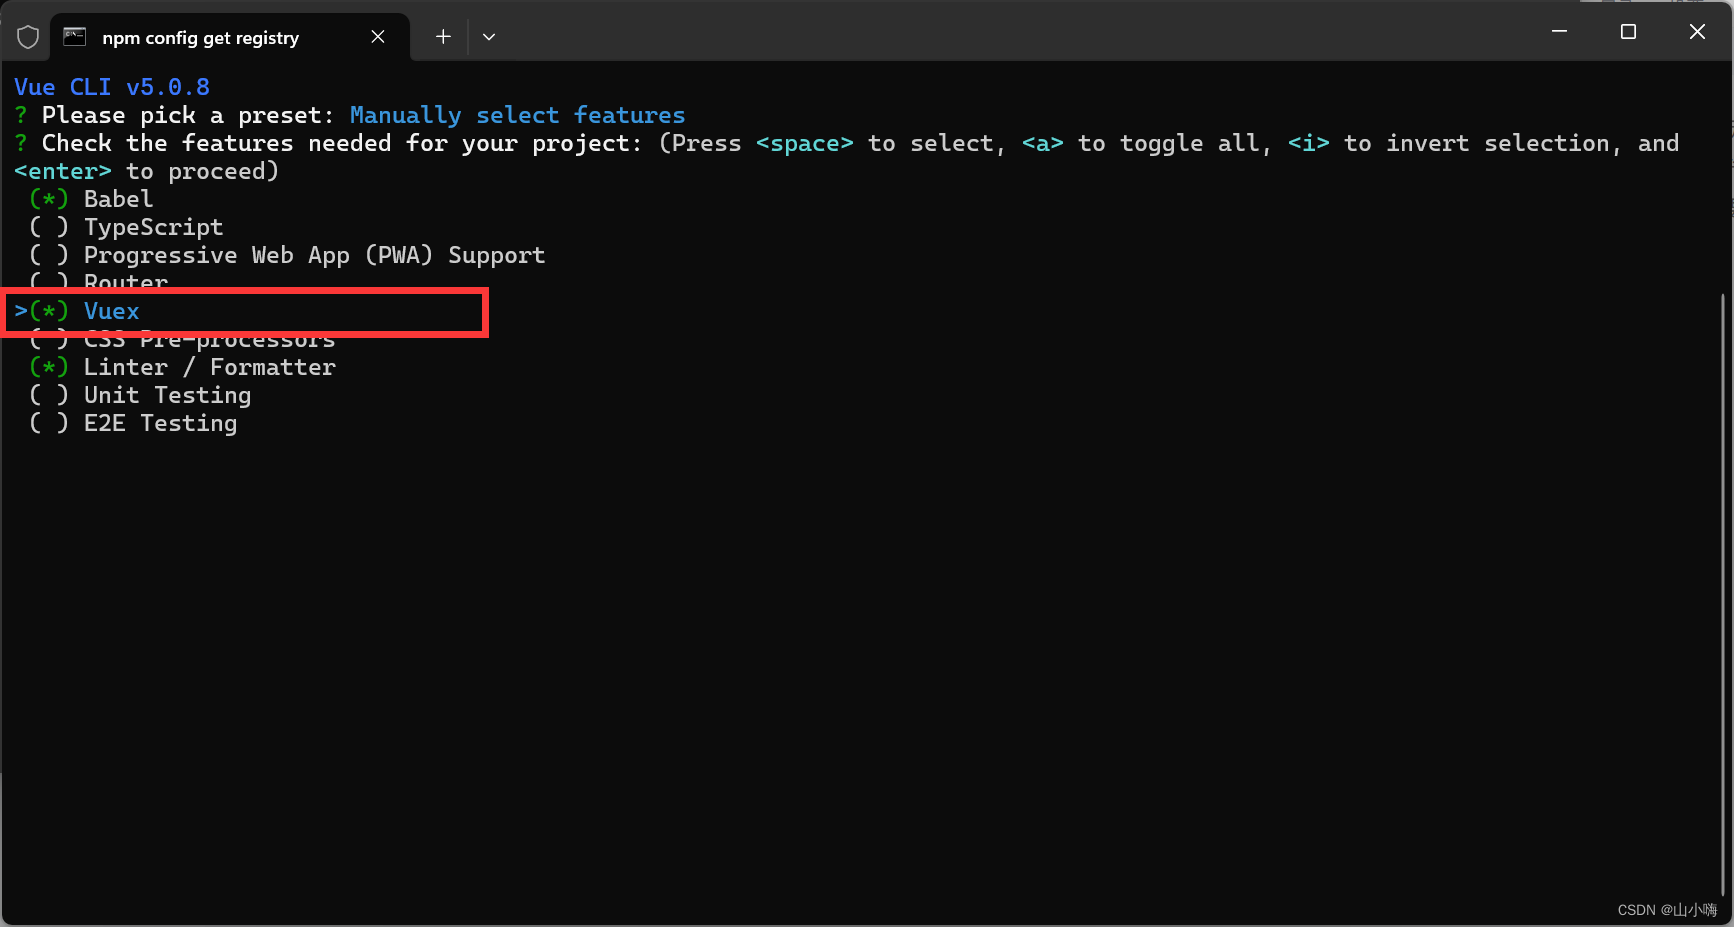
运行命令后,Vue CLI会提示你选择一些配置选项:
default (babel, eslint): 默认配置,包含Babel和ESLint。Manually select features: 手动选择配置项,例如Router、Vuex、CSS预处理器等。
选择default选项:
? Please pick a preset: default (babel, eslint)
CLI将会自动生成项目结构,并安装依赖。
3. 运行项目
进入项目目录并启动开发服务器:
cd my-vue-project
npm run serve
成功启动后,终端会显示开发服务器的地址,通常是http://localhost:8080。打开浏览器,访问该地址,你将看到默认的Vue欢迎页面。
4. 项目结构
使用Vue CLI创建的项目包含以下结构:
my-vue-project
├── node_modules/        # 项目依赖
├── public/              # 静态资源
│   ├── favicon.ico
│   └── index.html
├── src/                 # 源代码
│   ├── assets/          # 资源文件(如图片、样式)
│   ├── components/      # Vue组件
│   │   └── HelloWorld.vue
│   ├── App.vue          # 根组件
│   └── main.js          # 入口文件
├── .gitignore           # Git忽略文件
├── babel.config.js      # Babel配置
├── package.json         # 项目描述文件和依赖
├── README.md            # 项目说明文件
└── yarn.lock / package-lock.json  # 锁定依赖版本
5. 修改和扩展项目
你可以在src/components/目录下创建新的组件,并在App.vue中引用和使用这些组件。
创建一个新组件
在src/components/目录下创建一个名为MyComponent.vue的文件:
<template>
  <div>
    <h1>{{ message }}</h1>
  </div>
</template>

<script>
export default {
  data() {
    return {
      message: 'Hello from MyComponent!'
    };
  }
};
</script>

<style scoped>
h1 {
  color: green;
}
</style>
在App.vue中使用新组件
打开src/App.vue,修改内容如下:
<template>
  <div id="app">
    <img alt="Vue logo" src="./assets/logo.png">
    <HelloWorld msg="Welcome to Your Vue.js App"/>
    <MyComponent />
  </div>
</template>

<script>
import HelloWorld from './components/HelloWorld.vue';
import MyComponent from './components/MyComponent.vue';

export default {
  name: 'App',
  components: {
    HelloWorld,
    MyComponent
  }
};
</script>

<style>
/* 可以在这里添加全局样式 */
</style>
6. 热重载
Vue CLI内置了热重载功能,当你修改项目中的文件并保存时,浏览器会自动刷新以显示最新的更改。这大大提高了开发效率。
总结
通过以上步骤,你已经了解了如何使用Vue CLI创建一个简单的Vue项目,并且熟悉了项目的基本结构和运行方式。Vue CLI提供了许多强大的工具和配置选项,可以帮助你更高效地开发Vue.js应用程序。在实际项目中,你可以根据需要扩展和修改项目,添加更多的功能和组件。
理解单文件组件(.vue文件)
单文件组件(Single File Component,SFC)是Vue.js中一种将模板、脚本和样式封装在一个文件中的方式,文件扩展名为.vue。这种组件格式使得开发和维护Vue.js应用程序变得更加高效和直观。
单文件组件的结构
一个.vue文件通常包含三个部分:<template>、<script>和<style>,每个部分对应组件的不同方面。
<template>
  <!-- 模板部分 -->
</template>

<script>
  // 脚本部分
</script>

<style>
  /* 样式部分 */
</style>
1. <template> 部分
<template>部分用于定义组件的HTML结构。它可以包含Vue的指令和数据绑定语法。
<template>
  <div>
    <h1>{{ message }}</h1>
    <button @click="updateMessage">Click me</button>
  </div>
</template>
2. <script> 部分
<script>部分包含组件的逻辑,包括数据、方法、生命周期钩子等。
<script>
export default {
  data() {
    return {
      message: 'Hello, Vue!'
    };
  },
  methods: {
    updateMessage() {
      this.message = 'Message updated!';
    }
  }
};
</script>
3. <style> 部分
<style>部分用于定义组件的样式。可以使用普通CSS、预处理器(如SCSS、LESS)或CSS模块化方案。使用scoped属性可以使样式只作用于当前组件。
<style scoped>
h1 {
  color: blue;
}
</style>
示例:一个完整的单文件组件
以下是一个完整的单文件组件示例:
<template>
  <div>
    <h1>{{ message }}</h1>
    <button @click="updateMessage">Click me</button>
  </div>
</template>

<script>
export default {
  data() {
    return {
      message: 'Hello, Vue!'
    };
  },
  methods: {
    updateMessage() {
      this.message = 'Message updated!';
    }
  }
};
</script>

<style scoped>
h1 {
  color: blue;
}
button {
  background-color: lightgray;
  border: none;
  padding: 10px 20px;
  cursor: pointer;
}
button:hover {
  background-color: gray;
  color: white;
}
</style>
使用单文件组件
要使用单文件组件,需要在Vue项目中进行以下操作:
- 创建组件文件
在src/components目录下创建一个新文件MyComponent.vue,并添加上述代码。
- 在主应用中引用组件
在src/App.vue中引用并使用这个组件:
<template>
  <div id="app">
    <img alt="Vue logo" src="./assets/logo.png">
    <HelloWorld msg="Welcome to Your Vue.js App"/>
    <MyComponent />
  </div>
</template>

<script>
import HelloWorld from './components/HelloWorld.vue';
import MyComponent from './components/MyComponent.vue';

export default {
  name: 'App',
  components: {
    HelloWorld,
    MyComponent
  }
};
</script>

<style>
/* 全局样式 */
</style>
- 运行项目
确保项目运行正常,命令如下:
npm run serve
打开浏览器访问http://localhost:8080,你将看到包含MyComponent组件的页面。
优点
使用单文件组件有以下优点:
- 结构清晰:将模板、脚本和样式封装在一个文件中,使得组件的结构更加清晰。
- 可维护性高:所有与组件相关的代码都在一个文件中,方便维护和修改。
- 样式作用域:通过
scoped属性,可以使样式仅作用于当前组件,避免样式冲突。 - 工具支持:Vue CLI和其他开发工具对单文件组件提供了良好的支持,如热重载、代码提示和代码检查等。
总结
单文件组件是Vue.js中一个非常重要和强大的特性,它简化了组件的开发和维护过程。通过将模板、脚本和样式封装在一个文件中,开发者可以更好地管理和组织代码,提高开发效率和代码质量。在实际开发中,充分利用单文件组件的优势,可以显著提升Vue.js项目的可维护性和可扩展性。
学习组件之间的通信(props, events)
在Vue.js中,组件之间的通信是构建复杂应用程序时必须掌握的技能。Vue.js提供了props和events两种主要方式来实现父子组件之间的数据传递和事件触发。下面详细讲解这两种方式的使用方法。
1. 父组件向子组件传递数据(Props)
props用于从父组件向子组件传递数据。父组件通过属性绑定的方式传递数据,子组件通过声明props来接收这些数据。
示例:
父组件
<template>
  <div>
    <h1>Parent Component</h1>
    <child-component :message="parentMessage"></child-component>
  </div>
</template>

<script>
import ChildComponent from './ChildComponent.vue';

export default {
  name: 'ParentComponent',
  components: {
    ChildComponent
  },
  data() {
    return {
      parentMessage: 'Hello from parent!'
    };
  }
};
</script>
子组件
<template>
  <div>
    <h2>Child Component</h2>
    <p>{{ message }}</p>
  </div>
</template>

<script>
export default {
  name: 'ChildComponent',
  props: {
    message: {
      type: String,
      required: true
    }
  }
};
</script>
在这个例子中,ParentComponent通过message属性将parentMessage数据传递给ChildComponent,子组件通过props声明接收这个数据。
2. 子组件向父组件传递数据(Events)
events用于从子组件向父组件传递数据或通知事件。子组件通过$emit方法触发自定义事件,父组件通过事件监听器来捕获和处理这些事件。
示例:
子组件
<template>
  <div>
    <h2>Child Component</h2>
    <button @click="sendMessage">Send Message to Parent</button>
  </div>
</template>

<script>
export default {
  name: 'ChildComponent',
  methods: {
    sendMessage() {
      this.$emit('message-sent', 'Hello from child!');
    }
  }
};
</script>
父组件
<template>
  <div>
    <h1>Parent Component</h1>
    <child-component @message-sent="handleMessage"></child-component>
    <p>{{ messageFromChild }}</p>
  </div>
</template>

<script>
import ChildComponent from './ChildComponent.vue';

export default {
  name: 'ParentComponent',
  components: {
    ChildComponent
  },
  data() {
    return {
      messageFromChild: ''
    };
  },
  methods: {
    handleMessage(message) {
      this.messageFromChild = message;
    }
  }
};
</script>
在这个例子中,ChildComponent通过$emit触发了一个自定义事件message-sent,并传递了一个消息数据。ParentComponent通过事件监听器@message-sent捕获这个事件并调用handleMessage方法来处理传递过来的数据。
3. 结合使用Props和Events
有时我们需要同时使用props和events来实现父子组件之间的双向通信。以下是一个示例:
父组件
<template>
  <div>
    <h1>Parent Component</h1>
    <child-component :message="parentMessage" @update-message="updateMessage"></child-component>
    <p>{{ parentMessage }}</p>
  </div>
</template>

<script>
import ChildComponent from './ChildComponent.vue';

export default {
  name: 'ParentComponent',
  components: {
    ChildComponent
  },
  data() {
    return {
      parentMessage: 'Hello from Parent!'
    };
  },
  methods: {
    updateMessage(newMessage) {
      this.parentMessage = newMessage;
    }
  }
};
</script>
子组件
<template>
  <div>
    <h2>Child Component</h2>
    <p>{{ message }}</p>
    <input v-model="localMessage" @input="notifyParent">
  </div>
</template>

<script>
export default {
  name: 'ChildComponent',
  props: {
    message: {
      type: String,
      required: true
    }
  },
  data() {
    return {
      localMessage: this.message
    };
  },
  methods: {
    notifyParent() {
      this.$emit('update-message', this.localMessage);
    }
  },
  watch: {
    message(newMessage) {
      this.localMessage = newMessage;
    }
  }
};
</script>
在这个例子中,父组件通过props将parentMessage传递给子组件ChildComponent。子组件通过input事件将输入框中的新数据通过update-message事件传递回父组件,父组件接收到事件后更新parentMessage。
总结
- Props:用于从父组件向子组件传递数据。父组件通过属性绑定传递数据,子组件通过声明
props接收数据。 - Events:用于从子组件向父组件传递数据或通知事件。子组件通过
$emit触发自定义事件,父组件通过事件监听器捕获和处理事件。
通过灵活使用props和events,可以实现父子组件之间的有效通信,构建复杂而灵活的Vue.js应用程序。在实际开发中,合理地设计和使用组件通信方式,可以大大提高代码的可维护性和扩展性。
练习父子组件通信
为了更好地练习和掌握Vue.js的父子组件通信,我们可以构建一个更加复杂且实用的示例。这个示例将展示父组件和子组件之间的数据传递、事件传递以及如何处理这些数据和事件。
示例项目:任务管理应用
我们将创建一个任务管理应用,其中包括添加任务、标记任务为完成、以及删除任务。父组件负责管理任务列表,子组件负责展示单个任务和相应的操作。
1. 创建项目结构
首先,确保你已经安装了Vue CLI,然后创建一个新的Vue项目:
vue create task-manager
cd task-manager
2. 创建父组件
在src/components目录下创建一个新的文件TaskList.vue:
<template>
  <div>
    <h1>Task Manager</h1>
    <input v-model="newTask" @keyup.enter="addTask" placeholder="Add a new task" />
    <button @click="addTask">Add Task</button>
    <ul>
      <task-item
        v-for="(task, index) in tasks"
        :key="task.id"
        :task="task"
        @delete-task="deleteTask(index)"
        @toggle-completion="toggleTaskCompletion(index)"
      ></task-item>
    </ul>
  </div>
</template>

<script>
import TaskItem from './TaskItem.vue';

export default {
  name: 'TaskList',
  components: {
    TaskItem
  },
  data() {
    return {
      newTask: '',
      tasks: []
    };
  },
  methods: {
    addTask() {
      if (this.newTask.trim()) {
        this.tasks.push({
          id: Date.now(),
          text: this.newTask.trim(),
          completed: false
        });
        this.newTask = '';
      }
    },
    deleteTask(index) {
      this.tasks.splice(index, 1);
    },
    toggleTaskCompletion(index) {
      this.tasks[index].completed = !this.tasks[index].completed;
    }
  }
};
</script>
3. 创建子组件
在src/components目录下创建一个新的文件TaskItem.vue:
<template>
  <li>
    <span :class="{ completed: task.completed }">{{ task.text }}</span>
    <button @click="toggleCompletion">{{ task.completed ? 'Undo' : 'Complete' }}</button>
    <button @click="deleteTask">Delete</button>
  </li>
</template>

<script>
export default {
  name: 'TaskItem',
  props: {
    task: {
      type: Object,
      required: true
    }
  },
  methods: {
    toggleCompletion() {
      this.$emit('toggle-completion');
    },
    deleteTask() {
      this.$emit('delete-task');
    }
  }
};
</script>

<style scoped>
.completed {
  text-decoration: line-through;
}
button {
  margin-left: 10px;
}
</style>
4. 在主应用中使用父组件
打开src/App.vue,引用并使用TaskList组件:
<template>
  <div id="app">
    <TaskList />
  </div>
</template>

<script>
import TaskList from './components/TaskList.vue';

export default {
  name: 'App',
  components: {
    TaskList
  }
};
</script>

<style>
/* 全局样式 */
</style>
5. 运行项目
在项目根目录下运行以下命令启动开发服务器:
npm run serve
打开浏览器访问http://localhost:8080,你将看到一个任务管理应用。你可以添加任务、标记任务为完成、以及删除任务。
详细解释
父组件(TaskList.vue)
数据管理:
newTask:用于绑定输入框中的新任务文本。tasks:用于存储任务列表。
方法:
addTask:添加新任务到任务列表中。deleteTask:从任务列表中删除任务。toggleTaskCompletion:切换任务的完成状态。
子组件的使用:
<task-item>:使用子组件,并通过props传递单个任务数据。@delete-task和@toggle-completion:监听子组件的自定义事件,并调用相应的方法。
子组件(TaskItem.vue)
Props:
task:定义了一个props用于接收父组件传递的任务数据。
方法:
toggleCompletion:触发toggle-completion事件,通知父组件任务完成状态的变化。deleteTask:触发delete-task事件,通知父组件删除任务。
样式:
completed:根据任务的完成状态,动态添加样式,使完成的任务显示为划线状态。
总结
通过这个综合示例,我们练习了如何在Vue.js项目中实现父子组件之间的通信:
- Props:用于从父组件向子组件传递数据,子组件通过
props接收数据。 - Events:用于从子组件向父组件传递数据或通知事件,子组件通过
$emit触发自定义事件,父组件通过事件监听器捕获和处理事件。
这种方式可以有效地实现组件间的数据传递和事件通知,使得组件间通信变得清晰和可维护。通过多练习这种模式,可以更好地掌握Vue.js组件间通信的技巧。
学习插槽(slots)和作用域插槽
插槽(Slots)是Vue.js中的一个强大特性,用于在组件中插入内容,增强了组件的灵活性和可复用性。Vue.js提供了默认插槽、具名插槽和作用域插槽,下面我们将详细讲解这些插槽及其用法。
1. 默认插槽
默认插槽用于在组件的模板中插入外部传入的内容。如果没有传入内容,则可以设置默认内容。
示例:
父组件
<template>
  <div>
    <h1>Parent Component</h1>
    <child-component>
      <p>This content is inserted into the default slot.</p>
    </child-component>
  </div>
</template>

<script>
import ChildComponent from './ChildComponent.vue';

export default {
  name: 'ParentComponent',
  components: {
    ChildComponent
  }
};
</script>
子组件
<template>
  <div>
    <h2>Child Component</h2>
    <slot>This is the default content if no slot content is provided.</slot>
  </div>
</template>

<script>
export default {
  name: 'ChildComponent'
};
</script>
在这个例子中,父组件向子组件的默认插槽中插入了一段内容。如果父组件没有提供内容,子组件会显示默认内容。
2. 具名插槽
具名插槽允许在一个组件中使用多个插槽,并通过名字来引用和插入不同的内容。
示例:
父组件
<template>
  <div>
    <h1>Parent Component</h1>
    <child-component>
      <template v-slot:header>
        <h2>Header Content</h2>
      </template>
      <template v-slot:default>
        <p>Main Content</p>
      </template>
      <template v-slot:footer>
        <p>Footer Content</p>
      </template>
    </child-component>
  </div>
</template>

<script>
import ChildComponent from './ChildComponent.vue';

export default {
  name: 'ParentComponent',
  components: {
    ChildComponent
  }
};
</script>
子组件
<template>
  <div>
    <header>
      <slot name="header">Default Header</slot>
    </header>
    <main>
      <slot>Default Main Content</slot>
    </main>
    <footer>
      <slot name="footer">Default Footer</slot>
    </footer>
  </div>
</template>

<script>
export default {
  name: 'ChildComponent'
};
</script>
在这个例子中,父组件通过具名插槽v-slot:header、v-slot:default、v-slot:footer向子组件传递不同的内容。子组件使用slot标签来定义具名插槽的位置。
3. 作用域插槽
作用域插槽允许子组件将数据传递给父组件插槽中的内容,使得插槽内容可以访问子组件的数据。作用域插槽通过slot-scope特性实现。
示例:
父组件
<template>
  <div>
    <h1>Parent Component</h1>
    <child-component>
      <template v-slot:default="slotProps">
        <p>Count from child: {{ slotProps.count }}</p>
        <button @click="slotProps.increment">Increment in Parent</button>
      </template>
    </child-component>
  </div>
</template>

<script>
import ChildComponent from './ChildComponent.vue';

export default {
  name: 'ParentComponent',
  components: {
    ChildComponent
  }
};
</script>
子组件
<template>
  <div>
    <h2>Child Component</h2>
    <slot :count="count" :increment="increment"></slot>
  </div>
</template>

<script>
export default {
  name: 'ChildComponent',
  data() {
    return {
      count: 0
    };
  },
  methods: {
    increment() {
      this.count++;
    }
  }
};
</script>
在这个例子中,子组件通过slot标签向插槽传递count和increment方法。父组件在默认插槽中通过v-slot:default="slotProps"访问这些数据和方法,并在插槽内容中使用它们。
总结
- 默认插槽:用于在组件模板中插入外部内容。如果没有提供内容,则显示默认内容。
- 具名插槽:允许在组件中使用多个插槽,并通过名字来引用和插入不同的内容。
- 作用域插槽:允许子组件将数据传递给父组件插槽中的内容,使得插槽内容可以访问子组件的数据。
通过使用这些插槽,可以使组件更加灵活和可复用,能够满足复杂的布局和数据传递需求。在实际开发中,根据具体需求选择合适的插槽类型,可以显著提升组件的可维护性和扩展性。
练习插槽的使用
练习插槽的使用可以帮助你更好地掌握Vue.js组件的灵活性和可复用性。以下是一个详细的示例,展示了如何使用默认插槽、具名插槽和作用域插槽。
示例项目:用户卡片组件
我们将创建一个用户卡片组件,包含用户的头像、名称和自定义内容。通过插槽可以插入不同的内容到组件的不同部分。
1. 创建用户卡片组件
在src/components目录下创建一个新的文件UserCard.vue:
<template>
  <div class="user-card">
    <header>
      <slot name="avatar">
        <img src="default-avatar.png" alt="User Avatar" class="avatar">
      </slot>
    </header>
    <main>
      <slot name="name">
        <h2>Default Name</h2>
      </slot>
      <slot>
        <p>This is default content.</p>
      </slot>
    </main>
    <footer>
      <slot name="footer">
        <button>Default Button</button>
      </slot>
    </footer>
  </div>
</template>

<script>
export default {
  name: 'UserCard'
};
</script>

<style scoped>
.user-card {
  border: 1px solid #ccc;
  padding: 20px;
  border-radius: 5px;
  width: 300px;
  margin: 20px;
}
.avatar {
  width: 100px;
  height: 100px;
  border-radius: 50%;
}
</style>
2. 在主应用中使用用户卡片组件
打开src/App.vue,引用并使用UserCard组件:
<template>
  <div id="app">
    <UserCard>
      <template v-slot:avatar>
        <img src="https://via.placeholder.com/100" alt="User Avatar" class="avatar">
      </template>
      <template v-slot:name>
        <h2>John Doe</h2>
      </template>
      <template v-slot:default>
        <p>John is a software developer from San Francisco.</p>
      </template>
      <template v-slot:footer>
        <button @click="sayHello">Say Hello</button>
      </template>
    </UserCard>

    <UserCard>
      <template v-slot:avatar>
        <img src="https://via.placeholder.com/100" alt="User Avatar" class="avatar">
      </template>
      <template v-slot:name>
        <h2>Jane Smith</h2>
      </template>
      <template v-slot:default>
        <p>Jane is a graphic designer from New York.</p>
      </template>
      <template v-slot:footer>
        <button @click="sayGoodbye">Say Goodbye</button>
      </template>
    </UserCard>
  </div>
</template>

<script>
import UserCard from './components/UserCard.vue';

export default {
  name: 'App',
  components: {
    UserCard
  },
  methods: {
    sayHello() {
      alert('Hello!');
    },
    sayGoodbye() {
      alert('Goodbye!');
    }
  }
};
</script>

<style>
/* 全局样式 */
</style>
详细解释
默认插槽
<slot>
  <p>This is default content.</p>
</slot>
如果父组件没有提供插槽内容,子组件将显示默认内容。在上面的例子中,默认插槽内容为<p>This is default content.</p>,但在使用组件时,我们插入了自定义的内容。
具名插槽
<slot name="avatar">
  <img src="default-avatar.png" alt="User Avatar" class="avatar">
</slot>
具名插槽允许我们在组件中插入多个不同的内容部分。父组件通过v-slot指令指定具名插槽的名称。在这个例子中,我们使用了avatar、name和footer具名插槽。
作用域插槽
作用域插槽允许子组件向父组件传递数据。在这个示例中没有展示作用域插槽的使用,我们将通过另一个示例展示。
示例项目:商品列表组件
我们将创建一个商品列表组件,展示商品的名称和价格,并通过作用域插槽向父组件传递数据。
创建商品列表组件
在src/components目录下创建一个新的文件ProductList.vue:
<template>
  <div class="product-list">
    <div v-for="product in products" :key="product.id" class="product">
      <slot :product="product">
        <h2>{{ product.name }}</h2>
        <p>{{ product.price }}</p>
      </slot>
    </div>
  </div>
</template>

<script>
export default {
  name: 'ProductList',
  data() {
    return {
      products: [
        { id: 1, name: 'Product A', price: '$100' },
        { id: 2, name: 'Product B', price: '$150' },
        { id: 3, name: 'Product C', price: '$200' }
      ]
    };
  }
};
</script>

<style scoped>
.product-list {
  display: flex;
  flex-direction: column;
}
.product {
  border: 1px solid #ccc;
  padding: 10px;
  margin: 10px;
  border-radius: 5px;
}
</style>
在主应用中使用商品列表组件
打开src/App.vue,引用并使用ProductList组件:
<template>
  <div id="app">
    <ProductList>
      <template v-slot:default="slotProps">
        <h2>{{ slotProps.product.name }}</h2>
        <p>{{ slotProps.product.price }}</p>
        <button @click="addToCart(slotProps.product)">Add to Cart</button>
      </template>
    </ProductList>
  </div>
</template>

<script>
import ProductList from './components/ProductList.vue';

export default {
  name: 'App',
  components: {
    ProductList
  },
  methods: {
    addToCart(product) {
      alert(`${product.name} added to cart!`);
    }
  }
};
</script>

<style>
/* 全局样式 */
</style>
详细解释
作用域插槽
<slot :product="product">
  <h2>{{ product.name }}</h2>
  <p>{{ product.price }}</p>
</slot>
在商品列表组件中,我们通过slot标签向插槽传递product数据。父组件在默认插槽中通过v-slot:default="slotProps"访问这些数据,并在插槽内容中使用它们。
总结
通过这些示例,我们了解了如何使用默认插槽、具名插槽和作用域插槽在Vue.js中实现灵活的组件设计。插槽是Vue.js的一个强大特性,可以显著提升组件的可复用性和灵活性。在实际开发中,根据具体需求选择合适的插槽类型,可以使组件更加灵活和可维护。


![[ue5]建模场景学习笔记(4)——必修内容可交互的地形,交互沙(1)](https://img-blog.csdnimg.cn/direct/fa9c60c867734068a51ed829ec491f66.png)