一、简介
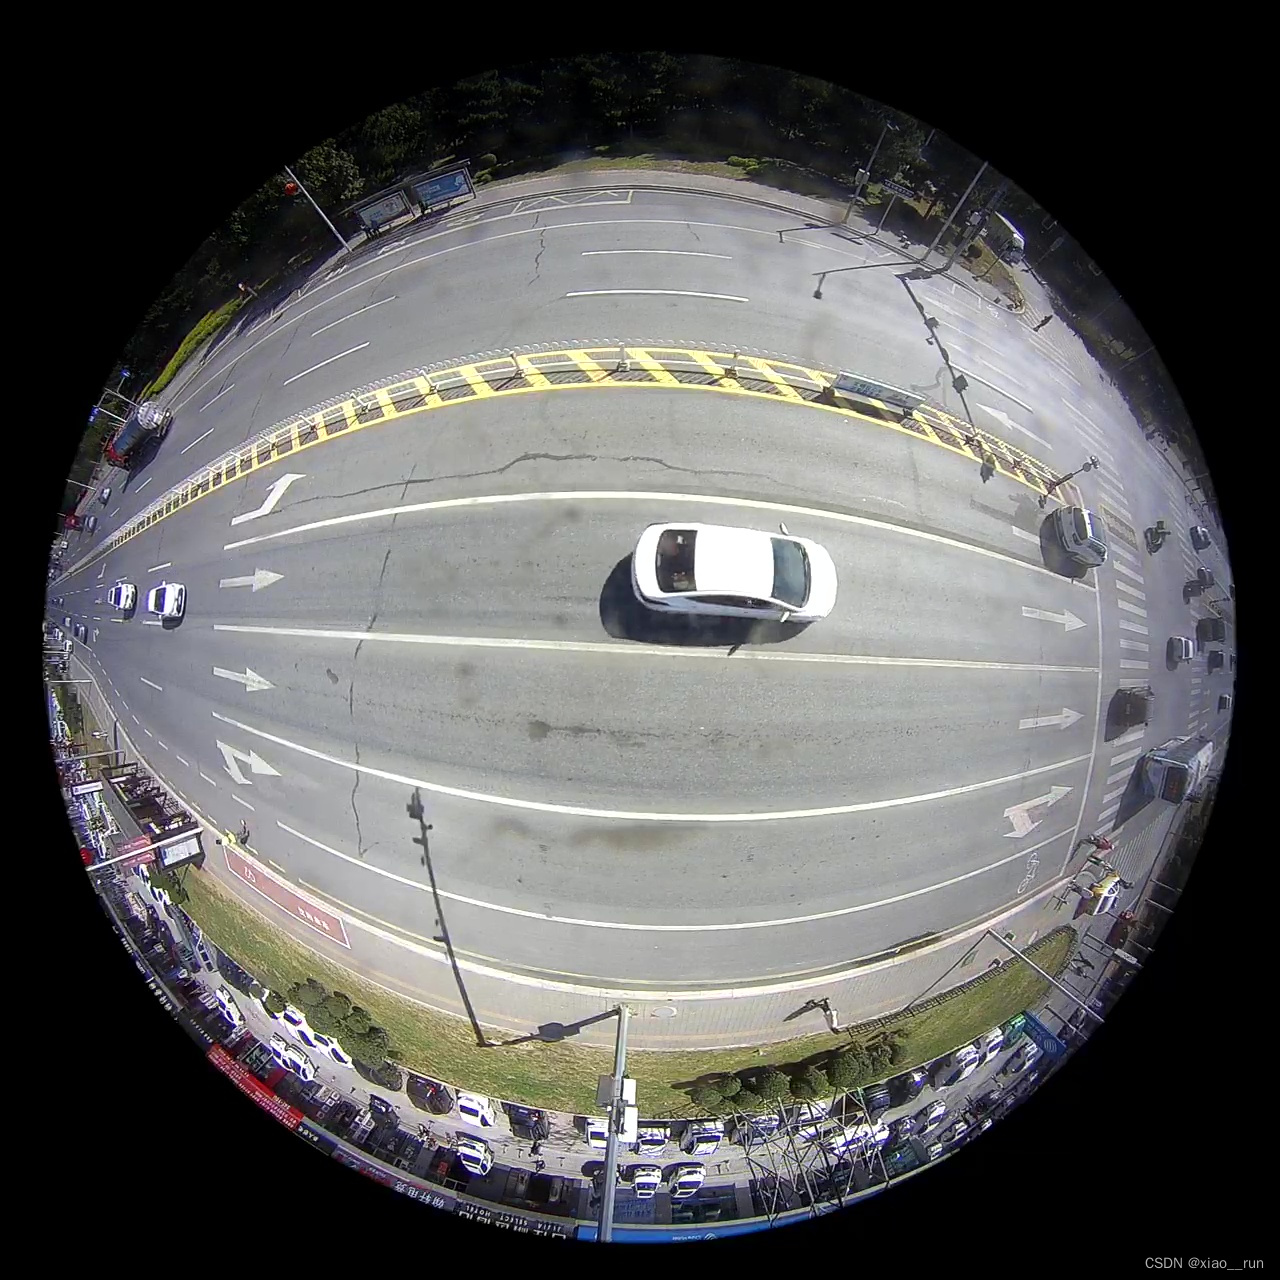
本文提供了鱼眼及普通相机的标定python版源码,调用opencv的接口,原理为张正友标定法。这里不过多赘述,话不多说无套路直接上源码,亲测有效,搬走即用。
注:
- 需准备一个标定版,在此网站下载打印出来即可;
- 例如12x8的棋盘格内角点为11x7.
- 张氏标定法使用二维方格组成的标定板进行标定,采集标定板不同位姿图片,提取图片中角点像素坐标,通过单应矩阵计算出相机的内外参数初始值,利用非线性最小二乘法估计畸变系数,最后使用极大似然估计法优化参数。该方法操作简单,而且精度较高,可以满足大部分场合。
二 、源码
2.1 鱼眼相机标定
"""
~~~~~~~~~~~~~~~~~~~~~~~~~~
鱼眼相机标定
~~~~~~~~~~~~~~~~~~~~~~~~~~

用法:
    python calibrate_camera.py \
        -i 0 \
        -grid 9x6 \
        -out fisheye.yaml \
        -framestep 20 \
        --resolution 640x480
        --fisheye
"""
import argparse
import os
import numpy as np
import cv2


# 将相机参数文件保存到此目录
TARGET_DIR = os.path.join(os.getcwd(), "yaml")

# 默认参数文件
DEFAULT_PARAM_FILE = os.path.join(TARGET_DIR, "calib.yaml")


def main():
    global gray
    parser = argparse.ArgumentParser()

    # 输入视频流
    parser.add_argument("-i", "--input", type=int, default=0,
                        help="输入相机设备")

    # 棋盘格大小
    parser.add_argument("-grid", "--grid", default="10x7",
                        help="标定棋盘格的大小")

    parser.add_argument("-r", "--resolution", default="640x480",
                        help="相机图像的分辨率")

    parser.add_argument("-framestep", type=int, default=20,
                        help="在视频中使用每第n帧")

    parser.add_argument("-o", "--output", default=DEFAULT_PARAM_FILE,
                        help="输出yaml文件的路径")


    args = parser.parse_args()

    if not os.path.exists(TARGET_DIR):
        os.mkdir(TARGET_DIR)

    text1 = "按下 c 进行标定"
    text2 = "按下 q 退出"
    text3 = "设备: {}".format(args.input)
    font = cv2.FONT_HERSHEY_SIMPLEX
    fontscale = 0.6

    resolution_str = args.resolution.split("x")
    W = int(resolution_str[0])
    H = int(resolution_str[1])
    grid_size = tuple(int(x) for x in args.grid.split("x"))
    grid_points = np.zeros((1, np.prod(grid_size), 3), np.float32)
    grid_points[0, :, :2] = np.indices(grid_size).T.reshape(-1, 2)

    objpoints = []  # 真实世界空间中的3D点
    imgpoints = []  # 图像平面中的2D点

    device = args.input
    cap = cv2.VideoCapture(device)  # 打开设备
    # 设置分辨率
    cap.set(cv2.CAP_PROP_FRAME_WIDTH, W)
    cap.set(cv2.CAP_PROP_FRAME_HEIGHT, H)
    if cap is None or not cap.isOpened():
        print("无法打开设备")
        return

    quit = False
    do_calib = False
    i = -1
    while True:
        i += 1
        _r, img = cap.read()
        img= cv2.resize(img, (W, H))
        if i % args.framestep != 0:
            continue

        print("在第 " + str(i) + " 帧中寻找棋盘格角点...")
        gray = cv2.cvtColor(img, cv2.COLOR_BGR2GRAY)
        found, corners = cv2.findChessboardCorners(
            gray,
            grid_size,
            cv2.CALIB_CB_ADAPTIVE_THRESH +
            cv2.CALIB_CB_NORMALIZE_IMAGE +
            cv2.CALIB_CB_FILTER_QUADS
        )
        if found:
            term = (cv2.TERM_CRITERIA_EPS + cv2.TERM_CRITERIA_COUNT, 30, 0.01)
            cv2.cornerSubPix(gray, corners, (5, 5), (-1, -1), term)
            print("OK")
            imgpoints.append(corners)
            objpoints.append(grid_points)
            cv2.drawChessboardCorners(img, grid_size, corners, found)

        cv2.putText(img, text1, (20, 70), font, fontscale, (255, 200, 0), 2)
        cv2.putText(img, text2, (20, 110), font, fontscale, (255, 200, 0), 2)
        cv2.putText(img, text3, (20, 30), font, fontscale, (255, 200, 0), 2)
        cv2.imshow("corners", img)
        key = cv2.waitKey(1) & 0xFF
        if key == ord("c"):
            print("\n进行标定...\n")
            N_OK = len(objpoints)
            if N_OK < 12:
                print("检测到的角点少于12个 (%d),标定失败" %(N_OK))
                continue
            else:
                do_calib = True
                break

        elif key == ord("q"):
            quit = True
            break

    if quit:
        print("标定已退出。")
        cap.release()
        cv2.destroyAllWindows()

    if do_calib:
        N_OK = len(objpoints)
        K = np.zeros((3, 3))
        D = np.zeros((4, 1))
        rvecs = [np.zeros((1, 1, 3), dtype=np.float64) for _ in range(N_OK)]
        tvecs = [np.zeros((1, 1, 3), dtype=np.float64) for _ in range(N_OK)]
        calibration_flags = (cv2.fisheye.CALIB_RECOMPUTE_EXTRINSIC +
                             cv2.fisheye.CALIB_CHECK_COND +
                             cv2.fisheye.CALIB_FIX_SKEW)

        ret, mtx, dist, rvecs, tvecs = cv2.fisheye.calibrate(
                objpoints,
                imgpoints,
                (W, H),
                K,
                D,
                rvecs,
                tvecs,
                calibration_flags,
                (cv2.TERM_CRITERIA_EPS + cv2.TERM_CRITERIA_MAX_ITER, 30, 1e-6)
            )


        if ret:
            fs = cv2.FileStorage(args.output, cv2.FILE_STORAGE_WRITE)
            fs.write("resolution", np.int32([W, H]))
            fs.write("camera_matrix", mtx)
            fs.write("dist_coeffs", dist)
            fs.release()
            print("相机数据保存成功")
            cv2.putText(img, "SUCCESS!", (220, 240), font, 2, (0, 0, 255), 2)

        else:
            cv2.putText(img, "FAILED!", (220, 240), font, 2, (0, 0, 255), 2)

        cv2.imshow("corners", img)
        cv2.waitKey(0)


if __name__ == "__main__":
    main()
2.2 普通工业相机标定
"""
~~~~~~~~~~~~~~~~~~~~~~~~~~
普通工业相机标定
~~~~~~~~~~~~~~~~~~~~~~~~~~
用法:
    python calibrate_camera.py \
        -i 0 \
        -grid 7x10 \
        -out calib.yaml \
        -framestep 20 \
        --resolution 640x480
"""
import argparse
import os
import numpy as np
import cv2

# 将相机参数文件保存到此目录
TARGET_DIR = os.path.join(os.getcwd(), "calib_yaml")

# 默认参数文件
DEFAULT_PARAM_FILE = os.path.join(TARGET_DIR, "calib.yaml")


def main():
    global gray
    parser = argparse.ArgumentParser()  # 创建解析器

    # 输入视频流
    parser.add_argument("-i", "--input", default="0",
                        help="输入相机设备")    # type=int,

    # 棋盘格大小
    parser.add_argument("-grid", "--grid", default="11x8",
                        help="标定棋盘格的大小")

    parser.add_argument("-r", "--resolution", default="640x480",
                        help="相机图像的分辨率")

    parser.add_argument("-framestep", type=int, default=20,
                        help="在视频中使用每第n帧")

    parser.add_argument("-o", "--output", default=DEFAULT_PARAM_FILE,
                        help="输出yaml文件的路径")

    args = parser.parse_args()

    if not os.path.exists(TARGET_DIR):
        os.mkdir(TARGET_DIR)

    text1 = "Press c for calibration"
    text2 = "Press q to exit"
    text3 = "device: {}".format(args.input)
    font = cv2.FONT_HERSHEY_SIMPLEX
    fontscale = 0.6

    resolution_str = args.resolution.split("x")  # 分辨率
    W = int(resolution_str[0])
    H = int(resolution_str[1])
    grid_size = tuple(int(x) for x in args.grid.split("x"))  # 棋盘格大小
    grid_points = np.zeros((1, np.prod(grid_size), 3), np.float32)  # 3D点
    grid_points[0, :, :2] = np.indices(grid_size).T.reshape(-1, 2)  # 2D点

    objpoints = []  # 真实世界空间中的3D点
    imgpoints = []  # 图像平面中的2D点

    device = args.input  # 设备
    cap = cv2.VideoCapture(device)  # 打开设备
    # 设置分辨率
    cap.set(cv2.CAP_PROP_FRAME_WIDTH, W)
    cap.set(cv2.CAP_PROP_FRAME_HEIGHT, H)
    if cap is None or not cap.isOpened():
        print("无法打开设备")
        return

    quit = False
    do_calib = False
    i = -1
    while True:
        i += 1
        _r, img = cap.read()
        img= cv2.resize(img, (W, H))
        if i % args.framestep != 0:
            continue

        print("在第 " + str(i) + " 帧中寻找棋盘格角点...")
        gray = cv2.cvtColor(img, cv2.COLOR_BGR2GRAY)  # 转换为灰度图像
        found, corners = cv2.findChessboardCorners(  # 检测棋盘格角点
            gray,
            grid_size,
            cv2.CALIB_CB_ADAPTIVE_THRESH +
            cv2.CALIB_CB_NORMALIZE_IMAGE +
            cv2.CALIB_CB_FILTER_QUADS
        )
        if found:  # 如果找到棋盘格角点
            term = (cv2.TERM_CRITERIA_EPS + cv2.TERM_CRITERIA_COUNT, 30, 0.01)  # 终止条件
            cv2.cornerSubPix(gray, corners, (5, 5), (-1, -1), term)  # 亚像素级角点检测
            print("OK")
            imgpoints.append(corners)  # 2D点
            objpoints.append(grid_points)  # 3D点
            cv2.drawChessboardCorners(img, grid_size, corners, found)  # 绘制棋盘格角点

        cv2.putText(img, text1, (20, 70), font, fontscale, (255, 200, 0), 2)
        cv2.putText(img, text2, (20, 110), font, fontscale, (255, 200, 0), 2)
        cv2.putText(img, text3, (20, 30), font, fontscale, (255, 200, 0), 2)
        cv2.imshow("corners", img)
        key = cv2.waitKey(1) & 0xFF
        if key == ord("c"):
            print("\n进行标定...\n")
            N_OK = len(objpoints)  # 有效的标定图像数量
            if N_OK < 12:
                print("检测到的角点少于12个 (%d),标定失败" % (N_OK))
                continue
            else:
                do_calib = True
                break

        elif key == ord("q"):
            quit = True
            break

    if quit:
        print("标定已退出。")
        cap.release()
        cv2.destroyAllWindows()

    if do_calib:
        N_OK = len(objpoints)
        K = np.zeros((3, 3))
        D = np.zeros((4, 1))
        rvecs = [np.zeros((1, 1, 3), dtype=np.float64) for _ in range(N_OK)]
        tvecs = [np.zeros((1, 1, 3), dtype=np.float64) for _ in range(N_OK)]

        ret, mtx, dist, rvecs, tvecs = cv2.calibrateCamera(
            objpoints,
            imgpoints,
            gray.shape[::-1],
            None,
            None)

        if ret:
            fs = cv2.FileStorage(args.output, cv2.FILE_STORAGE_WRITE)
            fs.write("resolution", np.int32([W, H]))
            fs.write("camera_matrix", mtx)  # 内参矩阵
            fs.write("dist_coeffs", dist)  # 畸变系数
            # print("rvecs:", rvecs)  # 旋转向量
            # print("tvecs:", rvecs)  # 平移向量
            fs.release()
            print("相机数据保存成功")
            cv2.putText(img, "SUCCESS!", (220, 240), font, 2, (0, 0, 255), 2)
        else:
            cv2.putText(img, "FAILED!", (220, 240), font, 2, (0, 0, 255), 2)

        cv2.imshow("corners", img)
        cv2.waitKey(0)


if __name__ == "__main__":
    main()


![<span style='color:red;'>鱼</span><span style='color:red;'>眼</span><span style='color:red;'>相机</span>的测距流程及误差分析[像素坐标系到空间一点以及测距和误差分析]](https://img-blog.csdnimg.cn/direct/2c09a8b30a7b4daa8d05ec1b46a34be8.png)