# 1. 创建自己的虚拟环境
conda create -n VMamba python=3.10.13
conda activate VMamba
# 2. cuda-11.8
conda install cudatoolkit==11.8 -c nvidia
# 3. torch torchvision torchaudio 与 官网命令一致
pip install torch==2.1.1 torchvision==0.16.1 torchaudio==2.1.1 --index-url https://download.pytorch.org/whl/cu118
# 4. nvcc
conda install -c "nvidia/label/cuda-11.8.0" cuda-nvcc
# 5. packaging
conda install packaging
# 6.openlab环境
pip install mmcv==2.1.0 -f https://download.openmmlab.com/mmcv/dist/cu118/torch2.1/index.html
pip install mmengine==0.10.1
pip install mmdet==3.3.0 mmsegmentation==1.2.2 mmpretrain==1.2.0
# 7. causal-conv1d== & mamba-ssm==1.1.1
pip install causal-conv1d==1.1.1
pip install mamba-ssm==1.1.2 #1.1.1实测会报错
causal-conv1d和mamba-ssm上述方法安装失败,可以见链接,采用whl安装。
关于NameError: name 'selective_scan_cuda_core问题,是跟cd kernels/selective_scan && pip install .这个安装不成功有关,(分析原因应该是cuda版本不对)
NameError: name 'selective_scan_cuda_core' is not defined. Did you mean: 'selective_scan_flop_jit'?
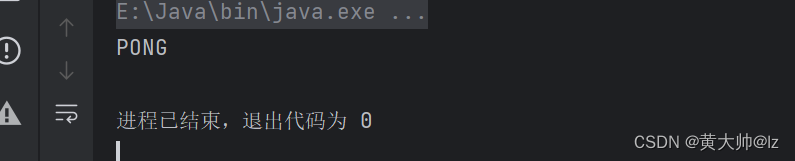
这边直接上我的环境信息吧,
certifi==2022.12.7
charset-normalizer==2.1.1
einops==0.8.0
filelock==3.13.1
fsspec==2024.2.0
fvcore==0.1.5.post20221221
huggingface-hub==0.23.0
idna==3.4
iopath==0.1.10
Jinja2==3.1.3
MarkupSafe==2.1.5
mpmath==1.3.0
networkx==3.2.1
ninja==1.11.1.1
numpy==1.26.3
packaging @ file:///home/conda/feedstock_root/build_artifacts/packaging_1637239678211/work
pillow==10.2.0
portalocker==2.8.2
pyparsing @ file:///home/conda/feedstock_root/build_artifacts/pyparsing_1652235407899/work
PyYAML==6.0.1
requests==2.28.1
safetensors==0.4.3
selective-scan @ file:///home/rycc/cc/VMamba/kernels/selective_scan
sympy==1.12
tabulate==0.9.0
termcolor==2.4.0
timm==0.9.16
torch==2.1.1+cu118
torchaudio==2.1.1+cu118
torchvision==0.16.1+cu118
tqdm==4.66.4
triton==2.1.0
typing_extensions==4.9.0
urllib3==1.26.13
yacs==0.1.8
测试代码,在classification/models/vmamba.py最后添加,并运行
device = torch.device("cuda:0")
hidden_dim = 3  # 假设 VSSBlock 的隐藏维度为 64
network = VSSM(hidden_dim).to('cuda:0')
# 随机生成一张输入图片作为示例
input_image = torch.randn(1, 3, 224, 224)  # 假设输入图片大小为 224x224,通道数为 3(RGB图像)
input_image = input_image.to(device)
# 前向传播
output = network(input_image)
# 输出结果的大小
print("Output shape:", output.shape)
输出结果,表示成功配置

训练命令 (目前数据集还未下载,后续更新)
python -m torch.distributed.launch --nnodes=1 --node_rank=0 --nproc_per_node=2 --master_addr="127.0.0.1" --master_port=29501 main.py --cfg /home/rycc/cc/VMamba/classification/configs/vssm/vmambav0_base_224.yaml


![[Bug]:由于中国防火墙,无法连接 huggingface.co](https://img-blog.csdnimg.cn/direct/acd03f89821d49a49fd6e95843385919.jpeg)