多态
虚函数
先来看一段代码:
#include<iostream>
using namespace std;

class Animal {
public :
    void run() {
        cout << "I don't know how to run" << endl;
    }
};

class Cat : public Animal{
public :
    void run() {
        cout << "I can run with four legs" << endl;
    }
};

class Bat : public Animal{
public :
    void run() {
        cout << "I can fly" << endl;
    }
};

#define P(func) {\
    printf("%s : ", #func);\
    func;\
}

int main() {
    Cat c;
    //子类的对象可以隐式的转换为父类的类型
    Animal &a = c;
    Animal *p = &c;
    P(c.run());
    P(a.run());
    P(p->run());
    return 0;
}
a是Animal的引用类行而指向的是c对象,p是Animal的指针类型指向对象c的地址。
那么我们认为的结果应该都是调用Cat类型中的run方法,但是结果却是调用的Animal中的run方法
那么如何完成我们想要的效果呢,把基类中也就是Animal类中的run()方法变为虚函数,在父类中对应函数前加上virtual关键字,再子类中对应的函数后加上override关键字。
class Animal {
public :
    virtual void run() {
        cout << "I don't know how to run" << endl;
    }
};

class Cat : public Animal{
public :
    void run() override{
        cout << "I can run with four legs" << endl;
    }
};

class Bat : public Animal{
public :
    void run() override{
        cout << "I can fly" << endl;
    }
};
这样过后执行整个代码,就可以得到我们想要的效果了。
这里对应的知识点:
普通成员函数是跟着类型的,比开始时,run方法不是虚函数只是普通的成员函数,那么在对应类类型前调用该函数,执行的就是对应类型中的函数方法,那么Animal &a = c,调用的就是Animal中的run方法,Animal *p = c调用的run方法也是Animal中的run方法。虚函数是跟着对象的,比如在对父类中(Animal类)run方法加上virtual关键字之后,让run方法变为了虚函数,而子类中的run方法也变为了虚函数,执行时调用的对应函数就是对象对应的函数。Animal &a = c对应调用就是对象c的类型中的run方法,同理Animal *p = c调用的run方法也是对象c的类中的run方法。
编译期和运行期
来一段简单的代码理解运行期和编译期
#include<iostream>
using namespace std;


int main() {
    int n;
    scanf("%d", &n);
    //只有再代码执行时,读入n
    //才能知道m具体等于几
    //所以这是运行期
    int m = 2 * n;
    //在读代码时我们就能准确的知道c等于3
    //所以这是编译期
    int c = 1 + 2;
    return 0;
}
理解完后再看下面的代码:
#include<iostream>
using namespace std;

class Animal {
public :
    void say() {
        cout << " Class Animal" << endl;
    }
};

class Cat : public Animal {
public :
    void say() {
        cout << " Class Cat" << endl;
    }
};

class Dog : public Animal {
public :
    void say() {
        cout << " Class Dog" << endl;
    }
};

class Bat : public Animal {
public :
    void say() {
        cout << " Class Bat" << endl;
    }
};
int main() {
    #define MAX_N 10
    srand(time(0));
    Animal *arr[MAX_N + 5];
    for (int i = 0; i < MAX_N; i++) {
        switch (rand() % 3) {
            case 0: arr[i] = new Cat(); break;
            case 1: arr[i] = new Dog(); break;
            case 2: arr[i] = new Bat(); break;
        }
    }
    for (int i = 0; i < MAX_N; i++) {
        arr[i]->say();
    }
    return 0;
}
在不运行这段代码,我们都知道最后的结果会是,调用了10次Animal中的say方法,因为指针数组是Animal类型的,并且say方法是普通的成员方法,所以指针数组不管指向什么子类对象都只会调用Animal中的say方法,所以这段代码是编译器的状态。
执行结果:
那么我们将say方法改为虚函数:
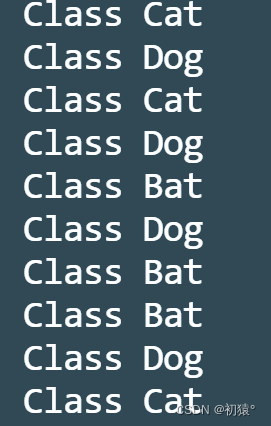
#include<iostream>
using namespace std;

class Animal {
public :
    virtual void say() {
        cout << " Class Animal" << endl;
    }
};

class Cat : public Animal {
public :
    void say() override {
        cout << " Class Cat" << endl;
    }
};

class Dog : public Animal {
public :
    void say() override {
        cout << " Class Dog" << endl;
    }
};

class Bat : public Animal {
public :
    void say() override {
        cout << " Class Bat" << endl;
    }
};
int main() {
    #define MAX_N 10
    srand(time(0));
    Animal *arr[MAX_N + 5];
    for (int i = 0; i < MAX_N; i++) {
        switch (rand() % 3) {
            case 0: arr[i] = new Cat(); break;
            case 1: arr[i] = new Dog(); break;
            case 2: arr[i] = new Bat(); break;
        }
    }
    for (int i = 0; i < MAX_N; i++) {
        arr[i]->say();
    }
    return 0;
}
那么现在,输出的结果我们是不确定的了,现在调用的say方法,就应该是每个arr[i]中对应的对象中类型的say方法。所这段代码需要在运行后才知道结果。
那么执行结果是不确定了,我执行两次的结果可以看一下:
可以发现是不同的结果,这段代码只有在执行后才能知道结果,这就是运行期。
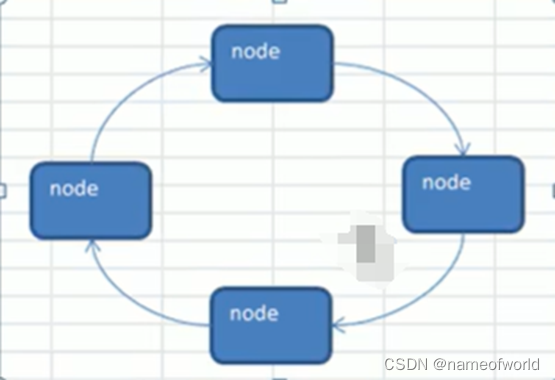
那么我们就可以理解图中的解释。


多态程序设计中注意事项
看下面代码来理解为什么要这样去设计:
#include<iostream>
using namespace std;


class Base {
public :
    Base(){
        cout << "Base constructor" << endl;
    }
    virtual ~Base(){
        cout << "Base destructor" << endl;
    }
};

class A : public Base {
public :
    A() : data(new int[0]) {
        cout << "A constructor" << endl;
    }
    ~A() override {
        delete[] data;
        cout << "A destructor" << endl;
    }
    int *data;
};

int main() {
    //这里Base类的指向A类型的对象
    //如果析构函数不是虚函数
    //在析构p时,那么会调用Base类的析构函数
    //而不是调用对象对应的A类中的析构函数
    //那么就会造成内存泄漏
    //比如这里data通过A类的构造函数中new关键字获取了内存
    //而没有通过A类中的析构函数将对应的内存给释放掉
    Base *p = new A();
    delete p;
    return 0;
}
对应上面这份代码,可以尝试将父类中的析构函数,设置为普通函数,看打印结果,你会发现,它只调用了父类的析构函数没有调用A对象的析构。
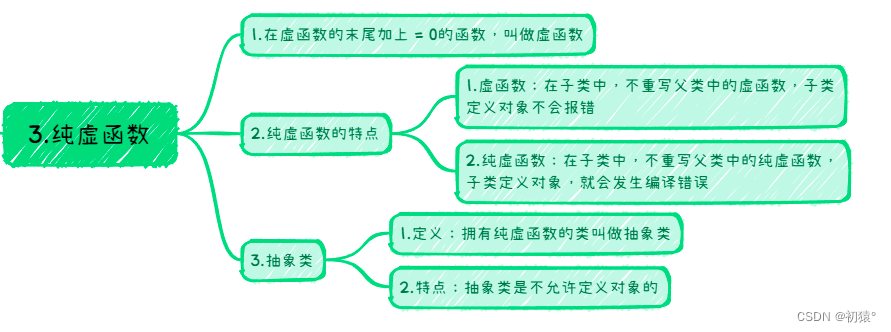
纯虚函数
#include<iostream>
using namespace std;

namespace test1 {
class Animal{
public :
    virtual void say() = 0;
};

class Cat : public Animal{
public :
    void say() override {
        cout << "Class Cat" << endl;
    }
};

class Dog : public Animal{
public :
    void say() override {
        cout << "Class Dog" << endl;
    }
};

class Bat : public Animal{
public :
    void say() override {
        cout << "Class Bat" << endl;
    }
};

int main() {
    #define MAX_N 5
    srand(time(0));
    Animal *arr[MAX_N + 5];
    for (int i = 0; i < MAX_N; i++) {
        switch (rand() % 3) {
            case 0 : arr[i] = new Dog(); break;
            case 1 : arr[i] = new Cat(); break;
            case 2 : arr[i] = new Bat(); break;
        }
    }
    for (int i = 0; i < MAX_N; i++) arr[i]->say();
    return 0;
}
}

/*
namespace test2{
class A {
public :
    virtual void func() = 0;
};
class B : public A{
public :
};
int main() {
    B b;
    return 0;
}
}
*/

/*
namespace test3{
class A {
public :
    virtual void func() = 0;
};
class B : public A{
public :
    void func() override {};
};
int main() {
    A a;
    return 0;
}
}
*/

int main() {
    //test1中展示了纯虚函数的使用方法
    test1::main();
    //在test2中可以发现B继承A
    //A中有一个纯虚函数func
    //而在B中没有重写func在定义B的对象d会发生报错
    //test2::main();
    //在test3中因为A类是一个抽象类
    //所以这个A类不能定义对象
    //test3::main();
    return 0;
}
通过抽象类如何去理解接口
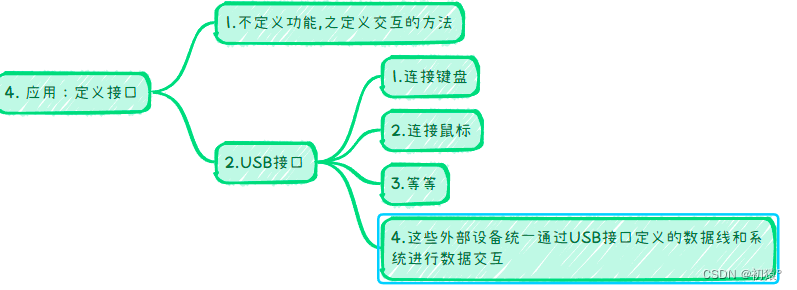
假设现在我们实现USB接口,然后USB可以接键盘和鼠标:
#include <iostream>
#include <cstdlib>
#include <ctime>
using namespace std;

class USB_interface {
public :
    virtual string get() = 0;
    virtual void set(string) = 0;
    string msg;
};


class KeyBoard : public USB_interface {
public :
    string get() override {
        return "this messge come from key  board\n";
    }
    void set(string msg) {
        cout << "key borad receive msg : " << msg << endl;
    }
};
class Mouse : public USB_interface {
public :
    string get() override {
        return "mouse dida dida\n";
    }
    void set(string msg) {
        cout << "mouse receive msg" << msg << endl;
    }
};


int main() {
    srand(time(0));
    USB_interface *usb[2];
    int ind = rand() % 2;
    usb[ind] = new KeyBoard();
    usb[1 - ind] = new Mouse();
    for (int i = 0; i < 2; i++) {
        cout << "USB #" << i << ":" << endl;
        cout << usb[i]->get() << endl;
        usb[i]->set("over done!");
    }
    return 0;
}
通过执行代码可以发现,USB接口它只是起到连接键盘或者鼠标,而具体的实现功能都在鼠标和键盘里面实现的。可以理解USB接口它里面有一些纯虚函数,而通过USB接口接上的东西他需要重写这些纯虚函数,并且还可以自己定义一些方法,这就是接口的作用。

虚函数的底层原理
来看一段代码:
#include<iostream>
using namespace std;

class Base {
public :
    void say() {
        cout << "Class Base" << endl;
    }
};

class A : public Base {
public :
    void say() {
        cout << "Class A" << endl;
    }
    int x;
};

class B : public Base {
public :
    void say() {
        cout << "Class B" << endl;
    }
    int x;
};

int main() {
    A a;
    B b;
    cout << "sizeof(A) :" << sizeof(A) << endl;
    cout << "sizeof(B) :" << sizeof(B) << endl;
    return 0;
}
通过执行可以发现,a对象和b对象只有4字节。也就是他们包含的int x的字节大小。
再看下面一段代码,他们中的say方法是虚函数时。
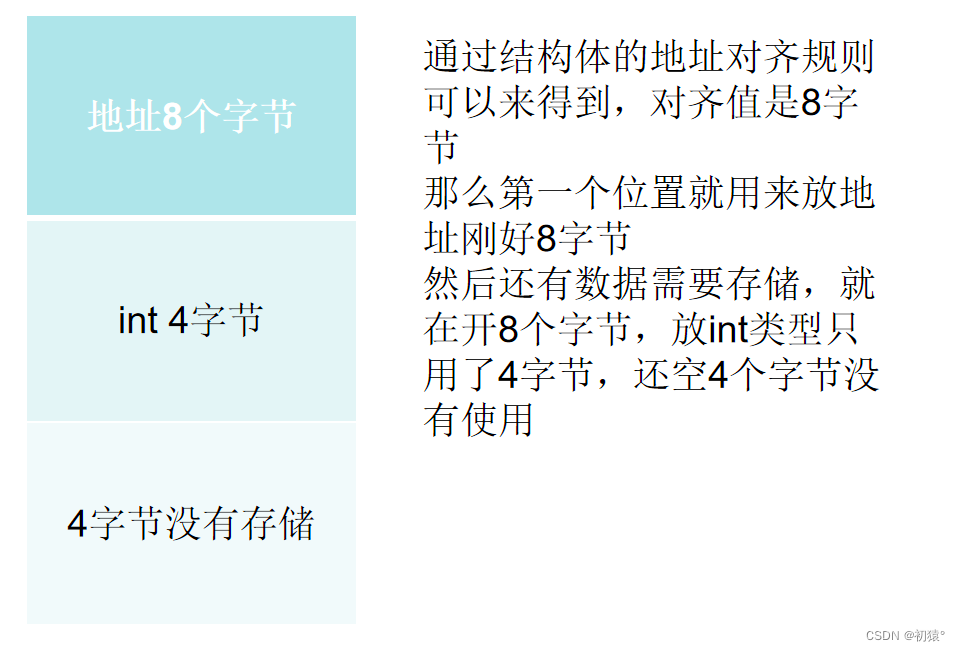
#include<iostream>
using namespace std;

class Base {
public :
    virtual void say() {
        cout << "Class Base" << endl;
    }
};

class A : public Base {
public :
    void say() override {
        cout << "Class A" << endl;
    }
    int x;
};

class B : public Base {
public :
    void say() override {
        cout << "Class B" << endl;
    }
    int x;
};

int main() {
    A a;
    B b;
    cout << "sizeof(A) :" << sizeof(A) << endl;
    cout << "sizeof(B) :" << sizeof(B) << endl;
    return 0;
}
a和b对象有16个字节了
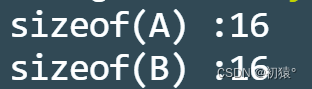
这是为什么,这就要说到虚函数表。
虚函数表:
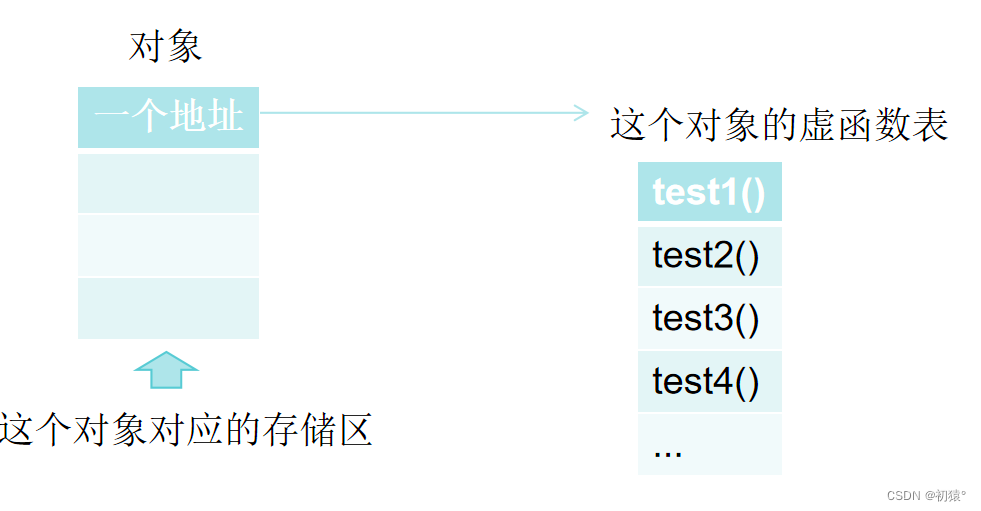
每个对象如果它的类型有虚函数,那么这个对象对应的存储区通常第一个元素就是一个地址,而这个地址就是指向虚函数表的首地址。
而上面的16字节是怎么算来的,结构体内存对齐
来看下面一段代码:
#include<iostream>
using namespace std;

class Base {
public :
    virtual void say() {
        cout << "Class Base" << endl;
    }
};

class A : public Base {
public :
    void say() override {
        cout << "Class A" << endl;
    }
    int x;
};

class B : public Base {
public :
    void say() override {
        cout << "Class B" << endl;
    }
    int x;
};

int main() {
    A a1, a2;
    B b;
    cout << "sizeof(A) :" << sizeof(A) << endl;
    cout << "sizeof(B) :" << sizeof(B) << endl;
    //((void **)(&a1))[0]获取a1对象的虚函数表的地址
    cout << "Class A(a1) virtual function address : " << ((void **)(&a1))[0] << endl;
    cout << "Class A(a2) virtual function address : " << ((void **)(&a2))[0] << endl;
    cout << "Class B virtual function address : " << ((void **)(&b))[0] << endl;
    return 0;
}
执行结果:
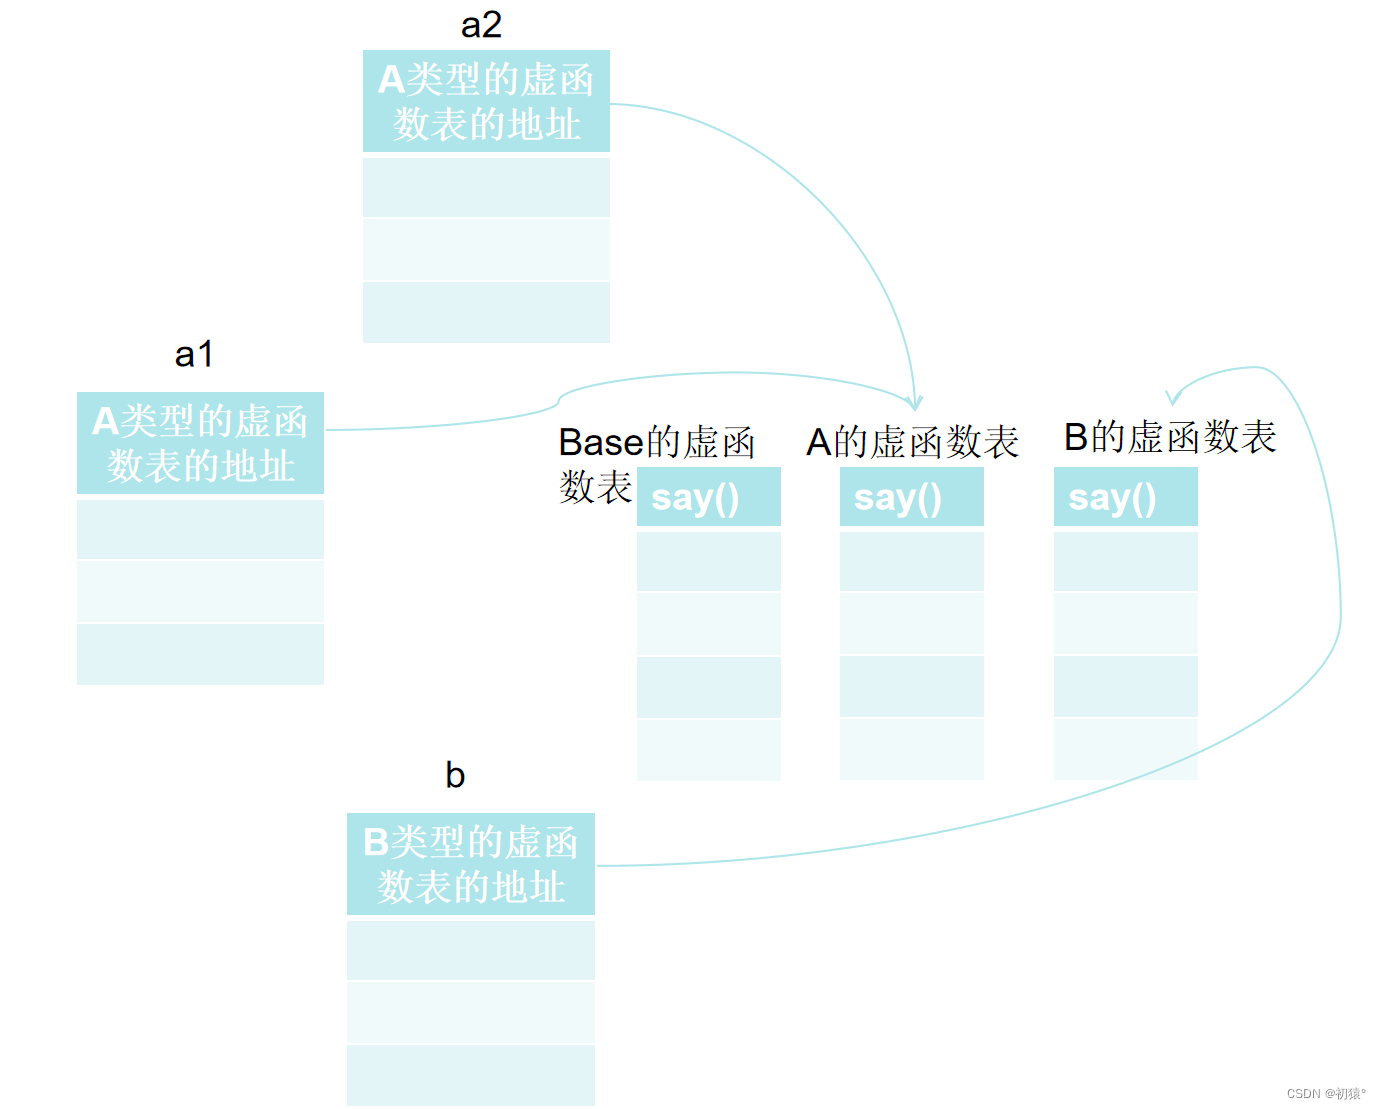
可以发现a1和a2的虚函数表地址是相同的,而b的虚函数表的地址和他们不同,那么就可以知道相同类型的虚函数表是相同的,而不同的类型虚函数表是不同的。
来看下面的图:
这样就可以理解为什么虚函数是跟着对象走的。
深入理解this指针:
来看下面一段代码:
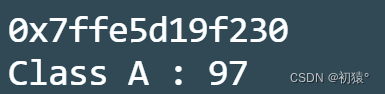
#include<iostream>
using namespace std;

class Base {
public :
    virtual void say(int x) {
        cout << this << endl;
        cout << "Class Base : " << x << endl;
    }
};

class A : public Base {
public :
    void say(int x) override {
        cout << this << endl;
        cout << "Class A : " << x << endl;
    }
    int x;
};

class B : public Base {
public :
    void say(int x) override {
        cout << this << endl;
        cout << "Class B : " << x << endl;
    }
    int x;
};

typedef void (*func_t)(int);

int main() {
    A a1, a2;
    B b;
    Base *p1 = &a1, *p2 = &a2, *p3 = &b;
    cout << "sizeof(A) :" << sizeof(A) << endl;
    cout << "sizeof(B) :" << sizeof(B) << endl;
    //((void **)(&a1))[0]获取a1对象的虚函数表的地址
    cout << "Class A(a1) virtual function address : " << ((void **)(&a1))[0] << endl;
    cout << "Class A(a2) virtual function address : " << ((void **)(&a2))[0] << endl;
    cout << "Class B virtual function address : " << ((void **)(&b))[0] << endl;
    p1->say(1);
    cout << "================" << endl;
    p2->say(2);
    cout << "================" << endl;
    p3->say(3);
    cout << "================" << endl;
    //通过原生指针调用say()方法
    ((func_t **)(&a2))[0][0](97);
    return 0;
}
执行结果:
对于p1,p2,p3调用没有任何问题,都是准确调用传参,但是到了通过原生指针调用a2中的虚函数表的第一个函数也就是say方法,然后传入参数是97为什么输出的x的值是0,而this指针的值变为了16进制的61,转换为10进制的就是97,为什么this指针的值被赋值为97了。
也就是当前say方法实际是这样的:
void say(A *this, int x) override {...}所以在使用C语言原生指针调用成员方法时是需要将this指针当作参数传入的,那么如和正确调用该函数呢,如下:
    //修改处
    //void *任何类型的指针
    typedef void (*func_t)(void *, int);


    //修改处使用原生指针调用say方法处
    ((func_t **)(&a2))[0][0](&a2, 97);
那么最终的执行结果就是和我们想要的结果是一样的:


:<span style='color:red;'>类</span>和<span style='color:red;'>对象</span>——<span style='color:red;'>多</span><span style='color:red;'>态</span>**](https://img-blog.csdnimg.cn/direct/0e15644b5e2241408f969ec3f6dd5450.png)