文章目录
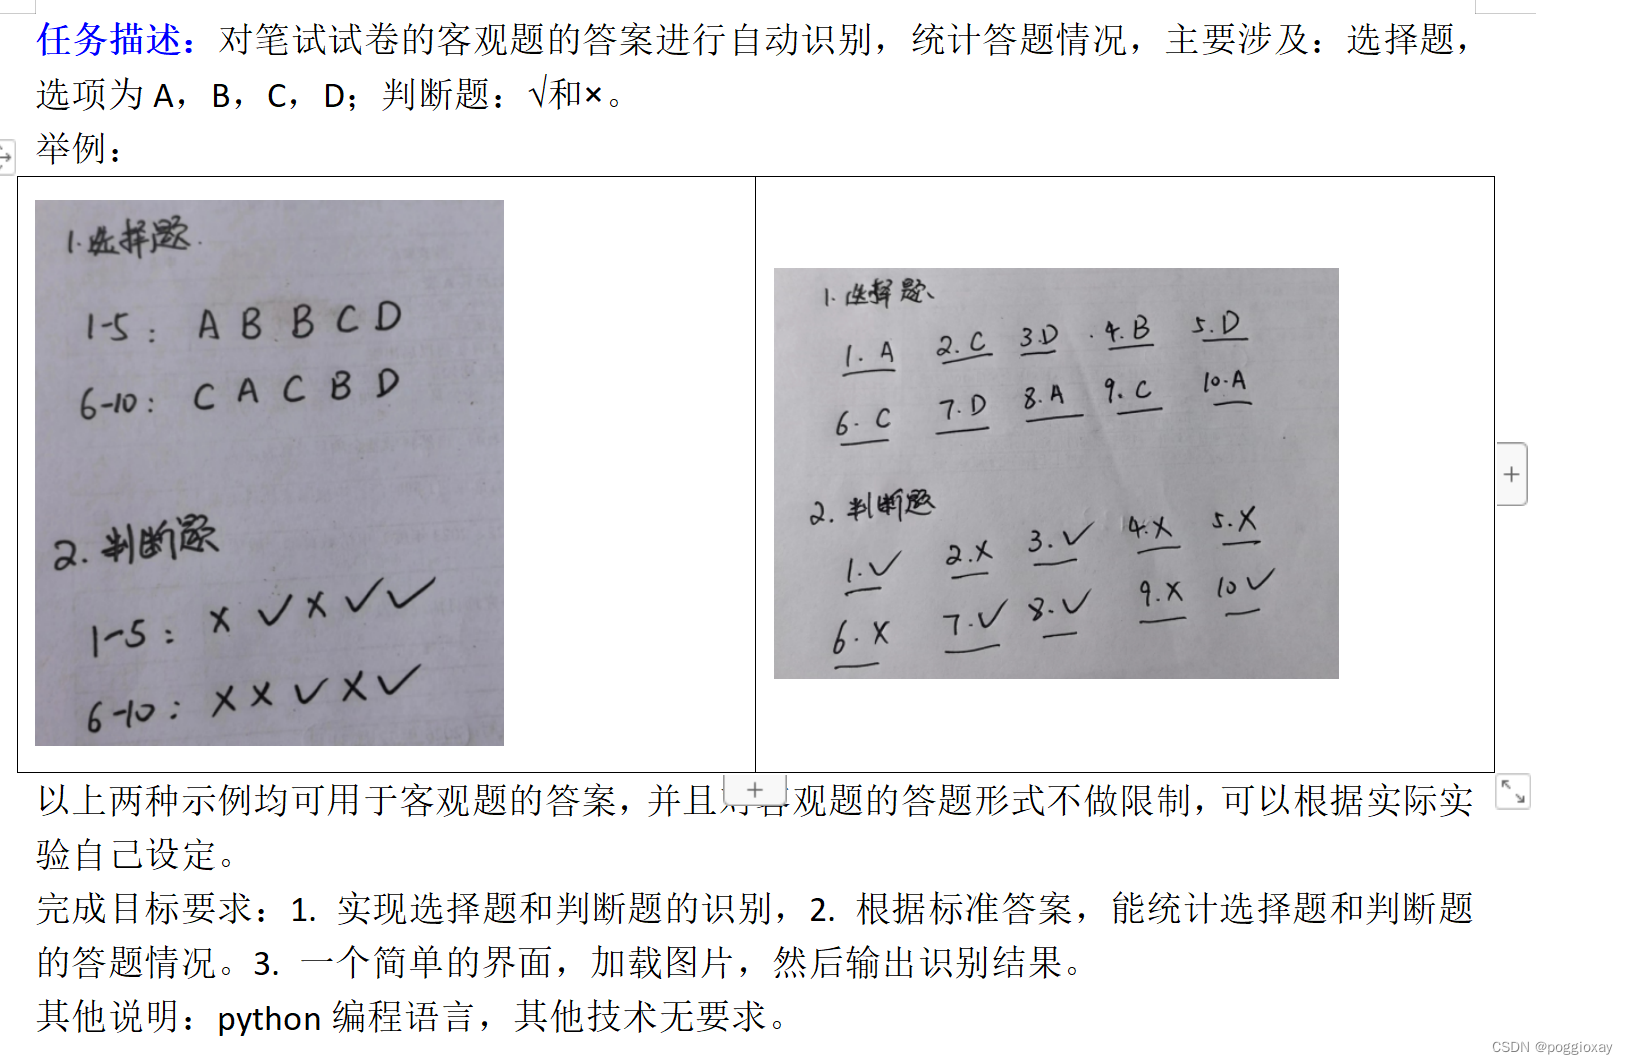
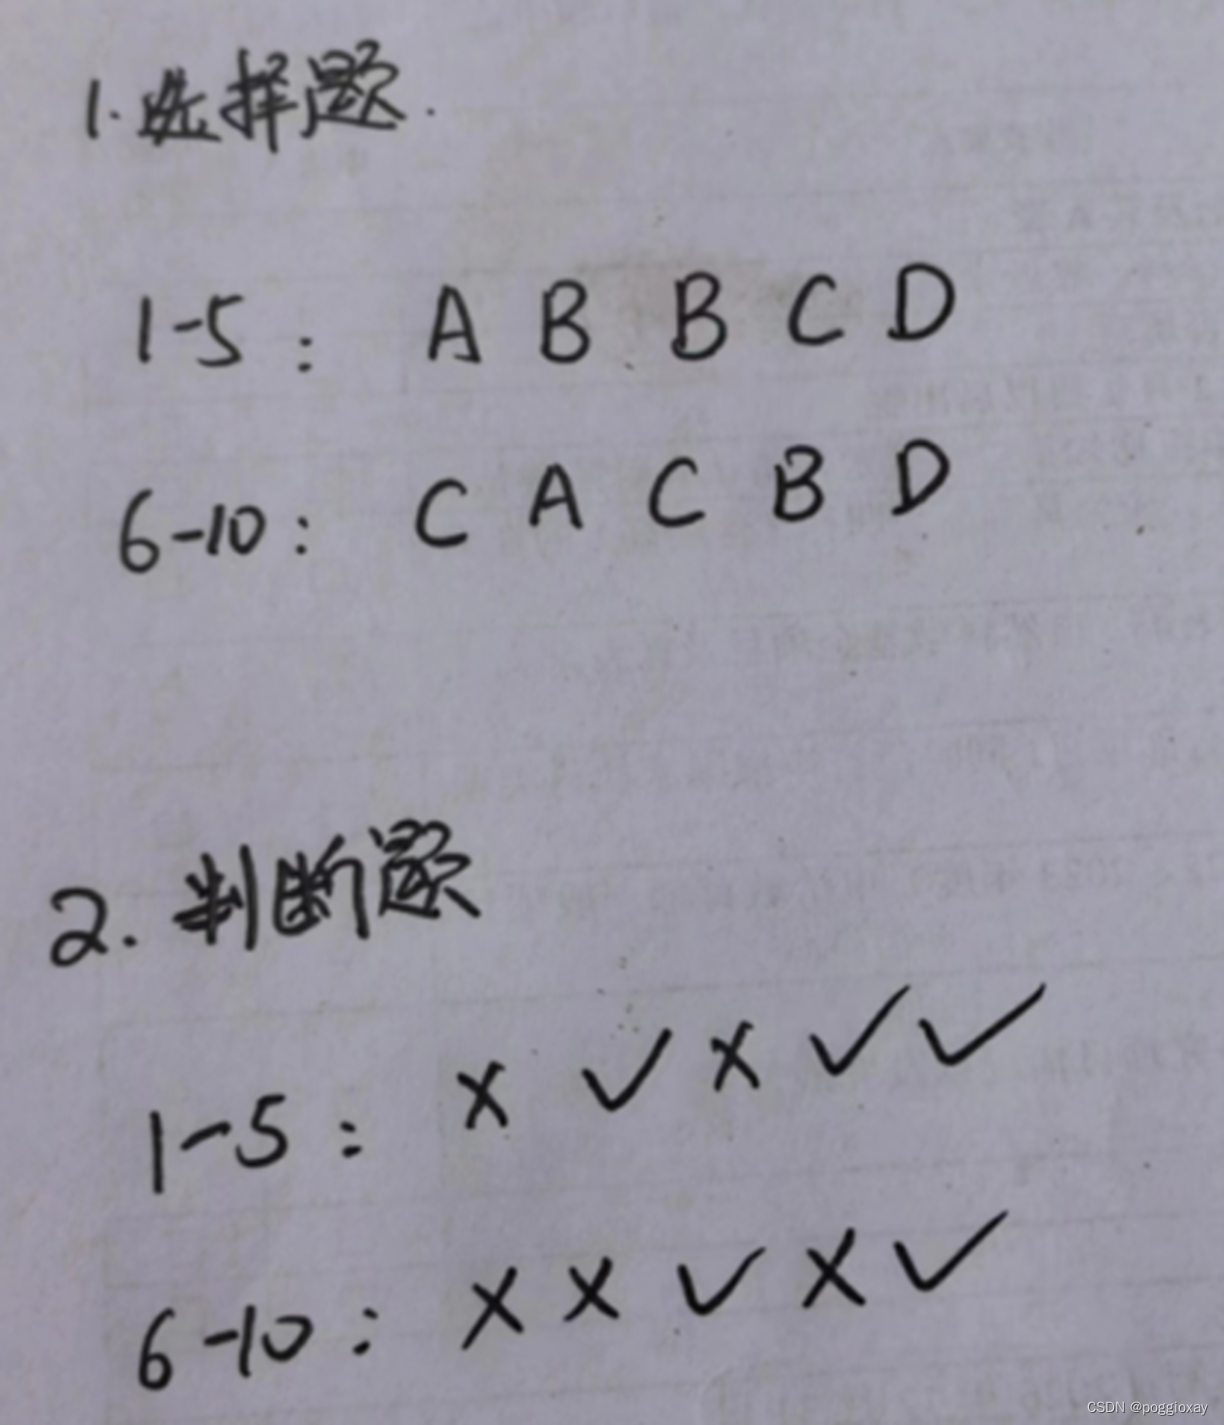
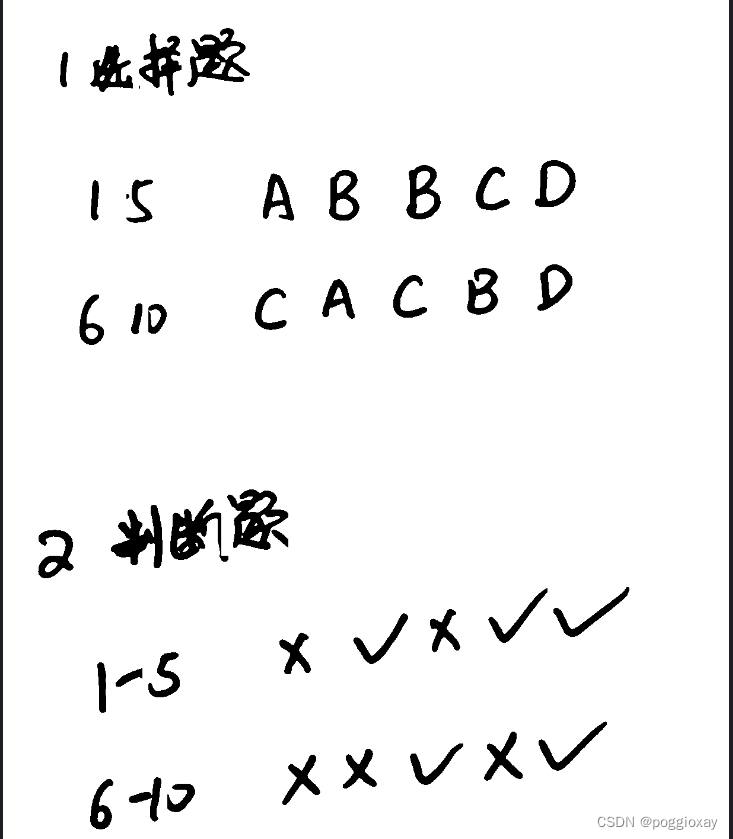
题目要求
实现方法1:pytesseract
因为我最近在学习python结合django框架的web开发,所以我的第一次测试选取的是python+django实现上传页面的前后端书写。
python的OCR工具pytesseract
pytesseract介绍
pytesseract是基于Python的OCR工具, 底层使用的是Google的Tesseract-OCR
引擎,支持识别图片中的文字,支持jpeg, png, gif, bmp, tiff等图片格式。
OCR介绍
OCR(Optical character
recognition,光学字符识别)是一种将图像中的手写字或者印刷文本转换为机器编码文本的技术。通过数字方式存储文本数据更容易保存和编辑,可以存储大量数据,比如1G的硬盘可以存储数百万本书。OCR技术可以将图片,纸质文档中的文本转换为数字形式的文本。OCR过程一般包括以下步骤:
- 图像预处理
- 文本定位
- 字符分割
- 字符识别 最初由惠普开发,后来Google赞助的开源OCR引擎 tesseract 提供了比较精确的文字识别API,本文将要介绍的Python库Pytesseract就是基于Tesseract-OCR 引擎。
pytesseract的安装以及环境配置
页面展示

代码实现
目录结构

url.py
from django.conf import settings
from django.conf.urls.static import static
from django.urls import path
from app01 import views

urlpatterns = [
    path('', views.home),
    path('upload/', views.upload_image),
] + static(settings.MEDIA_URL, document_root=settings.MEDIA_ROOT)
view.py
import cv2
from django.conf import settings
from django.shortcuts import render
import pytesseract
from PIL import Image
import numpy as np
from django.core.files.storage import default_storage
import io
import sys

# 修改控制台的默认编码为UTF-8
sys.stdout = io.TextIOWrapper(sys.stdout.buffer, encoding='utf-8')
def home(request):
    return render(request, 'home.html')

def upload_image(request):
    if request.method == 'POST' and request.FILES['file']:
        # 获取文件对象
        file = request.FILES['file']
        #保存上传文件并获取文件名
        file_name = default_storage.save(file.name, file)
        #获取文件完整路径
        file_path = default_storage.path(file_name)

        file_url = settings.MEDIA_URL + file_name  # 构建文件的 URL

        # 图像处理


        #读取图像
        image = Image.open(file_path)
        image_array = np.array(image)

        #转化为灰度图像
        gray = cv2.cvtColor(image_array, cv2.COLOR_BGR2GRAY)

        #图像二值化处理,cv2.threshold() 函数返回两个值:第一个值 (ret) 是用OTSU算法计算出的最优阈值。
        #第二个值 (thresh) 是阈值处理后的图像,这是一个二值图。

        thresh = cv2.threshold(gray, 0, 255, cv2.THRESH_BINARY_INV + cv2.THRESH_OTSU)[1]

        # 图像膨胀与腐蚀,可以帮助减少图像中的断裂
        kernel = np.ones((2, 2), np.uint8)
        dilated = cv2.dilate(thresh, kernel, iterations=1)
        eroded = cv2.erode(dilated, kernel, iterations=1)

        #将处理后的图像(一个NumPy数组)转换成PIL图像格式,以便使用pytesseract进行文字识别
        pil_img = Image.fromarray(eroded)

        #将识别的文字转化为字符串
        text = pytesseract.image_to_string(pil_img,lang='chi_sim')
        text.encode('utf-8', 'ignore').decode('utf-8')

        # 分析答案

        #分隔文本
        #strip()去除字符串首尾的空白字符(包括空格、制表符、换行符等)
        #split()默认以空白字符(包括空格、换行、制表符等)为分隔符,将字符串分割成多个部分,返回一个列表。

        answers = text.strip().split()
        #correct_answers = {'a': 'a', 'b': 'b', 'c': 'c', 'd': 'd', 'A': 'A', 'B': 'B', 'C': 'C', 'D': 'D','√': 'True', '×': 'False'}

        #遍历answers列表中的每一个元素,如果该元素在correct_answers中
        #score = sum([1 for ans in answers if ans in correct_answers])

        return render(request, 'home.html', {'file_url': file_url, 'answers': answers})
    return render(request, 'home.html')
home.html
<!DOCTYPE html>
<html>
<head>
<title>Exam Answer Recognition</title>
<link href="//unpkg.com/layui@2.9.8/dist/css/layui.css" rel="stylesheet">
</head>
<body>
<br>
<h1>请上传你的答案</h1>
{# enctype="multipart/form-data,编码类型,适合上传文件时使用#}
<br>
<br>
<form action="/upload/" method="post" enctype="multipart/form-data">
{% csrf_token %}
<input type="file" name="file">
<button type="submit" class="layui-btn">上传图片</button>
</form>
{##将上传的图片传入前端#}
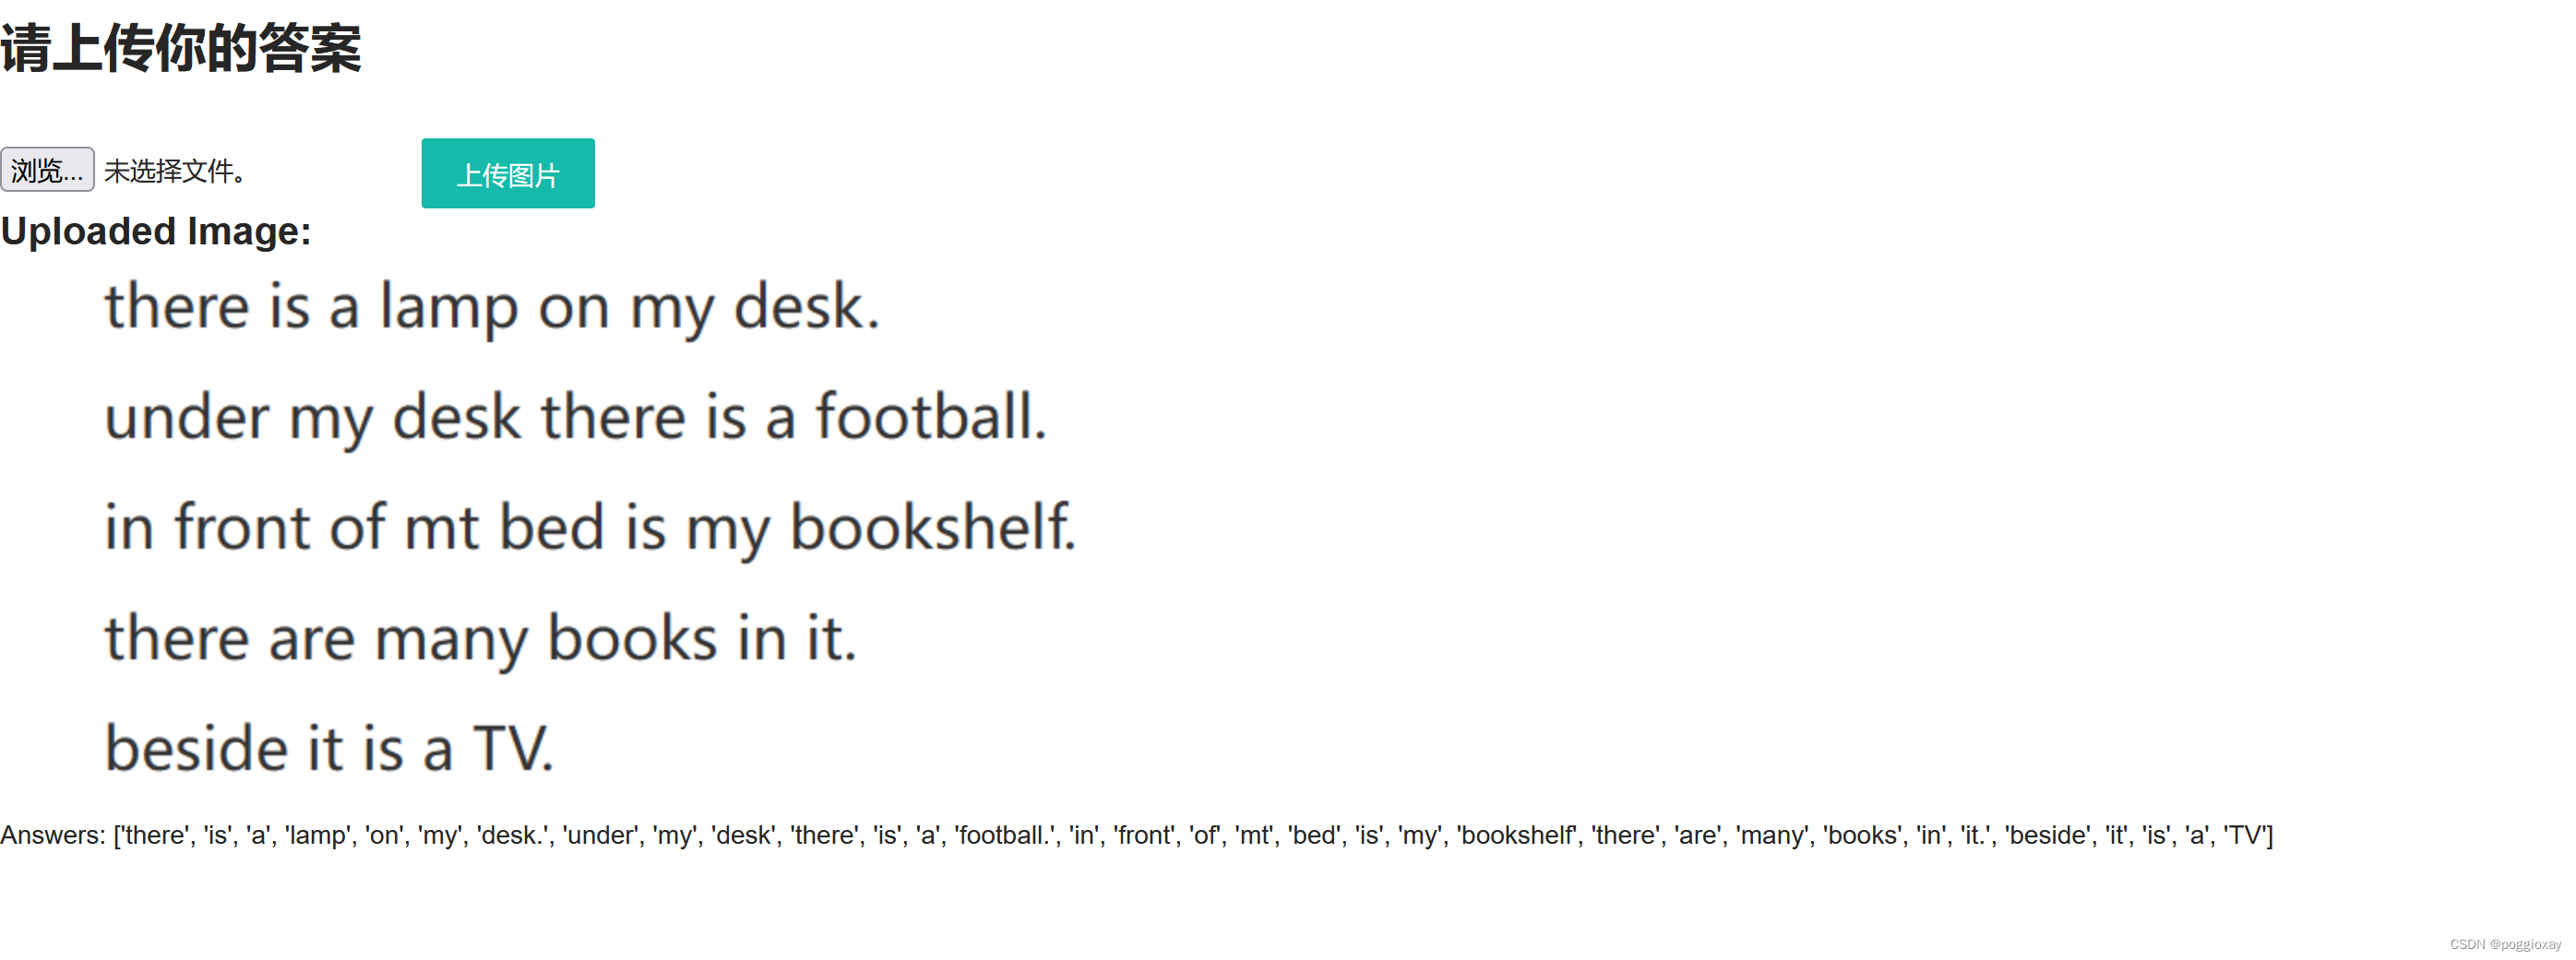
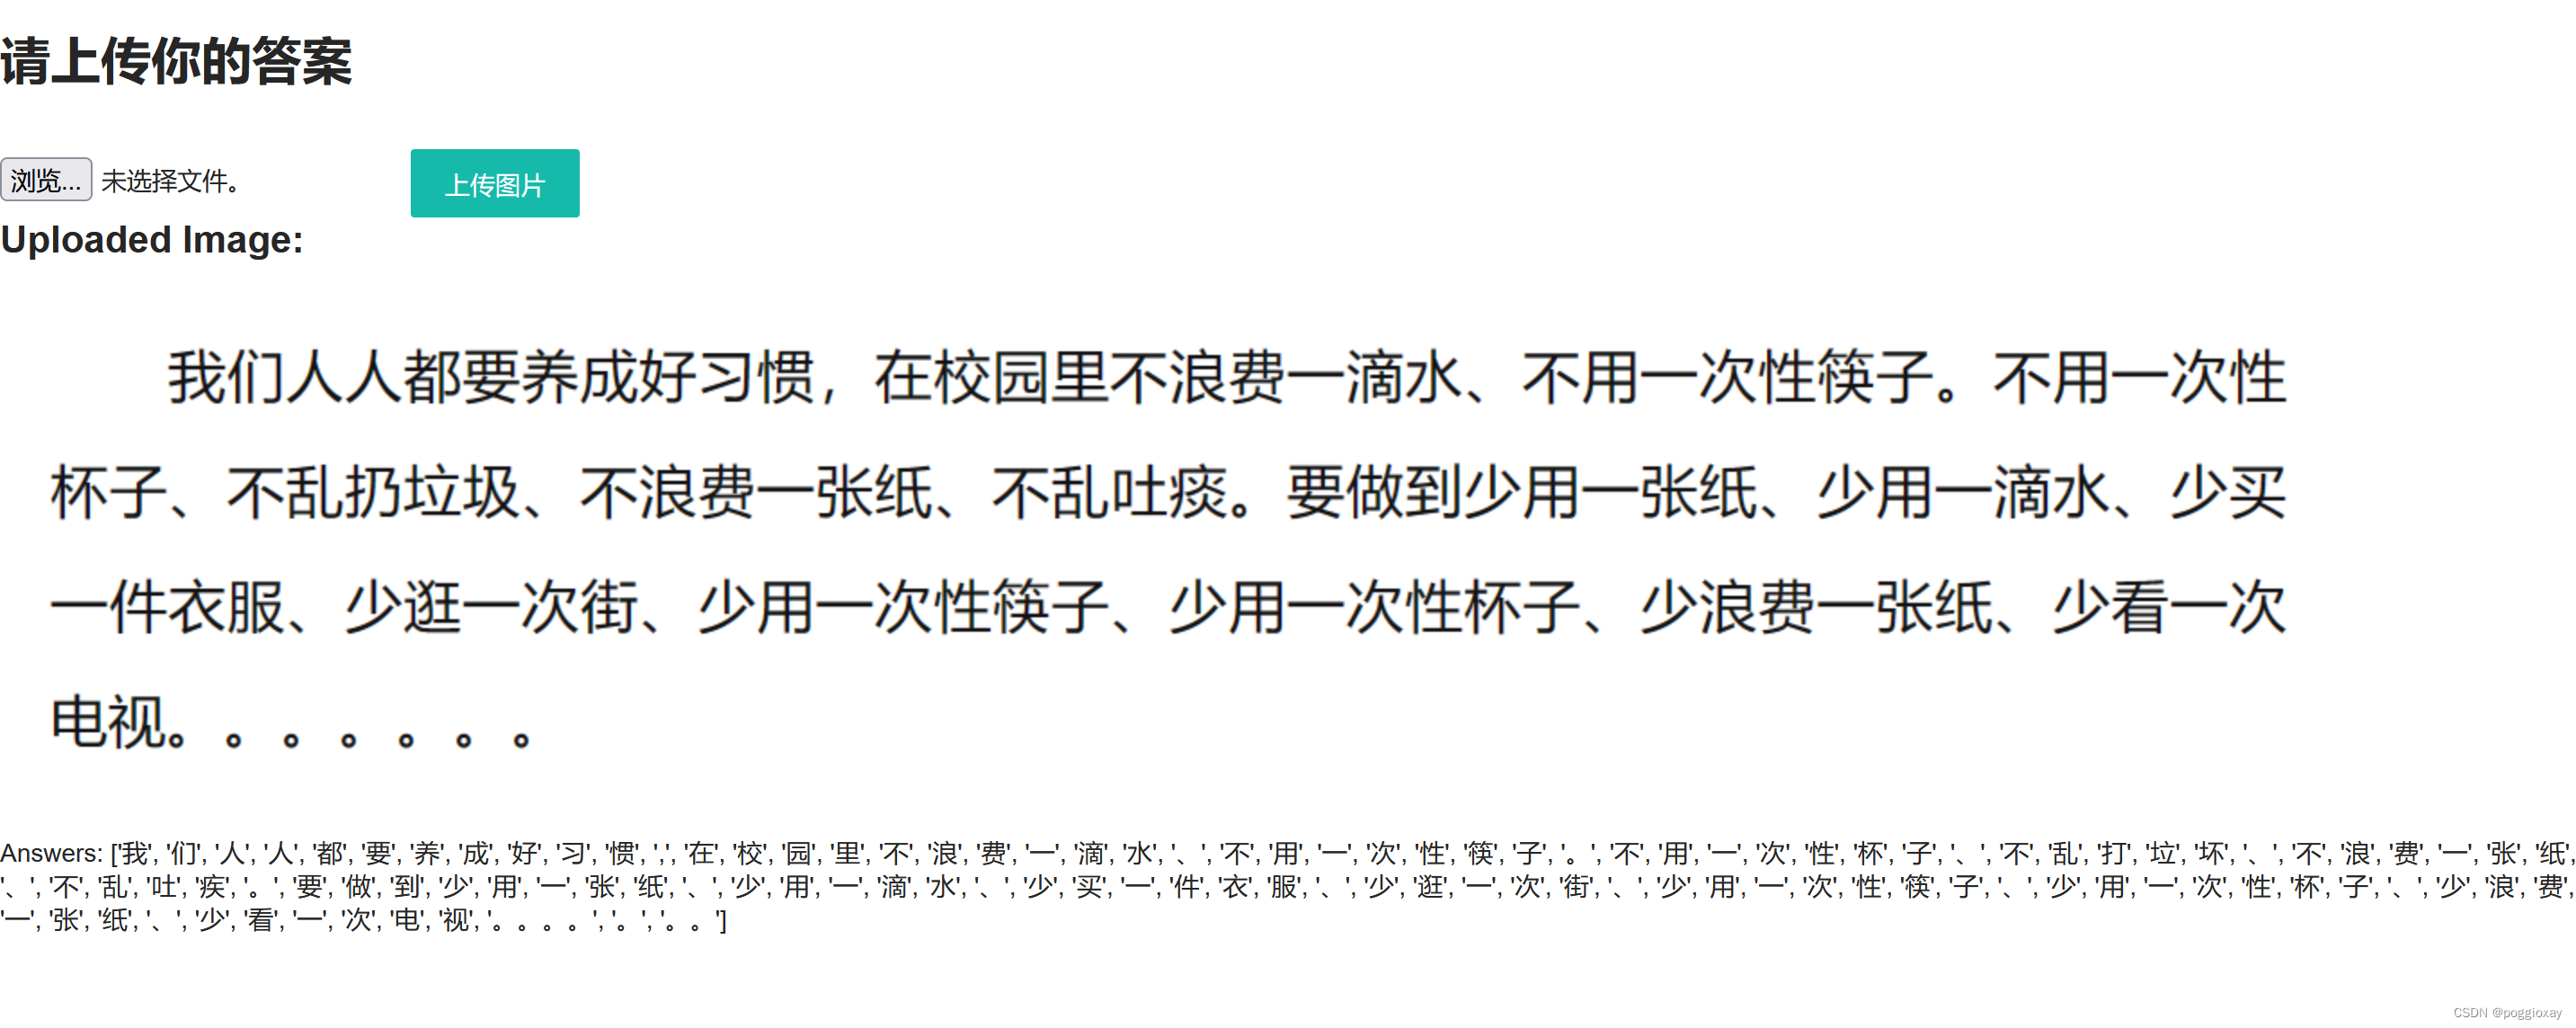
{% if file_url %}
<h2>Uploaded Image:</h2>
<img src="{{ file_url }}" alt="Uploaded Image">
{% endif %}
{% if answers %}
{# <h2>Score: {{ score }}</h2>#}
<p>Answers: {{ answers }}</p>
{% endif %}
</body>
</html>
优缺点分析
该方法虽然可以实现电子版文字、图片和字符的分析,但是对于手写体,还是存在一些不足,无法识别。
实现方法2:PaddleOCR
PaddleOCR介绍
PaddleOCR是一个基于飞桨(PaddlePaddle)开发的多语言OCR工具包,它具备实用性和轻量级的特点,支持超过80种语言的文字识别。
PaddleOCR的一大特色是提供了一系列预训练模型,这些模型包括文本检测、文本方向分类和文本识别等多种类型,以实现高精度的OCR效果。
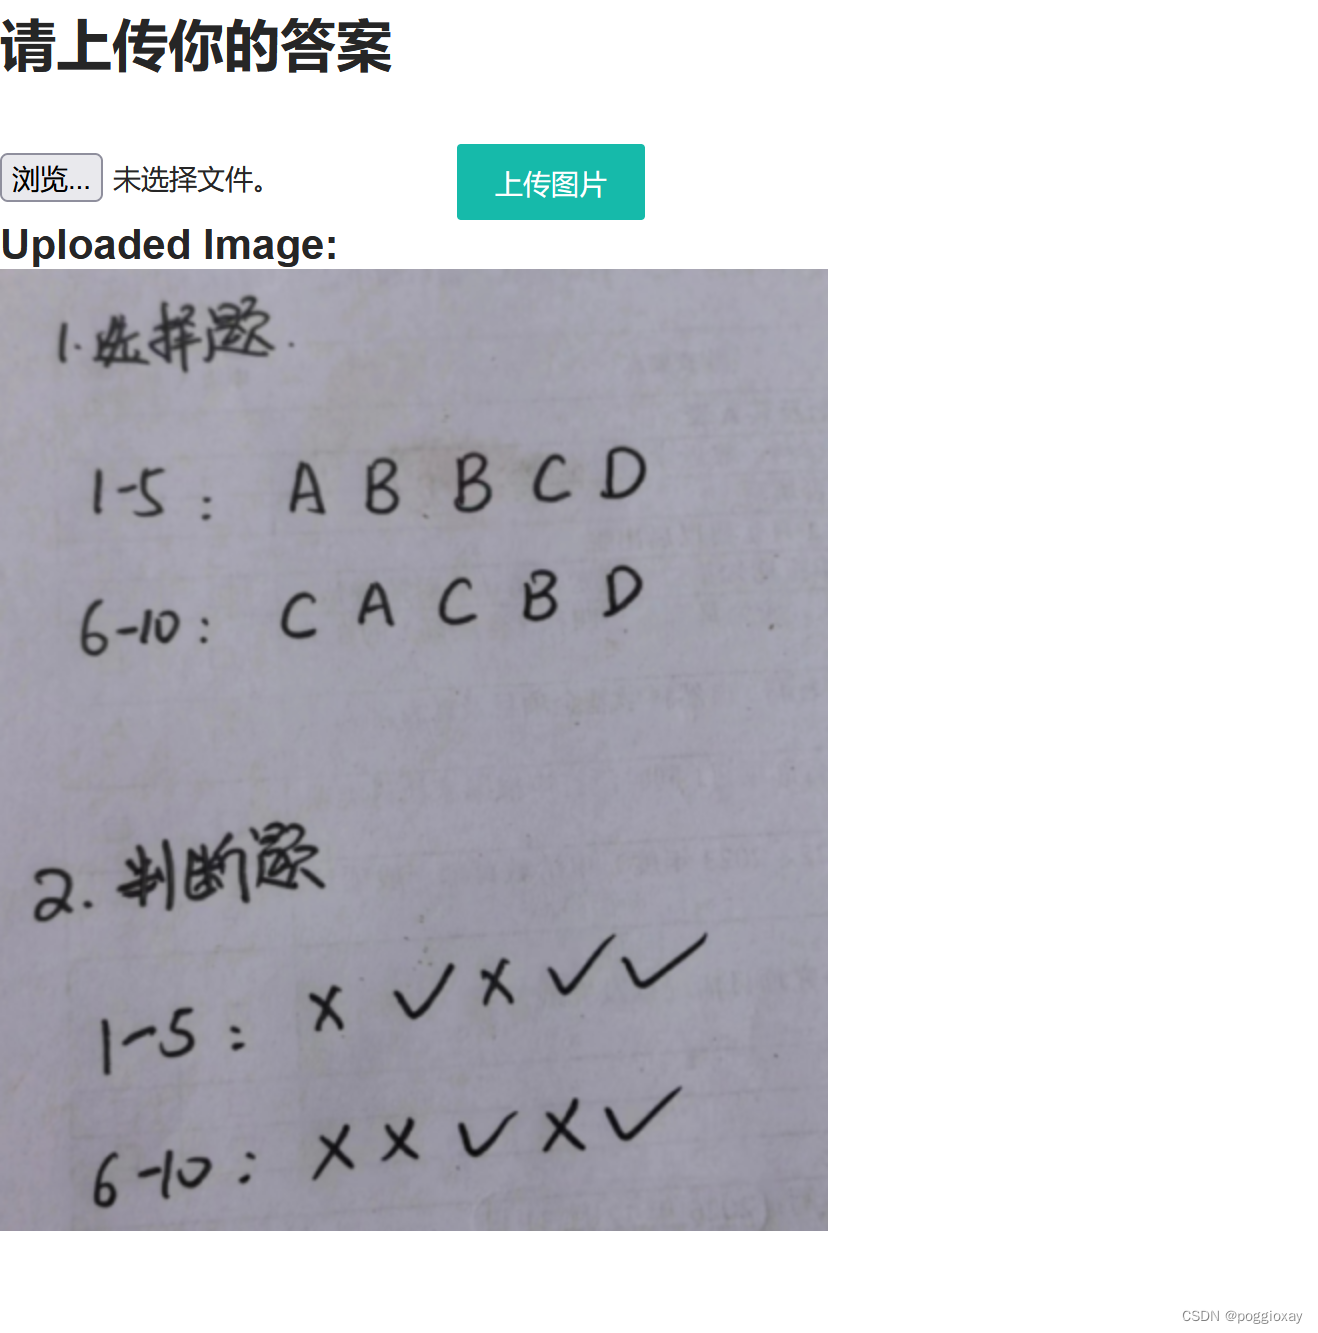
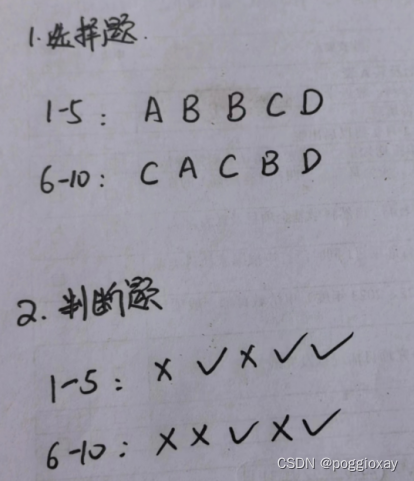
页面展示
分别上传下面两张图片


实现代码
import re
import tkinter as tk
from tkinter import filedialog


from paddleocr import PaddleOCR, draw_ocr
from PIL import Image, ImageTk


# Paddleocr目前支持的多语言语种可以通过修改lang参数进行切换
# PaddleOCR 是基于 PaddlePaddle 开发的一个开源的光学字符识别工具,支持多种语言


#创建了一个 PaddleOCR 对象,参数 use_angle_cls=True 表示启用文字方向分类器,这有助于识别图像中的文字方向。
# 参数 lang="ch" 设置语言模式为中文,这意味着 OCR 将优化以识别中文字符。
ocr = PaddleOCR(use_angle_cls=False, lang="ch")

def select_image():
    # 使用文件对话框选择图片
    # 允许用户从自己的文件系统中选择一个文件。该函数返回选中文件的完整路径。如果用户取消操作,返回一个空字符串。
    path = filedialog.askopenfilename()
    if path:
        # 显示选择的图片

        #加载图片
        image = Image.open(path)

        #PIL 的图像对象转换为 tkinter 可以使用的 PhotoImage 对象
        photo = ImageTk.PhotoImage(image)


        # 进行 OCR 识别
        # 调用 ocr 对象的 ocr 方法对指定路径的图片进行文字识别。
        # 参数 cls=True 再次确认启用方向分类器,这有助于正确识别图像中的文字方向。
        result = ocr.ocr(path, cls=True)
        if result:
            sorted_result = sorted(result, key=lambda x: x[0][0][1])  # 按照文本框左上角的纵坐标排序
            display_text = ""
            # for line in sorted_result:
            #     for i in range(len(line)):
            #         # 使用正则表达式过滤只保留字母(大写和小写)、"v"、"x"
            #         filtered_text = re.findall(r'[A-Za-zvx]+', line[i][1][0])
            #         line_text = "".join(filtered_text) + "\n"
            #         display_text += line_text
            for line in sorted_result:
                for i in range(len(line)):
                    # 使用正则表达式过滤只保留字母(大写和小写)、"v"、"x"
                    # filtered_text = re.findall(r'[A-Za-zvx]+', line[i][1][0])
                    for char in line[i][1][0]:
                        if isinstance(char, str) and re.match(r'[A-Za-zvx√]', char):  # 确保是字符串并检查字符匹配
                            display_text += char + "\n"  # 每个字符后加换行
            # 更新 Text 控件来显示 OCR 结果
            text_result.delete(1.0, tk.END)  # 清空之前的内容
            text_result.insert(tk.END, display_text)
            text_result.pack()


            result = result[0]

            # result中提取每个文本的边界框,每个 line 的第一个元素 (line[0]) 是一个包含四个坐标点的元组,描述了文本的位置
            boxes = [line[0] for line in result]

            # 假定每个 line 的第二个元素 (line[1]) 是一个包含文本字符串和识别置信度的元组,line[1][0] 就是文本字符串。
            txts = [line[1][0] for line in result]

            # 这行代码提取每个文本识别的置信度分数,即 line[1][1]
            scores = [line[1][1] for line in result]

            # PIL库打开指定路径的图片文件,并将其转换为 RGB 彩色模式
            # draw_ocr 函数将识别的文本和它们的边界框绘制在原始图像上。
            # 需要原图、边界框、文本内容、置信度分数和用于绘制文本的字体路径这几个参数
            image = draw_ocr(Image.open(path).convert('RGB'), boxes, txts, scores, font_path='path/to/simfang.ttf')
            image = Image.fromarray(image)


def select_standard_answer():
    # 使用文件对话框选择标准答案图片
    path = filedialog.askopenfilename()
    if path:
        # 进行 OCR 识别
        result = ocr.ocr(path, cls=True)
        if result:
            sorted_result = sorted(result, key=lambda x: x[0][0][1])  # 按照文本框左上角的纵坐标排序
            standard_text = ""
            for line in  sorted_result:
                for i in range(len(line)):
                    # 使用正则表达式过滤只保留字母(大写和小写)、"v"、"x"
                    #filtered_text = re.findall(r'[A-Za-zvx]+', line[i][1][0])
                    for char in line[i][1][0]:
                        if isinstance(char, str) and re.match(r'[A-Za-zvx√]', char):  # 确保是字符串并检查字符匹配
                            standard_text += char + "\n"  # 每个字符后加换行
            # for line in sorted_result:
            #     for char in line[1][0]:  # 遍历每个字符
            #         if re.match(r'[A-Za-zvx]', char):  # 如果字符匹配
            #             standard_text += char + "\n"  # 每个字符后加换行

            # 更新标准答案文本框来显示 OCR 结果
            text_standard.delete(1.0, tk.END)  # 清空之前的内容
            text_standard.insert(tk.END, standard_text)
            text_standard.pack()

            # 对比两次上传的图片内容
            compare_text()


def compare_text():
    # 获取第一次上传的图片内容
    original_text = text_result.get(1.0, tk.END)
    # 获取第二次上传的标准答案内容
    standard_text = text_standard.get(1.0, tk.END)

    # 分割文本内容为单词列表
    # 使用正则表达式过滤只保留字母(大写和小写)、"v"、"x"
    original_words = re.findall(r'[A-Za-zvx]+', original_text)
    standard_words = re.findall(r'[A-Za-zvx]+', standard_text)

    # 找出不同之处
    differences = [word for word in original_words if word not in standard_words]
    # 计算不同之处的数量
    num_differences = len(differences)

    # 设置不同之处展示区域
    text_diff = tk.Text(root, height=10, width=50)
    text_diff.pack(side='top', fill='x')

    # 更新不同之处的输出
    text_diff.delete(1.0, tk.END)
    text_diff.insert(tk.END, "不同之处:\n")
    for diff in differences:
        text_diff.insert(tk.END, diff + "\n")
    text_diff.insert(tk.END, "不同之处数量: " + str(num_differences) + "\n")

    text_diff.insert(tk.END, "最终扣分: " + str(num_differences*2))
    text_diff.pack()


# 设置主窗口
root = tk.Tk()
root.title("试卷客观题自动识别")


# 设置上传按钮,command指定了当按钮被点击时,应该调用哪个函数
btn_load = tk.Button(root, text="上传图片", command=select_image)
btn_load.pack()
print("\n")
print("\n")
print("\n")

# 设置上传标准答案按钮
btn_standard = tk.Button(root, text="上传标准答案", command=select_standard_answer)
btn_standard.pack()

# # 设置图片展示区域
# label_image = tk.Label(root)   #将label_image放在主窗口中
# label_image.pack(side='top', fill='x')  #默认方式,顶部开始,水平居中显示
#
# # 设置结果图片展示区域
# label_result = tk.Label(root)
# label_result.pack(side='top', fill='x')


# 设置文本显示区域,用于展示 OCR 结果
text_result = tk.Text(root, height=10, width=50)
text_result.pack(side='top', fill='x')

# 设置标准答案文本显示区域
text_standard = tk.Text(root, height=10, width=50)
text_standard.pack(side='top', fill='x')


# 启动 GUI
root.mainloop()
优缺点分析
该方法比较于方法1,可以很好的识别手写图片。但是我们可以清楚的看到,对于数字的分析,仍然还会有一些出入,如上面示例中的1识别为大写字母I,书写字体较斜而影响识别顺序;对于x和√的识别,经过多次测试,我发现大部分的√都会被识别为v,所以将代码中的正则表达式修改为r'[A-Za-zv√x]+',但是还会出现识别不出来的情况。
在这里我遇到的难题主要是书写字体较斜而影响识别顺序,导致直接影响与标准答案的对比。
实现方法3:EasyOCR
EasyOCR介绍
Python中OCR第三方库非常多,比如easyocr、PaddleOCR、cnocr等等。EasyOCR是一个用Python编写的OCR库,用于识别图像中的文字并输出为文本,支持 80 多种语言。
检测部分使用CRAFT算法,识别模型为CRNN,由3个组件组成:特征提取Resnet、序列标记LSTM、解码CTC,整个深度学习过程基于pytorch实现。
思路介绍
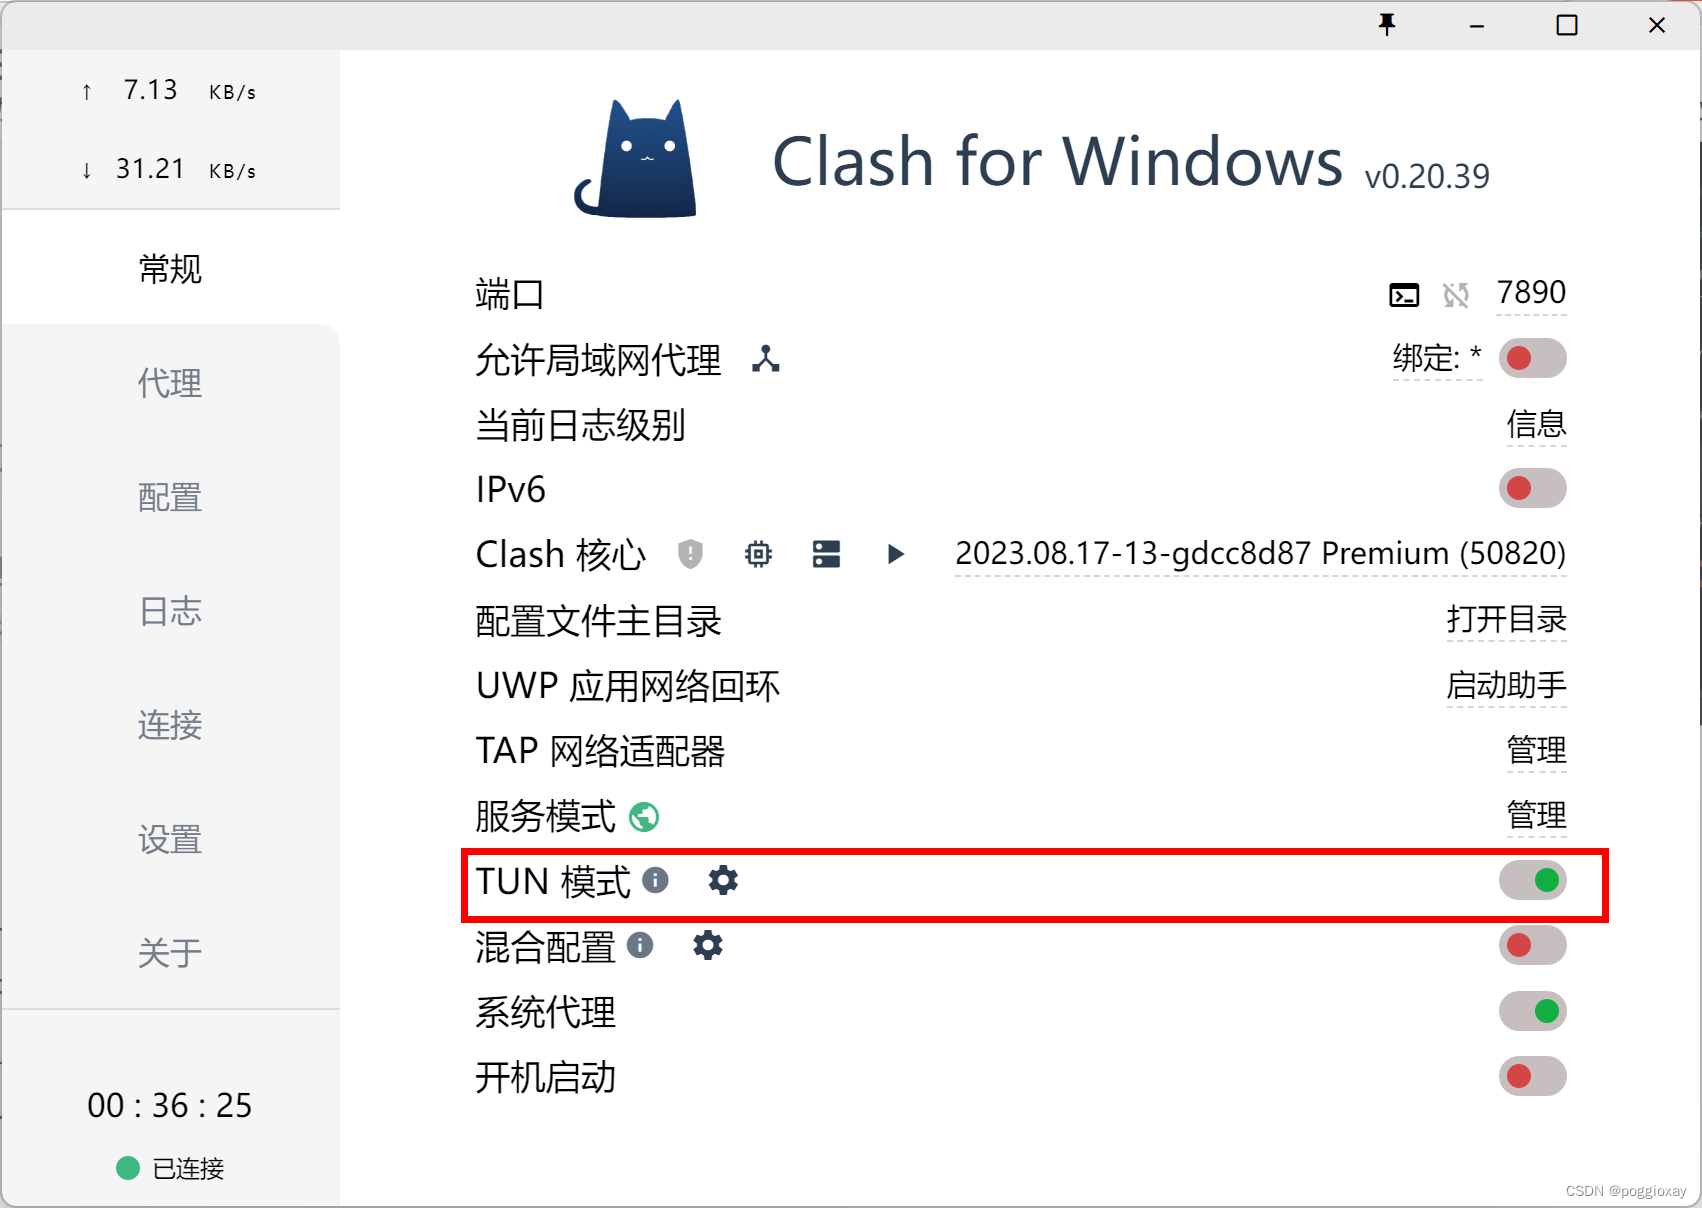
这段代码用于从指定路径读取图片,对其进行预处理(包括灰度转换和二值化),并通过轮廓检测识别出图片中的字符。随后,使用easyocr库对处理过的图像进行文字识别,并将识别结果输出显示。但是,需要注意的是,若在正常的网络下加载运行,时间比较久,建议使用代理打开TUN模式的网络情况下运行。
运行展示
原始图片:
处理后的图片:

运行代码
import cv2
import numpy as np
from easyocr import easyocr
from yaml import reader


def preprocess_image(image_path):
    image = cv2.imread(image_path)
    if image is None:
        raise ValueError("无法加载图像,请检查图像路径是否正确")

    #转换为灰度图
    gray_image = cv2.cvtColor(image, cv2.COLOR_BGR2GRAY)

    # 进行二值化处理,THRESH_BINARY_INV选项是设置阈值以下的像素点为白色(255),以上的为黑色(0)
    _, binary_image = cv2.threshold(gray_image, 120, 255, cv2.THRESH_BINARY_INV)

    # 创建一个全新的空白图像(背景为白色),OpenCV中,图像通常以uint8类型的数组表示。
    cleaned_image = np.full(binary_image.shape, 255, dtype=np.uint8)

    # 查找轮廓并过滤
    contours, _ = cv2.findContours(binary_image, cv2.RETR_EXTERNAL, cv2.CHAIN_APPROX_SIMPLE)
    characters = []
    for contour in contours:
        #计算每个轮廓的边界框(x和y表示左上角坐标,w和h表示宽度和高度)。
        x, y, w, h = cv2.boundingRect(contour)

        # 计算宽高比
        aspect_ratio = w / float(h)

        # 使用宽高比和尺寸过滤条件
        #宽高比在0.1到5之间,高度在20到500像素之间,宽度小于500像素,这里根据特定的图片已经写死,
        # 实际情况下需要修改
        if 0.1 < aspect_ratio < 5 and 20 < h < 500 and w < 500:

            #从二值化图像中切出每个字符,并反转颜色,
            char_image = 255 - binary_image[y:y + h, x:x + w]
            #给切出的字符图像周围加上白边,这样可以在后续的OCR处理中避免字符边缘被裁剪。
            padded_image = cv2.copyMakeBorder(char_image, 10, 10, 10, 10, cv2.BORDER_CONSTANT, value=[255, 255, 255])

            # 将符合条件的图像复制到新的空白图像上,保持原始位置
            cleaned_image[y:y + h + 20, x:x + w + 20] = padded_image
             #将字符的x坐标和图像存入列表。
            characters.append((x, padded_image))

    # 保存或返回处理后的图像
    cv2.imwrite("cleaned_image.png", cleaned_image)  # 保存到文件
    return characters, cleaned_image


# 调用函数并获取处理后的图像
characters, cleaned_image = preprocess_image(r"C:\Users\25344\Desktop\试卷客观题自动识别\EasyOCR实现\6.png")
# 创建一个reader对象,这里指定中文和英文的混合模式
reader = easyocr.Reader(['ch_sim', 'en'])
from PIL import Image

#加载图片
def load_image(image_path):
    return Image.open(image_path)

def ocr_image(image):
    # Convert PIL Image to an array that easyocr can use
    image_np = np.array(image)  # Requires `import numpy as np`
    results = reader.readtext(image_np, detail=0)  # Now using the numpy array instead
    text = " ".join(results)  # 将列表中的所有文本拼接成一个字符串
    return text

# 主函数
def main():
    try:
        image = load_image("cleaned_image.png")
        text = ocr_image(image)
        print(text)
    except Exception as e:
        print(f"运行错误: {e}")


if __name__ == "__main__":
    main()
优缺点分析
从它的运行结果来看,将图片进行处理后,对于字母识别情况不会因为书写字体较斜而影响识别顺序,比较于前一种效果较好。对于字符√和×的识别方面,比较于前一种较差。
在这里我遇到的难题是:在这三种模型中,无法找到一个较好的模型可以准确识别字符√和×。
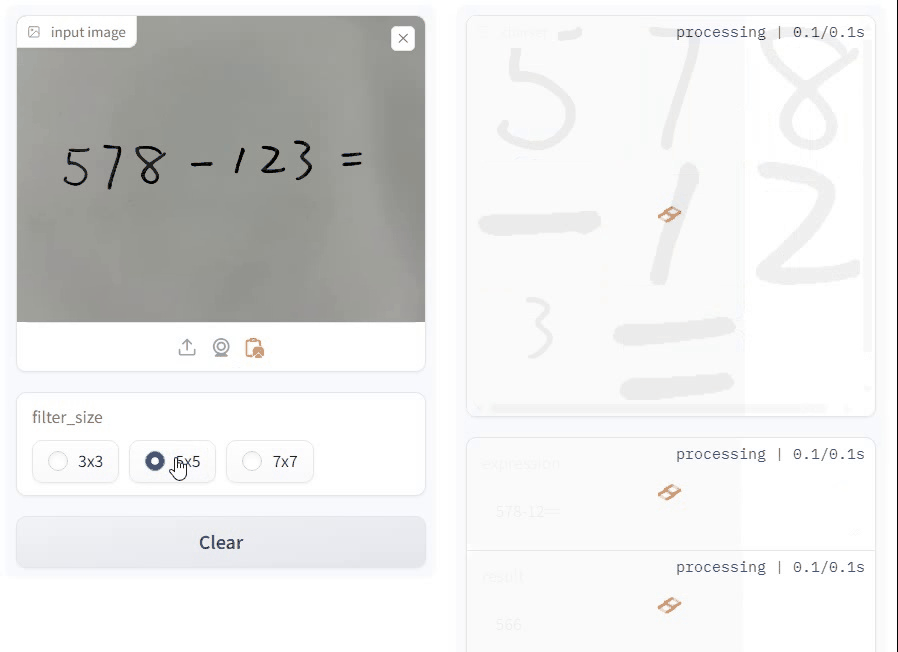
实现方法4:训练模型
由于还没有系统的学习过机器学习,所以这个过程还有很多不足,在接下来的空闲时间里,我会继续系统的学习机器学习来尝试训练模型。
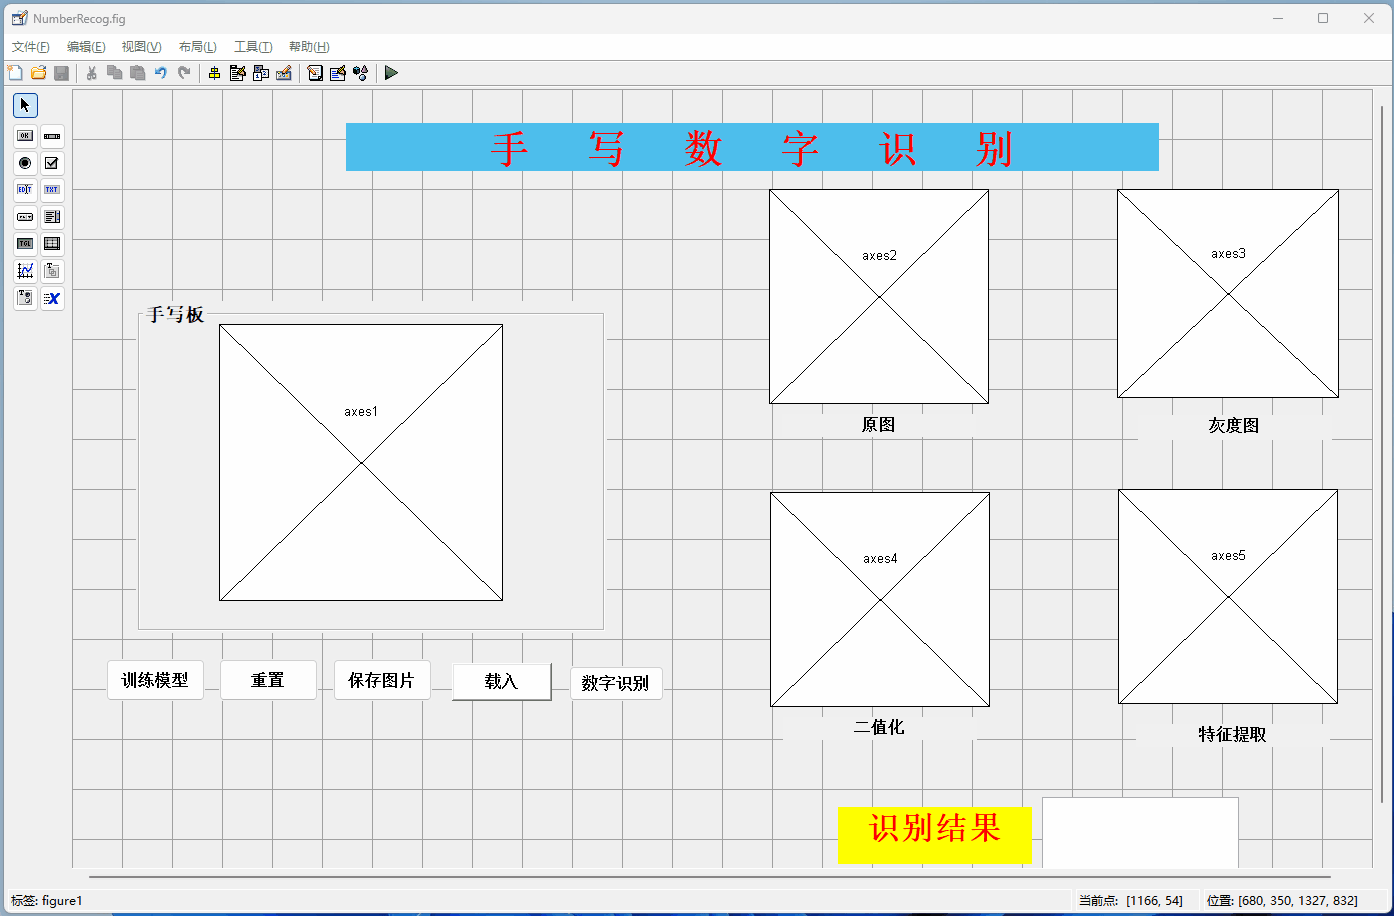
识别手写数字模型
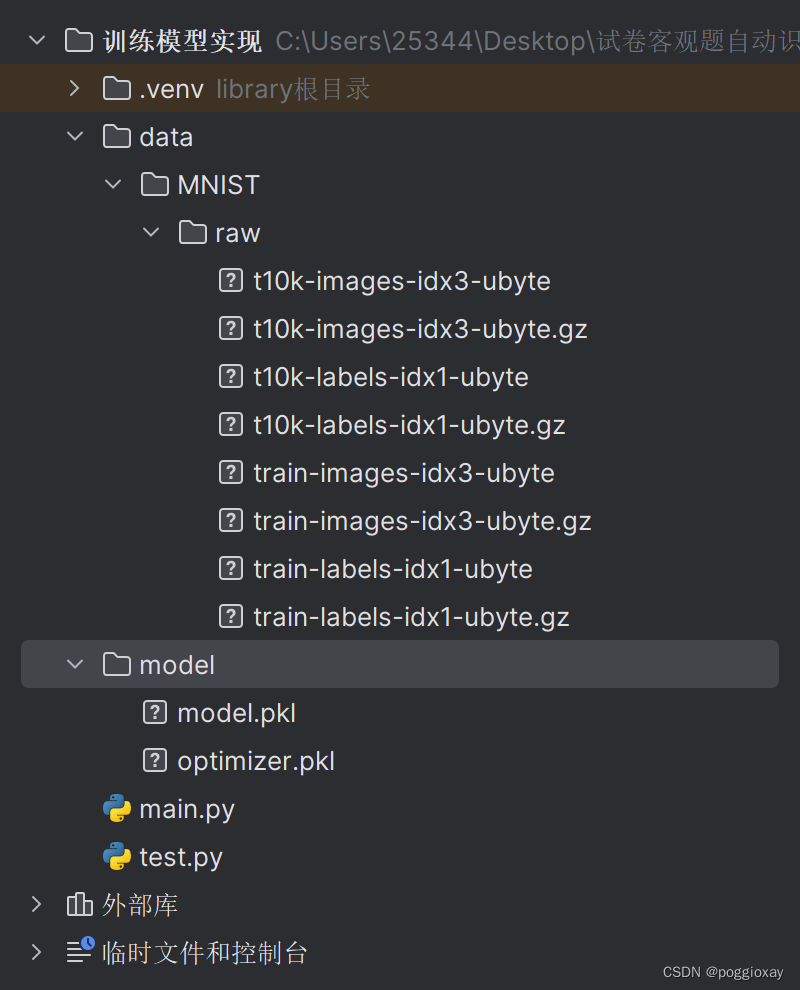
文件目录
运行结果

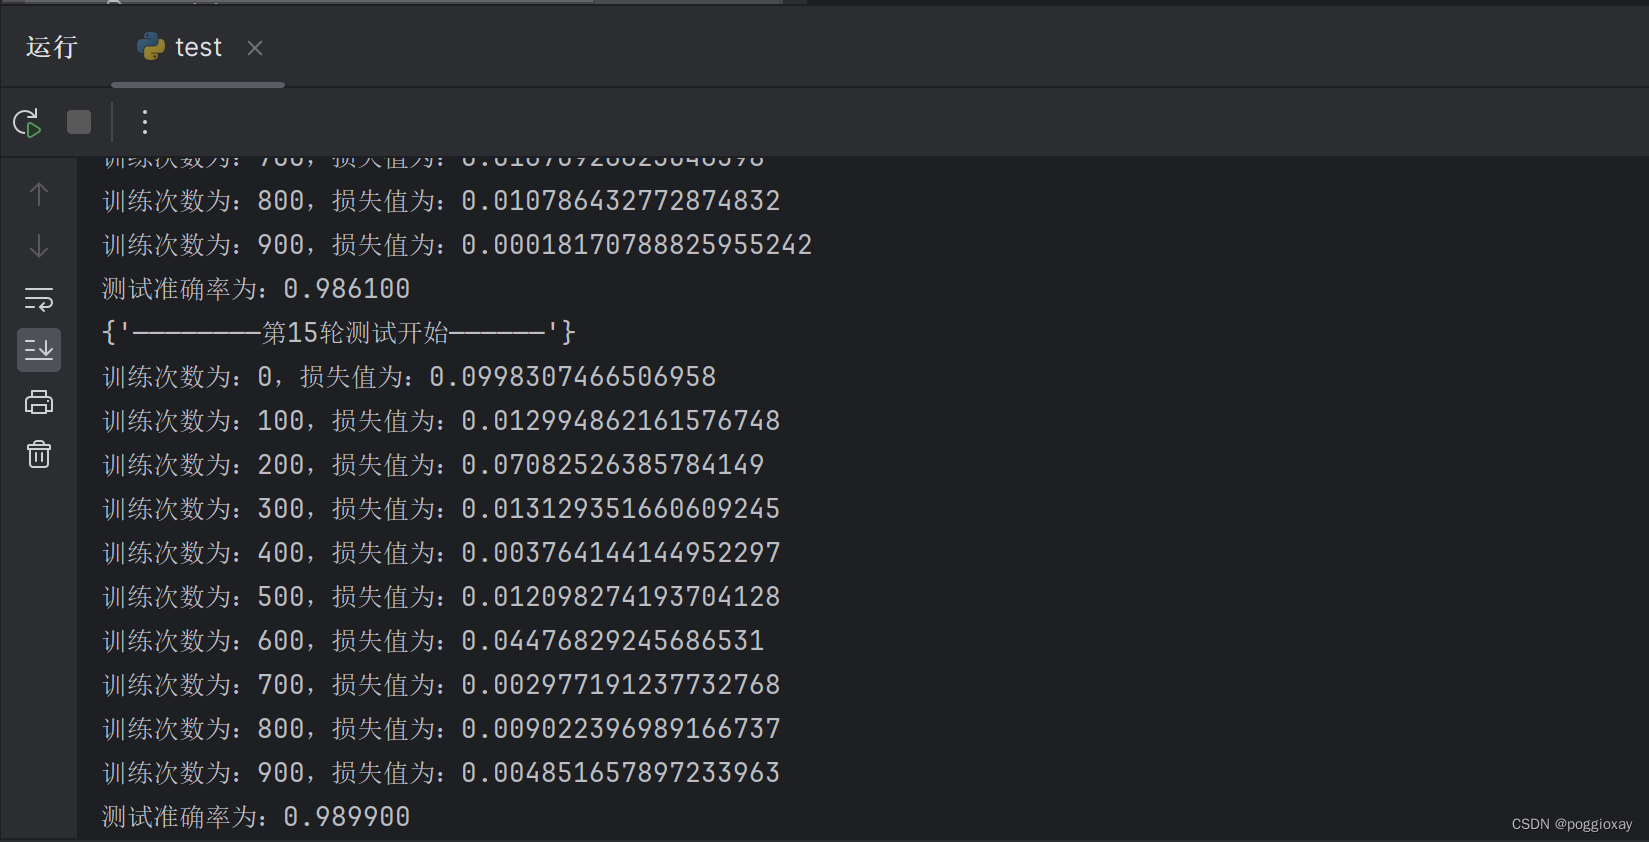
从第1次到第15次,损失值逐渐减小,准确率逐渐增加
上传图片:

运行结果:

可以看到识别的数字很乱,且这段代码的缺点在于每识别一次图片,该模型就会从第一次开始训练模型,耗费时间较长。
运行代码
testnum.py
import torch
from torch import nn
from torch.utils.data import DataLoader
from torchvision import datasets
from torchvision.transforms import ToTensor
from PIL import Image
import torchvision.transforms as transforms
import pygame
import sys ;sys.setrecursionlimit(sys.getrecursionlimit() * 5)
from pygame.locals import *
import tkinter as tk
from tkinter import filedialog

# 创建一个MNIST数据集的实例
training_data = datasets.MNIST(
    root="data",
    train=True,
    download=True,
    transform=ToTensor(),
)

test_data = datasets.MNIST(
    root="data",
    train=False,
    download=True,
    transform=ToTensor(),
)

# 创建一个神经网络模型
class NeuralNetwork(nn.Module):
    def __init__(self):
        super().__init__()
        self.flatten = nn.Flatten()
        self.hidden1 = nn.Linear(28 * 28, 128)
        self.hidden2 = nn.Linear(128, 256)
        self.out = nn.Linear(256, 10)

    def forward(self, x):
        x = self.flatten(x)
        x = self.hidden1(x)
        x = torch.relu(x)
        x = self.hidden2(x)
        x = torch.relu(x)
        x = self.out(x)
        return x


# 训练模型和测试模型的函数
def train(dataloader, model, loss_fn, optimizer):
    model.train()
    for X, y in dataloader:
        X, y = X.to(device), y.to(device)
        pred = model.forward(X)
        loss = loss_fn(pred, y)
        optimizer.zero_grad()
        loss.backward()
        optimizer.step()
        loss = loss.item()
        print(f"loss: {loss:>7f}")


def test(dataloader, model, loss_fn):
    size = len(dataloader.dataset)
    num_batches = len(dataloader)
    model.eval()
    test_loss, correct = 0, 0
    with torch.no_grad():
        for X, y in dataloader:
            X, y = X.to(device), y.to(device)
            pred = model.forward(X)
            test_loss += loss_fn(pred, y).item()
            correct += (pred.argmax(1) == y).type(torch.float).sum().item()
    test_loss /= num_batches
    correct /= size
    print(f"Test result: \n Accuracy: {(100 * correct)}%, Avg loss: {test_loss}")


# 定义一个函数来识别手写数字
def recognize_handwritten_digit(image_path, model):
    image = Image.open(image_path).convert('L')

    preprocess = transforms.Compose([
        transforms.Resize((28, 28)),
        transforms.ToTensor(),
    ])
    input_tensor = preprocess(image)
    input_batch = input_tensor.unsqueeze(0)
    input_batch = input_batch.to(device)

    with torch.no_grad():
        output = model(input_batch)

    _, predicted_class = torch.max(output, 1)

    return predicted_class.item()


# 检查是否支持CUDA,然后选择设备
device = "cuda" if torch.cuda.is_available() else "mps" if torch.backends.mps.is_available() else "cpu"
print(f"Using {device} device")

# 创建数据加载器
train_dataloader = DataLoader(training_data, batch_size=64)
test_dataloader = DataLoader(test_data, batch_size=64)

# 创建模型并传入设备
model = NeuralNetwork().to(device)

# 定义损失函数和优化器
loss_fn = nn.CrossEntropyLoss()
optimizer = torch.optim.Adam(model.parameters(), lr=0.001)

# 训练模型
for epoch in range(5):#训练次数
    print(f"Epoch {epoch + 1}\n-------------------------------")
    train(train_dataloader, model, loss_fn, optimizer)
    test(test_dataloader, model, loss_fn)


# 识别手写数字
def get_handwritten_input():
    pygame.init()

    # 设置窗口
    window = pygame.display.set_mode((280, 280))
    pygame.display.set_caption('Handwritten Input')
    window.fill((0, 0, 0))  # 设置背景为黑色

    drawing = False
    last_pos = None

    while True:
        for event in pygame.event.get():
            if event.type == QUIT:
                pygame.quit()
                sys.exit()
            elif event.type == MOUSEBUTTONDOWN:
                drawing = True
            elif event.type == MOUSEMOTION:
                if drawing:
                    mouse_x, mouse_y = pygame.mouse.get_pos()
                    if last_pos:
                        pygame.draw.line(window, (255, 255, 255), last_pos, (mouse_x, mouse_y), 15)  # 设置绘画颜色为白色
                    last_pos = (mouse_x, mouse_y)
            elif event.type == MOUSEBUTTONUP:
                drawing = False
                last_pos = None
            pygame.display.update()
            if event.type == KEYDOWN and event.key == K_RETURN:
                pygame.image.save(window, 'handwritten_input.png')
                return 'handwritten_input.png'

def main():
    while True:  # 死循环保证程序一直运行,直到关闭
        image_path = get_handwritten_input()
        predicted_digit = recognize_handwritten_digit(image_path, model)
        print(f"The predicted digit is: {predicted_digit}")

if __name__ == "__main__":
    main()
这段代码首先训练一个简单的神经网络来识别MNIST数据集中的手写数字,其次使用一个方法来分割图片中的各个数字,分割每个数字后,使用你现有的模型逐个进行识别。
testnum1.py
import cv2
import numpy as np
import tkinter as tk
from tkinter import filedialog
from PIL import Image
import torch
from torchvision import transforms

from testnum import model, device


# 假设model, device已经定义好
# NeuralNetwork和其他相关代码同前

def find_digits(img):
    # 预处理图像来寻找数字
    gray = cv2.cvtColor(img, cv2.COLOR_BGR2GRAY)
    ret, thresh = cv2.threshold(gray, 127, 255, cv2.THRESH_BINARY_INV)
    contours, _ = cv2.findContours(thresh, cv2.RETR_EXTERNAL, cv2.CHAIN_APPROX_SIMPLE)

    digit_imgs = []
    for contour in contours:
        # 提取每个轮廓的矩形边界框
        x, y, w, h = cv2.boundingRect(contour)
        # 裁剪图像中的数字
        digit = gray[y:y + h, x:x + w]
        digit_imgs.append(digit)

    return digit_imgs


def recognize_handwritten_digit(image):
    digit_images = find_digits(image)
    results = []

    for digit_image in digit_images:
        pil_img = Image.fromarray(digit_image)
        preprocess = transforms.Compose([
            transforms.Resize((28, 28)),
            transforms.ToTensor(),
        ])
        input_tensor = preprocess(pil_img)
        input_batch = input_tensor.unsqueeze(0).to(device)

        with torch.no_grad():
            output = model(input_batch)

        _, predicted_class = torch.max(output, 1)
        results.append(predicted_class.item())

    return results


def upload_and_predict():
    file_path = filedialog.askopenfilename()
    if file_path:
        image = cv2.imread(file_path)
        digits = recognize_handwritten_digit(image)
        label.config(text=f"Predicted Digits: {digits}")


root = tk.Tk()
root.title("Digit Recognizer")
root.geometry("20x20")  #这里的大小设定需要根据实际图片来修改
btn = tk.Button(root, text="Upload an Image", command=upload_and_predict)
btn.pack(pady=20)

label = tk.Label(root, text="Predicted Digits: None", font=("Helvetica", 14))
label.pack(pady=20)

root.mainloop()
识别手写字母模型
实现方法5:API调用
经过测试一些常见付费文字识别的API,例如百度、阿里云,最终选择百度的OCR识别手写字模型。
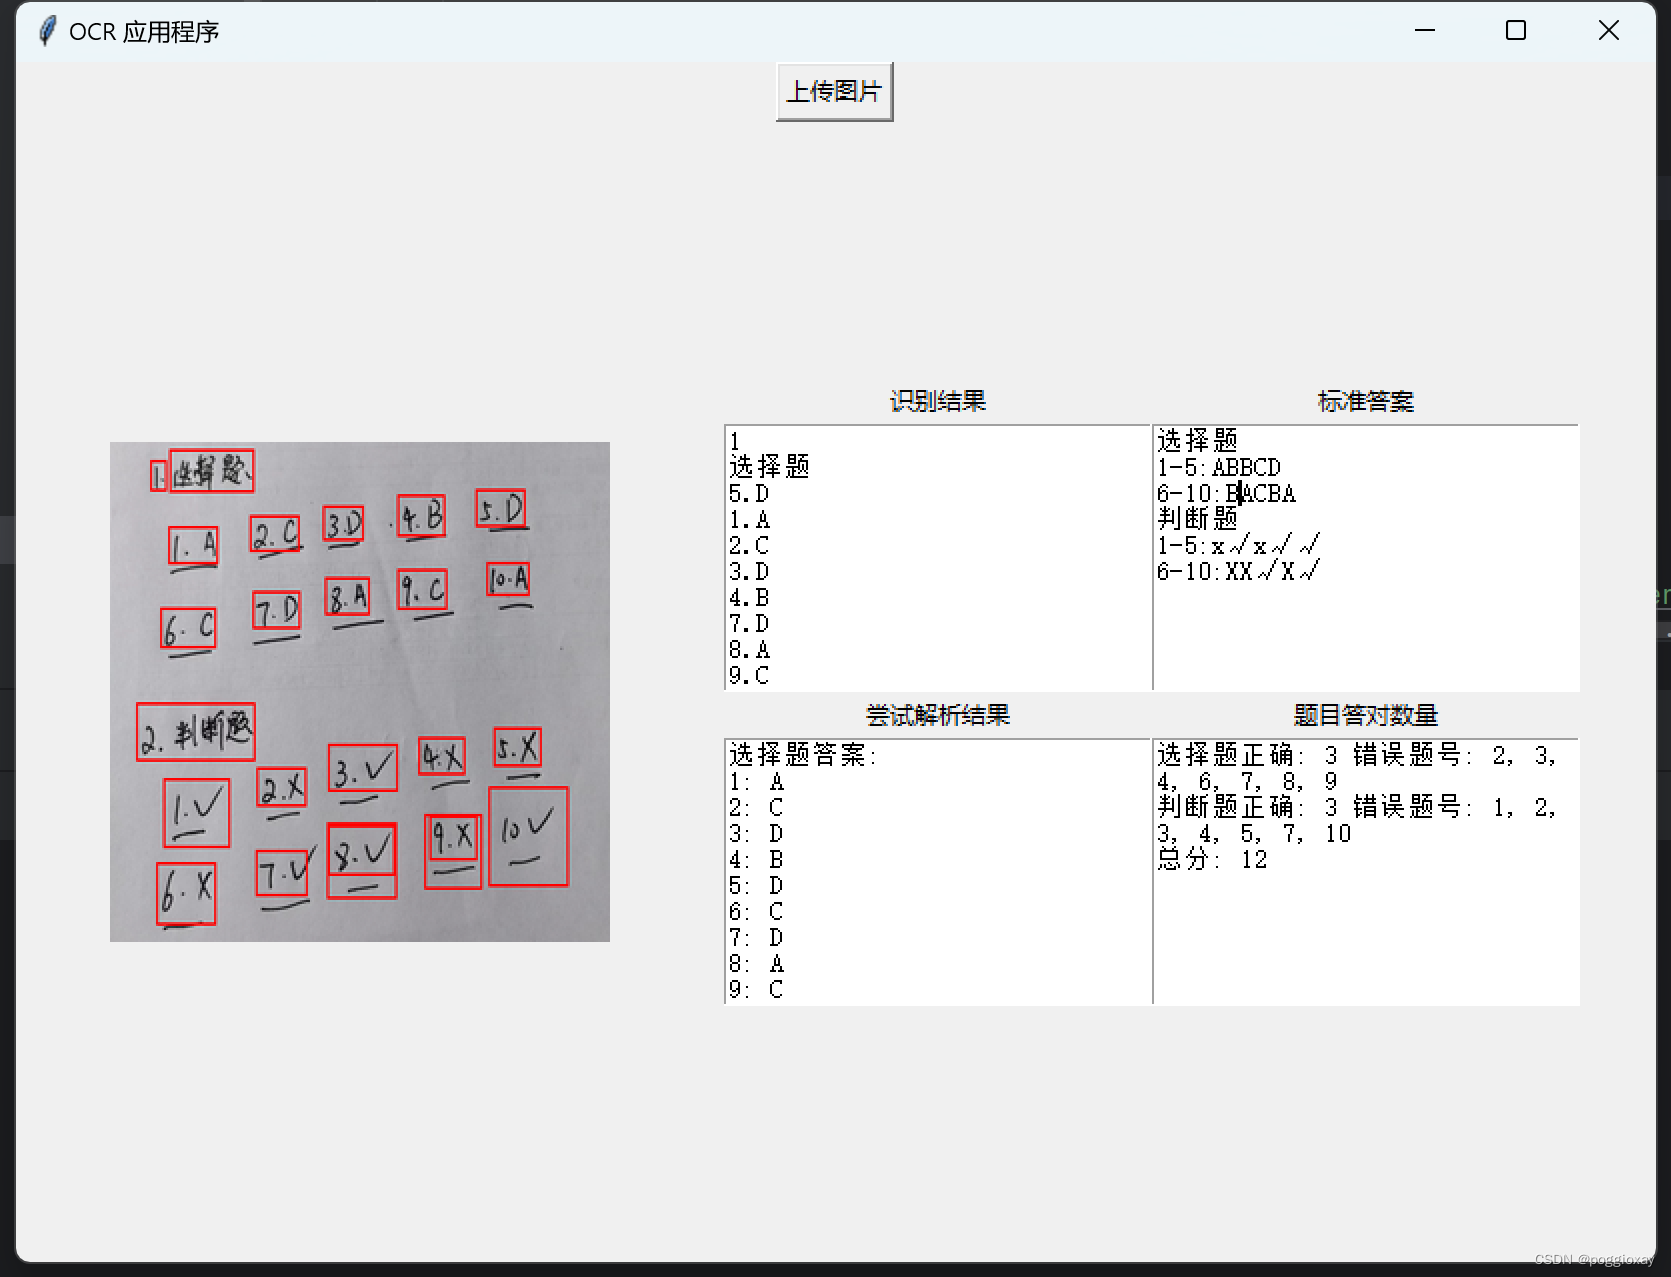
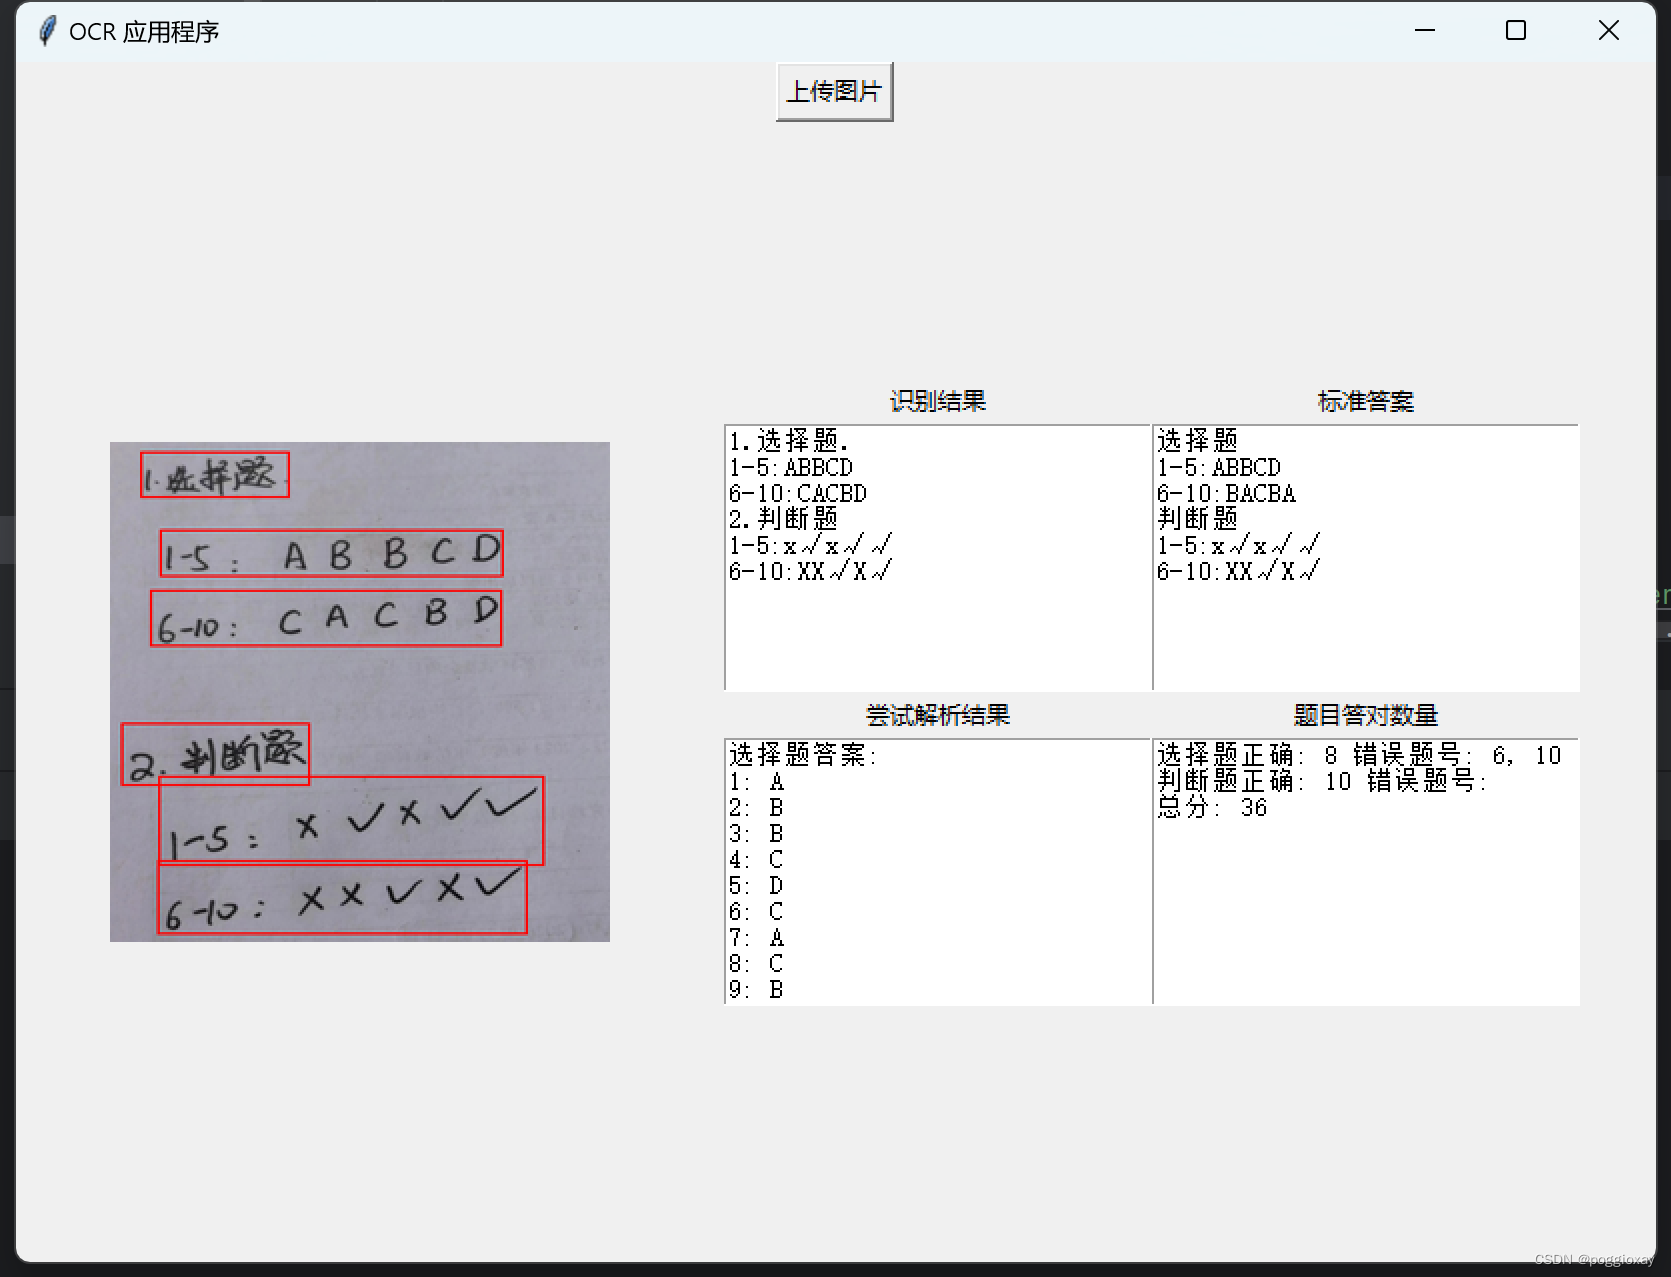
运行结果
标准答案一栏需要自己手动输入,在第二次程序打开时,会自动读取存储的标准答案;在修改标准答案后,也可以自动存储到文件。
实现代码
import base64
import os
import re
import tkinter as tk
import urllib
from tkinter import filedialog, messagebox
from PIL import Image, ImageTk, ImageDraw
import requests
import threading
import json

API_KEY = "L1BueHsF2m053ik1mhsG3iEU"
SECRET_KEY = "z36yhRJJ9Zsgqfej2TyXPROs7YYBHMLw"
STANDARD_ANSWER_FILE = "standard_answer_text.txt"

def get_access_token():
    url = "https://aip.baidubce.com/oauth/2.0/token"
    params = {"grant_type": "client_credentials", "client_id": API_KEY, "client_secret": SECRET_KEY}
    return str(requests.post(url, params=params).json().get("access_token"))

def get_file_content_as_base64(path, urlencoded=False):
    with open(path, "rb") as f:
        content = base64.b64encode(f.read()).decode("utf8")
        if urlencoded:
            content = urllib.parse.quote_plus(content)
    return content

def save_standard_answers():
    text = standard_answer_text.get("1.0", tk.END)
    with open(STANDARD_ANSWER_FILE, "w") as file:
        file.write(text)

def load_standard_answers():
    if os.path.exists(STANDARD_ANSWER_FILE):
        with open(STANDARD_ANSWER_FILE, "r") as file:
            text = file.read()
            standard_answer_text.delete("1.0", tk.END)
            standard_answer_text.insert("1.0", text)

def ocr_image(image_path, callback):
    try:
        url = "https://aip.baidubce.com/rest/2.0/ocr/v1/doc_analysis?access_token=" + get_access_token()
        headers = {'Content-Type': 'application/x-www-form-urlencoded', 'Accept': 'application/json'}
        payload = f'image={get_file_content_as_base64(image_path, True)}'
        response = requests.request("POST", url, headers=headers, data=payload)
        callback(response.text, image_path)
    except Exception as e:
        messagebox.showerror("错误", str(e))

def upload_action():
    file_path = filedialog.askopenfilename()
    if file_path:
        img = Image.open(file_path)
        img = img.resize((250, 250), Image.Resampling.LANCZOS)
        img = ImageTk.PhotoImage(img)
        panel.configure(image=img)
        panel.image = img
        ocr_result_text.delete(1.0, tk.END)
        ocr_result_text.insert(tk.END, "正在加载OCR结果...")
        threading.Thread(target=ocr_image, args=(file_path, update_result)).start()


def parse_ocr(ocr_output):
    # 初始化字典来存储答案
    choice_answers = {str(i): "" for i in range(1, 11)}
    judge_answers = {str(i): "" for i in range(1, 11)}

    # 处理OCR文本
    lines = ocr_output.strip().split('\n')

    for line in lines:
        line = line.strip()
        line = line.replace('.', '').replace('V', '√').replace('v', '√').replace('u', '√').replace('X', '×').replace(
            'x', '×')
        line = line.replace(':', ':').replace('—', '-').replace('一', '-')  # Normalizing potential OCR errors

        # 使用正则表达式匹配可能的范围题号
        range_pattern = r'(\d+)[-—一](\d+)[::]'
        match = re.search(range_pattern, line)
        if match:
            start, end = int(match.group(1)), int(match.group(2))
            answers = line[match.end():].strip()  # 从匹配结束的位置开始获取答案字符串
            question_range = range(start, end + 1)

            if any(c.upper() in ['A', 'B', 'C', 'D'] for c in answers):
                for i, ans in zip(question_range, answers):
                    choice_answers[str(i)] = ans.upper()
            else:
                for i, ans in zip(question_range, answers):
                    judge_answers[str(i)] = ans
        else:
            number = ''.join(filter(str.isdigit, line))
            answer = ''.join(c for c in line if not c.isdigit())  # 获取所有非数字字符

            if any(c.upper() in ['A', 'B', 'C', 'D'] for c in answer):  # 检查是否为选择题答案
                if answer.upper() in ['A', 'B', 'C', 'D']:
                    choice_answers[number] = answer.upper()
            else:  # 否则处理为判断题
                if any(c in ['√', '×'] for c in answer):
                    judge_answers[number] = answer
    return choice_answers, judge_answers

def format_answers(choice_answers, judge_answers):
    choice_result = "选择题答案:\n"
    for num, ans in choice_answers.items():
        choice_result += f"{num}: {ans}\n"

    judge_result = "\n判断题答案:\n"
    for num, ans in judge_answers.items():
        judge_result += f"{num}: {ans}\n"

    return choice_result + judge_result


def update_result(ocr_data, image_path):
    data = json.loads(ocr_data)
    img = Image.open(image_path)
    draw = ImageDraw.Draw(img)

    # 遍历结果,并在图像上绘制红色矩形
    for result in data['results']:
        location = result['words']['words_location']
        left = location['left']
        top = location['top']
        width = location['width']
        height = location['height']
        draw.rectangle([left, top, left + width, top + height], outline="red", width=2)

    # 更新GUI中的图像显示
    img = img.resize((250, 250), Image.Resampling.LANCZOS)
    photo = ImageTk.PhotoImage(img)
    panel.configure(image=photo)
    panel.image = photo

    # 显示OCR文本结果
    # 初始化一个空字符串来聚合结果
    aggregated_results = ""
    # 循环遍历OCR结果
    for result in data['results']:
        # 将每个识别出的文字加入到聚合字符串中,每个结果后面添加一个换行符
        aggregated_results += result['words']['word'] + "\n"
    # 清除文本框中的现有内容
    ocr_result_text.delete(1.0, tk.END)
    ocr_result_text.insert(tk.END, aggregated_results)


    # 更新尝试解析文本框
    # 解析OCR文本获取答案
    choice_answers, judge_answers = parse_ocr(aggregated_results)
    # 打印解析字典
    print(choice_answers, judge_answers)

    # 格式化答案为字符串
    result_string = format_answers(choice_answers, judge_answers)
    print(result_string)

    # 显示OCR解析文本结果
    parsed_result_text.delete(1.0, tk.END)
    parsed_result_text.insert(tk.END, result_string)

    # 计算最终答题情况
    update_correct_count_text(choice_answers, judge_answers)


def compare_answers(user_answers, standard_answers):
    correct_count = 0
    wrong_questions = []

    for key, user_answer in user_answers.items():
        if user_answer == standard_answers.get(key, ""):
            correct_count += 1
        else:
            wrong_questions.append(key)

    wrong_questions_str = ", ".join(wrong_questions)  # 将数组转换为逗号分隔的字符串
    return correct_count, wrong_questions_str


def update_correct_count_text(choice_answers, judge_answers):
    # 从GUI文本框中读取标准答案
    standard_text = standard_answer_text.get("1.0", tk.END).strip()
    # 解析标准答案为字典
    standard_choice_answers, standard_judge_answers = parse_ocr(standard_text)

    #从 choice_answers 和 judge_answers 解析得到的答案
    correct_choice_count, wrong_choice_questions = compare_answers(choice_answers, standard_choice_answers)
    correct_judge_count, wrong_judge_questions = compare_answers(judge_answers, standard_judge_answers)

    # 计算得分
    total_score = (correct_choice_count + correct_judge_count) * 2  # 假设每题2分

    # 显示结果到GUI
    results_text = f"选择题正确: {correct_choice_count} 错误题号: {wrong_choice_questions}\n"
    results_text += f"判断题正确: {correct_judge_count} 错误题号: {wrong_judge_questions}\n"
    results_text += f"总分: {total_score}"

    correct_count_text.delete(1.0, tk.END)
    correct_count_text.insert(tk.END, results_text)


root = tk.Tk()
root.title("OCR 应用程序")
root.geometry("820x600")  # 设定窗口初始大小

frame = tk.Frame(root)
frame.pack(fill=tk.BOTH, expand=True)

upload_btn = tk.Button(frame, text='上传图片', command=upload_action)
upload_btn.pack(side=tk.TOP)

panel = tk.Label(frame, width=320, height=320)
panel.pack(side=tk.LEFT, padx=10, pady=10)
# 创建纯白色的图片作为默认显示
default_img = Image.new('RGB', (250, 250), color='white')
default_photo = ImageTk.PhotoImage(default_img)
panel.configure(image=default_photo)
panel.image = default_photo

# 新增文本框和标签
text_frame = tk.Frame(frame)
text_frame.pack(side=tk.LEFT, padx=10)

labels = ["识别结果", "标准答案", "尝试解析结果", "题目答对数量"]
texts = []

for i in range(4):
    label = tk.Label(text_frame, text=labels[i])
    label.grid(row=i//2*2, column=(i%2)*2)
    text_widget = tk.Text(text_frame, height=10, width=30)
    text_widget.grid(row=i//2*2+1, column=(i%2)*2)
    texts.append(text_widget)

ocr_result_text, standard_answer_text, parsed_result_text, correct_count_text = texts
# 配置standard_answer_text文本框的内容变更事件
standard_answer_text.bind("<KeyRelease>", lambda event: save_standard_answers())

# 应用启动时加载标准答案
load_standard_answers()

root.mainloop()
优缺点分析
该方法实现的结果是目前最理想的结果,优势明显,但是缺点在于只是对API的调用,且付费使用,不适用于大规模的使用。


![AD21技巧[更加便捷的DRC检查][把线框转成Keep-Out Layer板框]](https://img-blog.csdnimg.cn/direct/1e13a27ad4744461ac767f2fcf6045d6.png)