背景
我们先了解下什么情况下会用到字节码插桩。学技术并不是为了秀技术,而是为了解决业务问题。
我们先想象一个业务场景— 我们需要统计耗时方法,这时,我们会怎么做?
在每个方法开头和结尾处分别记录开始时间与结束时间?在自己写的代码上用还好,但是第三方库类怎么办?
这时就可以用上字节码插桩了!因为 Java 文件编译成 class 后,这时可以获取全部的 class 文件,包含自己写的代码和其它库类的。拿到 class 文件后,就可以进行批量修改,并且对于 Java 文件是无感的,因为我们只针对 class 文件。
在使用字节码插桩之前,我们需要获取到每个 class 文件,这时,需要使用到自定义 Transform,而自定义Transform 需要在自定义 Gradle Plugin 时进行注册,所以,我们需要先学习下如何自定义一个 Gradle Plugin。
一、字节码插桩是什么
字节码插桩是一种在程序的字节码级别进行修改的技术。它通常用于在程序运行过程中动态地修改、分析或监控代码的行为,而无需修改源代码。
1.1 字节码插桩发生的时机
apk 的打包流程如下:
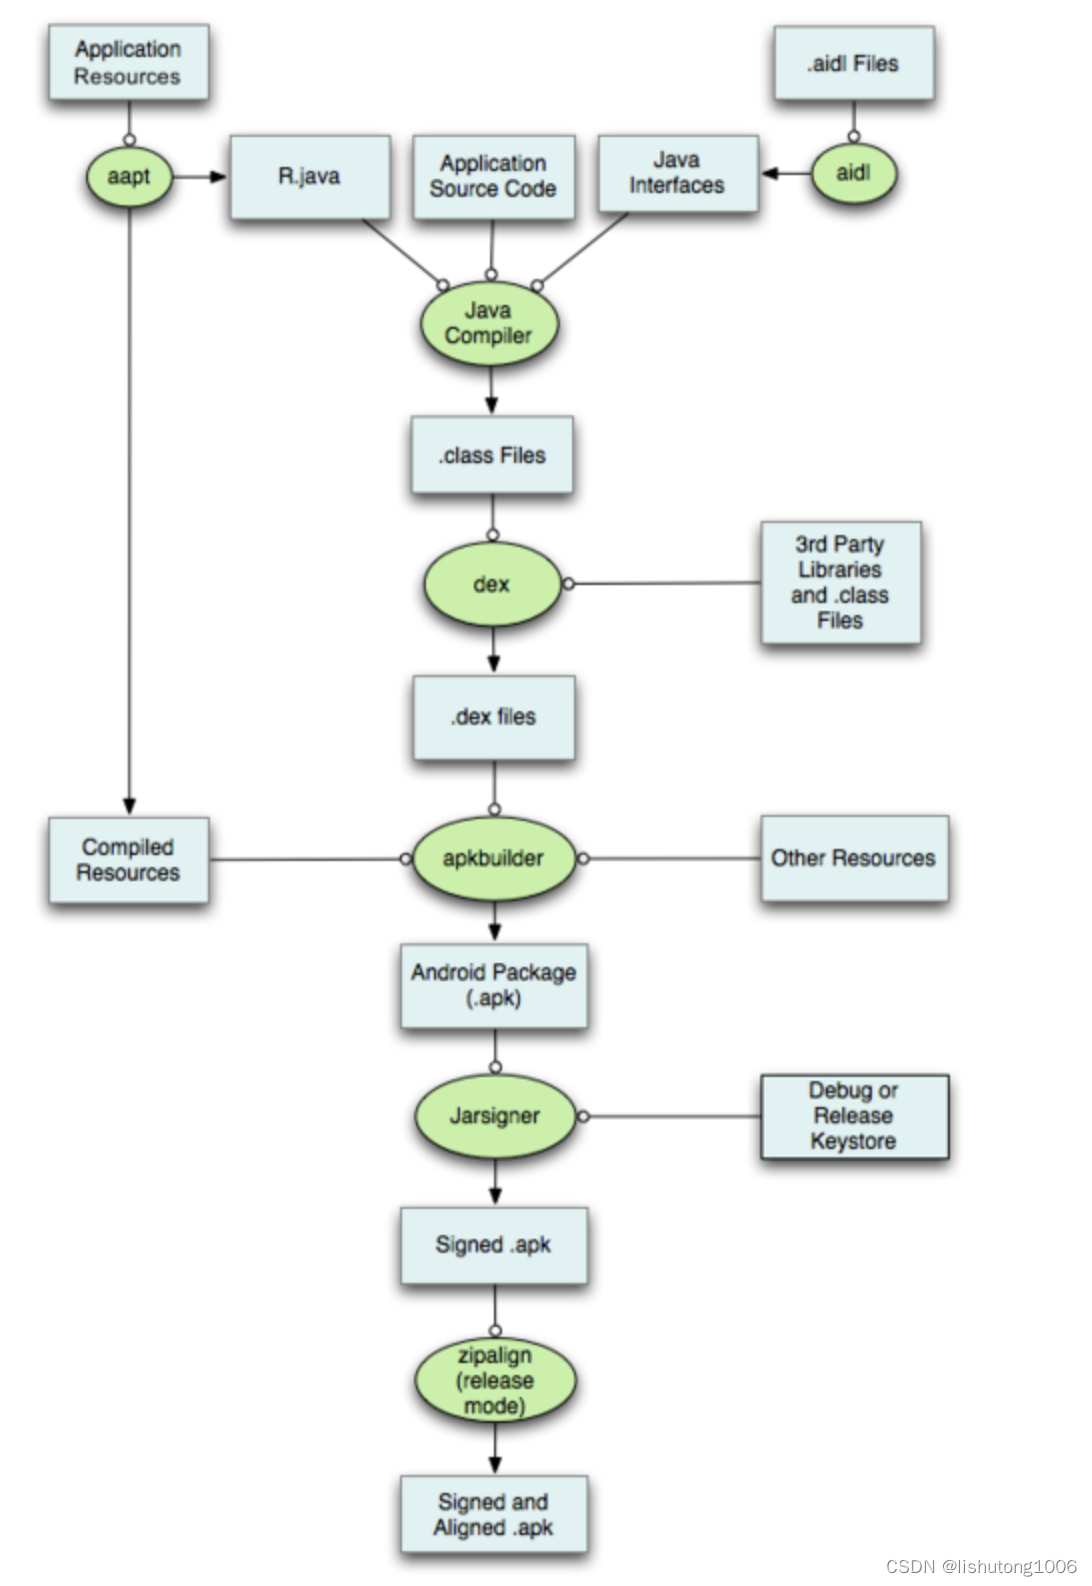
字节码插桩就发生在 .class 文件变成 .dex 文件之前。正是在这样的一个时机,字节码插桩才拥有修改全局 .class 文件的能力。
1.2 字节码插桩的应用场景
通过字节码插桩,我们可以全局替换目标方法的实现、增加目标方法的逻辑,这种处理方式更加通用彻底且具有兼容性,基于这样的能力,字节码插桩具备很大的想象空间:

二、自定义 Gradle 插件流程
2.1 创建插件 Module
Android Studio --> File --> New --> New Module --> Java or Kotlin Library --> plugin(名字自取)

2.2 配置插件 build.gradle
plugins {
    id 'java-library'
    alias(libs.plugins.jetbrainsKotlinJvm)
}

java {
    sourceCompatibility = JavaVersion.VERSION_17
    targetCompatibility = JavaVersion.VERSION_17
}

dependencies {
    // gradle
    implementation gradleApi()
    // asm
    implementation libs.asm
    implementation libs.asm.commons
    implementation libs.asm.analysis
    implementation libs.asm.util
    implementation libs.asm.tree
}
libs.version.toml配置如下
[versions]
agp = "7.4.0"
kotlin = "1.9.0"
asm = "9.7"
...

[libraries]
...
# asm相关依赖
asm = { module = "org.ow2.asm:asm", version.ref = "asm" }
asm-analysis = { module = "org.ow2.asm:asm-analysis", version.ref = "asm" }
asm-commons = { module = "org.ow2.asm:asm-commons", version.ref = "asm" }
asm-tree = { module = "org.ow2.asm:asm-tree", version.ref = "asm" }
asm-util = { module = "org.ow2.asm:asm-util", version.ref = "asm" }

[plugins]
androidApplication = { id = "com.android.application", version.ref = "agp" }
jetbrainsKotlinAndroid = { id = "org.jetbrains.kotlin.android", version.ref = "kotlin" }
jetbrainsKotlinJvm = { id = "org.jetbrains.kotlin.jvm", version.ref = "jetbrainsKotlinJvm" }
2.3 编写插件代码
package com.lx.plugin

import org.gradle.api.Plugin
import org.gradle.api.Project

class AsmPlugin : Plugin<Project> {
    override fun apply(target: Project) {
        println("asm plugin apply")
    }
}
2.4 配置插件

lx-plugin.properties 文件名称可以自取,后面会用到
2.5 发布到 maven 仓库
2.5.1 发布本地 maven 仓库
1. 在 plugin 的 build.gradle 中添加本地 maven 仓库配置

2. 双击 publish 将插件发布到本地 maven 仓库

3. 可以看到在 plugin 目录下有以下文件生成:

2.5.2 发布到远程 maven 仓库
我们将插件发布到远程 maven 仓库后,就可以提供所有人使用了。
1. Nexus 搭建远程 maven 仓库
为了演示效果,本文通过在本机搭建远程 maven 仓库。
参考链接:Nexus本地搭建(MacOS)_mac安装nexus-CSDN博客
2. 配置远程 maven 仓库地址
修改 plugin 的 build.gradle 中 maven 仓库配置

3. 双击 publish 将插件发布到本地 maven 仓库

4. 在 Sonatype Nexus Repository 中可以看到我们发布的插件了。

2.6 使用插件
1. 在 project 的 build.gradle 添加插件依赖

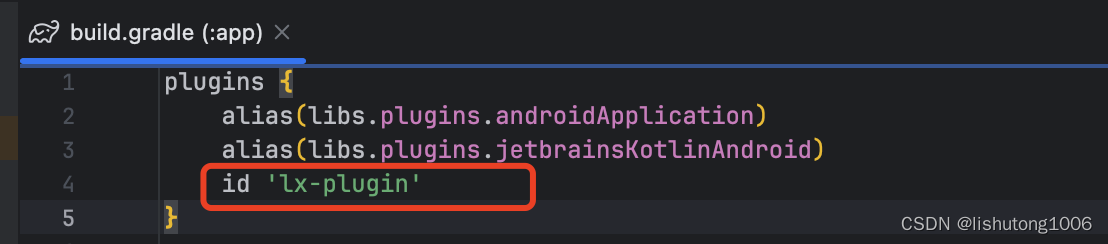
2. 在 app 的 build.gradle 中引入插件
3. 验证,直接编译该工程
在 Build Output 中可以看到正常的输出语句

三、自定义Gradle 插件实现方法耗时统计
3.1 自定义 MethodTimeAdviceAdapter
package com.lx.plugin

import org.objectweb.asm.MethodVisitor
import org.objectweb.asm.Type
import org.objectweb.asm.commons.AdviceAdapter

/**
 * Created by lixiong on 2024/4/29.
 */
class MethodTimeAdviceAdapter(
    api: Int,
    methodVisitor: MethodVisitor,
    access: Int,
    name: String?,
    descriptor: String?,
    private val className: String?
) : AdviceAdapter(api, methodVisitor, access, name, descriptor) {
    private val slotIndex = newLocal(Type.LONG_TYPE)

    /**
     * 方法开始执行
     */
    override fun onMethodEnter() {
        super.onMethodEnter()
        mv.visitMethodInsn(INVOKESTATIC, "java/lang/System", "currentTimeMillis", "()J", false)
        mv.visitVarInsn(LSTORE, slotIndex)
    }

    /**
     * 方法执行结束
     */
    override fun onMethodExit(opcode: Int) {
        mv.visitLdcInsn("MethodTime")
        mv.visitTypeInsn(NEW, "java/lang/StringBuilder")
        mv.visitInsn(DUP)
        mv.visitMethodInsn(INVOKESPECIAL, "java/lang/StringBuilder", "<init>", "()V", false)
        mv.visitLdcInsn("${className}.${name} time cost:")
        mv.visitMethodInsn(
            INVOKEVIRTUAL,
            "java/lang/StringBuilder",
            "append",
            "(Ljava/lang/String;)Ljava/lang/StringBuilder;",
            false
        )
        mv.visitMethodInsn(INVOKESTATIC, "java/lang/System", "currentTimeMillis", "()J", false)
        mv.visitVarInsn(LLOAD, slotIndex)
        mv.visitInsn(LSUB)
        mv.visitMethodInsn(
            INVOKEVIRTUAL,
            "java/lang/StringBuilder",
            "append",
            "(J)Ljava/lang/StringBuilder;",
            false
        )
        mv.visitMethodInsn(
            INVOKEVIRTUAL,
            "java/lang/StringBuilder",
            "toString",
            "()Ljava/lang/String;",
            false
        )
        mv.visitMethodInsn(
            INVOKESTATIC,
            "android/util/Log",
            "d",
            "(Ljava/lang/String;Ljava/lang/String;)I",
            false
        )
        mv.visitInsn(POP)
        super.onMethodExit(opcode)
    }
}
除了字节码部分其他的代码没什么好说的,都好理解,这部分代码也不需要自己写,可以在 Android Studio 中搜索 ASM bytecode viewer 插件。
3.1.1 使用ASM bytecode Viewer 生成相应的字节码
新建一个Demo.java 文件,编译后,在 Demo.class 右键代码区,点击 ASM Bytecode Viewer

然后选择 ASMified

记录下这里的代码,后面要用。
然后在 Demo.java 的 test 方法中编写想插入的代码,然后在通过 ASM Bytecode Viewer 查看 ASMified 代码

对比插入代码前后的 ASMified 代码的差异,就可以知道如何通过 MethodVisitor 插入字节码了。
3.2 自定义 MethodTimeClassVisitor
package com.lx.plugin

import org.objectweb.asm.ClassVisitor
import org.objectweb.asm.MethodVisitor
import org.objectweb.asm.Opcodes

/**
 * Created by lixiong on 2024/4/29.
 */
class MethodTimeClassVisitor(classVisitor: ClassVisitor) : ClassVisitor(Opcodes.ASM7, classVisitor) {
    private var className: String? = null

    override fun visit(
        version: Int,
        access: Int,
        name: String?,
        signature: String?,
        superName: String?,
        interfaces: Array<out String>?
    ) {
        super.visit(version, access, name, signature, superName, interfaces)
        className = name
    }

    override fun visitMethod(
        access: Int,
        name: String?,
        descriptor: String?,
        signature: String?,
        exceptions: Array<out String>?
    ): MethodVisitor {
        val methodVisitor = super.visitMethod(access, name, descriptor, signature, exceptions)
        return MethodTimeAdviceAdapter(api, methodVisitor, access, name, descriptor, className)
    }
}
3.3 自定义 MethodTimePlugin
package com.lx.plugin

import com.android.build.api.transform.Format
import com.android.build.api.transform.QualifiedContent
import com.android.build.api.transform.Transform
import com.android.build.api.transform.TransformInvocation
import com.android.build.gradle.internal.pipeline.TransformManager
import com.android.utils.FileUtils
import org.objectweb.asm.ClassReader
import org.objectweb.asm.ClassWriter
import java.io.FileOutputStream


/**
 * Created by lixiong on 2024/4/28.
 */
class MethodTimePlugin : Transform() {
    override fun getName(): String {
        return "MethodTimePlugin"
    }

    /**
     * 用于指明Transform的输入类型
     */
    override fun getInputTypes(): MutableSet<QualifiedContent.ContentType> {
        return TransformManager.CONTENT_CLASS
    }

    /**
     * 用于指明Transform的作用域
     */
    override fun getScopes(): MutableSet<in QualifiedContent.Scope> {
        return TransformManager.SCOPE_FULL_PROJECT
    }

    /**
     * 指明该Transform是否支持增量编译
     */
    override fun isIncremental(): Boolean {
        return true
    }

    override fun transform(transformInvocation: TransformInvocation?) {
        super.transform(transformInvocation)
        val inputs = transformInvocation?.inputs
        val outputProvider = transformInvocation?.outputProvider
        inputs?.forEach { transformInput ->
            // 遍历项目目录
            transformInput.directoryInputs.forEach { directoryInput ->
                if (directoryInput.file.isDirectory) {
                    FileUtils.getAllFiles(directoryInput.file).forEach { file ->
                        val name = file.name
                        // 过滤class文件, 排除R.class, BuildConfig.class
                        if (name.endsWith(".class") && !name.startsWith("R\$") &&
                            name != "R.class" && name != "BuildConfig.class"
                        ) {
                            // 找到需要的class文件,进行插桩
                            val path = file.absolutePath
                            val cr = ClassReader(file.readBytes())
                            val cw = ClassWriter(cr, ClassWriter.COMPUTE_MAXS)
                            val visitor = MethodTimeClassVisitor(cw)
                            cr.accept(visitor, ClassReader.EXPAND_FRAMES)

                            val bytes = cw.toByteArray()
                            var fos: FileOutputStream? = null
                            try {
                                fos = FileOutputStream(path)
                                fos.write(bytes)
                            } catch (e: Exception) {
                                e.printStackTrace()
                            } finally {
                                runCatching { fos?.close() }
                            }
                        }
                    }
                }
                val dest = outputProvider?.getContentLocation(
                    directoryInput.name,
                    directoryInput.contentTypes,
                    directoryInput.scopes,
                    Format.DIRECTORY
                )
                FileUtils.copyDirectoryToDirectory(directoryInput.file, dest)
            }

            // 遍历jar包
            transformInput.jarInputs.forEach { jarInput ->
                val dest = outputProvider?.getContentLocation(
                    jarInput.name,
                    jarInput.contentTypes,
                    jarInput.scopes,
                    Format.JAR
                )
                FileUtils.copyFile(jarInput.file, dest)
            }
        }
    }
}
3.4 注册插件

3.5 验证插件
首先需要发布插件,然后依赖插件,这一步可以看上一章的内容。
运行之后,查看 logcat 打印

完美,通过 jadx 工具查看下生成的 .class 文件是否插入成功
Demo.class

MainActivity.class

编译生成的 ActivityMainBinding.class

插入成功,至此简单的Asm字节码插桩就完成了。
3.6 对 jar 包进行插桩
1. 在 app module 的libs 中加入一个 test.jar 文件

2. 修改自定义的 MethodTimePlugin,完整代码如下:
package com.lx.plugin

import com.android.build.api.transform.Format
import com.android.build.api.transform.QualifiedContent
import com.android.build.api.transform.Transform
import com.android.build.api.transform.TransformInvocation
import com.android.build.gradle.internal.pipeline.TransformManager
import com.android.utils.FileUtils
import org.apache.commons.compress.utils.IOUtils
import org.objectweb.asm.ClassReader
import org.objectweb.asm.ClassWriter
import java.io.FileOutputStream
import java.nio.file.attribute.FileTime
import java.util.Enumeration
import java.util.jar.JarEntry
import java.util.jar.JarFile
import java.util.jar.JarOutputStream
import java.util.zip.CRC32
import java.util.zip.ZipEntry


/**
 * Created by lixiong on 2024/4/28.
 */
class MethodTimePlugin : Transform() {

    private val fileTime = FileTime.fromMillis(0)

    override fun getName(): String {
        return "MethodTimePlugin"
    }

    /**
     * 用于指明Transform的输入类型
     */
    override fun getInputTypes(): MutableSet<QualifiedContent.ContentType> {
        return TransformManager.CONTENT_CLASS
    }

    /**
     * 用于指明Transform的作用域
     */
    override fun getScopes(): MutableSet<in QualifiedContent.Scope> {
        return TransformManager.SCOPE_FULL_PROJECT
    }

    /**
     * 指明该Transform是否支持增量编译
     */
    override fun isIncremental(): Boolean {
        return true
    }

    override fun transform(transformInvocation: TransformInvocation?) {
        super.transform(transformInvocation)
        val inputs = transformInvocation?.inputs
        val outputProvider = transformInvocation?.outputProvider
        inputs?.forEach { transformInput ->
            // 遍历项目目录
            transformInput.directoryInputs.forEach { directoryInput ->
                if (directoryInput.file.isDirectory) {
                    FileUtils.getAllFiles(directoryInput.file).forEach { file ->
                        val name = file.name
                        // 过滤class文件, 排除R.class, BuildConfig.class
                        if (name.endsWith(".class") && !name.startsWith("R\$") &&
                            name != "R.class" && name != "BuildConfig.class"
                        ) {
                            // 找到需要的class文件,进行插桩
                            val path = file.absolutePath
                            val cr = ClassReader(file.readBytes())
                            val cw = ClassWriter(cr, ClassWriter.COMPUTE_MAXS)
                            val visitor = MethodTimeClassVisitor(cw)
                            cr.accept(visitor, ClassReader.EXPAND_FRAMES)

                            val bytes = cw.toByteArray()
                            var fos: FileOutputStream? = null
                            try {
                                fos = FileOutputStream(path)
                                fos.write(bytes)
                            } catch (e: Exception) {
                                e.printStackTrace()
                            } finally {
                                runCatching { fos?.close() }
                            }
                        }
                    }
                }
                val dest = outputProvider?.getContentLocation(
                    directoryInput.name,
                    directoryInput.contentTypes,
                    directoryInput.scopes,
                    Format.DIRECTORY
                )
                FileUtils.copyDirectoryToDirectory(directoryInput.file, dest)
            }

            // 遍历jar包
            transformInput.jarInputs.forEach { jarInput ->
                val dest = outputProvider?.getContentLocation(
                    jarInput.name,
                    jarInput.contentTypes,
                    jarInput.scopes,
                    Format.JAR
                )
                if (dest != null) {
                    FileUtils.mkdirs(dest.parentFile)
                    // 只对 test.jar 进行插桩
                    if (jarInput.file.name.endsWith("test.jar")) {
                        var jos: JarOutputStream? = null
                        try {
                            val jarFile = JarFile(jarInput.file)
                            jos = JarOutputStream(FileOutputStream(dest))
                            val entries: Enumeration<JarEntry> = jarFile.entries()
                            while (entries.hasMoreElements()) {
                                val entry: JarEntry = entries.nextElement()
                                val name: String = entry.name
                                val outEntry = JarEntry(name)
                                val inputStream = jarFile.getInputStream(entry)
                                // 过滤class文件, 排除R.class, BuildConfig.class
                                val newEntryContent = if (name.endsWith(".class") && !name.startsWith("R\$") &&
                                    name != "R.class" && name != "BuildConfig.class"
                                ) {
                                    // 找到需要的class文件,进行插桩
                                    val cr = ClassReader(inputStream)
                                    val cw = ClassWriter(cr, ClassWriter.COMPUTE_MAXS)
                                    val visitor = MethodTimeClassVisitor(cw)
                                    cr.accept(visitor, ClassReader.EXPAND_FRAMES)
                                    cw.toByteArray()
                                } else {
                                    IOUtils.toByteArray(inputStream)
                                }
                                // 将处理后的类文件写入 JAR 包
                                val crc32 = CRC32()
                                crc32.update(newEntryContent)
                                outEntry.crc = crc32.value
                                outEntry.method = ZipEntry.STORED
                                outEntry.size = newEntryContent.size.toLong()
                                outEntry.compressedSize = newEntryContent.size.toLong()
                                outEntry.setLastAccessTime(fileTime)
                                outEntry.setLastModifiedTime(fileTime)
                                outEntry.setCreationTime(fileTime)
                                jos.putNextEntry(outEntry)
                                jos.write(newEntryContent)
                                jos.closeEntry()
                            }
                        } catch (e: Exception) {
                            e.printStackTrace()
                        } finally {
                            runCatching {
                                jos?.flush()
                                jos?.close()
                            }
                        }
                    } else {
                        FileUtils.copyFile(jarInput.file, dest)
                    }
                }
            }
        }
    }
}
3. 通过 jadx 查看 apk 中 Test.class 文件
到此,jar 包中的方法也插桩成功。


![[InternLM训练营第二期笔记]6.Lagent & AgentLego 智能体应用搭建](https://img-blog.csdnimg.cn/direct/1c00d5d19ba54994be02a1415899c752.png)