文章目录
1. ioc(Inversion of Control) | DI(Dependency Injection)
(1) maven坐标导包
  <dependencies>
    <dependency>
      <groupId>org.springframework</groupId>
      <artifactId>spring-context</artifactId>
      <version>5.3.22</version>
    </dependency>
    <dependency>
      <groupId>junit</groupId>
      <artifactId>junit</artifactId>
      <version>4.13.2</version>
      <scope>test</scope>
    </dependency>
  </dependencies>
(2) 编写配置文件bean.xml
<?xml version="1.0" encoding="UTF-8"?>
<beans xmlns="http://www.springframework.org/schema/beans"
       xmlns:xsi="http://www.w3.org/2001/XMLSchema-instance"   xsi:schemaLocation="http://www.springframework.org/schema/beans http://www.springframework.org/schema/beans/spring-beans.xsd">

</beans>
(3) 配置bean
在bean.xml配置文件的中配置bean
<bean id="stu" class="com.xjy.pojo.student">
</bean>
获取注入的对象:
    @Test
    public void test1(){
        ConfigurableApplicationContext context = new ClassPathXmlApplicationContext("bean.xml");
        student stu = context.getBean(student.class);
        stu.setName("小明");
        stu.setAge(18);
        stu.setGender('男');
        System.out.println(stu);
    }
(4) 配置文件注入属性
 <bean id="stu" class="com.xjy.pojo.student">
        <property name="name" value="小慧慧"></property>
        <property name="age" value="18"></property>
        <property name="gender" value="女"></property>
    </bean>
获取对象:
    @Test
    public void test1(){
        ConfigurableApplicationContext context = new ClassPathXmlApplicationContext("bean.xml");
        student stu = context.getBean(student.class);
        System.out.println(stu);
    }
2. DI(dependency injection) 依赖注入(setter)其他属性
(1) 对象属性注入
    <bean id="address" class="com.xjy.pojo.Address">
        <property name="province" value="云南"></property>
        <property name="city" value="昆明"></property>
        <property name="specificPosition" value="云南大学"></property>
    </bean>

    <bean id="stu" class="com.xjy.pojo.student">
        <!--对象属性注入-->
        <property name="address" ref="address"></property
    </bean>
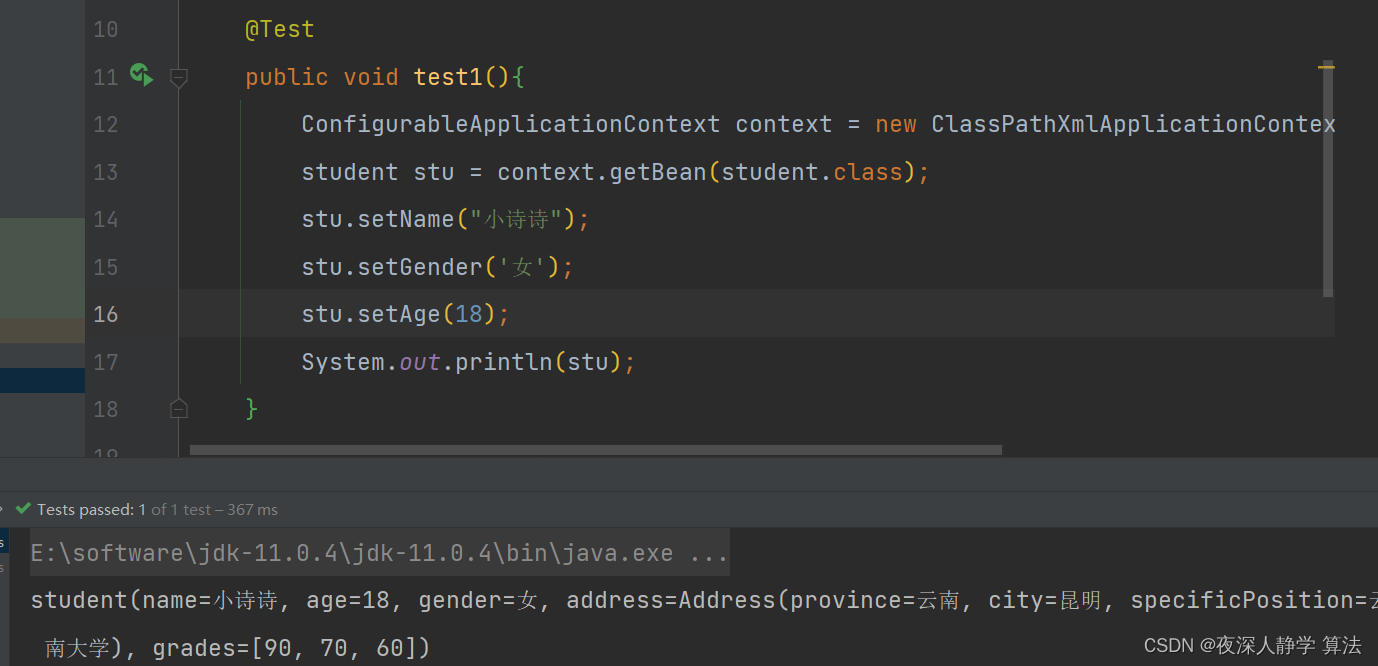
(2) 数组属性输入
    <bean id="stu" class="com.xjy.pojo.student">
        <!--对象属性注入-->
        <property name="address" ref="address"></property>
        <!--数组属性数组-->
        <property name="grades">
            <array>
                <value>90</value>
                <value>70</value>
                <value>60</value>
            </array>
        </property>
    </bean>
查看结果:
(3) 集合属性注入
        <!--list属性注入-->
        <property name="course">
            <list>
                <value>语文</value>
                <value>数学</value>
                <value>英语</value>
            </list>
        </property>
(4) map集合注入
        <!-- map集合注入-->
        <property name="girlfriend">
            <map>
                <entry key="小诗诗" value="温柔可爱灵力大方"></entry>
            </map>
        </property>
(5) 构造器注入
声明构造方法:
    public student(String name, int age, char gender) {
        this.name = name;
        this.age = age;
        this.gender = gender;
    }
声明bean(构造方法的参数需要和注入参数一一对应)
    <bean id="stu" class="com.xjy.pojo.student">
        <constructor-arg name="name" value="小诗诗"></constructor-arg>
        <constructor-arg name="age" value="18"></constructor-arg>
        <constructor-arg name="gender" value="女"></constructor-arg>
    </bean>
(6) 自动装配
    <bean id="address" class="com.xjy.pojo.Address">
        <property name="province" value="云南"></property>
        <property name="city" value="昆明"></property>
        <property name="specificPosition" value="安宁"></property>
     </bean>
     <!--这里配置了自动装配,会到ioc中找是否有对应类型的bean,常用还可按照名称装配(byname)-->
    <bean id="stu" class="com.xjy.pojo.student" autowire="byType">
        <!--对象属性注入-->
<!--        <property name="address" ref="address"></property>-->
  </bean>
3. 注解定义bean和依赖注入
(1) 开启注解扫描功能(配置文件)
<?xml version="1.0" encoding="UTF-8"?>
<beans xmlns="http://www.springframework.org/schema/beans"
       xmlns:context="http://www.springframework.org/schema/context"
       xmlns:xsi="http://www.w3.org/2001/XMLSchema-instance"
       xsi:schemaLocation="http://www.springframework.org/schema/beans
        http://www.springframework.org/schema/beans/spring-beans.xsd
        http://www.springframework.org/schema/context
        http://www.springframework.org/schema/context/spring-context.xsd">
    <!--开启注解扫描-->
    <context:component-scan base-package="com.xjy.pojo"></context:component-scan>
    <!--加载配置文件使用${}属性占位符引用配置文件属性-->
 <context:property-placeholder location="jdbc.properties"/>
</beans>
(2) 声明bean和注入属性
@Component("address")   // 声明bean
@PropertySource("jdbc.properties") // 配置文件读取
public class Address {
    @Value("云南")   // 注入属性(可以使用${}引用配置文件属性)
    private String province;
    @Value("昆明")
    private String city;
    @Value("安宁")
    private String specificPosition;
}
(3) 获取bean
    @Test
    public void testAddressBean(){
        ApplicationContext ctx = new ClassPathXmlApplicationContext("bean.xml");
        Address address = (Address) ctx.getBean("address");
        System.out.println(address);
    }
(4) 注解注入
	// 可以配合@Qualifier("名称")进行指定注入
    @Autowired
    private Address address;
查看注入是否成功:
    @Test
    public void testStudent(){
        ApplicationContext context = new ClassPathXmlApplicationContext("bean.xml");
        student bean = context.getBean(student.class);
        System.out.println(bean);
    }
(5) 配置类代替配置文件
编写配置类:
@Configuration		// 相当于配置文件
@ComponentScan("com.xjy.pojo")   //相当于包扫描
public class beanConfig {

}
通过配置文件获取:
    @Test
    public void test1(){
        ConfigurableApplicationContext context = new AnnotationConfigApplicationContext(beanConfig.class);
        Address add = context.getBean(Address.class);
        System.out.println(add);
    }
(6) 第三方bean配置
在配置文件中配置bean:
    @Bean
    public ArrayList<String> stu(){
        return new ArrayList<>();
    }
4. AOP(Aspect Oriented Programming)面向切面编程
(1) 依赖导入
    <dependency>
      <groupId>org.springframework</groupId>
      <artifactId>spring-aop</artifactId>
      <version>5.3.22</version>
    </dependency>
        <dependency>
      <groupId>org.aspectj</groupId>
      <artifactId>aspectjweaver</artifactId>
      <version>1.9.19</version>
    </dependency>
(2) 编写切面类
@Component      // 将该类声明为bean
@Aspect         // 声明该类为切面类
public class stuAspect {

    @After("execution(* com.xjy.pojo.student.*(..))")  // 后置通知,->切入点表达式表示插入方法
    public void getCurrent(JoinPoint joinPoint){
        Class<? extends JoinPoint> aClass = joinPoint.getClass();
        System.out.println(aClass+"执行结束");
    }
}
(3) 开启对aop的支持和注解扫描
@Configuration
@EnableAspectJAutoProxy     // 开启aop的支持
@ComponentScan({"com.xjy.pojo","com.xjy.aspect"})// 扫描注解包
public class beanConfig {
}
(4) 编写测试类测试
    @Test
    public void stuTest() throws InterruptedException {
        ApplicationContext context = new AnnotationConfigApplicationContext(beanConfig.class);
        student stu = context.getBean(student.class);
        stu.getSum();
    }
(5) 插入点表达式
execution(修饰符 返回值 方法全限定名(方法参数) 异常类型)

例如: (所有修饰符,所有返回值,com.examle.service中的所有类所有方法,所有参数)
execution(* com.example.service.*.*(..))
(6) 通知方法
前置通知Before
在目标方法执行前执行的通知。可以通过定义@Before注解的方法实现
后置通知(AfterReturning)
在目标方法成功执行后执行的通知。可以通过定义@AfterReturning注解的方法实现。
环绕通知(Around)
在目标方法执行前后都可以执行的通知,而且可以控制目标方法的执行。可以通过定义@Around注解的方法实现
@Component      // 将该类声明为bean
@Aspect         // 声明该类为切面类
public class stuAspect {
    @Pointcut("execution(* com.xjy.pojo.student.*(..))")
    public void cut(){}
    @Around("cut()")  // 前置通知,->切入点表达式表示插入方法
    public int getCurrent(ProceedingJoinPoint joinPoint) throws Throwable {
        long pre = System.currentTimeMillis();
        int result = (int) joinPoint.proceed();
        long end = System.currentTimeMillis();
        System.out.println(end-pre+"执行完毕");
        return result;
    }
}
测试运行:
    @Test
    public void stuTest() throws InterruptedException {
        ApplicationContext context = new AnnotationConfigApplicationContext(beanConfig.class);
        student stu = context.getBean(student.class);
        int sum = stu.getSum();
        System.out.println(sum);
    }
异常后通知(AfterThrowing)
在目标方法抛出异常时执行的通知。可以通过定义@AfterThrowing注解的方法实现
最终通知(AfterAdvice)
无论目标方法是否正常执行完成(包括正常返回或抛出异常),都会执行的通知。可以通过定义@After注解的方法实现。


![【C++报错】error C2143:语法错误:缺少“ : ”(在“<” 的前面)[ 相互引用问题 ]](https://img-blog.csdnimg.cn/direct/0a68f734002a4b7aa86deae8c208be38.png)