目录
2.txt.py 将指定文件夹中的特定类型的图片路径和对应的类别索引号写入文本文件
3.net.py 定义了一个 VGG16 分类模型,并提供了加载预训练权重、修改分类器和进行前向传播的功能
5.predict.py 加载训练好的 VGG16 模型并对给定的图像进行分类
引言
本周我阅读了一篇关于混合CNN-LSTM模型的文献,研究旨在改进LSTM模型对印度尼西亚雅加达社区对PPKM的情感分析的准确性,采用基于词-表情符号嵌入的混合CNN-LSTM模型,通过结合CNN和LSTM模型,利用词嵌入和表情符号嵌入特征来反映临时短期情感依赖关系和长期情感关系,通过评估模型的性能指标,得出CNN-LSTM混合模型在词+表情符号数据集上的表现更好,还通过实现VGG代码训练模型和图片分类
Abstract
This week, I read a literature on a hybrid CNN-LSTM model aimed at improving the accuracy of LSTM model in sentiment analysis of PPKM in the Jakarta community of Indonesia. A hybrid CNN-LSTM model based on word emoticon embedding was adopted, which combined CNN and LSTM models and utilized word embedding and emoticon embedding features to reflect temporary short-term and long-term emotional relationships. The performance indicators of the model were evaluated, It is concluded that the CNN-LSTM hybrid model performs better on the word+emoticon dataset, and the model is trained and image classification is achieved by implementing VGG code training
文献阅读
1、题目
2、引言
实施限制社区动员的政策,以降低COVID-19的每日发病率。然而,一个高精度的情绪分析模型可以确定公众对这些政策的情绪。作者的研究旨在提高LSTM模型在雅加达社区对PPKM的情感分析上的准确性,使用带有表情符号嵌入的印度尼西亚语推文。第一阶段是使用混合CNN-LSTM模型建模。它是CNN和LSTM的结合。CNN模型引用了单词嵌入和表情符号嵌入功能,这些功能反映了对临时短期情绪的依赖。与此同时,LSTM在单词和表情符号之间建立了长期的情感关系。接下来,模型评估使用准确度、损失、受试者工作曲线(ROC)、精确度和召回率曲线以及曲线下面积(AUC)值来查看所设计模型的性能。根据测试结果,我们得出结论,CNN-LSTM混合模型在单词+表情符号数据集上表现更好。ROC曲线下面积AUC为0.966,而精确-召回曲线AUC为0.957。
3、过去方案
以前的研究使用LSTM模型对推文进行负面和正面情感分类,并取得了0.917的准确性得分。另一些研究使用表情符号嵌入来提高推文情感分类的性能。然而,使用表情符号嵌入的改进方法在提高模型准确性方面仍存在研究机会。
4、创新点
首先,采用混合CNN-LSTM模型进行建模,该模型结合了CNN和LSTM,利用词嵌入和表情符号嵌入特征来反映临时短期情感依赖关系和长期情感关系。然后,通过评估模型的性能指标,如准确性、损失、ROC曲线、精确率-召回率曲线和AUC值,来观察设计模型的性能。
- 证明了词+表情符号嵌入方法的优越性;
- 解决了数据不平衡问题,采用随机过采样、ROC曲线和精确率-召回率曲线;
- 提出了一个良好的混合CNN+LSTM模型,采用softmax激活函数和SGD优化算法。
5、方法
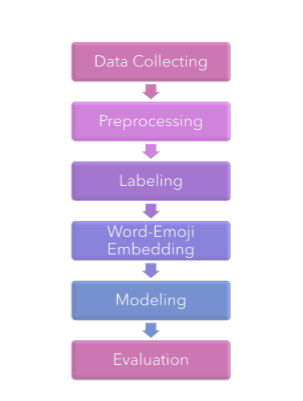
上图解释了研究流程,讨论了作者在研究中所采取的步骤,包括从数据收集,预处理,标记,单词emoji嵌入,建模和评估开始的几个步骤。
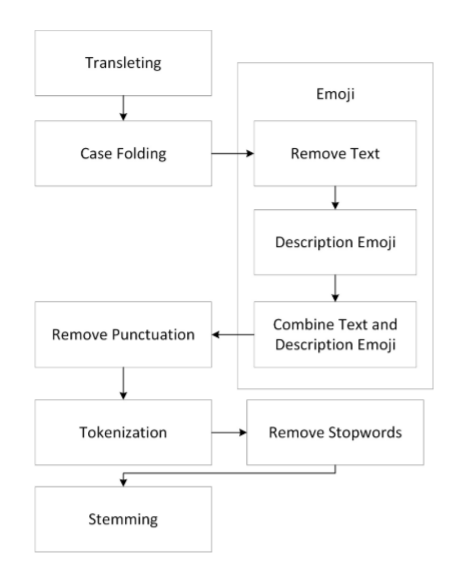
上图讨论在预处理阶段所采取的步骤,预处理是一个从媒体社交twitter收集数据集的过程,将清除不需要的元素。这样数据就干净、高质量、符合要求。预处理过程分为几个阶段,即翻译,大小写折叠,表情符号处理,去除标点符号,标记化,去除停用词和词干。
在预处理之后,下一个过程使用TextBlob库基于极性和主观性为每个推文标记积极或消极的标签。计算公式如下:

6、混合CNN-LSTM模型

CNN-LSTM 模型由一个初始卷积层组成,它将接收标题中每个标记的单词嵌入作为输入。从CNN层生成的输出将被聚合到更小的维度,然后馈送到LSTM层,LSTM层提取局部特征。经过预处理阶段后,语义相关的单词和表情符号将被转换为数字并制成嵌入层。稍后,这个嵌入层将用作LSTM的输入,情感分类方法,然后转换为向量,以找到语义相似性。
以下是所提出的CNN-LSTM 模型的公式:

对于输出层,使用softmax激活函数,softmax在其输入上执行标准的指数运算,并对每个类进行归一化,以便所有类的结果之和等于1。softmax激活的公式如下:

其中 是输入x的softmax激活函数,K是类的数量,
是输入x的标准指数函数。
使用随机梯度下降(SGD)。SGD用随机值代替了整体损失函数的梯度下降计算,计算公式如下:
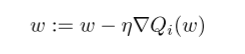
其中 w 是权重,η 是学习率,:= 是赋值运算, 是向量微分算子,
是数据项i的神经元函数。
7、实验过程
本研究使用NLTK库对数据集进行停用词去除和词干提取。预处理阶段包括翻译、大小写转换、表情符号处理、去除标点符号、分词、去除停用词和词干提取。使用TextBlob库根据极性和主观性为每个推文标记正面或负面情感,使用的数据集包括从2021年9月到11月收集的3000条推文,使用了DKI Jakarta地理编码。数据集被分为50%的训练数据和50%的测试数据,并使用随机过采样方法来解决数据集中的不平衡问题。
8、实验结果与评价
使用准确度和损失对训练过程进行评估,预测数据由真阳性(TP)和真阴性(TN)组成,损失函数公式如下:

其中p是积极情绪类,n是消极情绪类,t是实际值,f(s)是预测结果。
精确度-召回率曲线与ROC相似,但使用精确度和召回率代替TPR和FPR。两条曲线的定量性能是AUC,即每条曲线下的面积。AUC方程如下:


上图分别是单词+表情符号模型与单词模型相比训练损失基于损失曲线值和单词+emoji模型训练精度对比words模型准确度曲线值的模型拟合评估结果。

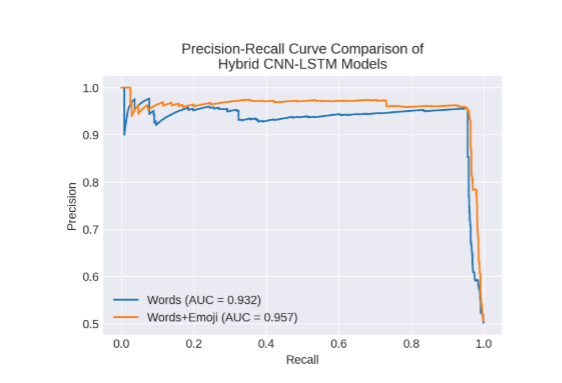
模型拟合的评估显示,具有单词+emoji数据集的 CNN-LSTM 模型结果ROC和精确度-召回率曲线高于具有单词数据集的模型。在评估拟合模型后,我们计算AUC。我们的目标是找出两个模型的AUC有多大。从这项研究中,我们发现,与单词数据集相比,具有单词+emoji数据集的CNN-LSTM模型具有上级AUC。words+emoji数据集的ROC AUC = 0.966,而words数据集的ROC AUC为0.946。同时,单词+表情符号数据集的精确度-召回率曲线AUC = 0.957,而单词数据集的精确度-召回率曲线AUC为0.932。
深度学习
通过VGG实现图片分类
1.data.py文件,用于处理数据
import cv2
import numpy as np
import torch.utils.data as data
from PIL import  Image
def preprocess_input(x):
    x/=127.5
    x-=1.
    return x
def cvtColor(image):
    if len(np.shape(image))==3 and np.shape(image)[-2]==3:
        return image
    else:
        image=image.convert('RGB')
        return image
class DataGenerator(data.Dataset):
    def __init__(self,annotation_lines,inpt_shape,random=True):
        self.annotation_lines=annotation_lines
        self.input_shape=inpt_shape
        self.random=random
    def __len__(self):
        return len(self.annotation_lines)
    def __getitem__(self, index):
        annotation_path=self.annotation_lines[index].split(';')[1].split()[0]
        image=Image.open(annotation_path)
        image=self.get_random_data(image,self.input_shape,random=self.random)
        image=np.transpose(preprocess_input(np.array(image).astype(np.float32)),[2,0,1])
        y=int(self.annotation_lines[index].split(';')[0])
        return image,y
    def rand(self,a=0,b=1):
        return np.random.rand()*(b-a)+a
    def get_random_data(self,image,inpt_shape,jitter=.3,hue=.1,sat=1.5,val=1.5,random=True):
        image=cvtColor(image)
        iw,ih=image.size
        h,w=inpt_shape
        if not random:
            scale=min(w/iw,h/ih)
            nw=int(iw*scale)
            nh=int(ih*scale)
            dx=(w-nw)//2
            dy=(h-nh)//2

            image=image.resize((nw,nh),Image.BICUBIC)
            new_image=Image.new('RGB',(w,h),(128,128,128))

            new_image.paste(image,(dx,dy))
            image_data=np.array(new_image,np.float32)
            return image_data
        new_ar=w/h*self.rand(1-jitter,1+jitter)/self.rand(1-jitter,1+jitter)
        scale=self.rand(.75,1.25)
        if new_ar<1:
            nh=int(scale*h)
            nw=int(nh*new_ar)
        else:
            nw=int(scale*w)
            nh=int(nw/new_ar)
        image=image.resize((nw,nh),Image.BICUBIC)
        #将图像多余的部分加上灰条
        dx=int(self.rand(0,w-nw))
        dy=int(self.rand(0,h-nh))
        new_image=Image.new('RGB',(w,h),(128,128,128))
        new_image.paste(image,(dx,dy))
        image=new_image
        #翻转图像
        flip=self.rand()<.5
        if flip: image=image.transpose(Image.FLIP_LEFT_RIGHT)
        rotate=self.rand()<.5
        if rotate:
            angle=np.random.randint(-15,15)
            a,b=w/2,h/2
            M=cv2.getRotationMatrix2D((a,b),angle,1)
            image=cv2.warpAffine(np.array(image),M,(w,h),borderValue=[128,128,128])
        #色域扭曲
        hue=self.rand(-hue,hue)
        sat=self.rand(1,sat) if self.rand()<.5 else 1/self.rand(1,sat)
        val=self.rand(1,val) if self.rand()<.5 else 1/self.rand(1,val)
        x=cv2.cvtColor(np.array(image,np.float32)/255,cv2.COLOR_RGB2HSV)#颜色空间转换
        x[...,1]*=sat
        x[...,2]*=val
        x[x[:,:,0]>360,0]=360
        x[:,:,1:][x[:,:,1:]>1]=1
        x[x<0]=0
        image_data=cv2.cvtColor(x,cv2.COLOR_HSV2RGB)*255
        return image_data
2.txt.py 将指定文件夹中的特定类型的图片路径和对应的类别索引号写入文本文件
import os
from os import getcwd

classes=['cat','dog','panda']
sets=['train']

if __name__=='__main__':
    wd=getcwd()
    for se in sets:
        list_file=open('cls_'+ se +'.txt','w')
        datasets_path=se
        types_name=os.listdir(datasets_path)#os.listdir() 方法用于返回指定的文件夹包含的文件或文件夹的名字的列表
        for type_name in types_name:
            if type_name not in classes:
                continue
            cls_id=classes.index(type_name)#输出0-1
            photos_path=os.path.join(datasets_path,type_name)
            photos_name=os.listdir(photos_path)
            for photo_name in photos_name:
                _,postfix=os.path.splitext(photo_name)#该函数用于分离文件名与拓展名
                if postfix not in['.jpg','.png','.jpeg']:
                    continue
                list_file.write(str(cls_id)+';'+'%s/%s'%(wd, os.path.join(photos_path,photo_name)))
                list_file.write('\n')
        list_file.close()
3.net.py 定义了一个 VGG16 分类模型,并提供了加载预训练权重、修改分类器和进行前向传播的功能
import torch
import torch.nn as nn

from torch.hub import load_state_dict_from_url


model_urls = {
    "vgg16": "C:/Users/daxin761/Desktop/vggmast-master/path/vgg16-397923af.pth",
    #"vgg16": "https://download.pytorch.org/models/vgg16-397923af.pth",
}#权重下载网址


class VGG(nn.Module):
    def __init__(self, features, num_classes = 1000, init_weights= True, dropout = 0.5):
        super(VGG,self).__init__()
        self.features = features
        self.avgpool = nn.AdaptiveAvgPool2d((7, 7))#AdaptiveAvgPool2d使处于不同大小的图片也能进行分类
        self.classifier = nn.Sequential(
            nn.Linear(512 * 7 * 7, 4096),
            nn.ReLU(True),
            nn.Dropout(p=dropout),
            nn.Linear(4096, 4096),
            nn.ReLU(True),
            nn.Dropout(p=dropout),#完成4096的全连接
            nn.Linear(4096, num_classes),#对num_classes的分类
        )
        if init_weights:
            for m in self.modules():
                if isinstance(m, nn.Conv2d):
                    nn.init.kaiming_normal_(m.weight, mode="fan_out", nonlinearity="relu")
                    if m.bias is not None:
                        nn.init.constant_(m.bias, 0)
                elif isinstance(m, nn.BatchNorm2d):
                    nn.init.constant_(m.weight, 1)
                    nn.init.constant_(m.bias, 0)
                elif isinstance(m, nn.Linear):
                    nn.init.normal_(m.weight, 0, 0.01)
                    nn.init.constant_(m.bias, 0)

    def forward(self, x):
        x = self.features(x)
        x = self.avgpool(x)
        x = torch.flatten(x, 1)#对输入层进行平铺,转化为一维数据
        x = self.classifier(x)
        return x


def make_layers(cfg, batch_norm = False):#make_layers对输入的cfg进行循环
    layers = []
    in_channels = 3
    for v in cfg:#对cfg进行输入循环,取第一个v
        if v == "M":
            layers += [nn.MaxPool2d(kernel_size=2, stride=2)]#把输入图像进行缩小
        else:
            conv2d = nn.Conv2d(in_channels, v, kernel_size=3, padding=1)#输入通道是3,输出通道64
            if batch_norm:
                layers += [conv2d, nn.BatchNorm2d(v), nn.ReLU(inplace=True)]
            else:
                layers += [conv2d, nn.ReLU(inplace=True)]
            in_channels = v
    return nn.Sequential(*layers)


cfgs = {
    "D": [64, 64, "M", 128, 128, "M", 256, 256, 256, "M", 512, 512, 512, "M", 512, 512, 512, "M"],

}

def vgg16(pretrained=False, progress=True,num_classes=3):
    model = VGG(make_layers(cfgs['D']))
    if pretrained:
        state_dict = load_state_dict_from_url(model_urls['vgg16'],model_dir='./model' ,progress=progress)#预训练模型地址
        model.load_state_dict(state_dict)
    if num_classes !=1000:
        model.classifier = nn.Sequential(
            nn.Linear(512 * 7 * 7, 4096),
            nn.ReLU(True),
            nn.Dropout(p=0.5),#随机删除一部分不合格
            nn.Linear(4096, 4096),
            nn.ReLU(True),#防止过拟合
            nn.Dropout(p=0.5),
            nn.Linear(4096, num_classes),
        )
    return model
if __name__=='__main__':
    in_data=torch.ones(1,3,224,224)
    net=vgg16(pretrained=False, progress=True,num_classes=2)
    out=net(in_data)
    print(out)
4.main.py 训练模型
import torch
import torch.nn as nn
from net import vgg16
from torch.utils.data import DataLoader#工具取黑盒子,用函数来提取数据集中的数据(小批次)
from data import *
'''数据集'''
annotation_path='cls_train.txt'#读取数据集生成的文件
with open(annotation_path,'r') as f:
    lines=f.readlines()
np.random.seed(10101)#函数用于生成指定随机数
np.random.shuffle(lines)#数据打乱
np.random.seed(None)
num_val=int(len(lines)*0.2)#十分之一数据用来测试
num_train=len(lines)-num_val
#输入图像大小
input_shape=[224,224]   #导入图像大小
train_data=DataGenerator(lines[:num_train],input_shape,True)
val_data=DataGenerator(lines[num_train:],input_shape,False)
val_len=len(val_data)
print(val_len)#返回测试集长度
# 取黑盒子工具
"""加载数据"""
gen_train=DataLoader(train_data,batch_size=4)#训练集batch_size读取小样本,规定每次取多少样本
gen_test=DataLoader(val_data,batch_size=4)#测试集读取小样本
'''构建网络'''
device=torch.device('cuda'if torch.cuda.is_available() else "cpu")#电脑主机的选择
net=vgg16(True, progress=True,num_classes=3)#定于分类的类别
net.to(device)
'''选择优化器和学习率的调整方法'''
lr=0.0001#定义学习率
optim=torch.optim.Adam(net.parameters(),lr=lr)#导入网络和学习率
sculer=torch.optim.lr_scheduler.StepLR(optim,step_size=1)#步长为1的读取
'''训练'''
epochs=1#读取数据次数,每次读取顺序方式不同
for epoch in range(epochs):
    total_train=0 #定义总损失
    for data in gen_train:
        img,label=data
        with torch.no_grad():
            img =img.to(device)
            label=label.to(device)
        optim.zero_grad()
        output=net(img)
        train_loss=nn.CrossEntropyLoss()(output,label).to(device)
        train_loss.backward()#反向传播
        optim.step()#优化器更新
        total_train+=train_loss #损失相加
    sculer.step()
    total_test=0#总损失
    total_accuracy=0#总精度
    for data in gen_test:
        img,label =data #图片转数据
        with torch.no_grad():
            img=img.to(device)
            label=label.to(device)
            optim.zero_grad()#梯度清零
            out=net(img)#投入网络
            test_loss=nn.CrossEntropyLoss()(out,label).to(device)
            total_test+=test_loss#测试损失,无反向传播
            accuracy=((out.argmax(1)==label).sum()).clone().detach().cpu().numpy()#正确预测的总和比测试集的长度,即预测正确的精度
            total_accuracy+=accuracy
    print("训练集上的损失:{}".format(total_train))
    print("测试集上的损失:{}".format(total_test))
    print("测试集上的精度:{:.1%}".format(total_accuracy/val_len))#百分数精度,正确预测的总和比测试集的长度
    torch.save(net.state_dict(),"DogandCat{}.pth".format(epoch+1))
    print("模型已保存")
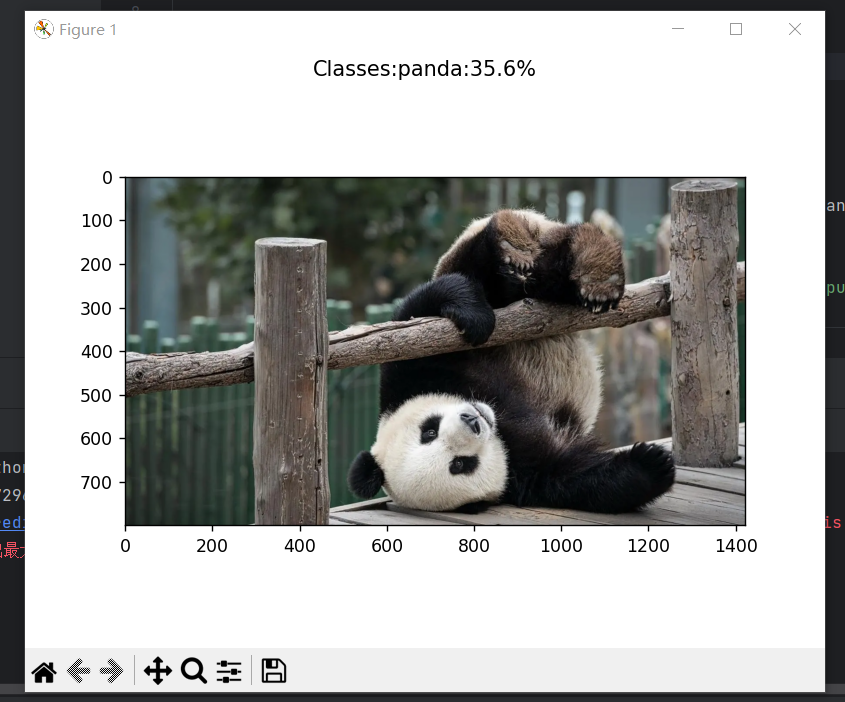
5.predict.py 加载训练好的 VGG16 模型并对给定的图像进行分类
from torchvision import transforms
from PIL import Image
import matplotlib.pyplot as plt
import torch
import torch.nn.functional as F
from net import vgg16
import os
os.environ['KMP_DUPLICATE_LIB_OK'] = 'True'
test_pth = r'D:/test/image/2.jpg' # 设置可以检测的图像
test = Image.open(test_pth)
'''处理图片'''
transform = transforms.Compose([transforms.Resize((224, 224)), transforms.ToTensor()])
image = transform(test)
'''加载网络'''
device = torch.device("cuda" if torch.cuda.is_available() else "cpu") # CPU与GPU的选择
net = vgg16() # 输入网络
model = torch.load(r"./DogandCat1.pth", map_location=device) # 已训练完成的结果权重输入
net.load_state_dict(model) # 模型导入
net.eval() # 设置为推测模式
image = torch.reshape(image, (1, 3, 224, 224)) # 四维图形,RGB三个通
with torch.no_grad():
out = net(image)
out = F.softmax(out, dim=1) # softmax 函数确定范围
out = out.data.cpu().numpy()
print(out)
a = int(out.argmax(1)) # 输出最大值位置
plt.figure()
list = ['Cat', 'Dog', 'panda']
plt.suptitle("Classes:{}:{:.1%}".format(list[a], out[0, a])) # 输出最大概率的道路类型
plt.imshow(test)
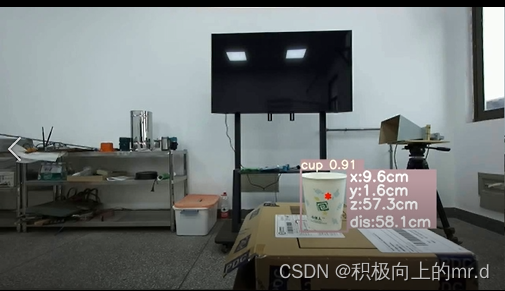
plt.show()6、展示效果
总结
本周阅读混合CNN-LSTM模型的相关文献,深入理解了CNN和LSTM其中应用的层面,并且通过代码复现VGG模型结构,并且对实现了图片分类,对其中的原理有了更深入的理解。