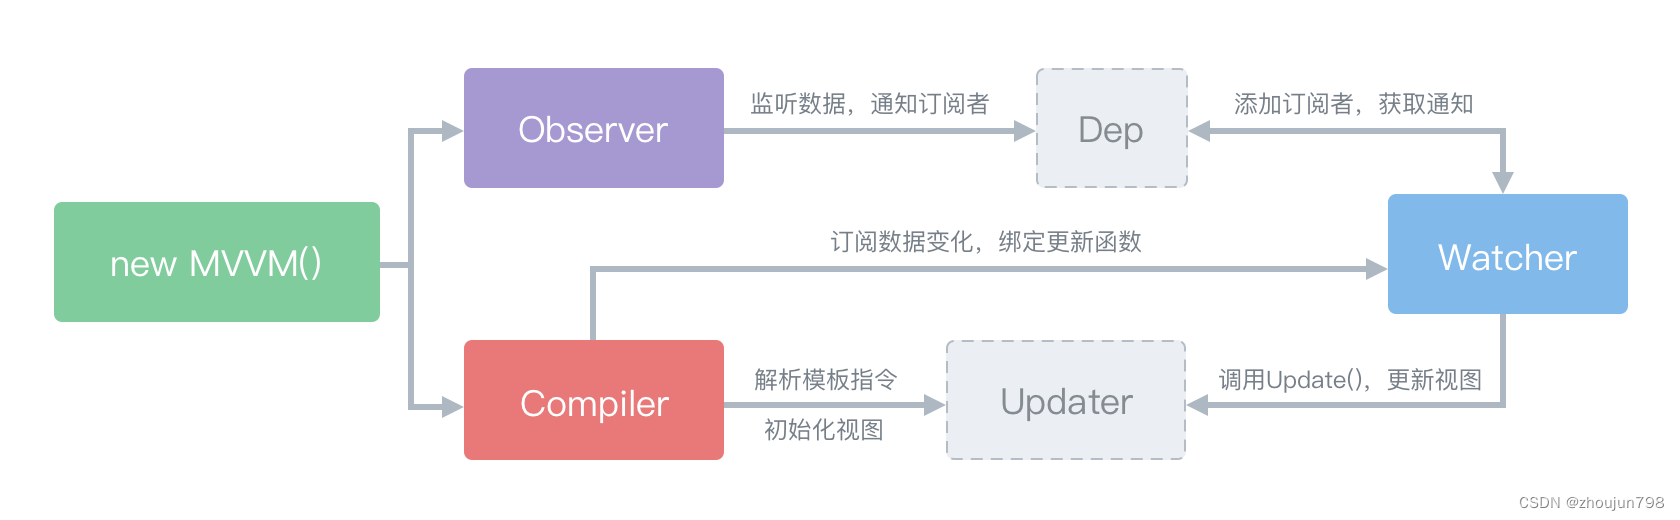
应用通过状态去渲染更新UI是程序设计中相对复杂,但又十分重要的,往往决定了应用程序的性能。程序的状态数据通常包含了数组、对象,或者是嵌套对象组合而成。在这些情况下,ArkUI采取MVVM = Model + View + ViewModel模式,其中状态管理模块起到的就是ViewModel的作用,将数据与视图绑定在一起,更新数据的时候直接更新视图。
Model层:存储数据和相关逻辑的模型。它表示组件或其他相关业务逻辑之间传输的数据。Model是对原始数据的进一步处理。
View层:在ArkUI中通常是@Components修饰组件渲染的UI。
ViewModel层:在ArkUI中,ViewModel是存储在自定义组件的状态变量、LocalStorage和AppStorage中的数据。
- 自定义组件通过执行其build()方法或者@Builder装饰的方法来渲染UI,即ViewModel可以渲染View。
- View可以通过相应event handler来改变ViewModel,即事件驱动ViewModel的改变,另外ViewModel提供了@Watch回调方法用于监听状态数据的改变。
- 在ViewModel被改变时,需要同步回Model层,这样才能保证ViewModel和Model的一致性,即应用自身数据的一致性。
- ViewModel结构设计应始终为了适配自定义组件的构建和更新,这也是将Model和ViewModel分开的原因。
目前很多关于UI构造和更新的问题,都是由于ViewModel的设计并没有很好的支持自定义组件的渲染,或者试图去让自定义组件强行适配Model层,而中间没有用ViewModel来进行分离。例如,一个应用程序直接将SQL数据库中的数据读入内存,这种数据模型不能很好的直接适配自定义组件的渲染,所以在应用程序开发中需要适配ViewModel层。

根据上面涉及SQL数据库的示例,应用程序应设计为:
Model:针对数据库高效操作的数据模型。
ViewModel:针对ArkUI状态管理功能进行高效的UI更新的视图模型。
部署 converters/adapters: converters/adapters作用于Model和ViewModel的相互转换。
- converters/adapters可以转换最初从数据库读取的Model,来创建并初始化ViewModel。
- 在应用的使用场景中,UI会通过event handler改变ViewModel,此时converters/adapters需要将ViewModel的更新数据同步回Model。
虽然与强制将UI拟合到SQL数据库模式(MV模式)相比,MVVM的设计比较复杂,但应用程序开发人员可以通过ViewModel层的隔离,来简化UI的设计和实现,以此来收获更好的UI性能。
ViewModel的数据源
ViewModel通常包含多个顶层数据源。@State和@Provide装饰的变量以及LocalStorage和AppStorage都是顶层数据源,其余装饰器都是与数据源做同步的数据。装饰器的选择取决于状态需要在自定义组件之间的共享范围。共享范围从小到大的排序是:
@State:组件级别的共享,通过命名参数机制传递,例如:CompA: ({ aProp: this.aProp }),表示传递层级(共享范围)是父子之间的传递。
@Provide:组件级别的共享,可以通过key和@Consume绑定,因此不用参数传递,实现多层级的数据共享,共享范围大于@State。
LocalStorage:页面级别的共享,可以通过@Entry在当前组件树上共享LocalStorage实例。
AppStorage:应用全局的UI状态存储,和应用进程绑定,在整个应用内的状态数据的共享。
@State装饰的变量与一个或多个子组件共享状态数据
@State可以初始化多种状态变量,@Prop、@Link和@ObjectLink可以和其建立单向或双向同步。
使用Parent根节点中@State装饰的testNum作为ViewModel数据项。将testNum传递给其子组件LinkChild和Sibling。
// xxx.ets
@Entry
@Component
struct Parent {
  @State @Watch("testNumChange1") testNum: number = 1;

  testNumChange1(propName: string): void {
    console.log(`Parent: testNumChange value ${this.testNum}`)
  }

  build() {
    Column() {
      LinkChild({ testNum: $testNum })
      Sibling({ testNum: $testNum })
    }
  }
}
LinkChild和Sibling中用@Link和父组件的数据源建立双向同步。其中LinkChild中创建了LinkLinkChild和PropLinkChild。
@Component
struct Sibling {
  @Link @Watch("testNumChange") testNum: number;

  testNumChange(propName: string): void {
    console.log(`Sibling: testNumChange value ${this.testNum}`);
  }

  build() {
    Text(`Sibling: ${this.testNum}`)
  }
}

@Component
struct LinkChild {
  @Link @Watch("testNumChange") testNum: number;

  testNumChange(propName: string): void {
    console.log(`LinkChild: testNumChange value ${this.testNum}`);
  }

  build() {
    Column() {
      Button('incr testNum')
        .onClick(() => {
          console.log(`LinkChild: before value change value ${this.testNum}`);
          this.testNum = this.testNum + 1
          console.log(`LinkChild: after value change value ${this.testNum}`);
        })
      Text(`LinkChild: ${this.testNum}`)
      LinkLinkChild({ testNumGrand: $testNum })
      PropLinkChild({ testNumGrand: this.testNum })
    }
    .height(200).width(200)
  }
}
LinkLinkChild和PropLinkChild声明如下,PropLinkChild中的@Prop和其父组件建立单向同步关系。
@Component
struct LinkLinkChild {
  @Link @Watch("testNumChange") testNumGrand: number;

  testNumChange(propName: string): void {
    console.log(`LinkLinkChild: testNumGrand value ${this.testNumGrand}`);
  }

  build() {
    Text(`LinkLinkChild: ${this.testNumGrand}`)
  }
}


@Component
struct PropLinkChild {
  @Prop @Watch("testNumChange") testNumGrand: number = 0;

  testNumChange(propName: string): void {
    console.log(`PropLinkChild: testNumGrand value ${this.testNumGrand}`);
  }

  build() {
    Text(`PropLinkChild: ${this.testNumGrand}`)
      .height(70)
      .backgroundColor(Color.Red)
      .onClick(() => {
        this.testNumGrand += 1;
      })
  }
}

当LinkChild中的@Link testNum更改时。
更改首先同步到其父组件Parent,然后更改从Parent同步到Sibling。
LinkChild中的@Link testNum更改也同步给子组件LinkLinkChild和PropLinkChild。
@State装饰器与@Provide、LocalStorage、AppStorage的区别:
- @State如果想要将更改传递给孙子节点,需要先将更改传递给子组件,再从子节点传递给孙子节点。
- 共享只能通过构造函数的参数传递,即命名参数机制CompA: ({ aProp: this.aProp })。
完整的代码示例如下:
@Component
struct LinkLinkChild {
  @Link @Watch("testNumChange") testNumGrand: number;

  testNumChange(propName: string): void {
    console.log(`LinkLinkChild: testNumGrand value ${this.testNumGrand}`);
  }

  build() {
    Text(`LinkLinkChild: ${this.testNumGrand}`)
  }
}


@Component
struct PropLinkChild {
  @Prop @Watch("testNumChange") testNumGrand: number = 0;

  testNumChange(propName: string): void {
    console.log(`PropLinkChild: testNumGrand value ${this.testNumGrand}`);
  }

  build() {
    Text(`PropLinkChild: ${this.testNumGrand}`)
      .height(70)
      .backgroundColor(Color.Red)
      .onClick(() => {
        this.testNumGrand += 1;
      })
  }
}


@Component
struct Sibling {
  @Link @Watch("testNumChange") testNum: number;

  testNumChange(propName: string): void {
    console.log(`Sibling: testNumChange value ${this.testNum}`);
  }

  build() {
    Text(`Sibling: ${this.testNum}`)
  }
}

@Component
struct LinkChild {
  @Link @Watch("testNumChange") testNum: number;

  testNumChange(propName: string): void {
    console.log(`LinkChild: testNumChange value ${this.testNum}`);
  }

  build() {
    Column() {
      Button('incr testNum')
        .onClick(() => {
          console.log(`LinkChild: before value change value ${this.testNum}`);
          this.testNum = this.testNum + 1
          console.log(`LinkChild: after value change value ${this.testNum}`);
        })
      Text(`LinkChild: ${this.testNum}`)
      LinkLinkChild({ testNumGrand: $testNum })
      PropLinkChild({ testNumGrand: this.testNum })
    }
    .height(200).width(200)
  }
}


@Entry
@Component
struct Parent {
  @State @Watch("testNumChange1") testNum: number = 1;

  testNumChange1(propName: string): void {
    console.log(`Parent: testNumChange value ${this.testNum}`)
  }

  build() {
    Column() {
      LinkChild({ testNum: $testNum })
      Sibling({ testNum: $testNum })
    }
  }
}
@Provide装饰的变量与任何后代组件共享状态数据
@Provide装饰的变量可以与任何后代组件共享状态数据,其后代组件使用@Consume创建双向同步,详情见@Provide和@Consume。
因此,@Provide-@Consume模式比使用@State-@Link-@Link从父组件将更改传递到孙子组件更方便。@Provide-@Consume适合在单个页面UI组件树中共享状态数据。
使用@Provide-@Consume模式时,@Consume和其祖先组件中的@Provide通过绑定相同的key连接,而不是在组件的构造函数中通过参数来进行传递。
以下示例通过@Provide-@Consume模式,将更改从父组件传递到孙子组件。
@Component
struct LinkLinkChild {
  @Consume @Watch("testNumChange") testNum: number;

  testNumChange(propName: string): void {
    console.log(`LinkLinkChild: testNum value ${this.testNum}`);
  }

  build() {
    Text(`LinkLinkChild: ${this.testNum}`)
  }
}

@Component
struct PropLinkChild {
  @Prop @Watch("testNumChange") testNumGrand: number = 0;

  testNumChange(propName: string): void {
    console.log(`PropLinkChild: testNumGrand value ${this.testNumGrand}`);
  }

  build() {
    Text(`PropLinkChild: ${this.testNumGrand}`)
      .height(70)
      .backgroundColor(Color.Red)
      .onClick(() => {
        this.testNumGrand += 1;
      })
  }
}

@Component
struct Sibling {
  @Consume @Watch("testNumChange") testNum: number;

  testNumChange(propName: string): void {
    console.log(`Sibling: testNumChange value ${this.testNum}`);
  }

  build() {
    Text(`Sibling: ${this.testNum}`)
  }
}

@Component
struct LinkChild {
  @Consume @Watch("testNumChange") testNum: number;

  testNumChange(propName: string): void {
    console.log(`LinkChild: testNumChange value ${this.testNum}`);
  }

  build() {
    Column() {
      Button('incr testNum')
        .onClick(() => {
          console.log(`LinkChild: before value change value ${this.testNum}`);
          this.testNum = this.testNum + 1
          console.log(`LinkChild: after value change value ${this.testNum}`);
        })
      Text(`LinkChild: ${this.testNum}`)
      LinkLinkChild({ /* empty */ })
      PropLinkChild({ testNumGrand: this.testNum })
    }
    .height(200).width(200)
  }
}

@Entry
@Component
struct Parent {
  @Provide @Watch("testNumChange1") testNum: number = 1;

  testNumChange1(propName: string): void {
    console.log(`Parent: testNumChange value ${this.testNum}`)
  }

  build() {
    Column() {
      LinkChild({ /* empty */ })
      Sibling({ /* empty */ })
    }
  }
}
给LocalStorage实例中对应的属性建立双向或单向同步
通过@LocalStorageLink和@LocalStorageProp,给LocalStorage实例中的属性建立双向或单向同步。可以将LocalStorage实例视为@State变量的Map。
LocalStorage对象可以在ArkUI应用程序的几个页面上共享。因此,使用@LocalStorageLink、@LocalStorageProp和LocalStorage可以在应用程序的多个页面上共享状态。
以下示例中:
创建一个LocalStorage实例,并通过@Entry(storage)将其注入根节点。
在Parent组件中初始化@LocalStorageLink(“testNum”)变量时,将在LocalStorage实例中创建testNum属性,并设置指定的初始值为1,即@LocalStorageLink(“testNum”) testNum: number = 1。
在其子组件中,都使用@LocalStorageLink或@LocalStorageProp绑定同一个属性名key来传递数据。
LocalStorage可以被认为是@State变量的Map,属性名作为Map中的key。
@LocalStorageLink和LocalStorage中对应的属性的同步行为,和@State和@Link一致,都为双向数据同步。
以下为组件的状态更新图:

@Component
struct LinkLinkChild {
  @LocalStorageLink("testNum") @Watch("testNumChange") testNum: number = 1;

  testNumChange(propName: string): void {
    console.log(`LinkLinkChild: testNum value ${this.testNum}`);
  }

  build() {
    Text(`LinkLinkChild: ${this.testNum}`)
  }
}

@Component
struct PropLinkChild {
  @LocalStorageProp("testNum") @Watch("testNumChange") testNumGrand: number = 1;

  testNumChange(propName: string): void {
    console.log(`PropLinkChild: testNumGrand value ${this.testNumGrand}`);
  }

  build() {
    Text(`PropLinkChild: ${this.testNumGrand}`)
      .height(70)
      .backgroundColor(Color.Red)
      .onClick(() => {
        this.testNumGrand += 1;
      })
  }
}

@Component
struct Sibling {
  @LocalStorageLink("testNum") @Watch("testNumChange") testNum: number = 1;

  testNumChange(propName: string): void {
    console.log(`Sibling: testNumChange value ${this.testNum}`);
  }

  build() {
    Text(`Sibling: ${this.testNum}`)
  }
}

@Component
struct LinkChild {
  @LocalStorageLink("testNum") @Watch("testNumChange") testNum: number = 1;

  testNumChange(propName: string): void {
    console.log(`LinkChild: testNumChange value ${this.testNum}`);
  }

  build() {
    Column() {
      Button('incr testNum')
        .onClick(() => {
          console.log(`LinkChild: before value change value ${this.testNum}`);
          this.testNum = this.testNum + 1
          console.log(`LinkChild: after value change value ${this.testNum}`);
        })
      Text(`LinkChild: ${this.testNum}`)
      LinkLinkChild({ /* empty */ })
      PropLinkChild({ /* empty */ })
    }
    .height(200).width(200)
  }
}

// create LocalStorage object to hold the data
const storage = new LocalStorage();
@Entry(storage)
@Component
struct Parent {
  @LocalStorageLink("testNum") @Watch("testNumChange1") testNum: number = 1;

  testNumChange1(propName: string): void {
    console.log(`Parent: testNumChange value ${this.testNum}`)
  }

  build() {
    Column() {
      LinkChild({ /* empty */ })
      Sibling({ /* empty */ })
    }
  }
}
给AppStorage中对应的属性建立双向或单向同步
AppStorage是LocalStorage的单例对象,ArkUI在应用程序启动时创建该对象,在页面中使用@StorageLink和@StorageProp为多个页面之间共享数据,具体使用方法和LocalStorage类似。
也可以使用PersistentStorage将AppStorage中的特定属性持久化到本地磁盘的文件中,再次启动的时候@StorageLink和@StorageProp会恢复上次应用退出的数据。
示例如下:
@Component
struct LinkLinkChild {
  @StorageLink("testNum") @Watch("testNumChange") testNum: number = 1;

  testNumChange(propName: string): void {
    console.log(`LinkLinkChild: testNum value ${this.testNum}`);
  }

  build() {
    Text(`LinkLinkChild: ${this.testNum}`)
  }
}

@Component
struct PropLinkChild {
  @StorageProp("testNum") @Watch("testNumChange") testNumGrand: number = 1;

  testNumChange(propName: string): void {
    console.log(`PropLinkChild: testNumGrand value ${this.testNumGrand}`);
  }

  build() {
    Text(`PropLinkChild: ${this.testNumGrand}`)
      .height(70)
      .backgroundColor(Color.Red)
      .onClick(() => {
        this.testNumGrand += 1;
      })
  }
}

@Component
struct Sibling {
  @StorageLink("testNum") @Watch("testNumChange") testNum: number = 1;

  testNumChange(propName: string): void {
    console.log(`Sibling: testNumChange value ${this.testNum}`);
  }

  build() {
    Text(`Sibling: ${this.testNum}`)
  }
}

@Component
struct LinkChild {
  @StorageLink("testNum") @Watch("testNumChange") testNum: number = 1;

  testNumChange(propName: string): void {
    console.log(`LinkChild: testNumChange value ${this.testNum}`);
  }

  build() {
    Column() {
      Button('incr testNum')
        .onClick(() => {
          console.log(`LinkChild: before value change value ${this.testNum}`);
          this.testNum = this.testNum + 1
          console.log(`LinkChild: after value change value ${this.testNum}`);
        })
      Text(`LinkChild: ${this.testNum}`)
      LinkLinkChild({ /* empty */
      })
      PropLinkChild({ /* empty */
      })
    }
    .height(200).width(200)
  }
}


@Entry
@Component
struct Parent {
  @StorageLink("testNum") @Watch("testNumChange1") testNum: number = 1;

  testNumChange1(propName: string): void {
    console.log(`Parent: testNumChange value ${this.testNum}`)
  }

  build() {
    Column() {
      LinkChild({ /* empty */
      })
      Sibling({ /* empty */
      })
    }
  }
}
ViewModel的嵌套场景
大多数情况下,ViewModel数据项都是复杂类型的,例如,对象数组、嵌套对象或者这些类型的组合。对于嵌套场景,可以使用@Observed搭配@Prop或者@ObjectLink来观察变化。
@Prop和@ObjectLink嵌套数据结构
推荐设计单独的@Component来渲染每一个数组或对象。此时,对象数组或嵌套对象(属性是对象的对象称为嵌套对象)需要两个@Component,一个@Component呈现外部数组/对象,另一个@Component呈现嵌套在数组/对象内的类对象。 @Prop、@Link、@ObjectLink修饰的变量只能观察到第一层的变化。
对于类:
- 可以观察到赋值的变化:this.obj=new ClassObj(…)
- 可以观察到对象属性的更改:this.obj.a=new ClassA(…)
- 不能观察更深层级的属性更改:this.obj.a.b = 47
对于数组:
- 可以观察到数组的整体赋值:this.arr=[…]
- 可以观察到数据项的删除、插入和替换:this.arr[1] = new ClassA()、this.arr.pop()、 this.arr.push(new ClassA(…))、this.arr.sort(…)
- 不能观察更深层级的数组变化:this.arr[1].b = 47
如果要观察嵌套类的内部对象的变化,可以使用@ObjectLink或@Prop。优先考虑@ObjectLink,其通过嵌套对象内部属性的引用初始化自身。@Prop会对嵌套在内部的对象的深度拷贝来进行初始化,以实现单向同步。在性能上@Prop的深度拷贝比@ObjectLink的引用拷贝慢很多。
@ObjectLink或@Prop可以用来存储嵌套内部的类对象,该类必须用@Observed类装饰器装饰,否则类的属性改变并不会触发更新,UI并不会刷新。@Observed为其装饰的类实现自定义构造函数,此构造函数创建了一个类的实例,并使用ES6代理包装(由ArkUI框架实现),拦截修饰class属性的所有“get”和“set”。“set”观察属性值,当发生赋值操作时,通知ArkUI框架更新。“get”收集哪些UI组件依赖该状态变量,实现最小化UI更新。
如果嵌套场景中,嵌套数据内部是数组或者class时,需根据以下场景使用@Observed类装饰器。
如果嵌套数据内部是class,直接被@Observed装饰。
如果嵌套数据内部是数组,可以通过以下方式来观察数组变化。
@Observed class ObservedArray<T> extends Array<T> {
    constructor(args: T[]) {
        if (args instanceof Array) {
          super(...args);
        } else {
          super(args)
        }
    }
    /* otherwise empty */
}
ViewModel为外层class。
class Outer {
  innerArrayProp : ObservedArray<string> = [];
  ...
}
嵌套数据结构中@Prop和@ObjectLink之的区别
以下示例中:
父组件ViewB渲染@State arrA:Array<ClassA>。@State可以观察新数组的分配、数组项插入、删除和替换。
子组件ViewA渲染每一个ClassA的对象。
类装饰器@Observed ClassA与@ObjectLink a: ClassA。
可以观察嵌套在Array内的ClassA对象的变化。
不使用@Observed时:
ViewB中的this.arrA[Math.floor(this.arrA.length/2)].c=10将不会被观察到,相应的ViewA组件也不会更新。对于数组中的第一个和第二个数组项,每个数组项都初始化了两个ViewA的对象,渲染了同一个ViewA实例。在一个ViewA中的属性赋值this.a.c += 1;时不会引发另外一个使用同一个ClassA初始化的ViewA的渲染更新。

let NextID: number = 1;

// 类装饰器@Observed装饰ClassA
@Observed
class ClassA {
  public id: number;
  public c: number;

  constructor(c: number) {
    this.id = NextID++;
    this.c = c;
  }
}

@Component
struct ViewA {
  @ObjectLink a: ClassA;
  label: string = "ViewA1";

  build() {
    Row() {
      Button(`ViewA [${this.label}] this.a.c= ${this.a.c} +1`)
        .onClick(() => {
          // 改变对象属性
          this.a.c += 1;
        })
    }
  }
}

@Entry
@Component
struct ViewB {
  @State arrA: ClassA[] = [new ClassA(0), new ClassA(0)];

  build() {
    Column() {
      ForEach(this.arrA,
        (item: ClassA) => {
          ViewA({ label: `#${item.id}`, a: item })
        },
        (item: ClassA): string => { return item.id.toString(); }
      )

      Divider().height(10)

      if (this.arrA.length) {
        ViewA({ label: `ViewA this.arrA[first]`, a: this.arrA[0] })
        ViewA({ label: `ViewA this.arrA[last]`, a: this.arrA[this.arrA.length-1] })
      }

      Divider().height(10)

      Button(`ViewB: reset array`)
        .onClick(() => {
          // 替换整个数组,会被@State this.arrA观察到
          this.arrA = [new ClassA(0), new ClassA(0)];
        })
      Button(`array push`)
        .onClick(() => {
          // 数组中插入数据,会被@State this.arrA观察到
          this.arrA.push(new ClassA(0))
        })
      Button(`array shift`)
        .onClick(() => {
          // 数组中移除数据,会被@State this.arrA观察到
          this.arrA.shift()
        })
      Button(`ViewB: chg item property in middle`)
        .onClick(() => {
          // 替换数组中的某个元素,会被@State this.arrA观察到
          this.arrA[Math.floor(this.arrA.length / 2)] = new ClassA(11);
        })
      Button(`ViewB: chg item property in middle`)
        .onClick(() => {
          // 改变数组中某个元素的属性c,会被ViewA中的@ObjectLink观察到
          this.arrA[Math.floor(this.arrA.length / 2)].c = 10;
        })
    }
  }
}
在ViewA中,将@ObjectLink替换为@Prop。
@Component
struct ViewA {

  @Prop a: ClassA = new ClassA(0);
  label : string = "ViewA1";

  build() {
     Row() {
        Button(`ViewA [${this.label}] this.a.c= ${this.a.c} +1`)
        .onClick(() => {
            // change object property
            this.a.c += 1;
        })
     }
  }
}
与用@Prop修饰不同,用@ObjectLink修饰时,点击数组的第一个或第二个元素,后面两个ViewA会发生同步的变化。
@Prop是单向数据同步,ViewA内的Button只会触发Button自身的刷新,不会传播到其他的ViewA实例中。在ViewA中的ClassA只是一个副本,并不是其父组件中@State arrA : Array<ClassA>中的对象,也不是其他ViewA的ClassA,这使得数组的元素和ViewA中的元素表面是传入的同一个对象,实际上在UI上渲染使用的是两个互不相干的对象。
需要注意@Prop和@ObjectLink还有一个区别:@ObjectLink装饰的变量是仅可读的,不能被赋值;@Prop装饰的变量可以被赋值。
@ObjectLink实现双向同步,因为它是通过数据源的引用初始化的。
@Prop是单向同步,需要深拷贝数据源。
对于@Prop赋值新的对象,就是简单地将本地的值覆写,但是对于实现双向数据同步的@ObjectLink,覆写新的对象相当于要更新数据源中的数组项或者class的属性,这个对于 TypeScript/JavaScript是不能实现的。
MVVM应用示例
以下示例深入探讨了嵌套ViewModel的应用程序设计,特别是自定义组件如何渲染一个嵌套的Object,该场景在实际的应用开发中十分常见。
开发一个电话簿应用,实现功能如下:
显示联系人和设备(“Me”)电话号码 。
选中联系人时,进入可编辑态“Edit”,可以更新该联系人详细信息,包括电话号码,住址。
在更新联系人信息时,只有在单击保存“Save Changes”之后,才会保存更改。
可以点击删除联系人“Delete Contact”,可以在联系人列表删除该联系人。
ViewModel需要包括:
- AddressBook(class)
- me(设备): 存储一个Person类。
- contacts(设备联系人):存储一个Person类数组。
AddressBook类声明如下:
export class AddressBook {
  me: Person;
  contacts: ObservedArray<Person>;

  constructor(me: Person, contacts: Person[]) {
    this.me = me;
    this.contacts = new ObservedArray<Person>(contacts);
  }
}
- Person (class)
- name : string
- address : Address
- phones: ObservedArray<string>
- Address (class)
- street : string
- zip : number
- city : string
Address类声明如下:
@Observed
export class Address {
  street: string;
  zip: number;
  city: string;

  constructor(street: string,
              zip: number,
              city: string) {
    this.street = street;
    this.zip = zip;
    this.city = city;
  }
}
Person类声明如下:
let nextId = 0;

@Observed
export class Person {
  id_: string;
  name: string;
  address: Address;
  phones: ObservedArray<string>;

  constructor(name: string,
              street: string,
              zip: number,
              city: string,
              phones: string[]) {
    this.id_ = `${nextId}`;
    nextId++;
    this.name = name;
    this.address = new Address(street, zip, city);
    this.phones = new ObservedArray<string>(phones);
  }
}
需要注意的是,因为phones是嵌套属性,如果要观察到phones的变化,需要extends array,并用@Observed修饰它。ObservedArray类的声明如下。
@Observed
export class ObservedArray<T> extends Array<T> {
  constructor(args: T[]) {
    console.log(`ObservedArray: ${JSON.stringify(args)} `)
    if (args instanceof Array) {
      super(...args);
    } else {
      super(args)
    }
  }
}
- selected : 对Person的引用。
更新流程如下:
- 在根节点PageEntry中初始化所有的数据,将me和contacts和其子组件AddressBookView建立双向数据同步,selectedPerson默认为me,需要注意,selectedPerson并不是PageEntry数据源中的数据,而是数据源中,对某一个Person的引用。
PageEntry和AddressBookView声明如下:
@Component
struct AddressBookView {

    @ObjectLink me : Person;
    @ObjectLink contacts : ObservedArray<Person>;
    @State selectedPerson: Person = new Person("", "", 0, "", []);

    aboutToAppear() {
        this.selectedPerson = this.me;
    }

    build() {
        Flex({ direction: FlexDirection.Column, justifyContent: FlexAlign.Start}) {
            Text("Me:")
            PersonView({
             person: this.me,
             phones: this.me.phones,
             selectedPerson: this.selectedPerson
           })

            Divider().height(8)

           ForEach(this.contacts, (contact: Person) => {
             PersonView({
               person: contact,
               phones: contact.phones as ObservedArray<string>,
               selectedPerson: this.selectedPerson
             })
           },
             (contact: Person): string => { return contact.id_; }
           )

            Divider().height(8)

            Text("Edit:")
            PersonEditView({
             selectedPerson: this.selectedPerson,
             name: this.selectedPerson.name,
             address: this.selectedPerson.address,
             phones: this.selectedPerson.phones
           })
        }
            .borderStyle(BorderStyle.Solid).borderWidth(5).borderColor(0xAFEEEE).borderRadius(5)
    }
}

@Entry
@Component
struct PageEntry {
  @Provide addrBook: AddressBook = new AddressBook(
    new Person("Gigi", "Itamerenkatu 9", 180, "Helsinki", ["18*********", "18*********", "18*********"]),
    [
      new Person("Oly", "Itamerenkatu 9", 180, "Helsinki", ["18*********", "18*********"]),
      new Person("Sam", "Itamerenkatu 9", 180, "Helsinki", ["18*********", "18*********"]),
      new Person("Vivi", "Itamerenkatu 9", 180, "Helsinki", ["18*********", "18*********"]),
    ]);

  build() {
    Column() {
      AddressBookView({
       me: this.addrBook.me,
       contacts: this.addrBook.contacts,
       selectedPerson: this.addrBook.me
     })
    }
  }
}
PersonView,即电话簿中联系人姓名和首选电话的View,当用户选中,即高亮当前Person,需要同步回其父组件AddressBookView的selectedPerson,所以需要通过@Link建立双向同步。
PersonView声明如下:// 显示联系人姓名和首选电话 // 为了更新电话号码,这里需要@ObjectLink person和@ObjectLink phones, // 显示首选号码不能使用this.person.phones[0],因为@ObjectLink person只代理了Person的属性,数组内部的变化观察不到 // 触发onClick事件更新selectedPerson @Component struct PersonView { @ObjectLink person : Person; @ObjectLink phones : ObservedArray<string>; @Link selectedPerson : Person; build() { Flex({ direction: FlexDirection.Row, justifyContent: FlexAlign.SpaceBetween }) { Text(this.person.name) if (this.phones.length > 0) { Text(this.phones[0]) } } .height(55) .backgroundColor(this.selectedPerson.name == this.person.name ? "#ffa0a0" : "#ffffff") .onClick(() => { this.selectedPerson = this.person; }) } }选中的Person会在PersonEditView中显示详细信息,对于PersonEditView的数据同步分为以下三种方式:
在Edit状态通过Input.onChange回调事件接受用户的键盘输入时,在点击“Save Changes”之前,这个修改是不希望同步回数据源的,但又希望刷新在当前的PersonEditView中,所以@Prop深拷贝当前Person的详细信息;
PersonEditView通过@Link seletedPerson: Person和AddressBookView的``selectedPerson建立双向同步,当用户点击“Save Changes”的时候,@Prop的修改将被赋值给@Link seletedPerson: Person,这就意味这,数据将被同步回数据源。
PersonEditView中通过@Consume addrBook: AddressBook和根节点PageEntry建立跨组件层级的直接的双向同步关系,当用户在PersonEditView界面删除某一个联系人时,会直接同步回PageEntry,PageEntry的更新会通知AddressBookView刷新contracts的列表页。 PersonEditView声明如下:
     // 渲染Person的详细信息
     // @Prop装饰的变量从父组件AddressBookView深拷贝数据,将变化保留在本地, TextInput的变化只会在本地副本上进行修改。
     // 点击 "Save Changes" 会将所有数据的复制通过@Prop到@Link, 同步到其他组件
     @Component
     struct PersonEditView {

         @Consume addrBook : AddressBook;

         /* 指向父组件selectedPerson的引用 */
         @Link selectedPerson: Person;

         /*在本地副本上编辑,直到点击保存*/
         @Prop name: string = "";
         @Prop address : Address = new Address("", 0, "");
         @Prop phones : ObservedArray<string> = [];

         selectedPersonIndex() : number {
             return this.addrBook.contacts.findIndex((person: Person) => person.id_ == this.selectedPerson.id_);
         }

         build() {
             Column() {
                 TextInput({ text: this.name})
                     .onChange((value) => {
                         this.name = value;
                       })
                 TextInput({text: this.address.street})
                     .onChange((value) => {
                         this.address.street = value;
                     })

                 TextInput({text: this.address.city})
                     .onChange((value) => {
                         this.address.city = value;
                     })

                 TextInput({text: this.address.zip.toString()})
                     .onChange((value) => {
                         const result = Number.parseInt(value);
                         this.address.zip= Number.isNaN(result) ? 0 : result;
                     })

                 if (this.phones.length > 0) {
                   ForEach(this.phones,
                     (phone: ResourceStr, index?:number) => {
                       TextInput({ text: phone })
                         .width(150)
                         .onChange((value) => {
                           console.log(`${index}. ${value} value has changed`)
                           this.phones[index!] = value;
                         })
                     },
                     (phone: ResourceStr, index?:number) => `${index}`
                   )
                 }

                 Flex({ direction: FlexDirection.Row, justifyContent: FlexAlign.SpaceBetween }) {
                     Text("Save Changes")
                         .onClick(() => {
                             // 将本地副本更新的值赋值给指向父组件selectedPerson的引用
                             // 避免创建新对象,在现有属性上进行修改
                             this.selectedPerson.name = this.name;
                             this.selectedPerson.address = new Address(this.address.street, this.address.zip, this.address.city)
                             this.phones.forEach((phone : string, index : number) => { this.selectedPerson.phones[index] = phone } );
                         })
                     if (this.selectedPersonIndex()!=-1) {
                         Text("Delete Contact")
                             .onClick(() => {
                                 let index = this.selectedPersonIndex();
                                 console.log(`delete contact at index ${index}`);

                                 // 删除当前联系人
                                 this.addrBook.contacts.splice(index, 1);

                                 // 删除当前selectedPerson,选中态前移一位
                                 index = (index < this.addrBook.contacts.length) ? index : index-1;

                                 // 如果contract被删除完,则设置me为选中态
                                 this.selectedPerson = (index>=0) ? this.addrBook.contacts[index] : this.addrBook.me;
                             })
                     }
                 }

             }
         }
     }
其中关于@ObjectLink和@Link的区别要注意以下几点:
- 在AddressBookView中实现和父组件PageView的双向同步,需要用@ObjectLink me : Person和@ObjectLink contacts : ObservedArray<Person>,而不能用@Link,原因如下:
- @Link需要和其数据源类型完全相同,且仅能观察到第一层的变化;
- @ObjectLink可以被数据源的属性初始化,且代理了@Observed装饰类的属性,可以观察到被装饰类属性的变化。 - 当 联系人姓名 (Person.name) 或者首选电话号码 (Person.phones[0]) 发生更新时,PersonView也需要同步刷新,其中Person.phones[0]属于第二层的更新,如果使用@Link将无法观察到,而且@Link需要和其数据源类型完全相同。所以在PersonView中也需要使用@ObjectLink,即@ObjectLink person : Person和@ObjectLink phones : ObservedArray<string>。

在这个例子中,我们可以大概了解到如何构建ViewModel,在应用的根节点中,ViewModel的数据可能是可以巨大的嵌套数据,但是在ViewModel和View的适配和渲染中,我们尽可能将ViewModel的数据项和View相适配,这样的话在针对每一层的View,都是一个相对“扁平”的数据,仅观察当前层就可以了。
在应用实际开发中,也许我们无法避免去构建一个十分庞大的Model,但是我们可以在UI树状结构中合理地去拆分数据,使得ViewModel和View更好的适配,从而搭配最小化更新来实现高性能开发。
完整应用代码如下:
// ViewModel classes
let nextId = 0;

@Observed
export class ObservedArray<T> extends Array<T> {
  constructor(args: T[]) {
    console.log(`ObservedArray: ${JSON.stringify(args)} `)
    if (args instanceof Array) {
      super(...args);
    } else {
      super(args)
    }
  }
}

@Observed
export class Address {
  street: string;
  zip: number;
  city: string;

  constructor(street: string,
              zip: number,
              city: string) {
    this.street = street;
    this.zip = zip;
    this.city = city;
  }
}

@Observed
export class Person {
  id_: string;
  name: string;
  address: Address;
  phones: ObservedArray<string>;

  constructor(name: string,
              street: string,
              zip: number,
              city: string,
              phones: string[]) {
    this.id_ = `${nextId}`;
    nextId++;
    this.name = name;
    this.address = new Address(street, zip, city);
    this.phones = new ObservedArray<string>(phones);
  }
}

export class AddressBook {
  me: Person;
  contacts: ObservedArray<Person>;

  constructor(me: Person, contacts: Person[]) {
    this.me = me;
    this.contacts = new ObservedArray<Person>(contacts);
  }
}

// 渲染出Person对象的名称和Observed数组<string>中的第一个号码
// 为了更新电话号码,这里需要@ObjectLink person和@ObjectLink phones,
// 不能使用this.person.phones,内部数组的更改不会被观察到。
// 在AddressBookView、PersonEditView中的onClick更新selectedPerson
@Component
struct PersonView {
  @ObjectLink person: Person;
  @ObjectLink phones: ObservedArray<string>;
  @Link selectedPerson: Person;

  build() {
    Flex({ direction: FlexDirection.Row, justifyContent: FlexAlign.SpaceBetween }) {
      Text(this.person.name)
      if (this.phones.length) {
        Text(this.phones[0])
      }
    }
    .height(55)
    .backgroundColor(this.selectedPerson.name == this.person.name ? "#ffa0a0" : "#ffffff")
    .onClick(() => {
      this.selectedPerson = this.person;
    })
  }
}

@Component
struct phonesNumber {
  @ObjectLink phoneNumber: ObservedArray<string>

  build() {
    Column() {

      ForEach(this.phoneNumber,
        (phone: ResourceStr, index?: number) => {
          TextInput({ text: phone })
            .width(150)
            .onChange((value) => {
              console.log(`${index}. ${value} value has changed`)
              this.phoneNumber[index!] = value;
            })
        },
        (phone: ResourceStr, index: number) => `${this.phoneNumber[index] + index}`
      )
    }
  }
}


// 渲染Person的详细信息
// @Prop装饰的变量从父组件AddressBookView深拷贝数据,将变化保留在本地, TextInput的变化只会在本地副本上进行修改。
// 点击 "Save Changes" 会将所有数据的复制通过@Prop到@Link, 同步到其他组件
@Component
struct PersonEditView {
  @Consume addrBook: AddressBook;
  /* 指向父组件selectedPerson的引用 */
  @Link selectedPerson: Person;
  /*在本地副本上编辑,直到点击保存*/
  @Prop name: string = "";
  @Prop address: Address = new Address("", 0, "");
  @Prop phones: ObservedArray<string> = [];

  selectedPersonIndex(): number {
    return this.addrBook.contacts.findIndex((person: Person) => person.id_ == this.selectedPerson.id_);
  }

  build() {
    Column() {
      TextInput({ text: this.name })
        .onChange((value) => {
          this.name = value;
        })
      TextInput({ text: this.address.street })
        .onChange((value) => {
          this.address.street = value;
        })

      TextInput({ text: this.address.city })
        .onChange((value) => {
          this.address.city = value;
        })

      TextInput({ text: this.address.zip.toString() })
        .onChange((value) => {
          const result = Number.parseInt(value);
          this.address.zip = Number.isNaN(result) ? 0 : result;
        })

      if (this.phones.length > 0) {
        phonesNumber({ phoneNumber: this.phones })
      }

      Flex({ direction: FlexDirection.Row, justifyContent: FlexAlign.SpaceBetween }) {
        Text("Save Changes")
          .onClick(() => {
            // 将本地副本更新的值赋值给指向父组件selectedPerson的引用
            // 避免创建新对象,在现有属性上进行修改
            this.selectedPerson.name = this.name;
            this.selectedPerson.address = new Address(this.address.street, this.address.zip, this.address.city)
            this.phones.forEach((phone: string, index: number) => {
              this.selectedPerson.phones[index] = phone
            });
          })
        if (this.selectedPersonIndex() != -1) {
          Text("Delete Contact")
            .onClick(() => {
              let index = this.selectedPersonIndex();
              console.log(`delete contact at index ${index}`);

              // 删除当前联系人
              this.addrBook.contacts.splice(index, 1);

              // 删除当前selectedPerson,选中态前移一位
              index = (index < this.addrBook.contacts.length) ? index : index - 1;

              // 如果contract被删除完,则设置me为选中态
              this.selectedPerson = (index >= 0) ? this.addrBook.contacts[index] : this.addrBook.me;
            })
        }
      }

    }
  }
}

@Component
struct AddressBookView {
  @ObjectLink me: Person;
  @ObjectLink contacts: ObservedArray<Person>;
  @State selectedPerson: Person = new Person("", "", 0, "", []);

  aboutToAppear() {
    this.selectedPerson = this.me;
  }

  build() {
    Flex({ direction: FlexDirection.Column, justifyContent: FlexAlign.Start }) {
      Text("Me:")
      PersonView({
        person: this.me,
        phones: this.me.phones,
        selectedPerson: this.selectedPerson
      })

      Divider().height(8)

      ForEach(this.contacts, (contact: Person) => {
        PersonView({
          person: contact,
          phones: contact.phones as ObservedArray<string>,
          selectedPerson: this.selectedPerson
        })
      },
        (contact: Person): string => {
          return contact.id_;
        }
      )

      Divider().height(8)

      Text("Edit:")
      PersonEditView({
        selectedPerson: this.selectedPerson,
        name: this.selectedPerson.name,
        address: this.selectedPerson.address,
        phones: this.selectedPerson.phones
      })
    }
    .borderStyle(BorderStyle.Solid).borderWidth(5).borderColor(0xAFEEEE).borderRadius(5)
  }
}

@Entry
@Component
struct PageEntry {
  @Provide addrBook: AddressBook = new AddressBook(
    new Person("Gigi", "Itamerenkatu 9", 180, "Helsinki", ["18*********", "18*********", "18*********"]),
    [
      new Person("Oly", "Itamerenkatu 9", 180, "Helsinki", ["11*********", "12*********"]),
      new Person("Sam", "Itamerenkatu 9", 180, "Helsinki", ["13*********", "14*********"]),
      new Person("Vivi", "Itamerenkatu 9", 180, "Helsinki", ["15*********", "168*********"]),
    ]);

  build() {
    Column() {
      AddressBookView({
        me: this.addrBook.me,
        contacts: this.addrBook.contacts,
        selectedPerson: this.addrBook.me
      })
    }
  }
}
为了能让大家更好的学习鸿蒙(HarmonyOS NEXT)开发技术,这边特意整理了《鸿蒙开发学习手册》(共计890页),希望对大家有所帮助:https://qr21.cn/FV7h05
《鸿蒙开发学习手册》:
如何快速入门:https://qr21.cn/FV7h05
- 基本概念
- 构建第一个ArkTS应用
- ……
开发基础知识:https://qr21.cn/FV7h05
- 应用基础知识
- 配置文件
- 应用数据管理
- 应用安全管理
- 应用隐私保护
- 三方应用调用管控机制
- 资源分类与访问
- 学习ArkTS语言
- ……
基于ArkTS 开发:https://qr21.cn/FV7h05
- Ability开发
- UI开发
- 公共事件与通知
- 窗口管理
- 媒体
- 安全
- 网络与链接
- 电话服务
- 数据管理
- 后台任务(Background Task)管理
- 设备管理
- 设备使用信息统计
- DFX
- 国际化开发
- 折叠屏系列
- ……

鸿蒙开发面试真题(含参考答案):https://qr18.cn/F781PH
鸿蒙开发面试大盘集篇(共计319页):https://qr18.cn/F781PH
1.项目开发必备面试题
2.性能优化方向
3.架构方向
4.鸿蒙开发系统底层方向
5.鸿蒙音视频开发方向
6.鸿蒙车载开发方向
7.鸿蒙南向开发方向


![练习 18 Web [RoarCTF 2019]Easy Calc](https://img-blog.csdnimg.cn/direct/f96908f383d5425ba5ba766e53cb3056.png)