文章目录
一、封装
1.抽象、封装
1.抽象:实例抽象为对象,对象的集合为类
2.封装:成员(成员函数和数据成员)不想被类外访问,私有化(放入private)
“封装”思想:黑箱,①模块化 ②保密
2.类和对象
(0)学习视频
黑马程序员匠心之作|C++教程从0到1入门编程,学习编程不再难
(1)类的构成
类的三大构成元素:①访问权限 ②成员变量(属性) ③成员函数(方法、行为)
1.圆类:类的构成、实例化方法
#include <iostream>
using namespace std;

const double PI = 3.14;

class Circle{
    //访问权限
public:
    //成员变量
    int m_r;
    //成员函数
    double getPerimeter(){
        return 2 * PI * m_r;
    }
};

int main(){
    //通过圆类创建一个具体的圆对象
    Circle c1;
    c1.m_r = 1;
    cout << c1.getPerimeter() << endl;
    return 0;
}
2.学生类:使用公共成员函数来设置和获取私有成员变量
#include <iostream>
#include <string>
using namespace std;

//学生类
class Student{
private:
    string m_name;
    string m_stuID;
public:
    void setName(const string &name){
        m_name = name;
    }
    void setID(const string &ID){
        m_stuID = ID;
    }
    string getName(){
        return m_name;
    }
    string getID(){
        return m_stuID;
    }
};

int main() {
    Student stu;
//    stu.m_name = "Edward";  //类外不能访问private成员
//    stu.m_stuID = "1011173";
    stu.setName("Edward");   //使用公共成员函数来设置和获取私有成员变量
    stu.setID("1011173");
    cout << stu.getName() << endl;
    cout << stu.getID() << endl;
    return 0;
}
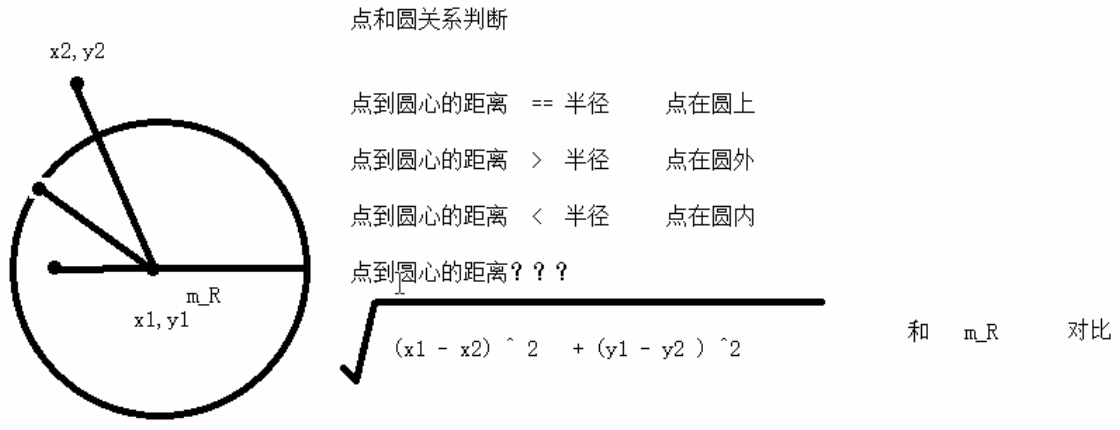
3.圆类和点类:点和圆的关系
(2)三种访问权限

class Person{
public:    //公共权限
    string m_Name;
protected: //保护权限
    string m_Car;
private:  //私有权限
    string m_Password; //银行卡密码
};
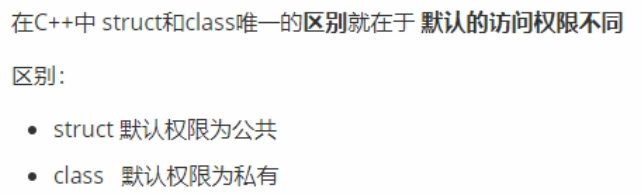
(3)struct和class的区别
(4)私有的成员变量、共有的成员函数
1.可以自己设置读写权限
2.对于写权限,可以在方法内用if验证要写的数据的有效性 (是否在合理范围内)
设置可读:getName()
设置可写:setName()
(5)类内可以直接访问私有成员,不需要经过对象
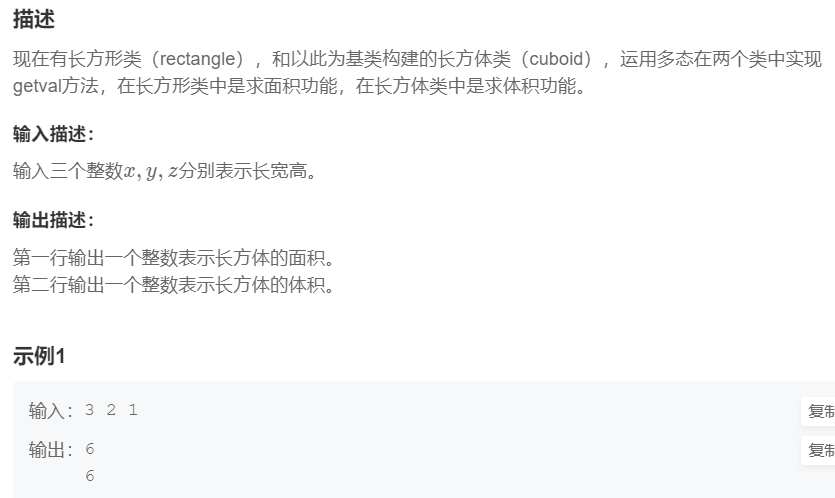
例1:求长方体的表面积
cuboid(int x,int y,int z):rectangle(x,y),height(z){	}
int area(){
	return 2 * (rectangle::area() + height*getlength() + height*getwidth());
}
提交网址:https://www.nowcoder.com/share/jump/2891302591711163673758
#include<bits/stdc++.h>
using namespace std;

class rectangle{
private:
	int length,width;
public:
	rectangle(int x,int y){
		length=x;
		width=y;
	}
	void set(int x,int y){
		length=x;
		width=y;
	}
	int getlength(){
		return length;
	}
	int getwidth(){
		return width;
	}
	int area(){
		return length*width;
	}
};

class cuboid:public rectangle{
private:
	int height;
public:
	cuboid(int x,int y,int z):rectangle(x,y),height(z){	}
	int area(){
		return 2 * (rectangle::area() + height*getlength() + height*getwidth());
	}
};
int main(){
	int x,y,z;
	cin>> x >> y >>z;
	cuboid a(x,y,z);
	cout<<a.rectangle::area()<<'\n'<<a.area();
	return 0;
}
二、继承
1.继承的好处:减少重复代码
2.语法:
class 子类名 : 继承方式 父类{

}
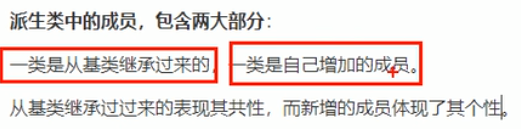
3.包含的两部分:
4.父类与子类,也叫 基类与派生类
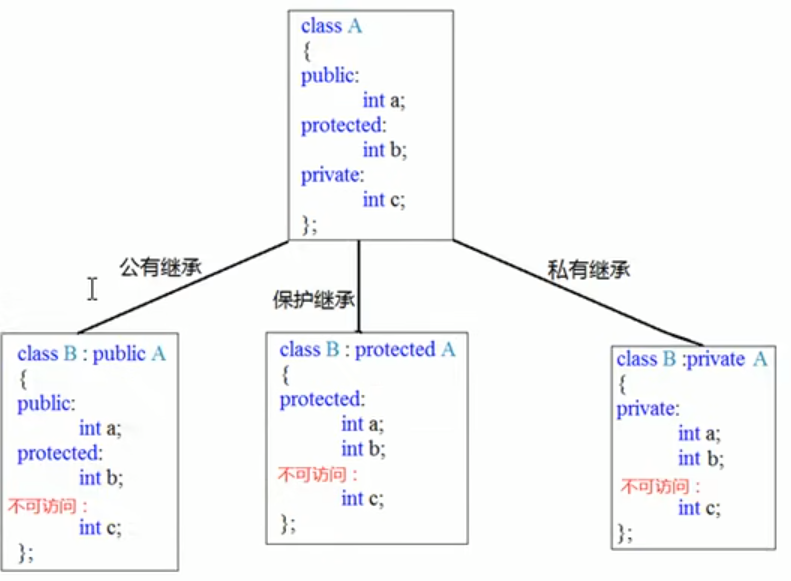
5.三种继承方式:公有继承,保护继承,私有继承
①公有继承,除了private其他不变。
②保护继承可以代代相传。
③私有继承只传下一代,断子绝孙。

6.继承的大小
父类中所有的非静态的成员属性,都会被子类继承。
父类的私有成员也会被子类继承,只是被编译器所隐藏了,访问不到。

#include <iostream>
using namespace std;

class Base{
public:
    int m_A;
protected:
    int m_B;
private:
    int m_C;
};

class derived:public Base{
public:
    int m_D;
};
int main() {
    derived d;
    cout << sizeof(d) << endl; //16
    return 0;
}
7.父子类构造和析构的顺序
①要创建一个子类对象,会先创建一个父类对象,然后继承。
②顺序:父类构造,子类构造,子类析构,父类析构
继承中,先调用父类的构造函数,再调用子类的构造函数。再调用子类的析构函数,再调用父类的析构函数。
#include <iostream>
using namespace std;

//父子类中构造和析构的顺序

class Base{
public:
    Base(){
        cout << "Base构造函数!" << endl;
    }
    ~Base(){
        cout << "Base析构函数!" << endl;
    }
};

class Derived: public Base{
public:
    Derived(){
        cout << "Derived构造函数!" << endl;
    }
    ~Derived(){
        cout << "Derived析构函数!" << endl;
    }
};

int main() {
    Derived d;
    return 0;
}
打印结果:
Base构造函数!
Derived构造函数!
Derived析构函数!
Base析构函数!
8.通过初始化列表,子类中调用父类的构造函数
cuboid(int x,int y,int z):rectangle(x,y),height(z){ } //子类的构造函数
提交网址:https://www.nowcoder.com/share/jump/2891302591711162831924
#include <bits/stdc++.h>
using namespace std;

class rectangle{
private:
	int length,width;
public:
	rectangle(int x,int y){
		length=x;
		width=y;
	}
	void set(int x,int y){
		length=x;
		width=y;
	}
	int area(){
		return length*width;
	}
};

class cuboid: public rectangle{
private:
	int height;
public:
	// write your code here...
	cuboid(int x,int y,int z):rectangle(x,y),height(z){	}
	int getvolume(){
		return rectangle::area()*height ;
	}
};
int main(){
	int x,y,z;
	cin>> x >> y >> z;
	cuboid a(x,y,z);
	cout << a.getvolume() << endl;
	return 0;
}
9.父子类中同名成员的处理
调用父类的需要加父类名 作用域限定符

#include <iostream>
using namespace std;

//继承中同名成员的处理

class Base{
public:
    int m_A = 1;
    void func(){
        cout << "调用Base类中的func()" << endl;
    }
};

class Derived: public Base{
public:
    int m_A = 2;
    void func(){
        cout << "调用Derived类中的func()" << endl;
    }
};

int main() {
    Derived d;
    //同名成员属性的处理
    cout << "Derived类下的m_A = " << d.m_A << endl;
    cout << "Base类下的m_A = " << d.Base::m_A << endl;
    //同名成员函数的处理
    d.func();
    d.Base::func();
    return 0;
}
10.静态同名成员的访问
静态有两种访问方式:
(1)通过对象访问:先创建对象
(2)通过类名访问:不创建对象,直接 类名 作用域限定符
若要调父类的同名成员,加 父类名 作用域限定符
11.多继承语法
(1)语法:
class 子类名: 继承方式 父类1,继承方式 父类2{

};
(2)问题:多个父类中有同名成员,导致二义性
(3)解决:加 父类名 作用域限定符
(4)总结:
多继承中,如果多个父类出现了同名成员,则子类在使用时要加作用域限定符
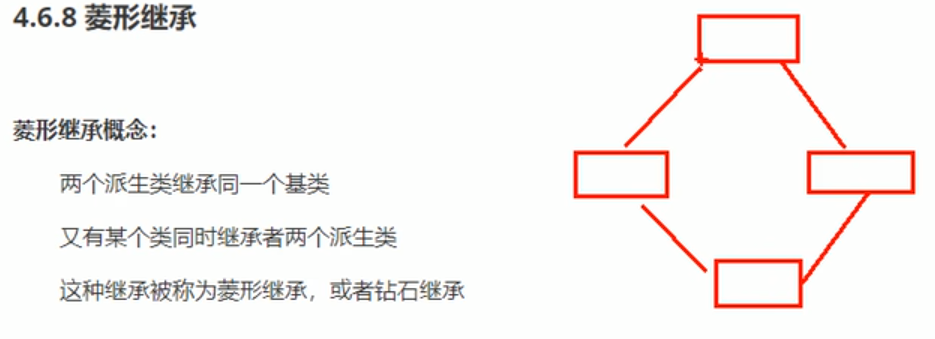
12.菱形继承(钻石继承)
(1)概念
(2)问题、解决:
①二义性:作用域限定
②数据重复:虚继承解决,把原来的基类变成虚基类。加virtual关键字。
//菱形继承
class Animal{ //动物类
public:
    int m_Age;
};

class Sheep: virtual public Animal{ //羊类
};

class Camel: virtual public Animal{ //驼类
};

class alpaca: public Sheep,public Camel{ //羊驼类
};
Visual Studio 使用开发者工具,查看对象模型
13.虚继承、虚基类
vbptr指向vbtable:虚基指针指向虚基表
14.sizeof
①空类的大小:1
类中没有数据成员,只有成员函数(非虚函数),则大小为空类。
②若有类中有虚函数,虚函数指针的大小为8
若类中存在多个虚函数,也只有一个虚函数指针 (指向虚表,虚函数存在虚表中)
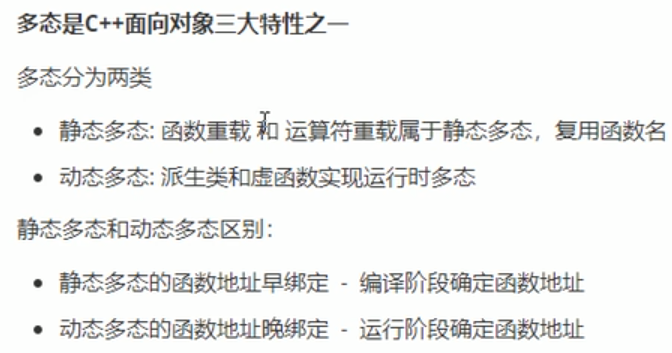
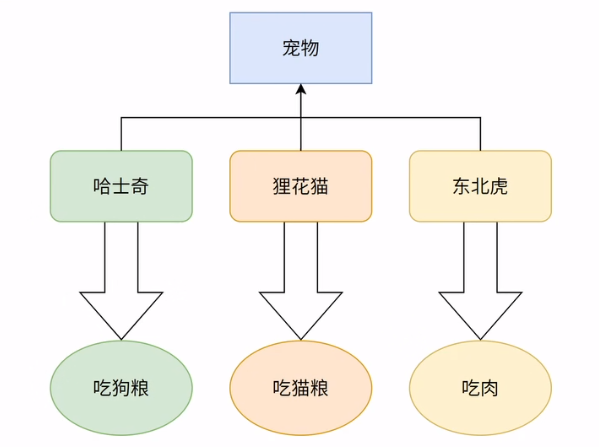
三、多态
1.概念
同一类域下的不同子类对同一行为的不同表现形式
2.多态的满足条件
(1)有继承关系
(2)父类中有虚函数(virtual),且子类重写父类中的虚函数
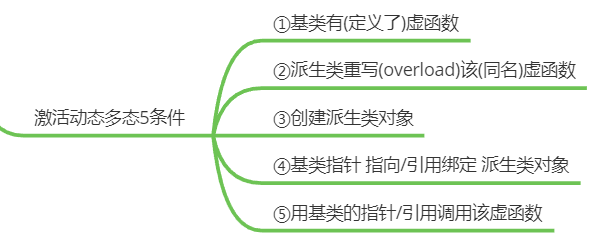
“一个接口,多种方法”,程序在运行时才决定调用的函数
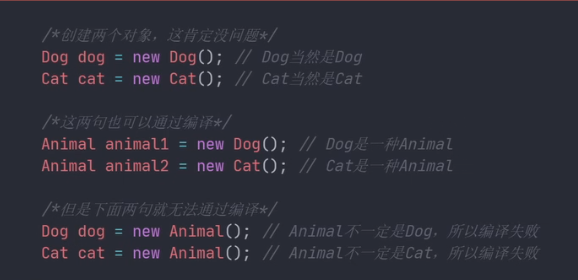
3.多态的使用条件
父类的引用(或指针),指向子类的对象 (参数类型是父类,传进来的是子类)
示例1:动物叫
#include <iostream>
using namespace std;

//多态

class Animal{
public:
//    void speak(){
    virtual void speak(){  //虚函数
        cout << "动物在叫" << endl;
    }
};

class Cat: public Animal{
public:
    void speak(){
        cout << "猫在喵喵叫" << endl;
    }
};

class Dog: public Animal{
public:
    void speak(){
        cout << "狗在汪汪叫"  << endl;
    }
};

//地址早绑定,在编译阶段就确定了函数地址
//如果想执行让猫叫,那么这个函数地址就不能提取绑定,需要在运行阶段进行绑定,需要父类有虚函数virtual
void doSpeak(Animal &animal){  //父类的引用指向子类的对象 : Animal &animal = cat或dog ;
    animal.speak();
}

void test1(){
    Cat cat;
    doSpeak(cat);

    Dog dog;
    doSpeak(dog);
}

int main() {
    test1();
    return 0;
}
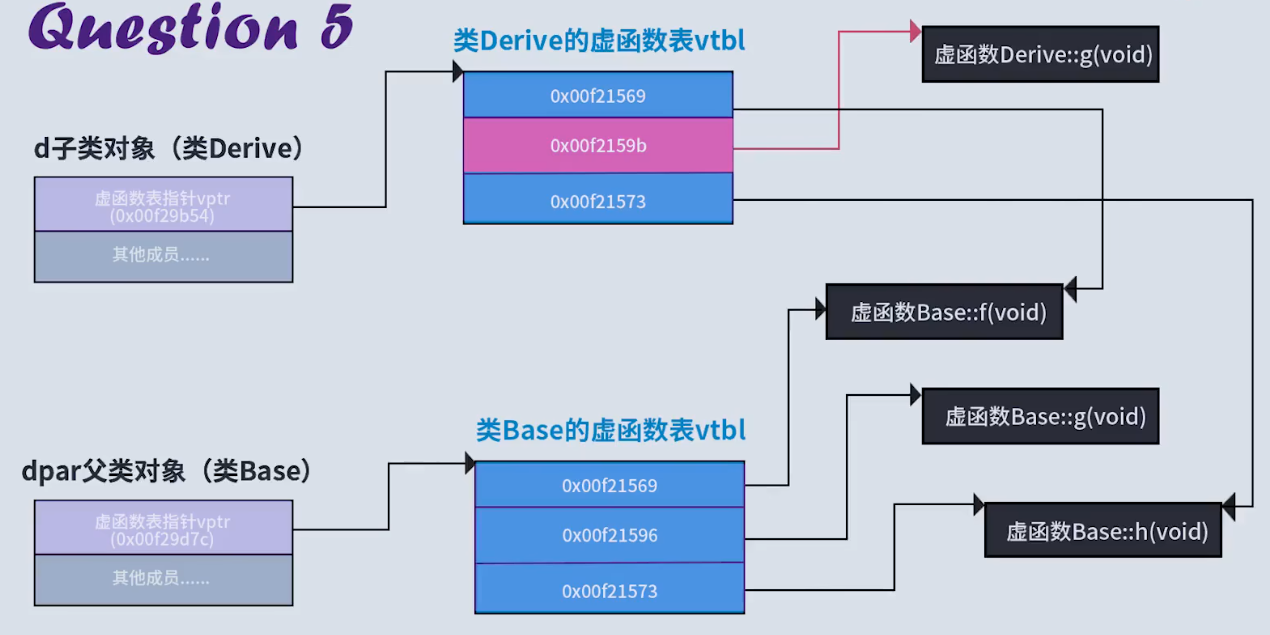
4.多态原理剖析
本来Cat类继承了虚函数表,内部本来是&Animal::speak()。
但Cat类重写了虚函数speak(),使得子类的虚函数表中,子类的虚函数地址替换父类的虚函数地址,类内部由&Animal::speak()变为了&Cat::speak()
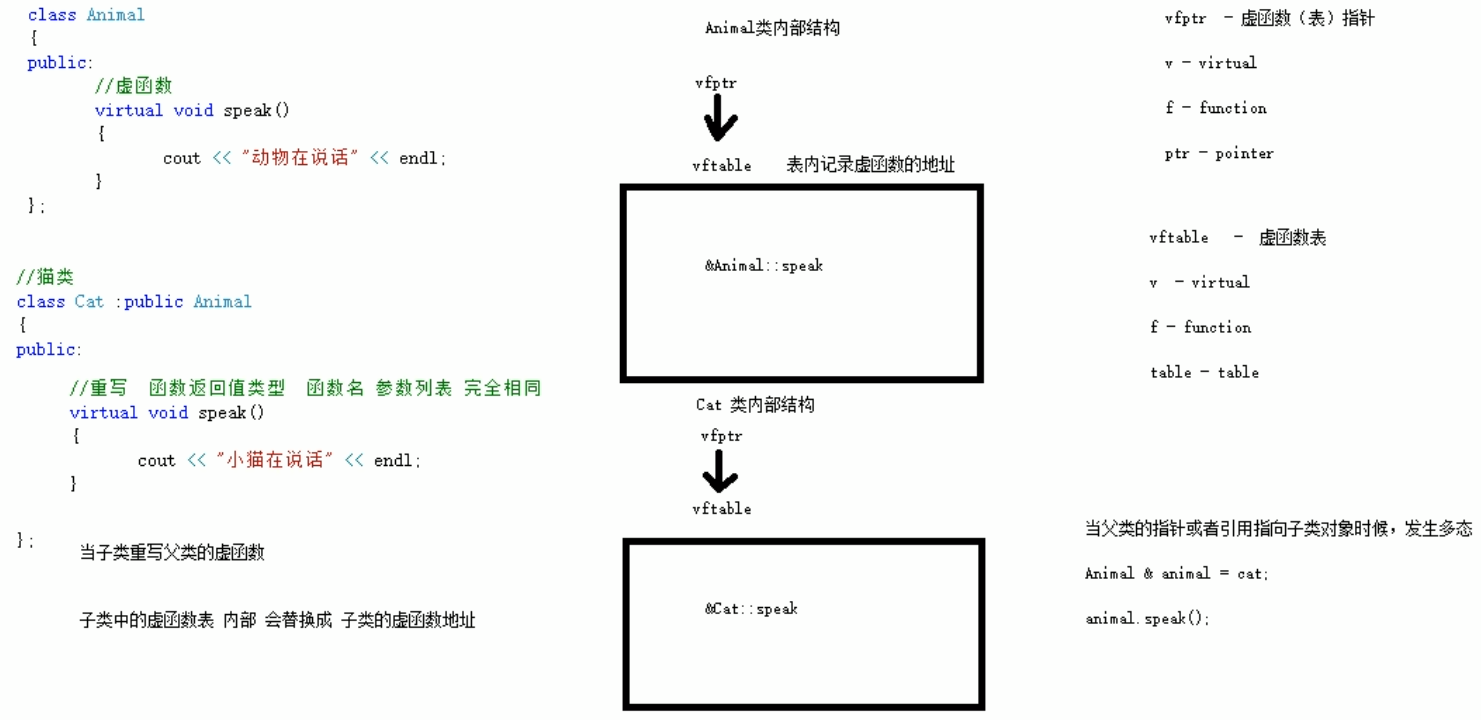
【可用VS的开发人员命令工具,查看ClassLayout进行验证】

//多态
#include <iostream>
using namespace std;

class Animal{
public:
//    void speak(){
    virtual void speak(){  //虚函数
        cout << "动物在叫" << endl;
    }
    virtual void haha(){}
};

class Cat: public Animal{
public:
    void speak(){
        cout << "猫在喵喵叫" << endl;
    }
};

class Dog: public Animal{
public:
    void speak(){
        cout << "狗在汪汪叫"  << endl;
    }
};

//地址早绑定,在编译阶段就确定了函数地址
//如果想执行让猫说话,那么这个函数地址就不能提取绑定,需要在运行阶段进行绑定,需要父类有虚函数virtual
void doSpeak(Animal &animal){  //父类的引用指向子类的对象 : Animal &animal = cat或dog ;
    animal.speak();
}

void test1(){
    Cat cat;
    doSpeak(cat);

    Dog dog;
    doSpeak(dog);
}

void test2(){
    cout << "sizeof(Animal):" << sizeof(Animal) << endl;
}

int main() {
    test1();
    test2();
    return 0;
}
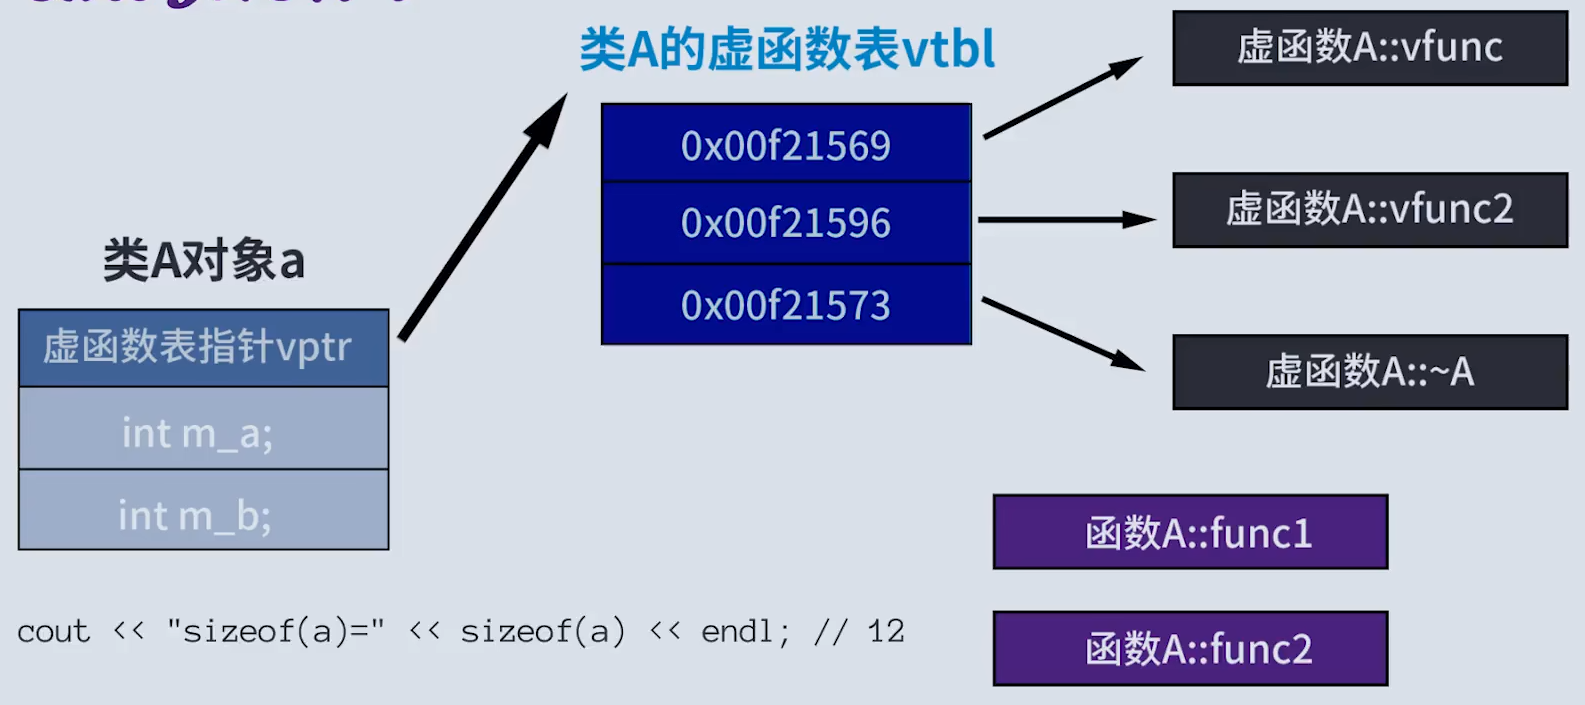
(1)关键字:virtual
(2)虚函数:virtual void vfunc()
(3)虚函数表 vftable
(4)虚函数表指针 vfptr
(5)类A对象a的大小:成员变量、虚函数表指针(4字节)【指针,32位系统为4字节,64位系统为8字节】
虚函数表指针 指向 虚函数表;虚函数表 指向 虚函数。
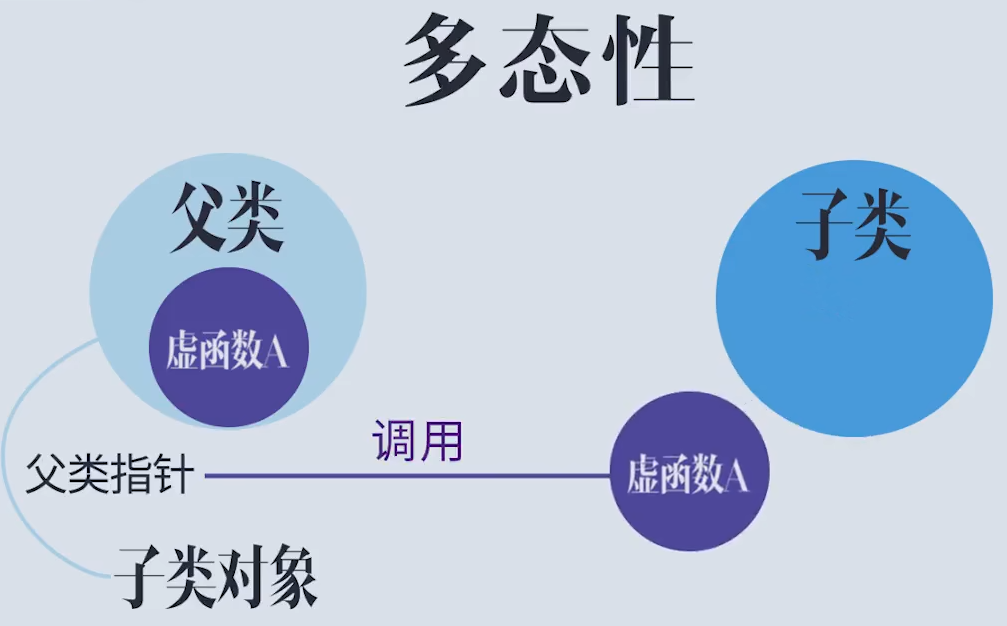
(6)多态性
父类中有一个虚函数,子类中也有一个同名的虚函数。
当通过父类指针 new 一个 子类对象,或通过父类引用来绑定一个子类对象时,如果用父类指针来调用虚函数,那么调用的其实是子类的虚函数。
(7)内存布局
5.纯虚函数和抽象类
1.纯虚函数
(1)提出目的:
在多态中,通常父类中虚函数的实现是毫无意义的,因为不会调用它。主要都是调用子类重写的虚函数。因此可以将虚函数改为纯虚函数,方便书写。
为了强制要求子类重写父类的虚函数,就将父类的虚函数写为纯虚函数。
(2)纯虚函数语法:
就是把 {函数体} 改成了 = 0;
virtual 返回值类型 函数名(参数列表) = 0;
2.抽象类
(1)含有纯虚函数的类称为抽象类
(2)抽象类无法实例化对象
(3)子类必须重写父类中的纯虚函数,否则继承后也是抽象类,无法实例化对象
3.代码示例
#include <iostream>
using namespace std;

class Base{
public:
    virtual void func() = 0; //纯虚函数
};

class Derived1: public Base{
public:
    void func(){
        cout << "子类1调用func()" << endl;
    }
};

class Derived2: public Base{
public:
    void func(){
        cout << "子类2调用func()" << endl;
    }
};

void test1(){
    //Base b;   //抽象类Base无法实例化对象
    //new Base;

    Derived1 d1;  //子类若不重写父类的纯虚函数,则也为抽象类,无法实例化对象
    Base *base1 = new Derived1;   //父类的指针,指向子类的对象
    base1->func();
    delete base1;

    cout << endl;

    Derived2 d2;  //子类若不重写父类的纯虚函数,则也为抽象类,无法实例化对象
    Base *base2 = new Derived2;   //父类的指针,指向子类的对象。
    base2->func(); //指向哪个子类对象,就调用哪个子类重写的函数,体现了动态多态
    delete base2;
}

int main() {
    test1();
    return 0;
}
6.虚析构和纯虚析构
1.提出目的
(1)目前存在的问题:
多态使用时,如果子类中有属性开辟到堆区,那么父类指针在释放时无法调用子类的析构代码
(2)解决方式:
将父类中的析构函数改为虚析构或纯虚析构
利用虚析构可以解决 父类指针无法析构子类对象的问题 (解决子类中的析构代码调用不到的问题)
2.虚析构和纯虚析构的共性
(1)可以解决父类指针释放子类对象
(2)都需要有具体的函数实现
3.虚析构和纯虚析构的区别
如果是纯虚析构:
①类内声明,类外实现
②该类属于抽象类,无法实例化对象
4.语法
(1)虚析构语法:
virtual ~类名(){}
virtual ~Animal(){

}
(2)纯虚析构语法:
virtual ~类名() = 0; //类内
类名::~类名(){}      //类外
	//类内
    virtual ~Animal() = 0;
};

Animal:: ~Animal(){
    cout << "调用纯虚析构函数 Animal:: ~Animal()" << endl;
}
5.总结

7.多态的应用 案例
(1)案例1 计算器类:多态的好处
1.多态的好处:
(1)代码组织结构清晰、可读性强、方便快速定位bug
(2)利于前期及后期的扩展和维护,不需要修改源码(开闭原则:对扩展开放,对修改关闭)
(3)接口统一 (子类重写父类的虚函数)
2.代码示例
(1)普通实现:
若要追加新功能,需要修改源码。
若计算器有bug,需要阅读全部代码来定位bug
优点是代码量少,缺点是不便于维护
(2)多态实现:
若要追加新功能,不需要修改源码,只要多加一个类即可
若计算器有bug,只需要查看对应的类的代码即可,方便定位bug和维护,代码组织结构清晰,可读性强
而且由于多态技术(子类重写父类虚函数),接口都是统一的
虽然代码量多,但这又不是写算法题,代码多点无所谓的。
总结:C++开发提倡利用多态设计程序架构,因为多态的优点很多
//多态的应用 案例1:计算器类
//分别用普通写法和多态技术,设计实现两个操作数进行运算的计算器类
#include <iostream>
#include <string>
using namespace std;

//1.普通实现
class Calculator{
public:
    int m_Num1;
    int m_Num2;
    int getResult(string oper){
        if(oper == "+")         return m_Num1+m_Num2;
        else if(oper == "-")    return m_Num1-m_Num2;
        else if(oper == "*")    return m_Num1*m_Num2;
        //如果想扩展新的功能,需要修改源码
        //在真实的开发中,提倡 开闭原则
        //开闭原则:对扩展进行开放,对修改进行关闭
    }
};

void test1(){
    Calculator cal;
    cal.m_Num1 = 10;
    cal.m_Num2 = 10;
    cout << cal.m_Num1 << " + " << cal.m_Num2 << " = " << cal.getResult("+") << endl;
    cout << cal.m_Num1 << " - " << cal.m_Num2 << " = " << cal.getResult("-") << endl;
    cout << cal.m_Num1 << " * " << cal.m_Num2 << " = " << cal.getResult("*") << endl;
}

//2.多态实现
//计算器的抽象类
class AbstractCalculator{
public:
    int m_Num1;
    int m_Num2;
    virtual int getResult(){ //虚函数
        return 0;
    }
};

//加法计算器
class AddCalculator: public AbstractCalculator{
public:
    int getResult(){
        return m_Num1 + m_Num2;
    }
};

//减法计算器
class SubCalculator: public AbstractCalculator{
public:
    int getResult(){
        return m_Num1 - m_Num2;
    }
};

//乘法计算器
class MulCalculator: public AbstractCalculator{
public:
    int getResult(){
        return m_Num1 * m_Num2;
    }
};

void test2(){
   //多态的使用条件:父类的指针或引用,指向子类的对象
    //加法运算
    AbstractCalculator *ac = new AddCalculator;
    ac->m_Num1 = 10;
    ac->m_Num2 = 10;
    cout << ac->m_Num1 << " + " << ac->m_Num2 << " = " <<ac->getResult() << endl;
     //new用完,记得销毁
    delete ac; //释放了所指的堆空间,但指针本身还存在
    //减法运算
    ac = new SubCalculator;
    ac->m_Num1 = 10;
    ac->m_Num2 = 10;
    cout << ac->m_Num1 << " - " << ac->m_Num2 << " = " <<ac->getResult() << endl;
    delete ac;
    //乘法运算
    ac = new MulCalculator;
    ac->m_Num1 = 10;
    ac->m_Num2 = 10;
    cout << ac->m_Num1 << " * " << ac->m_Num2 << " = " <<ac->getResult() << endl;
    delete ac;
}

int main() {
//    test1();
    test2();
    return 0;
}
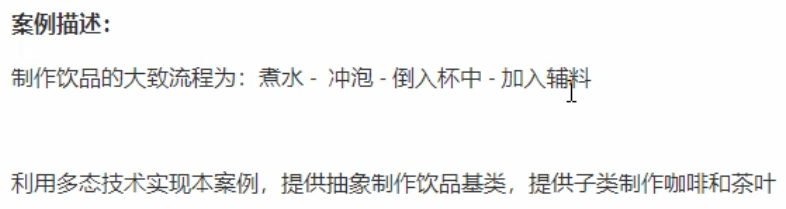
(2)案例2 制作饮品:抽象类作为模板,方便扩写新功能
抽象类作为模板,需要增添新功能时就方便扩写,而不需要修改以前写的代码。
方便维护,后续就任的程序员不需要去触动前人写的的祖传代码。

//多态案例2:制作饮品
#include <iostream>
using namespace std;

class AbstractDrink{
public:
    //煮水
    virtual void boilwater() = 0;
    //冲泡
    virtual void Brew() = 0;
    //倒入杯中
    virtual void PutInCup() = 0;
    //加入辅料
    virtual void PutSomething() = 0;
    //制作饮品
    void makeDrink(){
        boilwater();
        Brew();
        PutInCup();
        PutSomething();
    }
};

//制作咖啡
class Coffee: public AbstractDrink{
public:
    //煮水
    virtual void boilwater(){
        cout << "煮咖啡水" << endl;
    };
    //冲泡
    virtual void Brew(){
        cout << "冲泡咖啡" << endl;
    };
    //倒入杯中
    virtual void PutInCup(){
        cout << "倒入杯中" << endl;
    };
    //加入辅料
    virtual void PutSomething(){
        cout << "加糖和牛奶" << endl;
    };
};

//制作茶饮
class Tea: public AbstractDrink{
public:
    //煮水
    virtual void boilwater(){
        cout << "煮茶水" << endl;
    };
    //冲泡
    virtual void Brew(){
        cout << "冲泡茶叶" << endl;
    };
    //倒入杯中
    virtual void PutInCup(){
        cout << "倒入杯中" << endl;
    };
    //加入辅料
    virtual void PutSomething(){
        cout << "加枸杞" << endl;
    };
};

//制作饮品
void doDrink(AbstractDrink *ad){ //AbstractDrink * ad = new Coffee
    ad->makeDrink();
    delete ad; //手动释放堆区
}

void test1(){
    //制作咖啡
    doDrink(new Coffee);
    cout << "----------" << endl;
    //制作茶饮
    doDrink(new Tea);
}

int main() {
    test1();
    return 0;
}
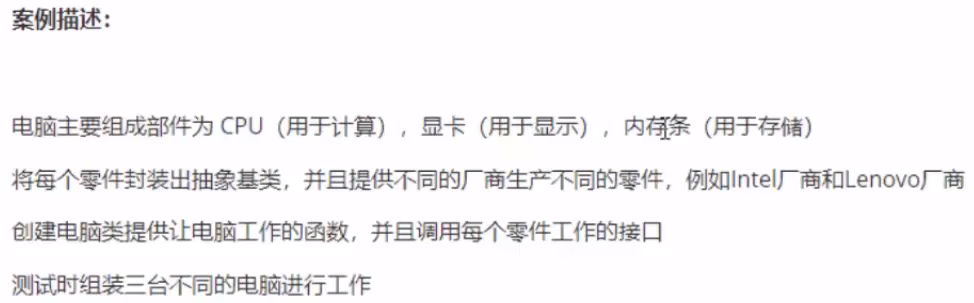
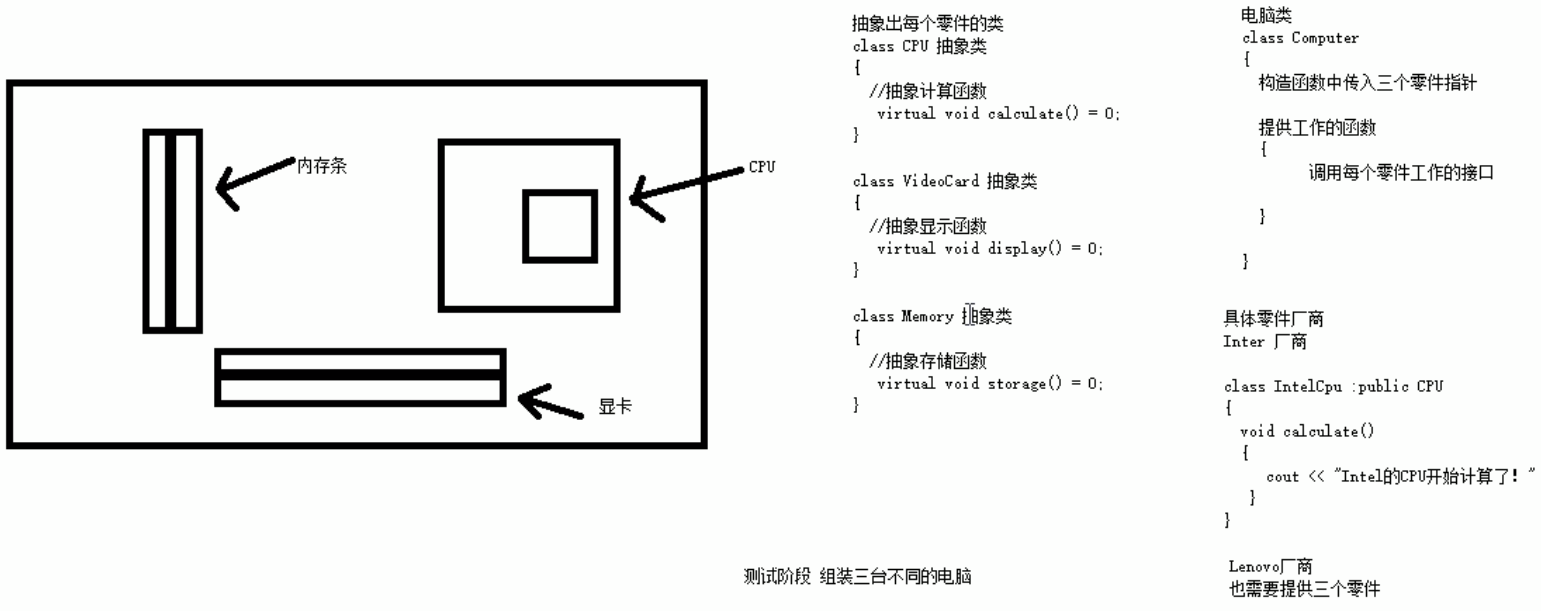
(3)案例3 电脑组装
源码:
1.3个抽象零件类
2.电脑类
3.厂商类,继承零件类
//案例3:电脑组装
#include <iostream>
using namespace std;

//1.抽象不同的零件类
 //(1)抽象CPU类
class CPU{
public:
    virtual void calculate() = 0;
};
//(2)抽象显卡类
class GPU{
public:
    virtual void display() = 0;
};
//(3)抽象内存条类
class Memory{
public:
    virtual void storage() = 0;
};

//2.电脑类
class Computer{
public:
    //构造函数:零件组装
    Computer(CPU *cpu,GPU *gpu,Memory *memory){
        m_cpu = cpu;
        m_gpu = gpu;
        m_memory = memory;
    }
    //提供工作的函数:让零件工作起来,调用接口
    void work(){
        m_cpu->calculate();
        m_gpu->display();
        m_memory->storage();
    }
    //析构函数:释放3个零件指针
    ~Computer(){
        if(m_cpu != NULL){ //释放CPU零件指针
            delete m_cpu;
            m_cpu = NULL;
        }
        if(m_gpu != NULL){ //释放显卡零件指针
            delete m_gpu;
            m_gpu = NULL;
        }
        if(m_memory != NULL){ //释放CPU零件指针
            delete m_memory;
            m_memory = NULL;
        }
    }
private:
    CPU *m_cpu; //CPU类零件的指针
    GPU *m_gpu; //GPU类零件的指针
    Memory *m_memory; //Memory类零件的指针
};

//3.具体厂商
 //(1)Intel厂商
  //①计算
class Intel_CPU: public CPU{
public:
    virtual void calculate(){
        cout << "Intel的CPU开始计算..." << endl;
    }
};
  //②显示
class Intel_GPU: public GPU{
public:
    virtual void display(){
        cout << "Intel的GPU开始显示..." << endl;
    }
};
  //③显示
class Intel_Memory: public Memory{
public:
    virtual void storage(){
        cout << "Intel的内存条开始存储..." << endl;
    }
};

 //(2)NVIDA厂商
  //①计算
 class NVIDA_CPU: public CPU{
 public:
     virtual void calculate(){
         cout << "NVIDA的CPU开始计算..." << endl;
     }
 };
  //②显示
class NVIDA_GPU: public GPU{
public:
    virtual void display(){
        cout << "NVIDA的GPU开始显示..." << endl;
    }
};
  //③显示
class NVIDA_Memory: public Memory{
public:
    virtual void storage(){
        cout << "NVIDA的内存条开始存储..." << endl;
    }
};

void test1(){
    //申请第一台电脑零件
    CPU *intelCPU = new Intel_CPU; //CPU类的指针 指向 Intel_CPU的对象
    GPU *intelGPU = new Intel_GPU;
    Memory *intelMem = new Intel_Memory;
    //组装第一台电脑(纯Intel)
    cout << "第一台电脑(纯Intel)开始工作了:" << endl;
    Computer *computer1 = new Computer(intelCPU,intelGPU,intelMem);
    computer1->work();
    delete computer1;
}

void test2(){
    //组装第二台电脑(纯NVIDA) : 零件参数直接new
    cout << "第二台电脑(纯NVIDA)开始工作了:" << endl;
    Computer *computer2 = new Computer(new NVIDA_CPU,new NVIDA_GPU,new NVIDA_Memory);
    computer2->work();
    delete computer2;
}

void test3(){
    //组装第三台电脑 : 零件混装
    cout << "第三台电脑(零件混装)开始工作了:" << endl;
    Computer *computer3 = new Computer(new Intel_CPU,new NVIDA_GPU,new NVIDA_Memory);
    computer3->work();
    delete computer3;
}

int main() {
    test1();
    test2();
    test3();
    return 0;
}
8.习题练习
例题1: 多态实现计算器功能
提交网址:https://www.nowcoder.com/share/jump/2891302591711350500230

我的答案:(详细注释)
#include <iostream>
using namespace std;

class BaseCalculator {
public:
    int m_A;
    int m_B;
    // write your code here......
    virtual int getResult() = 0; //纯虚函数
};

// 加法计算器类
class AddCalculator : public BaseCalculator {
    // write your code here......
public:
     virtual int getResult(){ //子类重写父类的虚函数
        return m_A + m_B;
     }
};

// 减法计算器类
class SubCalculator : public BaseCalculator {
    // write your code here......
public:
     virtual int getResult(){ //子类重写父类的虚函数
        return m_A - m_B;
     }
};


int main() {
    BaseCalculator* cal = new AddCalculator; //父类的指针指向子类的对象
    cal->m_A = 10;
    cal->m_B = 20;
    cout << cal->getResult() << endl; //父类指针调用同名函数
    delete cal;

    cal = new SubCalculator;  //父类的指针指向子类的对象
    cal->m_A = 20;
    cal->m_B = 10;
    cout << cal->getResult() << endl;  //父类指针调用同名函数
    delete cal;

    return 0;
}
例题2:多态实现求面积体积
提交网址:https://www.nowcoder.com/share/jump/2891302591711350426103
我的答案:(详细注释)
#include<bits/stdc++.h>
using namespace std;

class rectangle{
private:
	int length,width;
public:
	rectangle(int x,int y){
		length=x;
		width=y;
	}
	void set(int x,int y){
		length=x;
		width=y;
	}
	int getlength(){
		return length;
	}
	int getwidth(){
		return width;
	}
	// write your code here...
	virtual int getval(){  //虚函数
		return width*length;
	}
};

class cuboid: public rectangle{
private:
	int height;
public:
	cuboid(int x,int y,int z):rectangle(x,y){
		height = z;
	}
	// write your code here...
	virtual int getval(){  //子类重写父类的虚函数
		return getlength()*getwidth()*height;
	}
};

int main(){
	int x,y,z;
	cin >> x >> y >> z;
	cuboid a(x,y,z);  //a是长方体类
	rectangle b(x,y); //b是长方形类

	rectangle *p = &b; //p是父类指针,指向了子类的对象
	cout<<p->getval()<<'\n'; //调用子类的同名函数

	p = &a; //父类指针,指向父类的对象
	cout<<p->getval(); //调用父类自己的同名函数
	return 0;
}
四、面向过程 与 面向对象
1.类有什么好处?
答:将具体的对象抽象为类,具有了封装、继承、多态三大特性。
①封装使数据更安全,提高了安全性。权限设置为private,必须通过公有的方法才能访问私有的数据成员。
②继承减少了冗余代码,使得代码可以复用,大大提高了代码的复用性。如公有继承和保护继承。
③多态满足开闭原则,方便扩展功能而不需要修改源码,提高了维护性和扩展性。且函数接口可以统一。
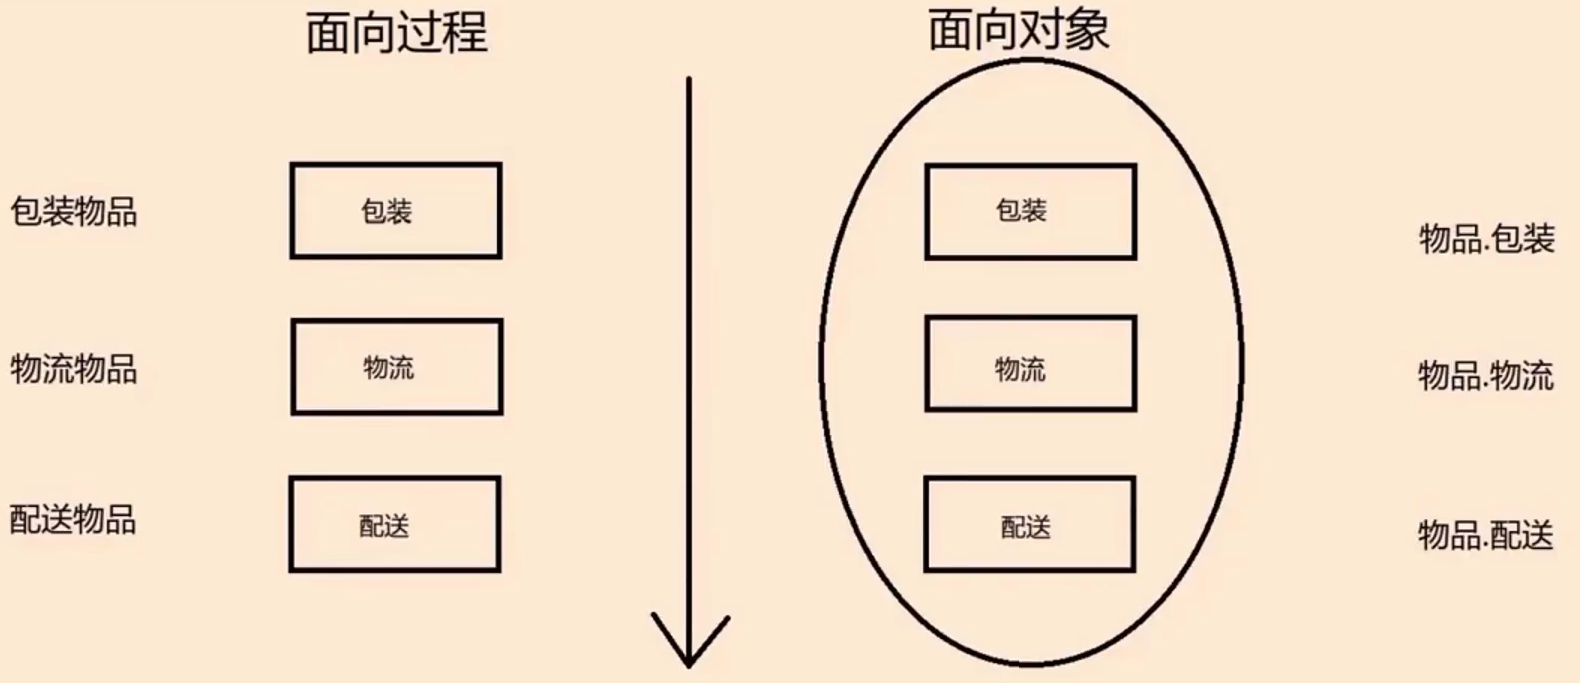
2.面向过程 与 面向对象的区别是什么?
1.类比雕版印刷术和活字印刷术,面向对象的可维护性、复用性和扩展性大大提高。
2.面向过程解决的是当前遇到的问题,大而全。
面向对象解决的是可能出现变化的问题。每个类的功能相对单一,但是通过组合的方式可以实现功能的复用。不但能解决当下的问题,并为解决未来的问题留下了方便的扩展可能。
3.面向对象有封装隐藏、多态重载,这种特性很难通过C语言的面向过程实现。
4.面向对象编程(OOP)是以对象为基础的编程思想。
它的核心概念包括:类、对象、封装、继承、多态、
在面向对象的程序中,可以将问题分解为多个独立的对象。每个对象都有自己的属性和行为。通过定义类和创建对象。可以实现代码的重用和模块化,提高程序的可维护性和扩展性。
5.面向对象的6原则:
①迪米特法则:一个软件实体应该尽可能少的与其他实体发生相互作用
②合成聚合复用原则:尽量使用合成、聚合,而不是继承关系达到复用目的
③接口隔离原则:为客户端提供尽可能小的单独接口,不要提供大的总接口
④开闭原则:对扩展开放,对修改关闭
⑤里氏代换原则:任何基类可以出现的地方,子类一定可以出现
⑥依赖倒转原则:依赖于抽象,不要依赖于实现
基于以上6点,诞生了23种设计模式


![[flask]请求全局钩子](https://img-blog.csdnimg.cn/direct/ccafdd82f1074e3db54efa20c8d2bbc6.png)
