前言
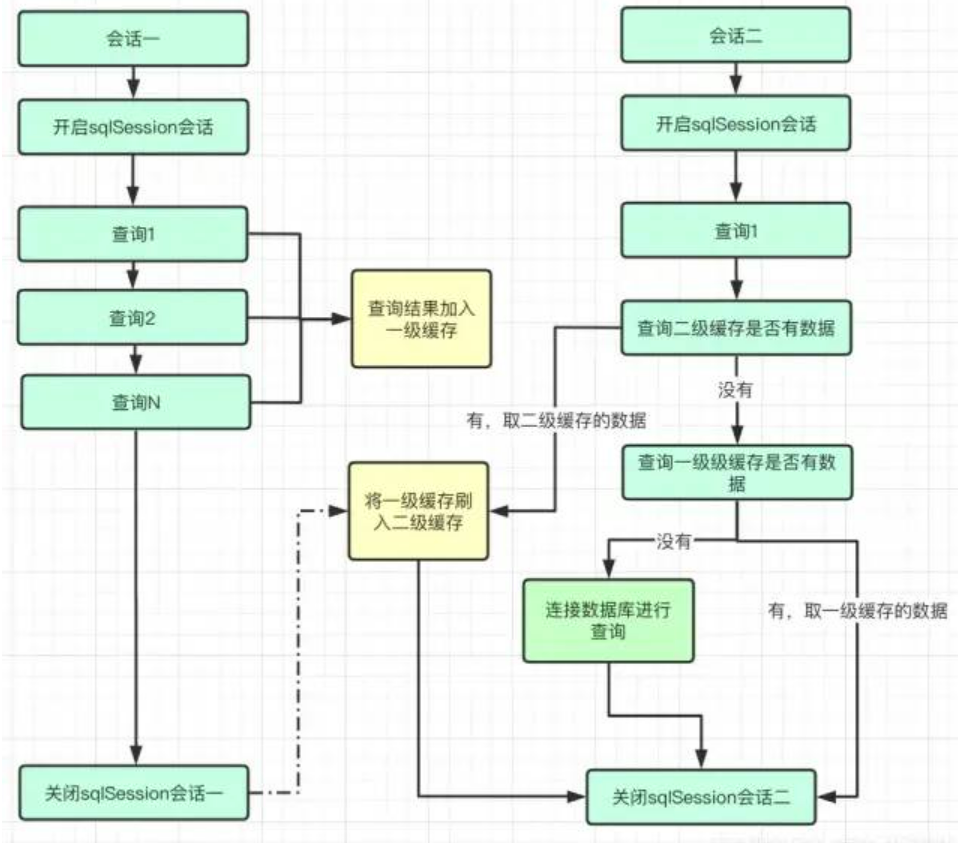
MyBatis的一级缓存在BaseExecutor类中实现,其内部维护了两个PerpetualCache实例;二级缓存在CachingExecutor类中实现,其内部维护了一个TransactionalCacheManager实例,用于管理所有的二级缓存对象。
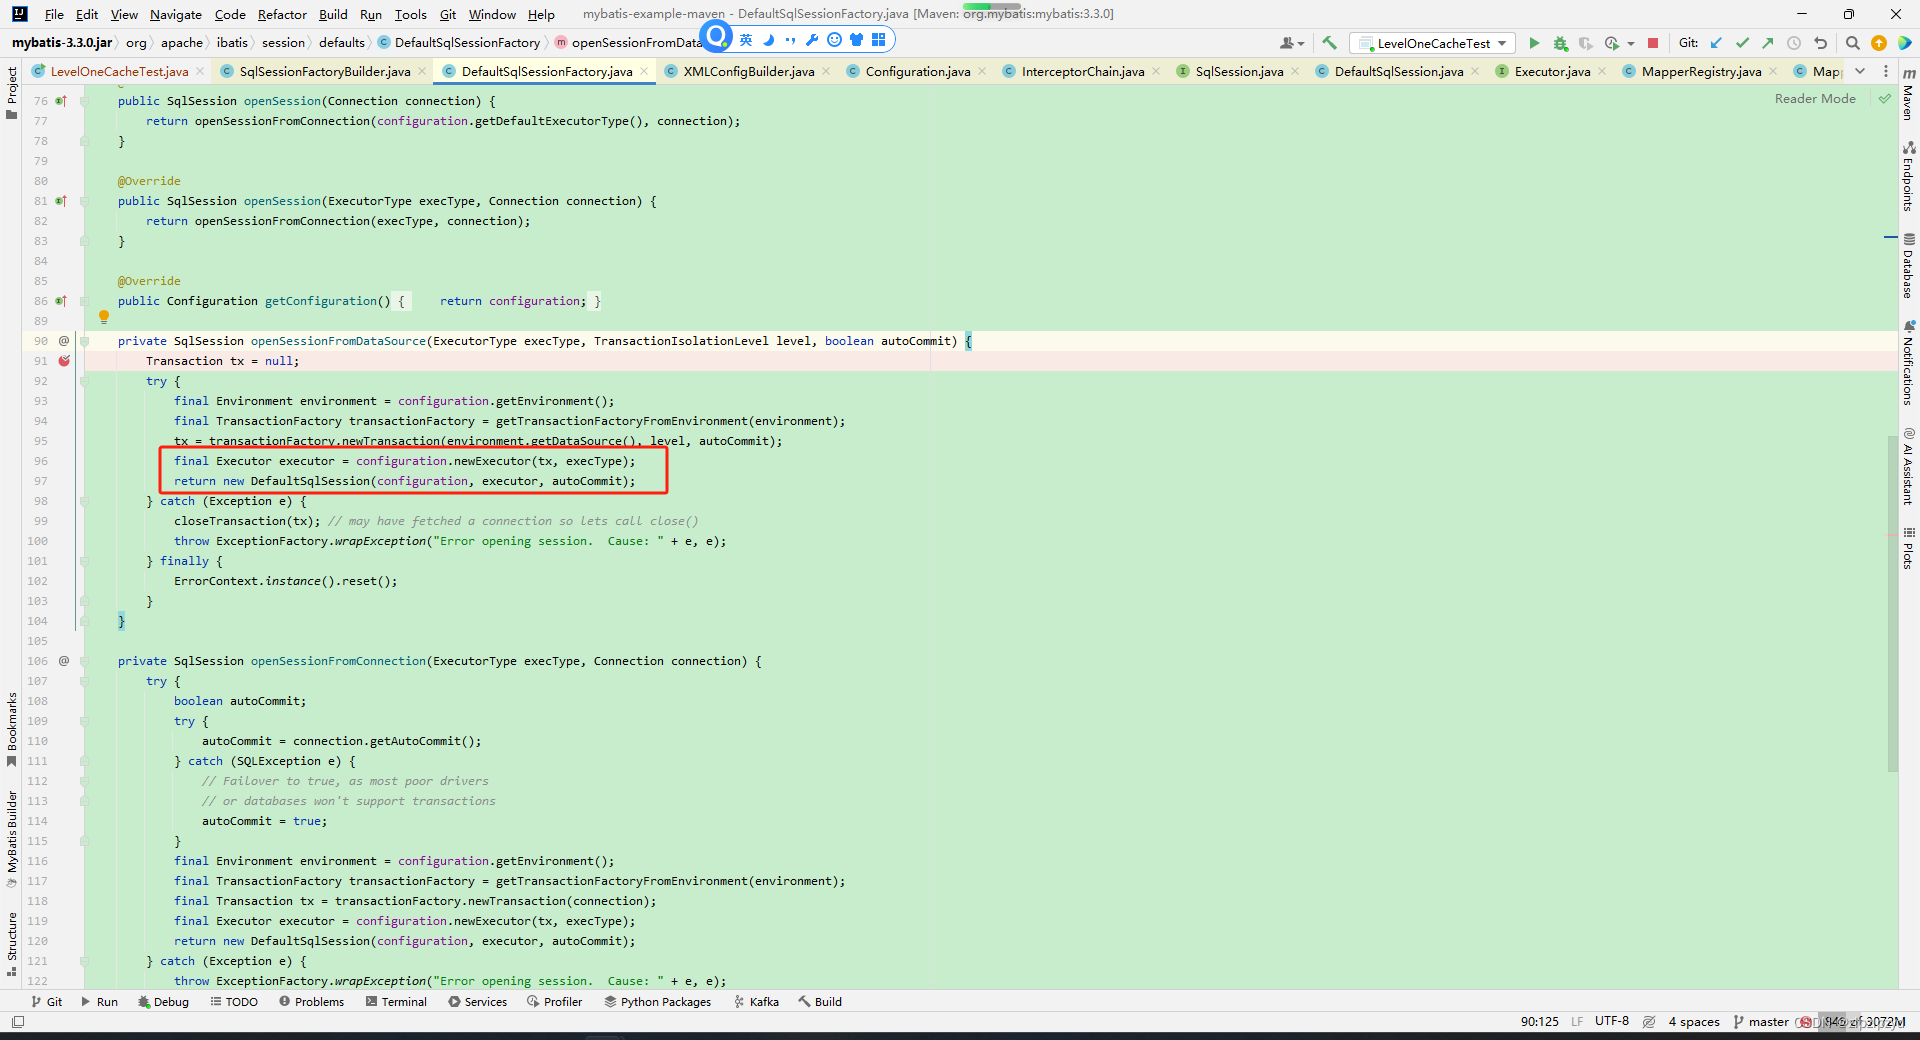
在CachingExecutor的query()方法中,获取二级缓存对象实例的代码是:Cache cache = ms.getCache();,即从MappedStatement对象中获取Cache对象,因此MappedStatement对象中必然组合了二级缓存对象实例。
6.3.4 二级缓存对象的创建
6.3.4.1 二级缓存对象的创建推理
借助IDE,可以反推出二级缓存对象的创建过程。
源码1:org.apache.ibatis.mapping.MappedStatement

private Cache cache;

public Builder cache(Cache cache) {
    mappedStatement.cache = cache;
    return this;
}
由 源码1 可知,MappedStatement对象组合了一个Cache对象,调用其cache()方法即可初始化该Cache对象。
源码2:org.apache.ibatis.builder.MapperBuilderAssistant

private Cache currentCache;

public MappedStatement addMappedStatement(...) {
    // ......
    MappedStatement.Builder statementBuilder = new MappedStatement.Builder(configuration, id, sqlSource, sqlCommandType)
        // ...
        .cache(currentCache).dirtySelect(dirtySelect);
    // ......
}

public Cache useCacheRef(String namespace) {
    // ......
    Cache cache = configuration.getCache(namespace);
    if (cache == null) {
        // throw ...
    }
    currentCache = cache;
    // ......
}
由 源码2 可知,MapperBuilderAssistant类的addMappedStatement()方法中调用了MappedStatement对象的cache()方法,并将其本身组合的Cache对象(currentCache变量)作为参数传入。
而currentCache变量的设置依赖于useCacheRef()方法,该方法会以Mapper的命名空间为参数调用Configuration对象的getCache()方法获取一个Cache对象,并赋值给currentCache变量。
源码3:org.apache.ibatis.session.Configuration

protected final Map<String, Cache> caches = new StrictMap<>("Caches collection");

public void addCache(Cache cache) {
    caches.put(cache.getId(), cache);
}
由 源码3 可知,Configuration对象中维护了一个Map容器(caches变量),用于保存Cache对象。调用其addCache(Cache cache)方法即可往容器中增加一个Cache对象。因此,二级缓存Cache对象一定也保存在这个容器中。
源码4:org.apache.ibatis.builder.MapperBuilderAssistant

private String currentNamespace;
private Cache currentCache;

public Cache useNewCache(Class<? extends Cache> typeClass, Class<? extends Cache> evictionClass, Long flushInterval,
                         Integer size, boolean readWrite, boolean blocking, Properties props) {
    Cache cache = new CacheBuilder(currentNamespace).implementation(valueOrDefault(typeClass, PerpetualCache.class))
            .addDecorator(valueOrDefault(evictionClass, LruCache.class)).clearInterval(flushInterval).size(size)
            .readWrite(readWrite).blocking(blocking).properties(props).build();
    configuration.addCache(cache);
    currentCache = cache;
    return cache;
}
由 源码4 可知,MapperBuilderAssistant类的useNewCache()方法会调用Configuration对象的addCache()方法。该方法中,通过CacheBuilder对象创建了一个Cache对象。
源码5:org.apache.ibatis.builder.xml.XMLMapperBuilder

private void cacheElement(XNode context) {
    if (context != null) {
        String type = context.getStringAttribute("type", "PERPETUAL");
        Class<? extends Cache> typeClass = typeAliasRegistry.resolveAlias(type);
        // 读取<cache>标签的eviction、flushInterval、size、readOnly属性
        String eviction = context.getStringAttribute("eviction", "LRU");
        Class<? extends Cache> evictionClass = typeAliasRegistry.resolveAlias(eviction);
        Long flushInterval = context.getLongAttribute("flushInterval");
        Integer size = context.getIntAttribute("size");
        boolean readWrite = !context.getBooleanAttribute("readOnly", false);
        boolean blocking = context.getBooleanAttribute("blocking", false);
        Properties props = context.getChildrenAsProperties();
        builderAssistant.useNewCache(typeClass, evictionClass, flushInterval, size, readWrite, blocking, props);
    }
}

private void configurationElement(XNode context) {
    try {
        // ...
        // Mapper XML配置文件中的<cache>标签
        cacheElement(context.evalNode("cache"));
        // ...
    } // ...
}

public void parse() {
    if (!configuration.isResourceLoaded(resource)) {
        configurationElement(parser.evalNode("/mapper"));
        configuration.addLoadedResource(resource);
        bindMapperForNamespace();
    }
    // ......
}
由 源码5 可知,XMLMapperBuilder类的cacheElement()方法会调用MapperBuilderAssistant类的useNewCache()方法。继续往前可以追溯到configurationElement()方法和parse()方法。
到这一步已经可以知道,Cache对象的创建依赖于Mapper配置文件中的<cache>标签。cacheElement方法中会读取<cache>标签的属性,例如eviction、flushInterval、size、readOnly等。
这样的结论和 MyBatis官方文档 的说法相呼应:默认情况下,只启用了本地的会话缓存,它仅仅对一个会话中的数据进行缓存。要启用全局的二级缓存,只需要在你的SQL映射文件中添加一行:<cache/>。
6.3.4.2 <cache/>标签
由 MyBatis官方文档 可知,<cache/>标签具有一些属性,例如:
<cache
  eviction="FIFO"
  flushInterval="60000"
  size="512"
  readOnly="true"/>
这些属性的作用是:
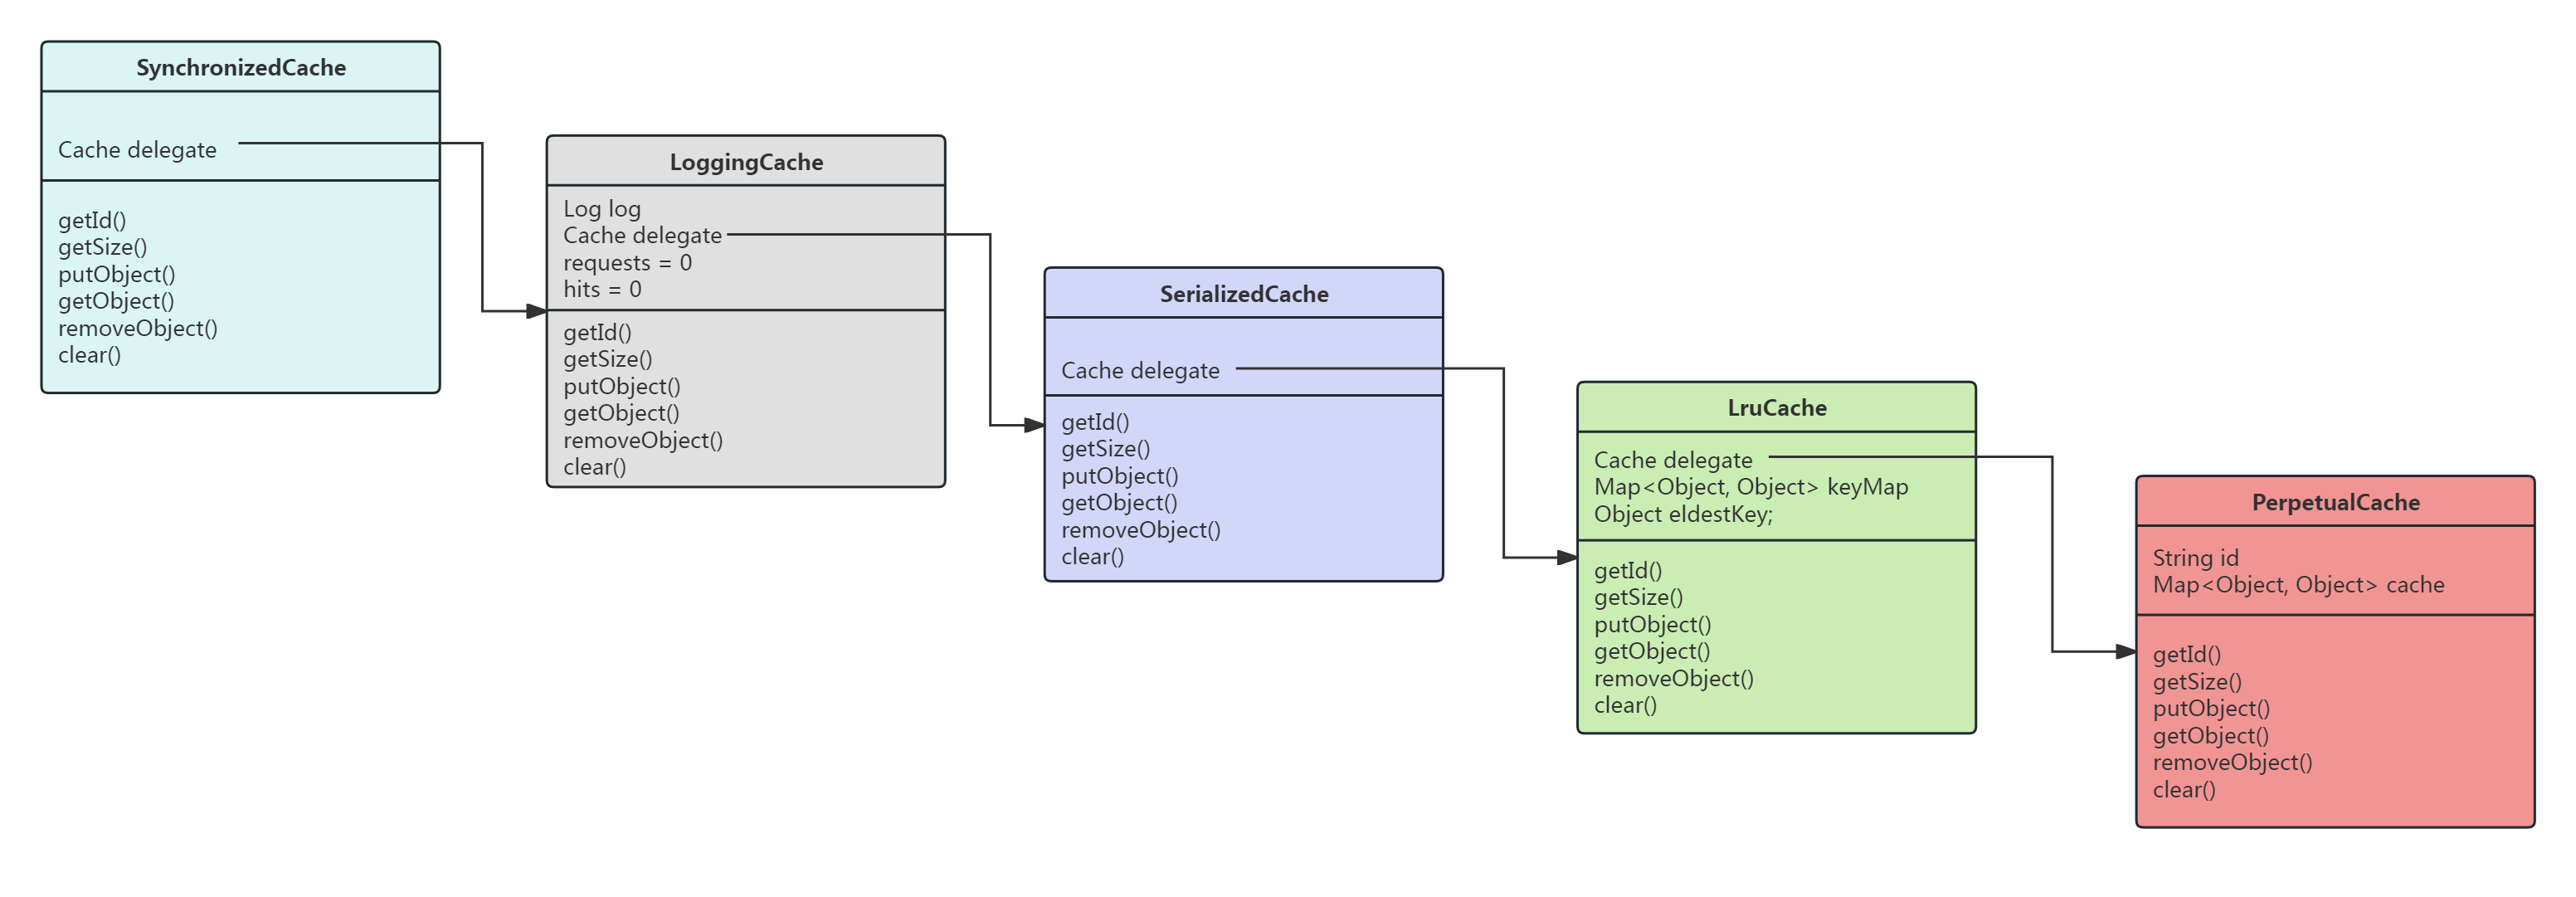
- eviction:缓存策略。可选值有:
FIFO- 先进先出:按对象进入缓存的顺序来移除它们。LRU- 最近最少使用:移除最长时间不被使用的对象。(默认策略)SOFT- 软引用:基于垃圾回收器状态和软引用规则移除对象。LRU- 弱引用:更积极地基于垃圾收集器状态和弱引用规则移除对象。
- flushInterval:缓存刷新频率。可以被设置为任意的正整数,单位是毫秒。默认不设置,也就是没有刷新频率,缓存仅仅会在调用语句时刷新。
- size:缓存容量。可以被设置为任意正整数,但要注意可用的内存资源。默认值是1024。
- readOnly:只读属性。可以被设置为true或false。只读的缓存会给所有调用者返回缓存对象的相同实例,因此这些对象不能被修改,这就提供了可观的性能提升;而可读写的缓存会(通过序列化)返回缓存对象的拷贝。速度上会慢一些,但是更安全,因此默认值是false。
6.4 MyBatis使用Redis缓存
MyBatis除了提供内置的一级缓存和二级缓存,还支持使用第三方缓存(例如Redis、Ehcache)作为二级缓存,甚至支持自定义缓存。
MyBatis官方提供了一个mybatis-redis模块,该模块用于整合Redis作为二级缓存。
首先,在pom.xml文件中引入mybatis-redis依赖:
<dependency>
    <groupId>org.mybatis.caches</groupId>
    <artifactId>mybatis-redis</artifactId>
    <version>1.0.0-beta2</version>
</dependency>
然后,在Mapper的XML配置文件中添加缓存配置,指定Redis缓存类:
<!--UserMapper.xml-->

<mapper namespace="com.star.mybatis.mapper.UserMapper">
    <cache type="org.mybatis.caches.redis.RedisCache"/>
    ......
</mapper>
最后,在classpath下新增redis.properties文件,配置Redis的连接信息:
#redis.properties

host=127.0.0.1
port=6379
password=
maxActive=100
maxIdel=20
whenExhaustedAction=WHEN_EXHAUSTED_GROW
maxWait=10
testOnBorrow=true
testOnReturn=true
timeBetweenEvictionRunsMillis=10000
numTestsPerEvictionRun=10000
minEvictableIdleTimeMillis=100
softMinEvictableIdleTimeMillis=-1
接下来研究一下mybatis-redis模块的实现。由上面的配置可知,该模块的缓存核心实现类是RedisCache类。
源码6:org.mybatis.caches.redis.RedisCache

public final class RedisCache implements Cache {

    private String id;
    private static JedisPool pool;

    public RedisCache(final String id) {
        if (id == null) {
            throw new IllegalArgumentException("Cache instances require an ID");
        }
        this.id = id;
        // 通过RedisConfigurationBuilder对象获取Redis配置信息
        RedisConfig redisConfig = RedisConfigurationBuilder.getInstance().parseConfiguration();
        // 实例化一个JedisPool对象,与Redis服务器建立连接
        pool = new JedisPool(redisConfig, redisConfig.getHost(), redisConfig.getPort(),
                redisConfig.getConnectionTimeout(), redisConfig.getSoTimeout(), redisConfig.getPassword(),
                redisConfig.getDatabase(), redisConfig.getClientName());
    }
}
由 源码6 可知,RedisCache实现了Cache接口,使用Jedis客户端操作Redis。 在其构造方法中,首先通过RedisConfigurationBuilder对象的实例获取一个描述了Redis配置信息的RedsiConfig对象,然后使用RedsiConfig对象创建JedisPool对象,建立与Redis服务器的连接。
源码7:org.mybatis.caches.redis.RedisConfigurationBuilder

private static final String SYSTEM_PROPERTY_REDIS_PROPERTIES_FILENAME = "redis.properties.filename";
private static final String REDIS_RESOURCE = "redis.properties";
private final String redisPropertiesFilename;

private RedisConfigurationBuilder() {
    redisPropertiesFilename = System.getProperty(SYSTEM_PROPERTY_REDIS_PROPERTIES_FILENAME, REDIS_RESOURCE);
}

public RedisConfig parseConfiguration(ClassLoader classLoader) {
    Properties config = new Properties();
    // 读取classpath下的redis.properties文件
    InputStream input = classLoader.getResourceAsStream(redisPropertiesFilename);
    if (input != null) {
        try {
            config.load(input);
        } // catch finally ......
    }
    RedisConfig jedisConfig = new RedisConfig();
    setConfigProperties(config, jedisConfig);
    return jedisConfig;
}
由 源码7 可知,RedisConfigurationBuilder对象会读取classpath下的redis.properties文件中的配置信息,将其转换为RedisConfig对象。
接下来研究一下RedisCache是如何存数据的,即putObject()方法:
源码8:org.mybatis.caches.redis.RedisCache

@Override
public void putObject(final Object key, final Object value) {
    execute(new RedisCallback() {
        @Override
        public Object doWithRedis(Jedis jedis) {
            jedis.hset(id.toString().getBytes(), key.toString().getBytes(), SerializeUtil.serialize(value));
            return null;
        }
    });
}
由 源码8 可知,RedisCache使用Redis的Hash数据结构存放缓存数据。 putObject()方法首先会借助SerializeUtil工具类的serialize()方法将需要保存的Java对象进行序列化,再调用Jedis的hset()方法将序列化后的数据存入Redis。
再来研究一下RedisCache是如何取数据的,即getObject()方法:
源码9:org.mybatis.caches.redis.RedisCache

@Override
public Object getObject(final Object key) {
    return execute(new RedisCallback() {
        @Override
        public Object doWithRedis(Jedis jedis) {
            return SerializeUtil.unserialize(jedis.hget(id.toString().getBytes(), key.toString().getBytes()));
        }
    });
}
由 源码9 可知,getObject()方法首先会调用Jedis的hget()方法将序列化的数据从Redis中查询出来,再借助SerializeUtil工具类的unserialize()方法将数据反序列化,转换为Java对象。
下面通过Debug工具验证一下MyBatis使用Redis是否生效。
第一次调用查询方法时,二级缓存的实现,确实已经换成了RedisCache:

第二次调用相同的查询方法时,直接从缓存中就得到了数据:

此时Redis中确实存在Key为com.star.mybatis.mapper.UserMapper的数据:

可见MyBatis使用Redis已经生效。
除了Redis外,MyBatis还提供了整合其他缓存的适配器,例如:ehcache-cache项目用于整合EhCache缓存,oscache-cache项目用于整合OSCache缓存,memcached-cache项目用于整合Memcached缓存。
6.5 小结
第六章到此就梳理完毕了,本章的主题是:MyBatis缓存。回顾一下本章的梳理的内容:
(十七)一级缓存和二级缓存的实现原理
(十八)二级缓存对象的创建、MyBatis使用Redis缓存
更多内容请查阅分类专栏:MyBatis3源码深度解析
第七章主要学习:MyBatis日志实现。主要内容包括:
- Java日志体系;
- MyBatis日志实现。