引言
上篇文章我们看到了如何从零训练一个聊天机器人,本文在此基础上介绍各种生成策略的原理和实现。最后通过Gradio构建一个聊天机器人应用。
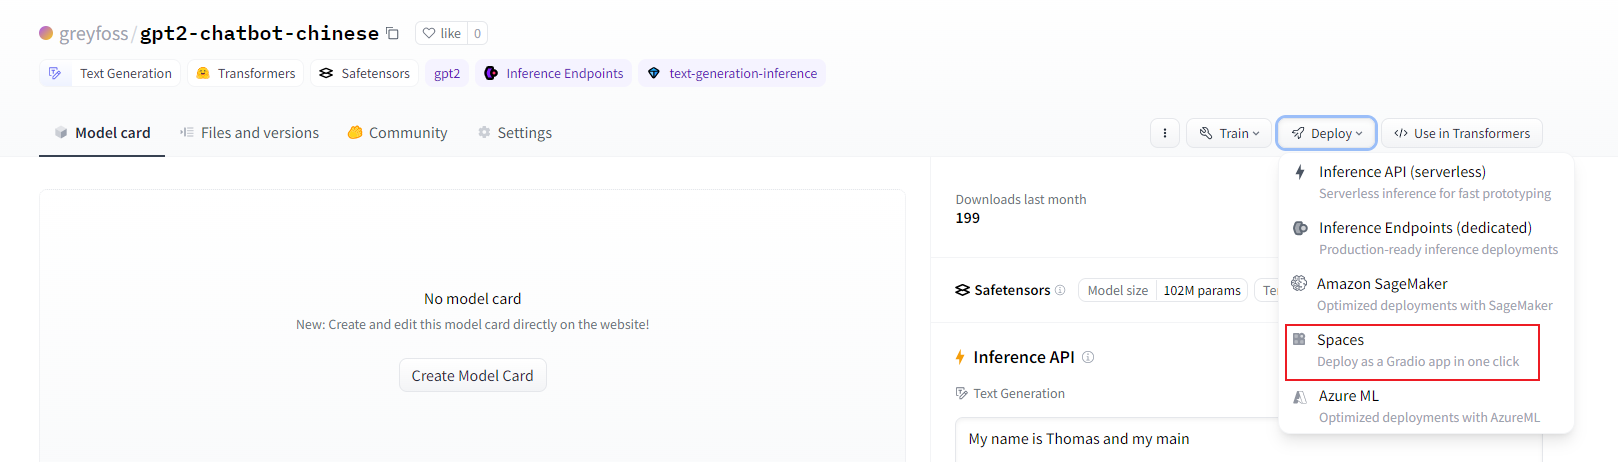
体验地址提前放出: https://huggingface.co/spaces/greyfoss/gpt2-chatbot
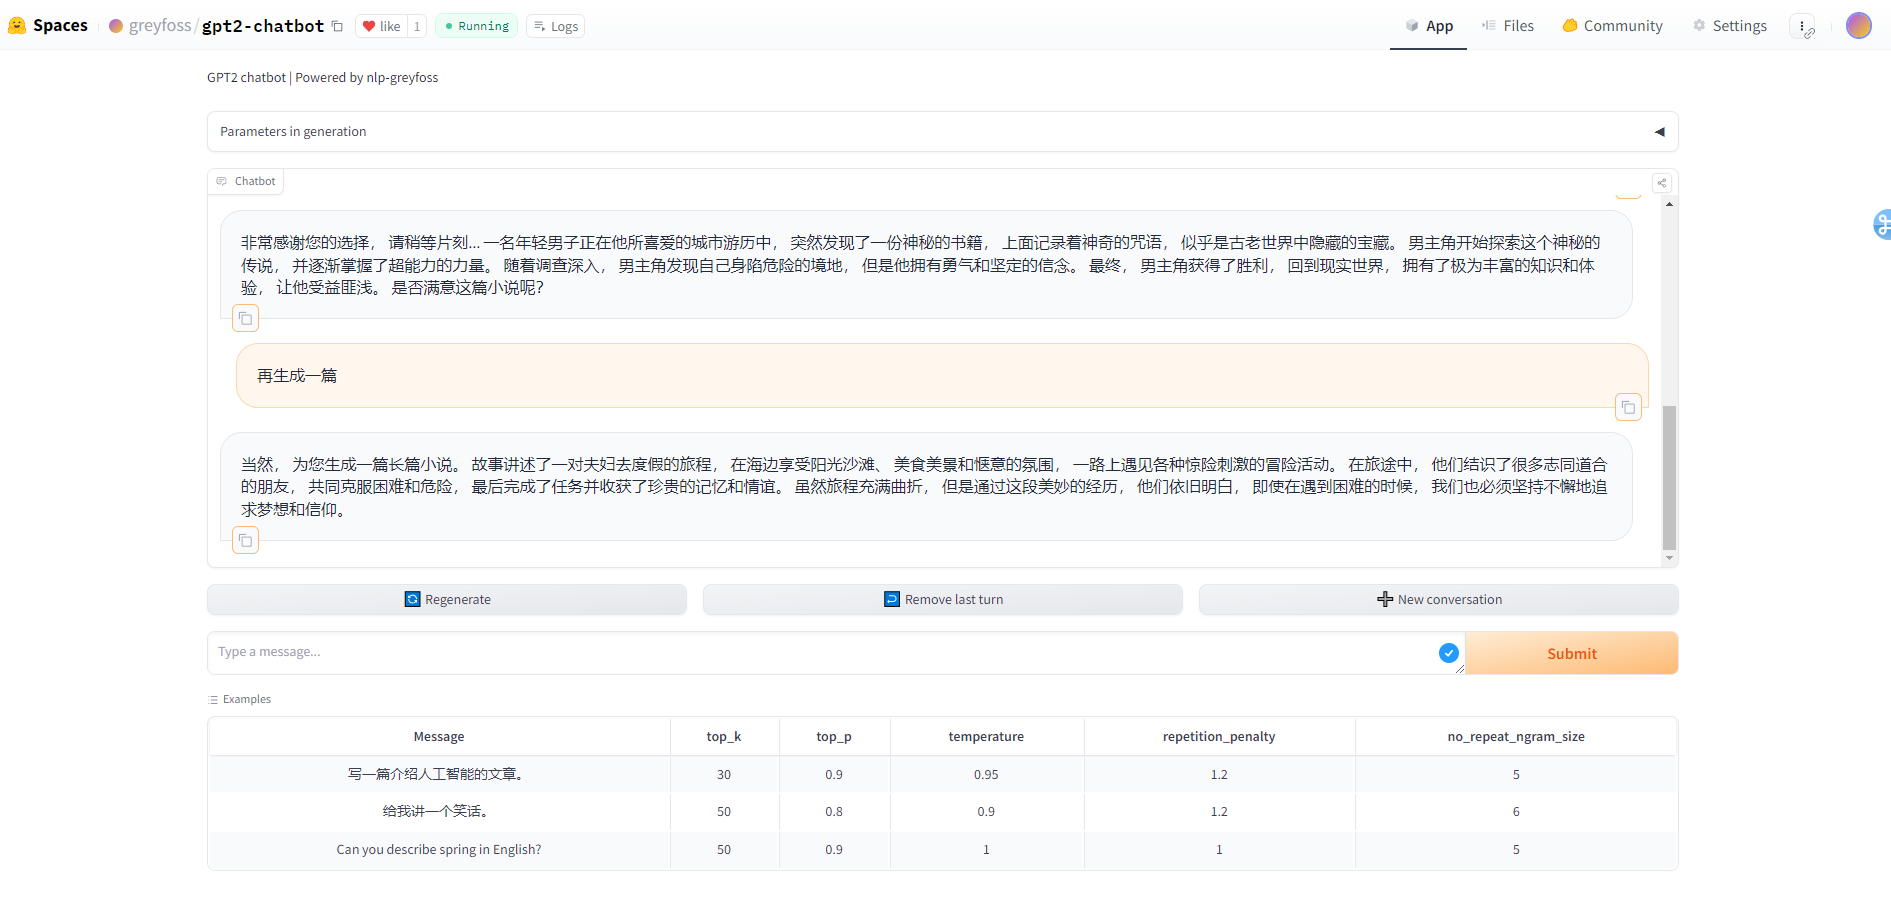
效果如上图所示。
定义生成框架
def generate(
    model,
    tokenizer,
    prompt,
    max_length=255,
    temperature=1.0,
    top_k=50,
    top_p=1.0,
    repetition_penalty=1.0,
    no_repeat_ngram_size=0,
    device="cuda",
):
    """

    Args:
        model : the model.
        tokenizer : the tokenizer.
        prompt : the input or instruction given to the model.
        max_length : max generate length. Defaults to 255.
        temperature : the value used to modulate the next token probabilities. Defaults to 1.0.
        top_k : the number of highest probability vocabulary tokens to keep for top-k-filtering. Defaults to 50.
        top_p : if set to float < 1, only the smallest set of most probable tokens with probabilities that add up to
            `top_p` or higher are kept for generation. Defaults to 1.0.
        repetition_penalty : The parameter for repetition penalty. 1.0 means no penalty. Defaults to 1.0.
        no_repeat_ngram_size : If set to int > 0, all ngrams of that size can only occur once. Defaults to 0.
        device : the device. Defaults to "cuda".

    """
    # 返回一个int列表
    input_ids = tokenizer.encode(prompt, add_special_tokens=False)
    # add a dim as [batch_size, seq_len]
    input_ids = torch.tensor(input_ids).long().to(device).unsqueeze(0)

    generated = []
    for _ in range(max_length):
        outputs = model(input_ids=input_ids)
        logits = outputs.logits
        next_token_logits = logits[0, -1, :]
        next_token_id = torch.argmax(next_token_logits, dim=-1, keepdim=True)
        generated.append(next_token_id.item())
        if next_token_id.item() == tokenizer.eos_token_id:
            break
        input_ids = torch.cat((input_ids, next_token_id.unsqueeze(0)), dim=1)

    return generated
首先,定义了生成函数generate,它有一些参数,model和tokenizer分别是我们训练的模型和使用的分词器。prompt是给模型的输入,如果期望模型有多轮对话能力,则需要把多轮对话拼接起来给模型。max_length是模型一次最多生成的长度。
剩下的几个参数是本文的核心内容,暂且按下。
该函数的作用是按照一定的策略迭代地生成内容。这里分为几步,第一步编码用户的输入,当然这里的输入有一定的格式化要求。
第二步将输入转换成Tensor,并且增加批次维度,虽然我们的批大小一定为1。
第三步是迭代的生成内容:
- 传入输入
- 获取模型预测的标记分布;
- 通过取概率最大的标记作为生成的标记。
- 如果预测的是结束标记,则退出。
- 否则和输入拼接到一起,继续喂给模型预测下一个标记。
然后我们编码生成框架的内容:
if __name__ == "__main__":
    device = "cuda" if torch.cuda.is_available() else "cpu"

    tokenizer = AutoTokenizer.from_pretrained("greyfoss/gpt2-chatbot-chinese")
    model = AutoModelForCausalLM.from_pretrained("greyfoss/gpt2-chatbot-chinese")
    model = model.to(device)
    model.eval()

    history = []

    while True:
        try:
            user_input = input("User: ")

            history.append(user_input)

            prompt = format(history)
            output = generate(model, tokenizer, prompt, device=device)
            output_text = tokenizer.decode(
                output,
                skip_special_tokens=True,
                clean_up_tokenization_spaces=True,
            )

            history.append(output_text)

            print(f"\033[32mAssistant \033[31m{output_text}\033[0m")
        except KeyboardInterrupt:
            break
首先下载训练好的模型;然后获取用户的输入并转换成一定的格式;接着调用generate函数获取模型生成的内容,即AI助手的回复;调用tokenizer进行解码;最后输出助手的回复。
整个过程包裹在循环中。由于使用的是BERT的分词器,它没有处理空格,我们会发现生成的汉字之间还有空格。这里不处理这个问题。
其中调用了format函数对输入进行转换,并且会把用户和AI助手的输出保存到历史列表中。
def format(history):
    prompt = train_args.bos_token

    for idx, txt in enumerate(history):
        if idx % 2 == 0:
            prompt += f"{train_args.user_token}{txt}{train_args.eos_token}"
        else:
            prompt += f"{train_args.bot_token}{txt}{train_args.eos_token}"
    prompt += train_args.bot_token
    return prompt
format做的事情很简单,就是拼接成训练时模型看到的格式,最后通过<Assistant>告诉模型该它说话了:
<BOS><User>utter 1<EOS><Assistant>utter 2<EOS><User>utter 3<EOS><Assistant>
以上就是本文用到的生成框架,下面我们来看一下生成效果如何:

这里可以看到一些问题:
- 你好的回复多了一个
博; 生成一篇小说,关于冒险主义的只理解了生成一篇小说;- 再次生成的小说内容有很大的重复;
同时也有一些值得欣慰的地方:
- 模型生成的内容流畅度还可以;
- 它能理解
再生成一个,说明具备多轮对话的能力;
下面我们修改它的生成策略,从贪心策略(每次选择概率最大的)到随机生成。
随机生成
改成随机生成只需要修改generate()中一行代码:
next_token_id = torch.multinomial(
    torch.softmax(next_token_logits, dim=-1), num_samples=1
)
# next_token_id = torch.argmax(next_token_logits, dim=-1, keepdim=True)

随机性是有了,但是生成的内容变得不通顺了。
因为现在相当于是从整个词表中随机采样一个标记,不管概率多低都是有可能被选中的,低概率的标记会影响生产文本的质量。因此,一种解决方法是只选择概率最高的那些标记。我们需要避免选择这些不太可能的标记,这就是top-k和top-p做的事情。我们先来看top-k。
Top-K
top-k很简单,仅采样概率最高的k个标记。
for _ in range(max_length):
    outputs = model(input_ids=input_ids)
    logits = outputs.logits
    next_token_logits = logits[0, -1, :]

    if top_k > 0:
        indices_to_remove = (
            next_token_logits
            < torch.topk(next_token_logits, top_k)[0][..., -1, None]
        )
        next_token_logits[indices_to_remove] = -float("Inf")

    next_token_id = torch.multinomial(
        torch.softmax(next_token_logits, dim=-1), num_samples=1
    )
    generated.append(next_token_id.item())
    if next_token_id.item() == tokenizer.eos_token_id:
        break
    input_ids = torch.cat((input_ids, next_token_id.unsqueeze(0)), dim=1)

return generated
实现起来也不难,首先判断一下top_k大于0才启用。
torch.topk(next_token_logits, top_k)返回next_token_logits中 top_k个最大的元素,实际返回的是一个数组,包含元素值和对应的索引。
x = torch.arange(1., 6.) # tensor([ 1.,  2.,  3.,  4.,  5.])
torch.topk(x, 3) # torch.return_types.topk(values=tensor([5., 4., 3.]), indices=tensor([4, 3, 2]))
默认会进行排序,torch.topk(next_token_logits, top_k)[0][..., -1, None]获取返回元组中的values,取最小的那个,最后的None是为了增加维度。
next_token_logits < torch.topk(next_token_logits, top_k)[0][..., -1, None]这段代码的意思是返回一个Tensor,其中的对应着一个bool列表,列表中每个元素表示对应位置的logits是否小于topk中最小的logits。
然后通过next_token_logits[indices_to_remove] = -float("Inf")将这些较小的logits设成负无穷大,这样在torch.softmax(next_token_logits, dim=-1)转换成概率的时候它们就会变成0,也就不会被选中。

上面是top_k=10的生成结果,可以看到流畅性好多了,但有时生成一些无意义的东西。比如 这 只 野 兽 正 在 追 逐 他 , 为 了 追 逐 这 只 野 兽 而 追 赶 。
以及生成了一些重复的内容: 他 必 须 通 过 各 种 困 难 和 挑 战 , 例 如 迷 宫 、 沼 泽 、 山 脉 和 沼 泽 。
其实只是词语级别上的重复还好,更糟糕的是句子级别上的重复。
我们可以增加重复惩罚来抑制重复内容的生成,避免重复的问题我们后面再说,现在我们来看另一种避免低概率标记的方式:top-p。
Top-P
top-p也是在限制可采样的标记数量,但要注意的是这里的p指的是累计概率,也称为核采样(nucleus sampling),如下图:
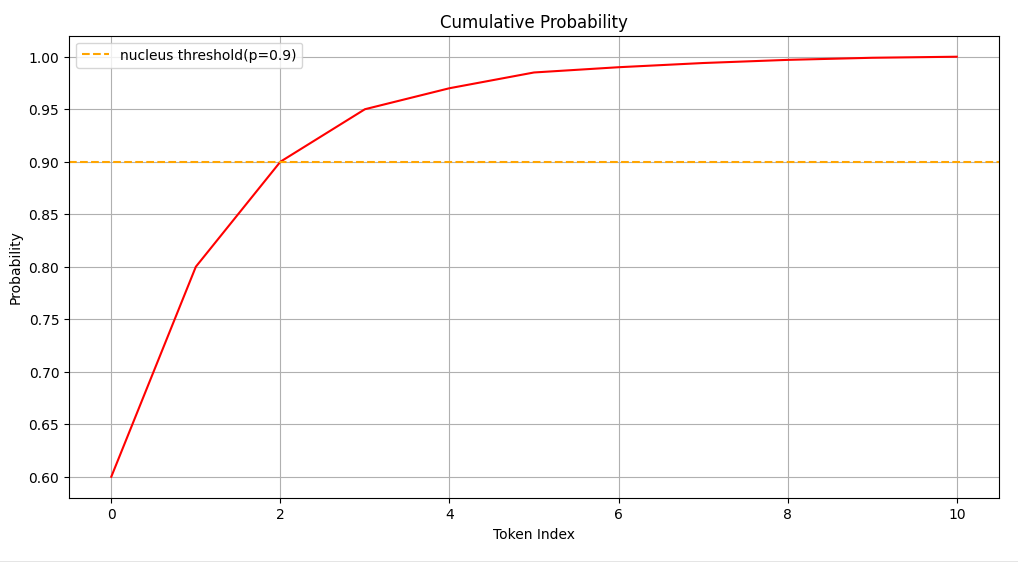
首先将预测标记的概率分布进行降序排序,然后计算概率的累积值。上图通过以下代码生成:
import numpy as np
import matplotlib.pyplot as plt

probs = np.array([0.6, 0.2, 0.1, 0.05, 0.02, 0.015, 0.005, 0.004, 0.003, 0.002, 0.001])
cumulative_probs = np.cumsum(probs) # [0.6   0.8   0.9   0.95  0.97  0.985 0.99  0.994 0.997 0.999 1.   ]

plt.figure(figsize=(12, 6))
plt.plot(np.arange(len(cumulative_probs)), cumulative_probs, color='r')
plt.axhline(y=0.9, color='orange', linestyle='--', label='nucleus threshold(p=0.9)')
plt.xlabel('Token Index')
plt.ylabel('Probability')
plt.title('Cumulative Probability')
plt.legend()
plt.grid(True)
plt.show()
为了便于理解,这里假设只有10个标记,概率排序后为:[0.6, 0.2, 0.1, 0.05, 0.02, 0.015, 0.005, 0.004, 0.003, 0.002, 0.001]。
它的累积值就是:[0.6 0.8 0.9 0.95 0.97 0.985 0.99 0.994 0.997 0.999 1. ]。
上图p=0.9意思只从前三个标记中采样,显然这个值越小采样的标记数也越少。
实现top p要复杂一点:
input_ids = tokenizer.encode(prompt, add_special_tokens=False)
input_ids = torch.tensor(input_ids).long().to(device).unsqueeze(0)

generated = []
for _ in range(max_length):
    outputs = model(input_ids=input_ids)
    logits = outputs.logits
    next_token_logits = logits[0, -1, :]

    if top_k > 0:
        indices_to_remove = (
            next_token_logits
            < torch.topk(next_token_logits, top_k)[0][..., -1, None]
        )
        next_token_logits[indices_to_remove] = -float("Inf")

    if top_p > 0:
        # 根据logits值排序
        sorted_logits, sorted_indices = torch.sort(
            next_token_logits, descending=True
        )
        # 转换排序后的logits为概率并计算累积值
        cumulative_probs = torch.cumsum(
            torch.softmax(sorted_logits, dim=-1), dim=-1
        )
        # 要移除的是累积值超过top_p的
        sorted_indices_to_remove = cumulative_probs > top_p
        # 通过将索引向右移,可以确保第一个超过阈值的token不会被移除
        sorted_indices_to_remove[..., 1:] = sorted_indices_to_remove[
            ..., :-1
        ].clone()
        sorted_indices_to_remove[..., 0] = 0
        # 根据sorted_indices_to_remove找到要移除的token索引
        indices_to_remove = sorted_indices[sorted_indices_to_remove]
        next_token_logits[indices_to_remove] = -float("Inf")

    next_token_id = torch.multinomial(
        torch.softmax(next_token_logits, dim=-1), num_samples=1
    )
    generated.append(next_token_id.item())
    if next_token_id.item() == tokenizer.eos_token_id:
        break
    input_ids = torch.cat((input_ids, next_token_id.unsqueeze(0)), dim=1)
生成时的设定如下:
output = generate(
    model, tokenizer, prompt, top_p=0.9, top_k=0, device=device
)

可以看到这次生成的内容还不错。
可能上面的代码有一个问题,为什么要将索引右移?下面通过代码来解释:
import torch
top_p = 0.9
# 设计一个排好序的概率列表
probs = torch.Tensor([0.6, 0.2, 0.1, 0.06, 0.04])
cumulative_probs = torch.cumsum(probs, dim=0) # tensor([0.6000, 0.8000, 0.9000, 0.9600, 1.0000])
sorted_indices_to_remove = cumulative_probs > top_p # tensor([False, False,  True,  True,  True])
在这种情况下,令top_p=0.9会发现它会移除概率0.1对应的标记。实际上我们可能想把0.1也包进去,因为仅是0.6+0.2的话累计概率才0.8。
sorted_indices_to_remove[..., 1:] = sorted_indices_to_remove[..., :-1].clone()
sorted_indices_to_remove[..., 0] = 0 # False
sorted_indices_to_remove
tensor([False, False, False, True, True])
然后将为True的设成负无穷:
probs[sorted_indices_to_remove] = -float("Inf")
probs
# tensor([0.6000, 0.2000, 0.1000, -inf, -inf])
接下来看如何进行重复惩罚。
重复惩罚
重复惩罚通过减少最近生成过的标记的概率来达到惩罚的目的,鼓励模型生成新的和不同的内容而不是重复自己,有助于促进多样化的输出。
本文介绍三种重复惩罚的方式:
- 温度缩放:通过温度参数(
temperature)来调整标记的概率分布。较高的温度会增加多样性,而较低的温度会导致更确定的输出。 - 基于标记的惩罚:通过参数
repetition_penalty根据最近生成的输出中标记的出现频率对其进行惩罚,出现频率更高的标记会受到更高的惩罚从而减少它再次生成的概率。 - N-gram惩罚:参数
no_repeat_ngram_size的值对应n-gram中的n,对出现频率较高的n-gram进行更严厉的惩罚。
我们依次来探讨。
温度缩放
使用基于温度缩放的随机采样方法来从训练好的语言模型生成文本, w i ∈ R d w_i \in \Bbb R^d wi∈Rd是词表中的第 i i i个标记,生成这个标记的概率为:
p i = exp ( w i / T ) ∑ j exp ( x j / T ) p_i = \frac{\exp(w_i/T)}{\sum_j \exp(x_j/T)} pi=∑jexp(xj/T)exp(wi/T)
这里的 T T T就是温度值。较高的温度值(例如大于1.0)会增加生成文本的随机性和多样性。它使得模型更有可能选择概率较低的标记,从而产生更多样化和创造性的输出。然而,较高的温度值也会增加生成不合理或不连贯文本的可能性。
相反,较低的温度值(例如接近0.0)会减少随机性,使生成的文本更加确定和一致。模型更倾向于选择概率较高的标记,因此生成的文本通常会更加可靠和一致。
从这个公式也很好理解,当 T T T超过 1 1 1时,相当于除了一个惩罚,值越大的惩罚越多;反之,当 T T T低于 1 1 1时,相当于乘了一个增强,值越大的增强越多。
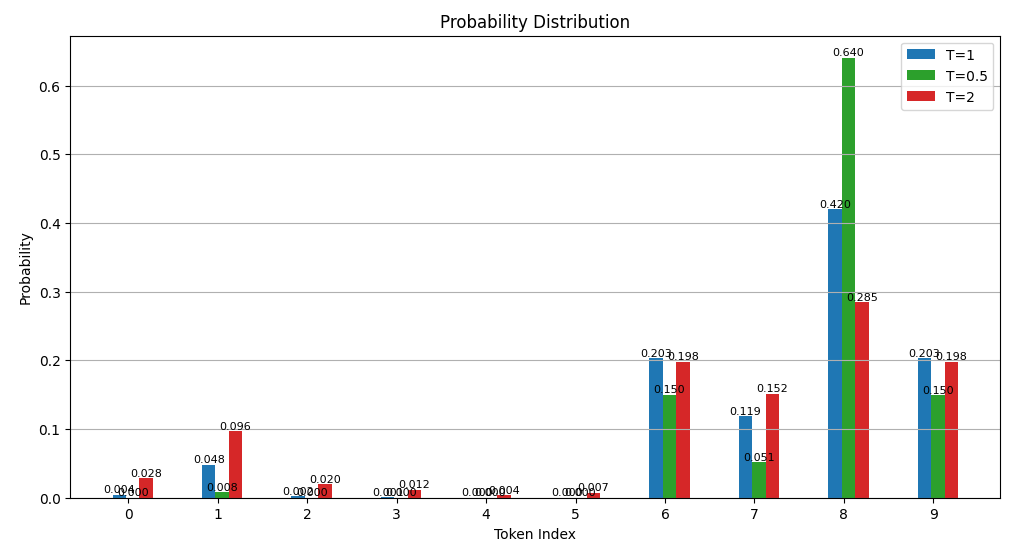
如上图所示,蓝色代表原来的概率;红色代表 T = 2 T=2 T=2;绿色代表 T = 0.5 T=0.5 T=0.5;可以比较它们的概率值之间温度参数变化之后的改变幅度。比如绿色极大地增强了原来Token index 8的值,实际上是从别的Token上匀了一些概率上去了,所以相比较之下别的Token概率取值还降低了。
在应用温度控制的随机抽样方法时,可以根据需要调整温度值,以在生成文本的随机性和可控性之间取得平衡。实现起来非常简单:
next_token_logits = logits[0, -1, :]
# temperature scaling
next_token_logits = next_token_logits / temperature
设置温度和其他参数如下:
output = generate(
    model,
    tokenizer,
    prompt,
    top_k=50,
    top_p=0.9,
    temperature=1.2,
    device=device,
)

可以看到,虽然温度缩放能增加多样性,但还不能防止重复生成。比如生成的5个英文名字中有两个是重复的。
下面我们来看一个更严格的,基于标记的惩罚。
基于标记的惩罚
基于标记的惩罚很简单,就是某个标记被生成过的话,下一次对它的概率进行惩罚:
if repetition_penalty != 1.0:
    for i in set(generated):
        next_token_logits[i] /= repetition_penalty
所以要惩罚的话,这个repetition_penalty需要大于1。
下面是在取值1.2情况下的例子:
output = generate(
    model,
    tokenizer,
    prompt,
    top_k=50,
    top_p=0.9,
    repetition_penalty=1.2,
    device=device,
)

模型回复的时候出了点问题,应该是不重复的英文名。不过这里模型能理解5和10的区别。
第一次回复中不包含重复的名字,第二次回复中存在一个noah。注意我们这里的实现仅考虑单轮AI生成的对话不重复,即没有考虑历史对话中的标记。由于是采样的方式,所以哪怕增加了一点惩罚还是生成重复的也不奇怪,除非将它的概率设成0。
我们尝试增大惩罚后(repetition_penalty=1.5)看看效果:

这次它的数字理解上出了点问题,但是单轮回复中不在包含重复的英文名,不错。
N-gram惩罚
本节介绍最严厉的惩罚方式,如果某个N-gram(即连续N个标记)出现在之前生成的内容中,那么这个N-gram的最后一个标记的概率会被降维打击到零。

我们先来看一下实现的效果,这是令N=2的结果。可以看到由于城市之前出现过,下文中模型用各种城x来替代城市。所以N-gram的设定一定要小心,不能设得太小。
下面来看是如何实现的(参考了Transformer源码):
if no_repeat_ngram_size > 0:

    # 禁掉的标记 input_ids[0] 表示我们只考虑批大小为1的情况
    # input_ids.shape[-1]是当前上下文的长度
    banned_tokens = _calc_banned_ngram_tokens(
        no_repeat_ngram_size, input_ids[0], input_ids.shape[-1]
    )
    for banned_token in banned_tokens:
        # 将禁用标记的logits设为无穷大,经过Exp后变成概率为0
        next_token_logits[banned_token] = -float("Inf")
上面的代码 计算本次预测中是否存在和之前内容重复的n-gram,如果存在,则让n-gram中最后一个标记的概率设成0。其中调用了_calc_banned_ngram_tokens,实现如下:
def _calc_banned_ngram_tokens(ngram_size, prev_input_ids, cur_len):
    # 边界处理
    if cur_len + 1 < ngram_size:
        return []
    # 得到所有的n-gram
    generated_ngrams = _get_ngrams(ngram_size, prev_input_ids)
    # 得到所有要禁止生成的token
    banned_tokens = _get_generated_ngrams(
        generated_ngrams, prev_input_ids, ngram_size, cur_len
    )

    return banned_tokens
它调用了两函数,prev_input_ids是之前生成token id列表。
_get_ngrams的实现:
def _get_ngrams(ngram_size, prev_input_ids):
    # 保存之前生成过的n-gram
    generated_ngram = defaultdict(list)
    # 转换为python列表
    gen_tokens = prev_input_ids.tolist()
    # 遍历所有的n-gram
    for ngram in zip(*[gen_tokens[i:] for i in range(ngram_size)]):
        # 以n-gram中前n-1个token id作为key
        prev_ngram_tuple = tuple(ngram[:-1])
		# 最后一个token作为value
        # 存入generated_ngram
        generated_ngram[prev_ngram_tuple] += [ngram[-1]]
    return generated_ngram
其中最复杂的是zip(*[gen_tokens[i:] for i in range(ngram_size)])。
这段代码通过使用 zip 函数将多个列表中的元素分组,创建了一个 n 元组列表。
gen_tokens 是之前生成过的token id列表。
for i in range(ngram_size) 循环创建一个范围,从 0 到 ngram_size - 1。
[gen_tokens[i:] for i in range(ngram_size)] 创建一个列表,列表中的元素是 gen_tokens 的子列表,每个子列表从 i 开始,其中 i 是范围中的当前值。
假设当前gen_tokens = [21130, 4495, 2768, 671, 5063, 1068, 754, 1088, 7372, 4638, 2207, 6432, 21129, 21131]。
那么[gen_tokens[i:] for i in range(ngram_size)]得到了列表为(假设n=3):
[[21130, 4495, 2768, 671, 5063, 1068, 754, 1088, 7372, 4638, 2207, 6432, 21129, 21131], [4495, 2768, 671, 5063, 1068, 754, 1088, 7372, 4638, 2207, 6432, 21129, 21131], [2768, 671, 5063, 1068, 754, 1088, 7372, 4638, 2207, 6432, 21129, 21131]]
zip(*[gen_tokens[i:] for i in range(ngram_size)]) 使用 zip 函数将这些子列表中的元素分组,创建 n 元组列表。这里得到的会是:
[(21130, 4495, 2768), (4495, 2768, 671), (2768, 671, 5063), (671, 5063, 1068), (5063, 1068, 754), (1068, 754, 1088), (754, 1088, 7372), (1088, 7372, 4638), (7372, 4638, 2207), (4638, 2207, 6432), (2207, 6432, 21129), (6432, 21129, 21131)]
就是所有的n-gram组合。
最后的_get_generated_ngrams简单一些:
def _get_generated_ngrams(banned_ngrams, prev_input_ids, ngram_size, cur_len):
    # before decoding the next token, prevent decoding of ngrams that have already appeared
    start_idx = cur_len + 1 - ngram_size
    ngram_idx = tuple(prev_input_ids[start_idx:cur_len].tolist())
    return banned_ngrams[ngram_idx]
主要看是否最后一个生成的n-gram会和前面生成的重复。
下面来看如何快速实现一个带界面的聊天机器人。
Gradio
用的是gradio这个库,版本是4.21.0。最终实现出来的效果如下图所示:
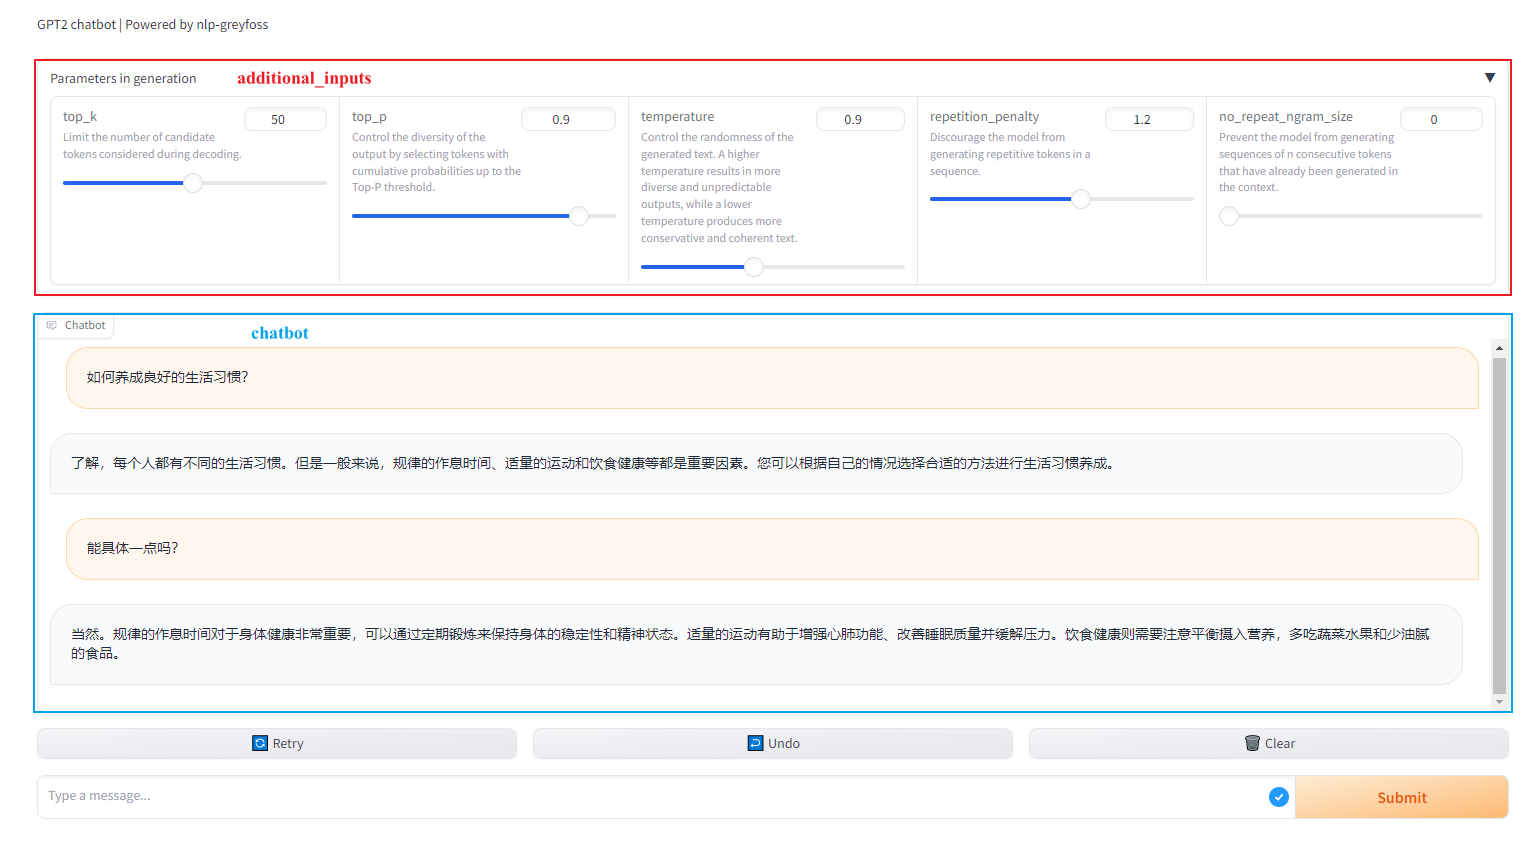
由于篇幅的关系,不会详细介绍这个库的使用,只会给出一些注释:
# 创建一个集成了聊天功能的接口
gr.ChatInterface(
        response, # 处理多轮对话和回复用户的消息
        chatbot=bot, # 显示用户的输入和模型的回复
        additional_inputs=[ # 额外的参数
            top_k,
            top_p,
            temperature,
            repetition_penalty,
            no_repeat_ngram_size,
        ],
    )
我们重点来看response方法的实现:
def response(
    user_input,
    chat_history,
    top_k,
    top_p,
    temperature,
    repetition_penalty,
    no_repeat_ngram_size,
):
    # chat_history是list的list,每个子list是用户和AI回复元组
    # 所以先拉平成一个列表
    history = list(itertools.chain(*chat_history))
    history.append(user_input)
	# 就可以使用我们之前编写的格式化函数了
    prompt = format(history)
    print(prompt) # <User>如何养成良好的生活习惯?<EOS><Assistant>

    output = generate(
        model,
        tokenizer,
        prompt,
        temperature=temperature,
        top_k=top_k,
        top_p=top_p,
        repetition_penalty=repetition_penalty,
        no_repeat_ngram_size=no_repeat_ngram_size,
    )
	# 处理中文和英文之间空格的不同
    tokens = tokenizer.convert_ids_to_tokens(output)
    for i, token in enumerate(tokens[:-1]):
        if is_english_word(token) and is_english_word(tokens[i + 1]):
            tokens[i] = token + " "
    text = "".join(tokens).replace("##", "").strip()
	# 只需要返回模型的回复,
    return text
通过执行launch()方法会输出一个链接:
Running on local URL:  http://127.0.0.1:7860

To create a public link, set `share=True` in `launch()`.
<User>如何养成良好的生活习惯?<EOS><Assistant>
<User>如何养成良好的生活习惯?<EOS><BOS>了解,每个人都有不同的生活习惯。但是一般来说,规律的作息时间、适量的运动和饮食健康等都是重要因素。您可以根据自己的情况选择合适的方法进行生活习惯养成。<EOS><EOS><User>能具体一点吗?<EOS><Assistant>
⚠️ 上面的代码有Bug,从输出格式化后的内容可以看出来,这个Bug读者朋友们知道如何解决吗?
打开这个链接就可以看到上面的界面。
核心代码只有这么点,剩下的诸如聊天历史的维护、响应函数的调用、前端的渲染都是Gradio帮我们完成的。
参考
- https://gist.github.com/thomwolf/1a5a29f6962089e871b94cbd09daf317
- https://www.gradio.app/guides/creating-a-chatbot-fast