引言
体验地址:https://huggingface.co/spaces/greyfoss/gpt2-chatbot
上篇文章我们通过Gradio作为前端轻松地连接到训练好的Chatbot,本文介绍如何分享你创建好的模型给你的朋友。
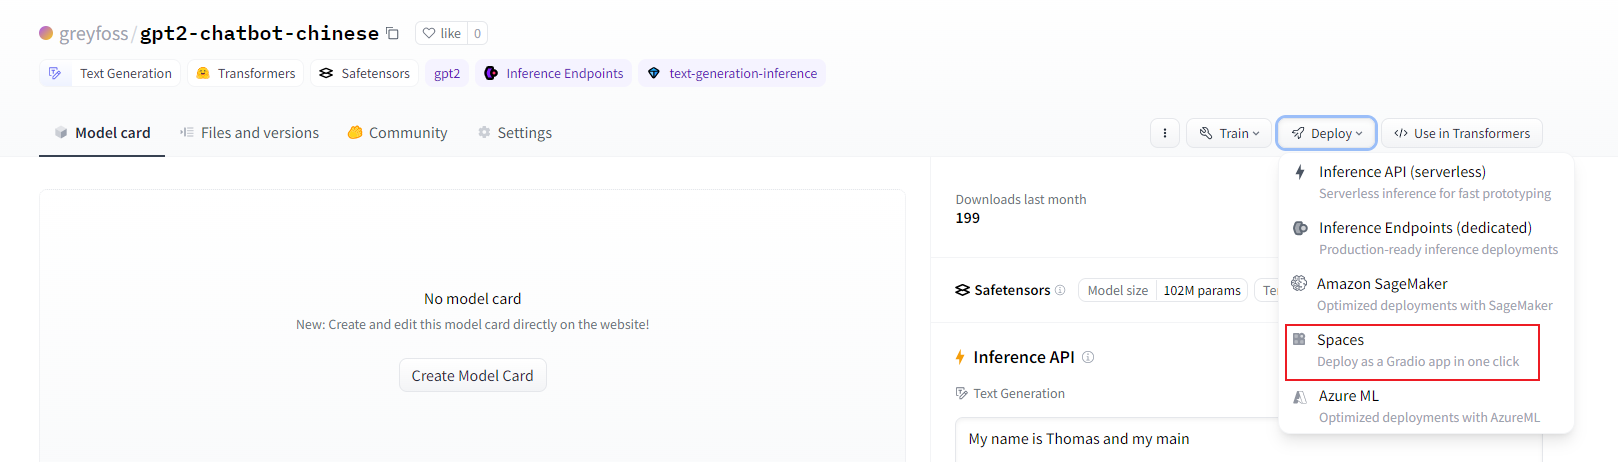
当你训练好的模型推送到Huggingface Hub上后,其实还可以进一步部署给朋友使用的,见上图。
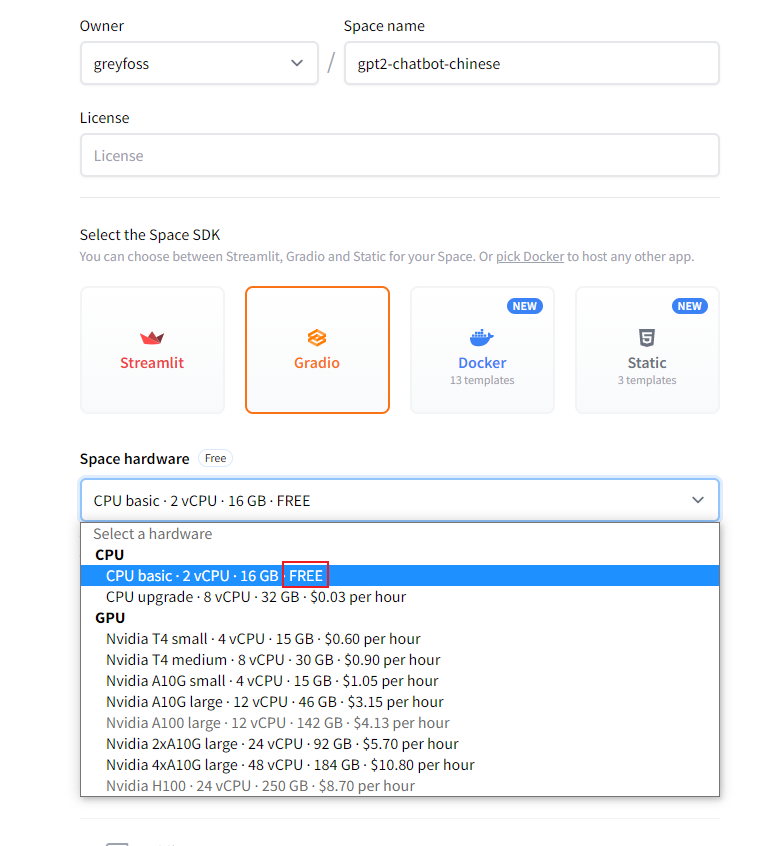
点进去后,会看到可以通过Gradio部署我们的聊天机器人,选择配置时被FREE深深吸引住了,再定睛一看原来是CPU,但是免费的还是挺香。2C16G应该对于这个模型来说也够用了。
为了在CPU上有良好的体验,我们需要在部署时进行一些优化,下面主要介绍通过ONNX来部署。
ONNX
本节的内容参考了Pytorch和HuggingFace官方教程,见参考1和2。
Open Neural Network eXchange (ONNX) 是表示机器学习模型格式的一种开放标准,定义了一套公共的运算符和一种公共的文件格式,以在各种框架中表示深度学习模型,包括PyTorch和TensorFlow。当将模型导出为ONNX格式时,这些运算符被用于构建一个计算图(通常称为中间表示),表示数据在神经网络中的流动。torch.onnx模块提供了从本地PyTorch torch.nn.Module模型中捕获计算图并将其转换为ONNX图的API。
通过公开具有标准化运算符和数据类型的图形,ONNX使得在不同框架之间轻松切换变得很容易。例如,可以将在PyTorch中训练的模型导出为ONNX格式,然后在TensorFlow中导入(反之亦然)。
导出的模型可以被许多支持ONNX的运行时所使用,包括微软的ONNX Runtime。
需要确保Pytorch的版本是2.1.0及以上,需要安装的库是:
!pip install --upgrade onnx onnxscript onnxruntime
验证一下:
import torch
print(torch.__version__)

import onnxscript
print(onnxscript.__version__)

from onnxscript import opset18

import onnxruntime
print(onnxruntime.__version__)
2.2.1+cu121
0.1.0.dev20240315
1.17.1
导出Pytorch模型到ONNX
截至PyTorch 2.1版本,ONNX Exporter有两个版本。
torch.onnx.dynamo_export是最新的(仍处于beta阶段)导出器,基于TorchDynamo技术,自PyTorch 2.0版本。
torch.onnx.export基于TorchScript后端,自PyTorch 1.2.0版本。
本节我们会看到如何将Pytorch模型使用TorchDynamo导出成ONNX格式。
ONNX是一种灵活的开放标准格式,用于表示机器学习模型。标准化的机器学习表示使得这些模型可以在各种硬件平台和运行环境中执行,从大规模云计算超级计算机到资源受限的边缘设备,如网络浏览器和手机。
定义一个简单的图像分类器
import torch
import torch.nn as nn
import torch.nn.functional as F


class MyModel(nn.Module):

  def __init__(self):
    super(MyModel, self).__init__()
    self.conv1 = nn.Conv2d(1, 6, 5)
    self.conv2 = nn.Conv2d(6, 16, 5)
    self.fc1 = nn.Linear(16 * 5 * 5, 120)
    self.fc2 = nn.Linear(120, 84)
    self.fc3 = nn.Linear(84, 10)

  def forward(self, x):
    x = F.max_pool2d(F.relu(self.conv1(x)), (2, 2))
    x = F.max_pool2d(F.relu(self.conv2(x)), 2)
    x = torch.flatten(x, 1)
    x = F.relu(self.fc1(x))
    x = F.relu(self.fc2(x))
    x = self.fc3(x)
    return x
导出成ONNX格式
我们已经定义了我们的模型,需要实例化它并创建一个随机的32x32输入。接下来,我们可以将模型导出为ONNX格式:
torch_model = MyModel()
torch_input = torch.randn(1, 1, 32, 32)
onnx_program = torch.onnx.dynamo_export(torch_model, torch_input)
可以看到,我们没有修改任何模型的代码,生成的ONNX模型以二进制protobuf文件的形式存储在torch.onnx.ONNXProgram中。
保存ONNX模型到文件中
我们可以进一步地使用以下代码将ONNX模型保存到磁盘上:
onnx_program.save("my_image_classifier.onnx")
这会在当前目录下保存这个文件。
我们可以使用以下代码将ONNX文件重新加载到内存中,并检查它的格式是否正确:
import onnx
onnx_model = onnx.load("my_image_classifier.onnx")
onnx.checker.check_model(onnx_model)
没报错说明没问题。
使用Netron可视化ONNX模型图
还可以使用Netron进行可视化。Netron可以安装在macOS、Linux或Windows计算机上,也可以直接在浏览器中运行。我们尝试使用Web版本,打开以下链接:https://netron.app/。

打开链接后,我们可以点击Open Model...按钮加载刚才保存好的ONNX模型。

使用ONNX运行时执行ONNX模型
我们转换成ONNX格式当然是想执行它。下面看如何使用ONNX Runtime执行ONNX模型。
ONNX标准并不支持PyTorch支持的所有数据结构和类型,因此在将输入传递给ONNX Runtime之前,我们需要将PyTorch输入适配为ONNX格式。在我们的示例中,输入恰好与原始的PyTorch模型相同,但在更复杂的模型中,输入可能比原始的PyTorch模型更多。
ONNX Runtime需要额外的步骤,这涉及将所有PyTorch张量转换为Numpy(在CPU上),并将它们封装到一个字典中,键是一个输入名称的字符串,值是Numpy张量。
现在,我们可以创建一个ONNX Runtime推理会话,使用处理后的输入执行ONNX模型,并获取输出。在本文中,ONNX Runtime在CPU上执行,但也可以在GPU上执行。
import onnxruntime
# torch_input = torch.randn(1, 1, 32, 32)
# 将PyTorch输入适配为ONNX格式
onnx_input = onnx_program.adapt_torch_inputs_to_onnx(torch_input)
print(f"Input length: {len(onnx_input)}")
print(f"Sample input: {onnx_input}")

ort_session = onnxruntime.InferenceSession("./my_image_classifier.onnx", providers=['CPUExecutionProvider']) # CPU

# 转换为Numpy
def to_numpy(tensor):
    return tensor.detach().cpu().numpy() if tensor.requires_grad else tensor.cpu().numpy()

onnxruntime_input = {k.name: to_numpy(v) for k, v in zip(ort_session.get_inputs(), onnx_input)}

onnxruntime_outputs = ort_session.run(None, onnxruntime_input)
Input length: 1
Sample input: (tensor([[[[-0.7220, -0.5403,  2.4361,  ..., -0.7169, -1.8715,  1.0804],
          [ 1.4021, -1.4058,  2.1243,  ..., -0.3179,  1.0338, -0.7995],
          [-0.4521, -0.7909, -0.5292,  ..., -1.4944, -0.5231,  0.1697],
          ...,
          [-0.0386,  0.5920, -1.5468,  ...,  0.3635, -1.0620, -1.6128],
          [ 0.5296, -1.3540, -0.3576,  ..., -0.6198,  2.6026, -0.3067],
          [-1.7563,  2.0526, -0.4164,  ..., -0.2538,  0.0301, -0.1198]]]]),)
比较Pytorch和ONNX运行时的结果
torch_outputs = torch_model(torch_input)
torch_outputs = onnx_program.adapt_torch_outputs_to_onnx(torch_outputs)

assert len(torch_outputs) == len(onnxruntime_outputs)
for torch_output, onnxruntime_output in zip(torch_outputs, onnxruntime_outputs):
    torch.testing.assert_close(torch_output, torch.tensor(onnxruntime_output))

print("PyTorch and ONNX Runtime output matched!")
print(f"Output length: {len(onnxruntime_outputs)}")
print(f"Sample output: {onnxruntime_outputs}")
PyTorch and ONNX Runtime output matched!
Output length: 1
Sample output: [array([[ 0.07159428, -0.05138571,  0.04295354, -0.12783284,  0.06733166,
         0.09275323, -0.00052077,  0.04322926, -0.00434714, -0.10994226]],
      dtype=float32)]
导出🤗 Transformers模型到ONNX
在生产环境中部署🤗 Transformers模型通常需要将模型导出为序列化格式,以便在专用运行时和硬件上加载和执行。
🤗 Optimum是Transformers的扩展,通过其exporters模块,可以将模型从PyTorch导出为ONNX序列化格式。🤗 Optimum还提供了一组性能优化工具,以在目标硬件上以最大效率训练和运行模型。
本节演示了如何使用🤗 Optimum将🤗 Transformers模型导出为ONNX格式。
一旦导出成ONNX格式,模型可以:
- 通过类似图量化和量化等技术为推理进行量化;
- 通过
ORTModelForXXX类运行在ONNX Runtime中,和🤗 Transformers中的AutoModel有同样的API; - 运行在量化推理pipelines中, 和🤗 Transformers中的 pipeline() 有同样的API;
🤗 Optimum通过利用配置对象来支持ONNX导出。
有两种方法可以将🤗 Transformers模型导出为ONNX格式,下面我们将展示这两种方法:
- 通过🤗 Optimum的CLI导出。
- 通过🤗 Optimum和
optimum.onnxruntime导出。
通过🤗 Optimum的CLI导出
首先需要安装额外的依赖:
pip install optimum[exporters]
下面的命令将把🤗 Hub的检查点distilbert/distilbert-base-uncased-distilled-squad导出为ONNX格式:
!optimum-cli export onnx --model distilbert/distilbert-base-uncased-distilled-squad distilbert_base_uncased_squad_onnx/
到当前目录的distilbert_base_uncased_squad_onnx文件下。
Framework not specified. Using pt to export the model.
config.json: 100% 451/451 [00:00<00:00, 1.93MB/s]
model.safetensors: 100% 265M/265M [00:01<00:00, 166MB/s]
Automatic task detection to question-answering.
tokenizer_config.json: 100% 28.0/28.0 [00:00<00:00, 78.8kB/s]
vocab.txt: 100% 232k/232k [00:00<00:00, 3.53MB/s]
tokenizer.json: 100% 466k/466k [00:00<00:00, 2.40MB/s]
Using the export variant default. Available variants are:
    - default: The default ONNX variant.
Using framework PyTorch: 2.2.1+cu121
/usr/local/lib/python3.10/dist-packages/transformers/models/distilbert/modeling_distilbert.py:246: TracerWarning: torch.tensor results are registered as constants in the trace. You can safely ignore this warning if you use this function to create tensors out of constant variables that would be the same every time you call this function. In any other case, this might cause the trace to be incorrect.
  mask, torch.tensor(torch.finfo(scores.dtype).min)
Post-processing the exported models...
Weight deduplication check in the ONNX export requires accelerate. Please install accelerate to run it.
Validating ONNX model distilbert_base_uncased_squad_onnx/model.onnx...
	-[✓] ONNX model output names match reference model (start_logits, end_logits)
	- Validating ONNX Model output "start_logits":
		-[✓] (2, 16) matches (2, 16)
		-[✓] all values close (atol: 0.0001)
	- Validating ONNX Model output "end_logits":
		-[✓] (2, 16) matches (2, 16)
		-[✓] all values close (atol: 0.0001)
The ONNX export succeeded and the exported model was saved at: distilbert_base_uncased_squad_onnx
上面的例子展示了如何从🤗 Hub中导出检查点,如果你想导出本地模型到ONNX,首先确保你把模型权重和分词器文件保存到同一个目录(local_path)。当使用CLI时,将local_path作为模型参数传递,并提供--task参数:
optimum-cli export onnx --model local_path --task question-answering distilbert_base_uncased_squad_onnx/
得到的model.onnx文件可以被运行在很多支持ONNX的加速器中,比如可以使用ONNX运行时加载并运行模型:
from transformers import AutoTokenizer
from optimum.onnxruntime import ORTModelForQuestionAnswering

tokenizer = AutoTokenizer.from_pretrained("distilbert_base_uncased_squad_onnx")
model = ORTModelForQuestionAnswering.from_pretrained("distilbert_base_uncased_squad_onnx")
inputs = tokenizer("What am I using?", "Using DistilBERT with ONNX Runtime!", return_tensors="pt")
outputs = model(**inputs)
print(outputs)
QuestionAnsweringModelOutput(loss=None, start_logits=tensor([[-4.7652, -1.0452, -7.0409, -4.6864, -4.0277, -6.2021, -4.9473,  2.6287,
          7.6111, -1.2488, -2.0551, -0.9350,  4.9758, -0.7707,  2.1493, -2.0703,
         -4.3232, -4.9472]]), end_logits=tensor([[ 0.4382, -1.6502, -6.3654, -6.0661, -4.1482, -3.5779, -0.0774, -3.6168,
         -1.8750, -2.8910,  6.2582,  0.5425, -3.7699,  3.8232, -1.5073,  6.2311,
          3.3604, -0.0772]]), hidden_states=None, attentions=None)
通过🤗 Optimum和optimum.onnxruntime导出
除了使用CLI,还可以使用代码导出🤗 Transformers模型:
from optimum.onnxruntime import ORTModelForSequenceClassification
from transformers import AutoTokenizer

model_checkpoint = "bert-base-chinese"
save_directory = "onnx/"

# 加载模型并导出成ONNX
ort_model = ORTModelForSequenceClassification.from_pretrained(model_checkpoint, export=True)
tokenizer = AutoTokenizer.from_pretrained(model_checkpoint)

# 保存ONNX的模型和分词器
ort_model.save_pretrained(save_directory)
tokenizer.save_pretrained(save_directory)
使用🤗 Transformers生成内容
在上篇文章中我们自己实现了generate方法,仅为了学习知识,实际中我们应该使用官方的generate方法:
def response(
        user_input,
        chat_history,
        top_k,
        top_p,
        temperature,
        repetition_penalty,
        no_repeat_ngram_size,
    ):
        history = list(itertools.chain(*chat_history))
        history.append(user_input)

        prompt = format(history)

        input_ids = tokenizer.encode(
            prompt,
            return_tensors="pt",
            add_special_tokens=False,
        ).to(device)

        prompt_length = input_ids.shape[1]

        beam_output = model.generate(
            input_ids,
            pad_token_id=tokenizer.pad_token_id,
            max_new_tokens=255,
            num_beams=3,
            top_k=top_k,
            top_p=top_p,
            no_repeat_ngram_size=no_repeat_ngram_size,
            temperature=temperature,
            repetition_penalty=repetition_penalty,
            early_stopping=True,
            do_sample=True,
        )
        # 不然会重复输出prompt内容
        output = beam_output[0][prompt_length:]

        tokens = tokenizer.convert_ids_to_tokens(output)
        for i, token in enumerate(tokens[:-1]):
            if is_english_word(token) and is_english_word(tokens[i + 1]):
                tokens[i] = token + " "
        text = "".join(tokens).replace("##", "").strip()
在HF Spaces部署Gradio项目
本节我们看如何上传训练好的模型到HF Spaces上,并以ONNX的格式通过Gradio进行演示。
首先要将训练好的模型上传到HF上,当然你得有一个HF账号,并且已经登录:
model.push_to_hub("gpt2-chatbot-chinese")
tokenizer.push_to_hub("gpt2-chatbot-chinese")
这里会默认上传到你账户下的gpt2-chatbot-chinese项目中,这个名称可以随意更改。
然后可以通过 https://huggingface.co/spaces/onnx/export 自动将🤗 Transformers模型导出成ONNX格式,并上传到ONNX model zero中。但是很遗憾没成功:
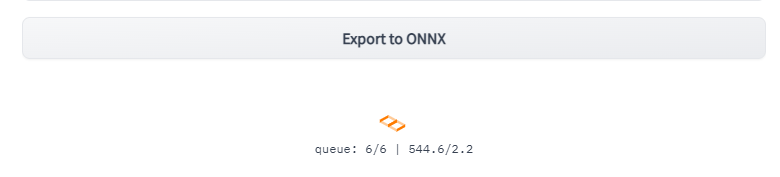
一直在排队。但是我发现HF Spaces中的应用是以Docker容器运行的,我们可以编写任何代码,包括将模型加载成ONNX!
核心代码是:
from optimum.onnxruntime import ORTModelForCausalLM

model = ORTModelForCausalLM.from_pretrained("greyfoss/gpt2-chatbot-chinese", export=True)
结束了!
创建Space时它会有一个代码仓库,我们可以修改app.py文件以及增加requirements.txt文件。除了没有Dockerfile其他和Docker项目用起来差不多。
requirements.txt(么有仔细看,应该写多了):
torch
numpy==1.25.2
pandas==2.1.0
tqdm==4.66.1
transformers==4.30.2
datasets==2.14.4
sentencepiece==0.1.99
huggingface_hub
optimum[exporters]
onnxruntime
accelerate
app.py改成:
from transformers import AutoTokenizer, AutoModelForCausalLM
import torch
from collections import defaultdict
import gradio as gr
from optimum.onnxruntime import ORTModelForCausalLM


import itertools
import regex as re
import logging


user_token = "<User>"
eos_token = "<EOS>"
bos_token = "<BOS>"
bot_token = "<Assistant>"


logger = logging.getLogger()
handler = logging.StreamHandler()
formatter = logging.Formatter(
        '%(asctime)s %(name)-12s %(levelname)-8s %(message)s')
handler.setFormatter(formatter)
logger.addHandler(handler)
logger.setLevel(logging.INFO)

max_context_length = 750

def format(history):
    prompt = bos_token

    for idx, txt in enumerate(history):
        if idx % 2 == 0:
            prompt += f"{user_token}{txt}{eos_token}"
        else:
            prompt += f"{bot_token}{txt}"
    prompt += bot_token
    return prompt

def remove_spaces_between_chinese(text):
    rex = r"(?<![a-zA-Z]{2})(?<=[a-zA-Z]{1})[ ]+(?=[a-zA-Z] |.$)|(?<=\p{Han}) +"
    return re.sub(rex, "", text, 0, re.MULTILINE | re.UNICODE)

def gradio(model, tokenizer):
    def response(
        user_input,
        chat_history,
        top_k,
        top_p,
        temperature,
        repetition_penalty,
        no_repeat_ngram_size,
    ):
        history = list(itertools.chain(*chat_history))
        history.append(user_input)

        prompt = format(history)

        input_ids = tokenizer.encode(
            prompt,
            return_tensors="pt",
            add_special_tokens=False,
        )[:, -max_context_length:]

        prompt_length = input_ids.shape[1]

        beam_output = model.generate(
            input_ids,
            pad_token_id=tokenizer.pad_token_id,
            max_new_tokens=250,
            num_beams=1, # with cpu
            top_k=top_k,
            top_p=top_p,
            no_repeat_ngram_size=no_repeat_ngram_size,
            temperature=temperature,
            repetition_penalty=repetition_penalty,
            early_stopping=True,
            do_sample=True
        )
        output = beam_output[0][prompt_length:]

        generated = remove_spaces_between_chinese(tokenizer.decode(output, skip_special_tokens=True, clean_up_tokenization_spaces=True))
        logger.info(prompt+generated)

        return generated

    bot = gr.Chatbot(show_copy_button=True, show_share_button=True, height="2000")

    with gr.Blocks() as demo:
        gr.Markdown("GPT2 chatbot | Powered by nlp-greyfoss")

        with gr.Accordion("Parameters in generation", open=False):
            with gr.Row():
                top_k = gr.Slider(
                    2.0,
                    100.0,
                    label="top_k",
                    step=1,
                    value=50,
                    info="Limit the number of candidate tokens considered during decoding.",
                )
                top_p = gr.Slider(
                    0.1,
                    1.0,
                    label="top_p",
                    value=0.9,
                    info="Control the diversity of the output by selecting tokens with cumulative probabilities up to the Top-P threshold.",
                )
                temperature = gr.Slider(
                    0.1,
                    2.0,
                    label="temperature",
                    value=0.9,
                    info="Control the randomness of the generated text. A higher temperature results in more diverse and unpredictable outputs, while a lower temperature produces more conservative and coherent text.",
                )
                repetition_penalty = gr.Slider(
                    0.1,
                    2.0,
                    label="repetition_penalty",
                    value=1.2,
                    info="Discourage the model from generating repetitive tokens in a sequence.",
                )
                no_repeat_ngram_size = gr.Slider(
                    0,
                    100,
                    label="no_repeat_ngram_size",
                    step=1,
                    value=5,
                    info="Prevent the model from generating sequences of n consecutive tokens that have already been generated in the context. ",
                )

        gr.ChatInterface(
            response,
            chatbot=bot,
            additional_inputs=[
                top_k,
                top_p,
                temperature,
                repetition_penalty,
                no_repeat_ngram_size,
            ],
            retry_btn = "🔄 Regenerate",
            undo_btn = "↩️ Remove last turn",
            clear_btn = "➕ New conversation",
            examples=[
                ["写一篇介绍人工智能的文章。", 30, 0.9, 0.95, 1.2, 5],
                ["给我讲一个笑话。", 50, 0.8, 0.9, 1.2, 6],
                ["Can you describe spring in English?", 50, 0.9, 1.0, 1, 5]
            ]
        )

    demo.queue().launch()


tokenizer = AutoTokenizer.from_pretrained("greyfoss/gpt2-chatbot-chinese")

model = ORTModelForCausalLM.from_pretrained("greyfoss/gpt2-chatbot-chinese", export=True)

gradio(model, tokenizer)
完整代码如上所示,同时还增加了打印print(prompt)的代码进行调试。在该过程中发现前面的format写错了( ⚠️以下是有Bug的代码):
def format(history):
    prompt = train_args.bos_token

    for idx, txt in enumerate(history):
        if idx % 2 == 0:
            prompt += f"{train_args.user_token}{txt}{train_args.eos_token}"
        else:
            prompt += f"{train_args.bos_token}{txt}{train_args.eos_token}"
    prompt += train_args.bot_token
    return prompt
真的不仔细看发现不了:
def format(history):
    prompt = train_args.bos_token

    for idx, txt in enumerate(history):
        if idx % 2 == 0:
            prompt += f"{train_args.user_token}{txt}{train_args.eos_token}"
        else:
            prompt += f"{train_args.bot_token}{txt}"
    prompt += train_args.bot_token
    return prompt
有两处修改,都是在else内:
bos_token改成bot_token,这个影响非常大,比如你好啊的回复会有问题;- 移除了
eos_token,使用🤗 Transformers的generate方法会自己增加<EOS>标记;

这次发送你好啊这种没有问题了。
这个Space在一定时间(两天内)没人访问后会进入休眠,毕竟是免费的。要等它激活,查看日志可以看到如下内容:
Framework not specified. Using pt to export the model.
Using the export variant default. Available variants are:
    - default: The default ONNX variant.
Using framework PyTorch: 2.2.1+cu121
Overriding 1 configuration item(s)
	- use_cache -> True
/usr/local/lib/python3.10/site-packages/transformers/models/gpt2/modeling_gpt2.py:810: TracerWarning: Converting a tensor to a Python boolean might cause the trace to be incorrect. We can't record the data flow of Python values, so this value will be treated as a constant in the future. This means that the trace might not generalize to other inputs!
  if batch_size <= 0:
Post-processing the exported models...
Deduplicating shared (tied) weights...
Found different candidate ONNX initializers (likely duplicate) for the tied weights:
	lm_head.weight: {'onnx::MatMul_3809'}
	transformer.wte.weight: {'transformer.wte.weight'}
Removing duplicate initializer onnx::MatMul_3809...
Running on local URL:  http://0.0.0.0:7860

To create a public link, set `share=True` in `launch()`.
<BOS><User>你好啊<EOS><Assistant>
<BOS><User>你好啊<EOS><Assistant>你好,有什么我可以帮助你的吗?<EOS><User>你好<EOS><Assistant>
当看到。但是你们可能看不到日志,不过前几次有问题多试几次就好了。Running on local URL: http://0.0.0.0:7860才表示启动成功
<BOS><User>你好啊<EOS><Assistant>
<BOS><User>你好啊<EOS><Assistant>你好,有什么我可以帮助你的吗?<EOS><User>你好<EOS><Assistant>
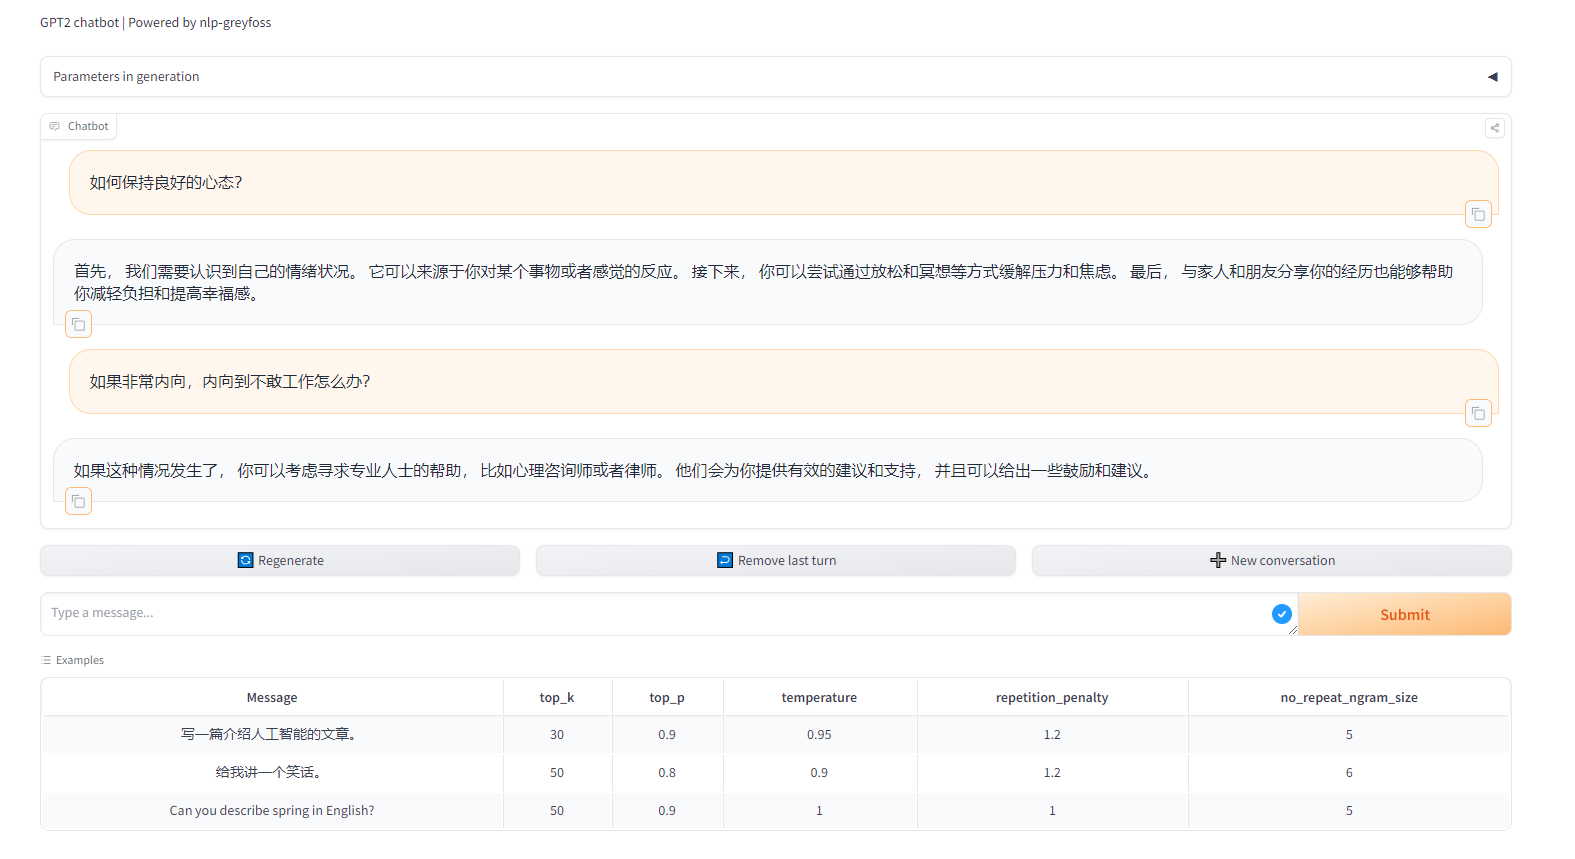
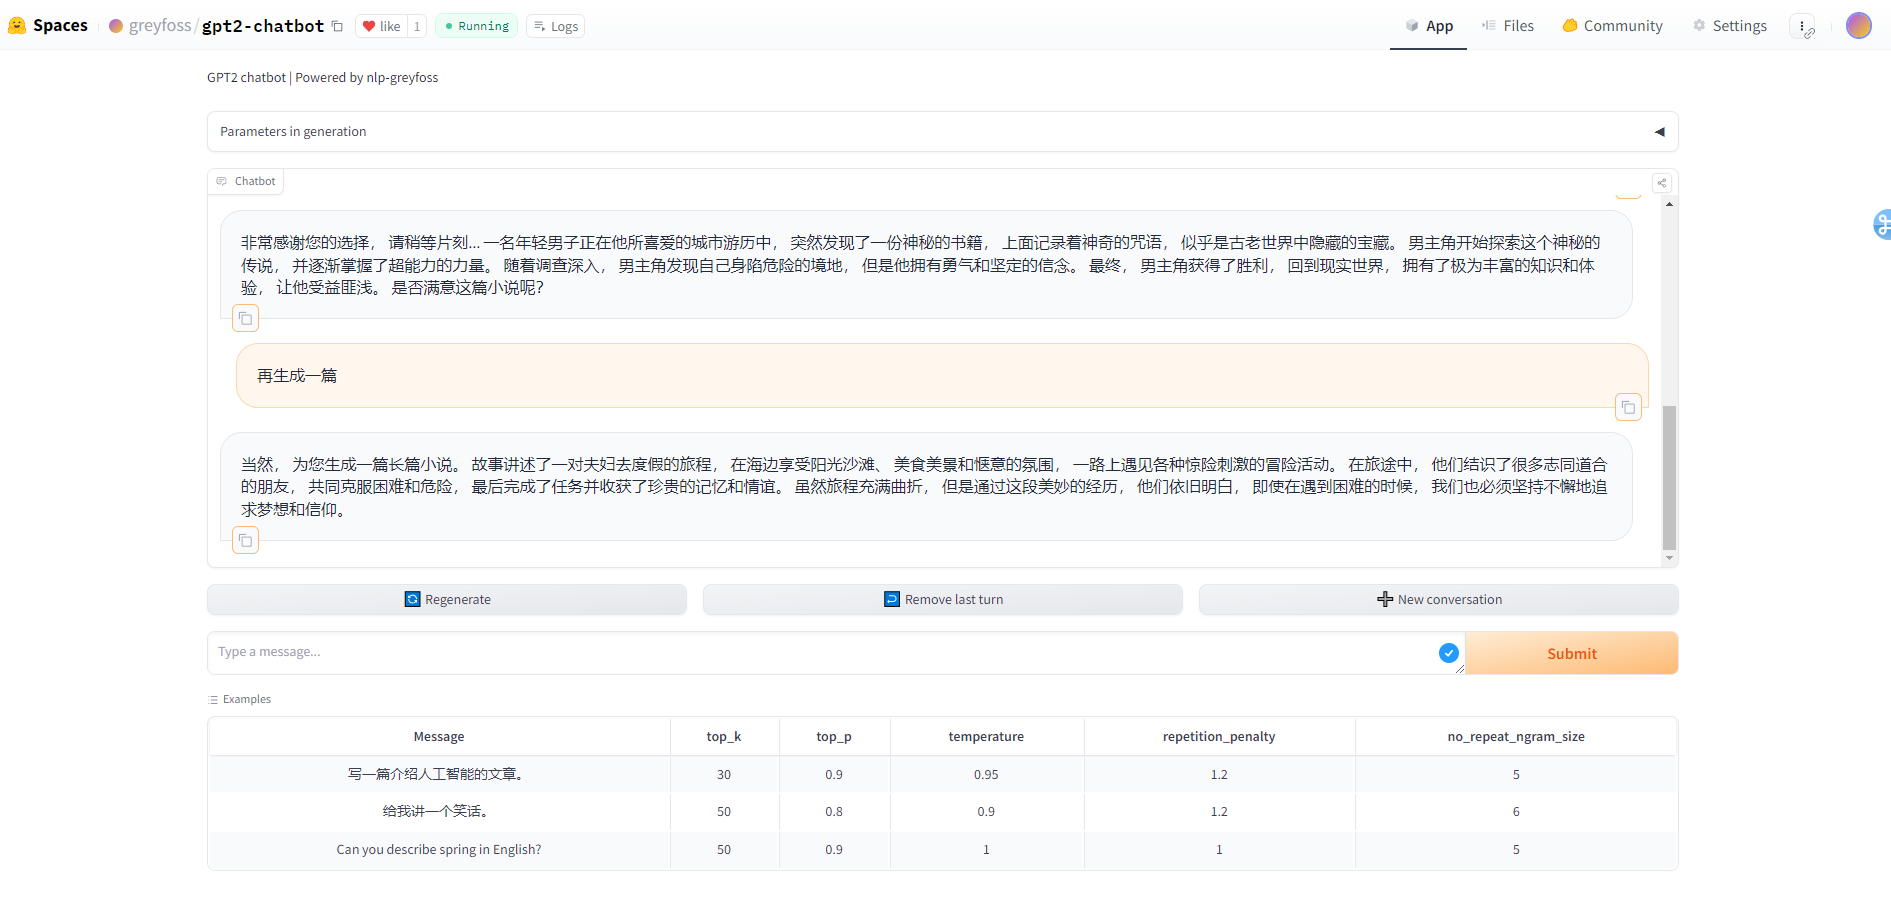
是格式化后的输入,这次没问题了。下面我们正常聊个天,看下效果如何。

首先我们可以调整生成参数。

这里通过代码写死了最多生成250个token,因此如果发现内容不够可以尝试输入继续让模型继续输出。这个例子展示了它可以继续进行创作。
然后可以点击New conversation进行新的会话:
最后,欢迎大家去体验: https://huggingface.co/spaces/greyfoss/gpt2-chatbot
参考
https://pytorch.org/tutorials/beginner/onnx/intro_onnx.html
https://huggingface.co/docs/transformers/en/serialization


![[flask]http请求//获取请求体数据](https://img-blog.csdnimg.cn/direct/171b183734b54be2abbe3cdf5745df6e.png)

