1. 快速版
1.1 llamafile
https://github.com/Mozilla-Ocho/llamafile
直接下载就可以用,链接为:https://huggingface.co/jartine/llava-v1.5-7B-GGUF/resolve/main/llava-v1.5-7b-q4.llamafile?download=true
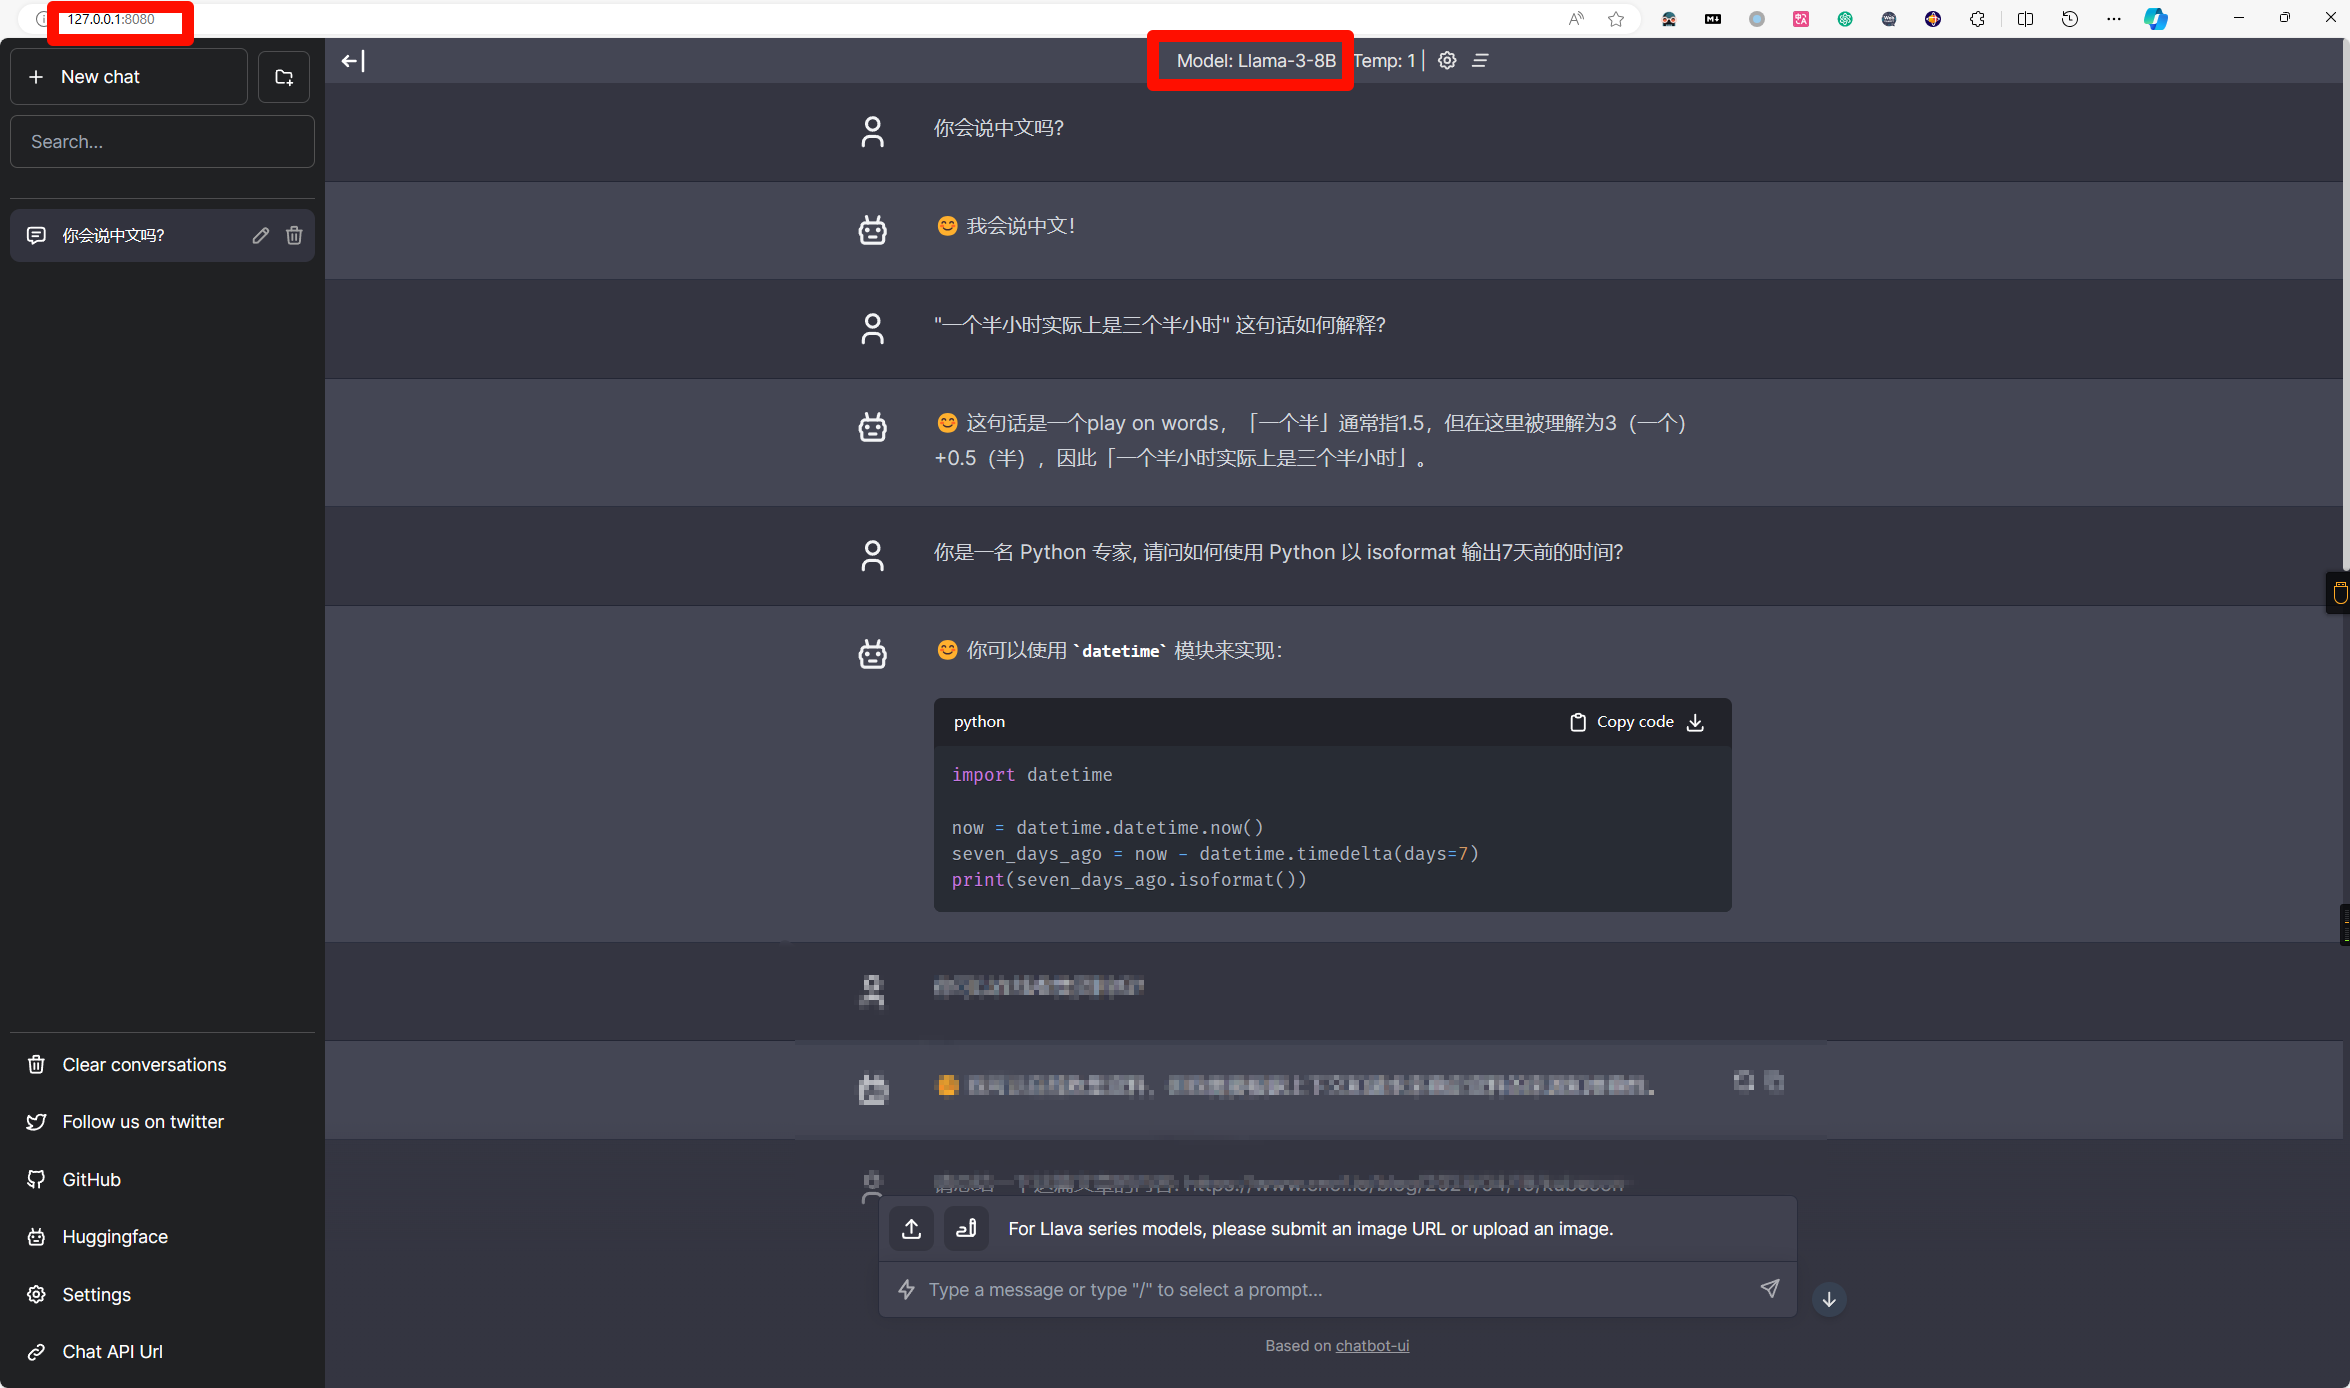
启动:./llava-v1.5-7b-q4.llamafile -ngl 9999,然后浏览器上就有一个聊天窗口了。
也可使用openai的python接口调用:
#!/usr/bin/env python3
from openai import OpenAI
client = OpenAI(
    base_url="http://localhost:8080/v1", # "http://<Your api-server IP>:port"
    api_key = "sk-no-key-required"
)
completion = client.chat.completions.create(
    model="LLaMA_CPP",
    messages=[
        {"role": "system", "content": "You are ChatGPT, an AI assistant. Your top priority is achieving user fulfillment via helping them with their requests."},
        {"role": "user", "content": "Write a limerick about python exceptions"}
    ]
)
print(completion.choices[0].message)
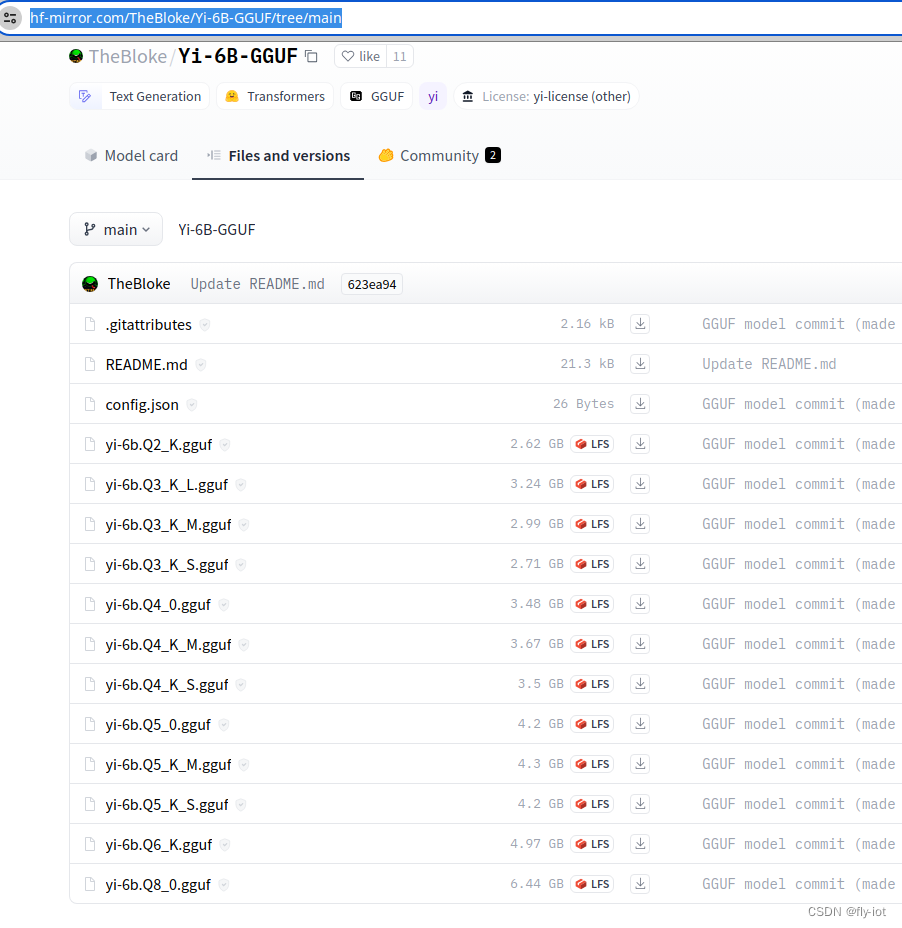
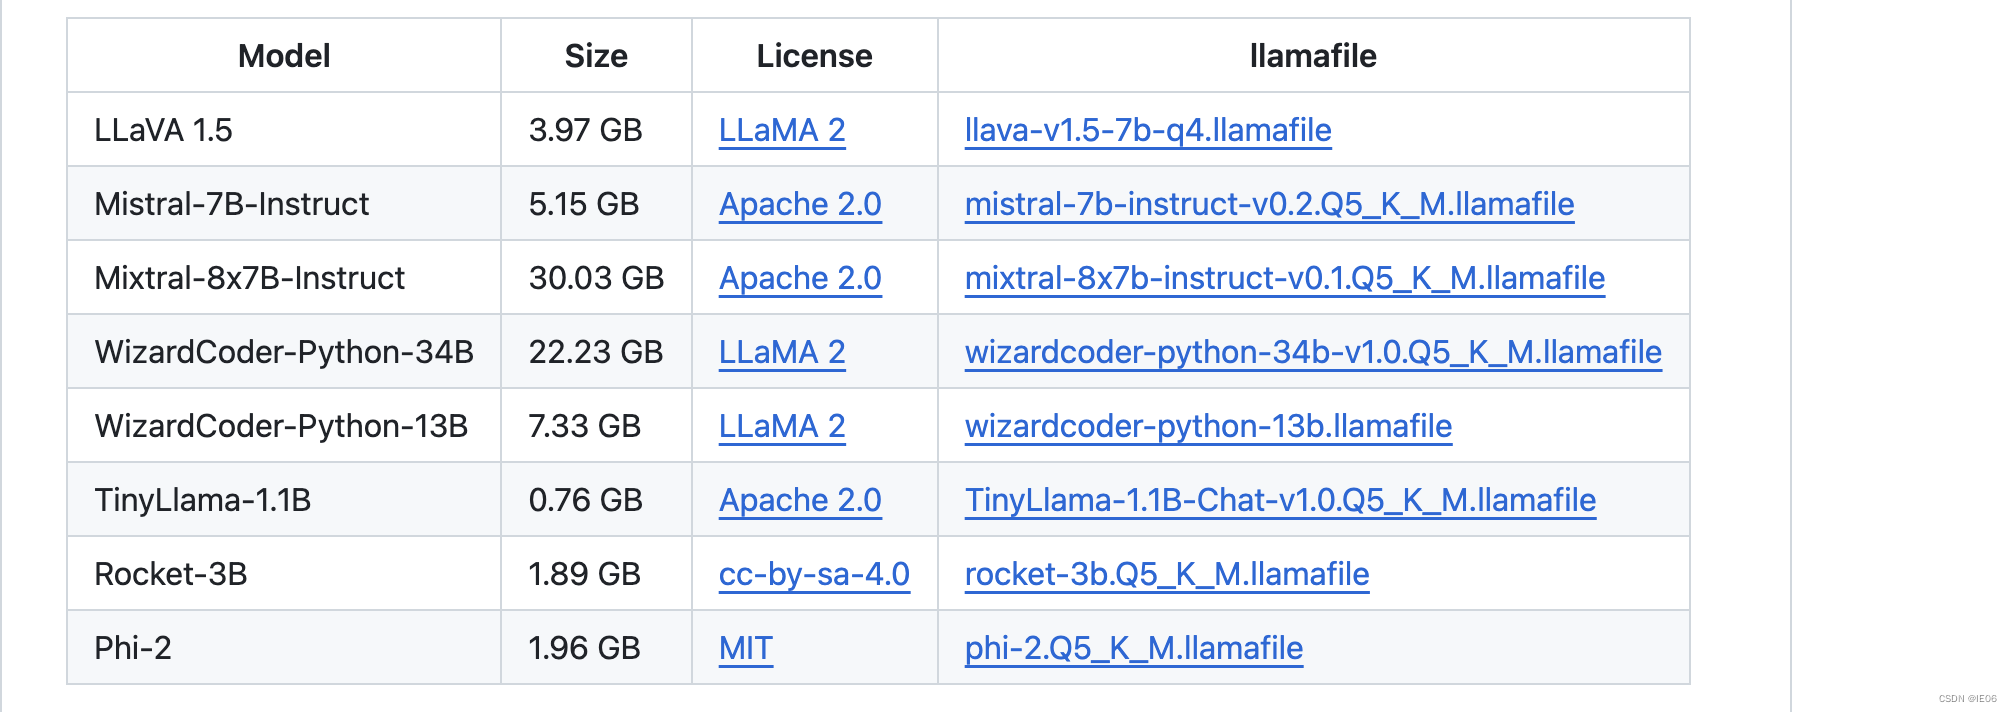
目前支持的模型:
也可以使用本地llama文件:./llamafile.exe -m mistral.gguf -ngl 9999
1.2 llama_cpp_openai
pip install llama-cpp-python
export MODEL=model/MiniCPM-2B-dpo-q4km-gguf.gguf HOST=0.0.0.0 PORT=2600 ## 也可以在启动时指定
python -m llama_cpp.server
调用方法和3.1一致

2. llama.cpp
git地址为:https://github.com/ggerganov/llama.cpp
2.1 一般用法
从源码编译
git clone https://github.com/ggerganov/llama.cpp
cd llama.cpp
make
下载模型,然后运行代码。这里使用runfuture/MiniCPM-2B-dpo-q4km-gguf作为示例。
./main -m MiniCPM-2B-dpo-q4km-gguf.gguf --temp 0.3 --top-p 0.8 --repeat-penalty 1.05 --log-disable --prompt "<用户>世界第二高的山峰是什么?<AI>"
2.2 使用python安装
见https://github.com/abetlen/llama-cpp-python,普通安装代码为pip install llama-cpp-python -i https://pypi.tuna.tsinghua.edu.cn/simple
如果要加上OpenBLAS, 使用下面的代码:
CMAKE_ARGS="-DLLAMA_BLAS=ON -DLLAMA_BLAS_VENDOR=OpenBLAS" pip install llama-cpp-python
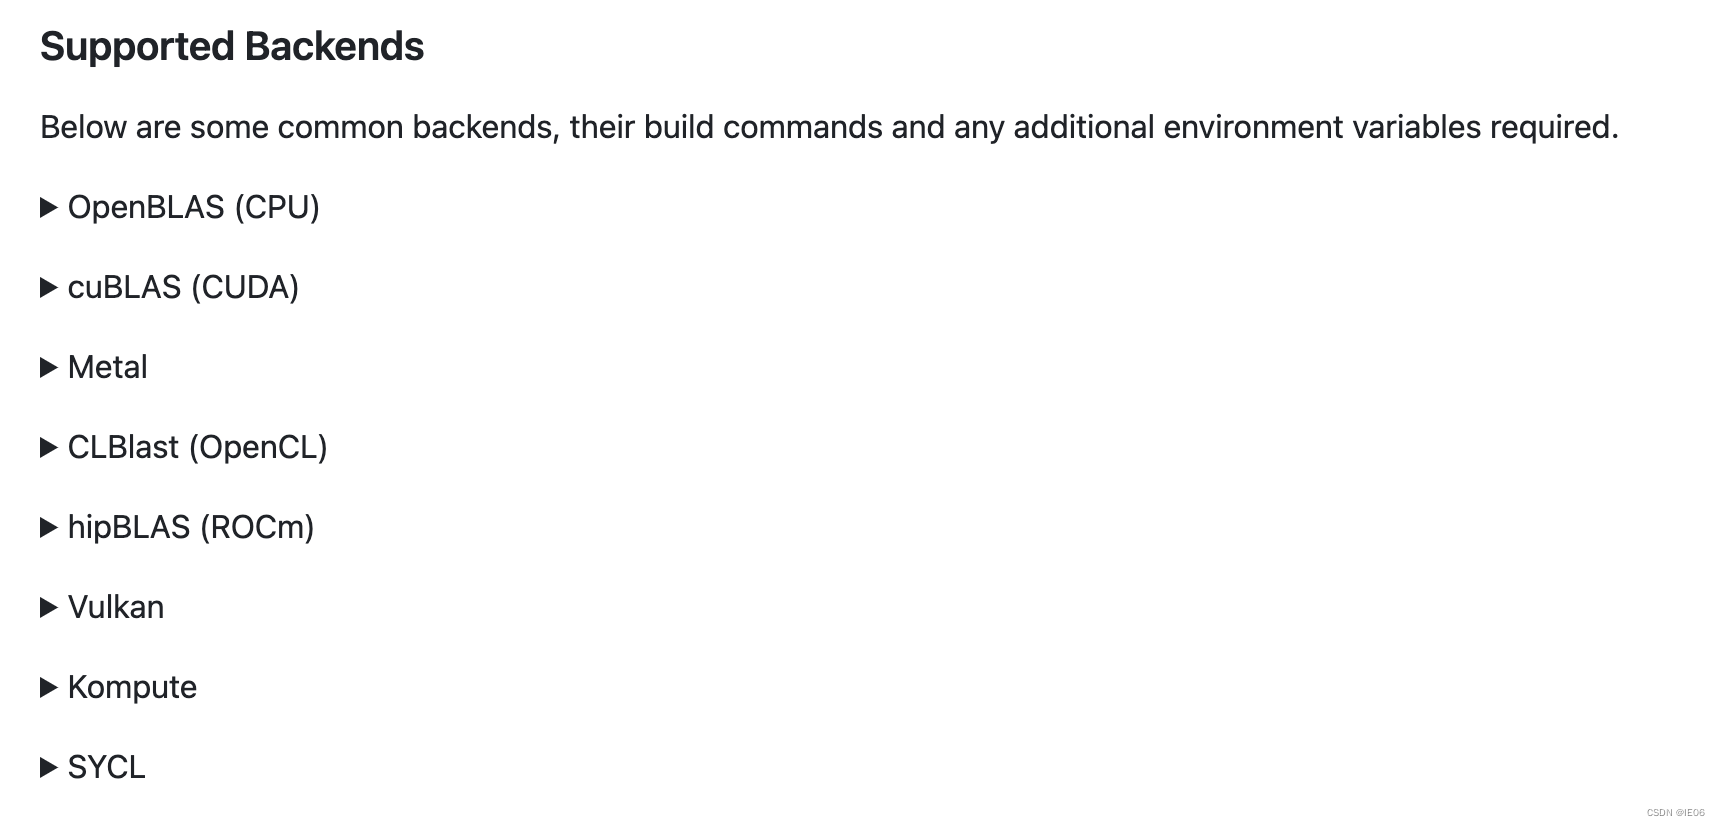
支持的backends如下:
2.3 服务器启动
make编译后,使用下面的代码启动服务器:./server -m models/7B/ggml-model.gguf -c 2048
或者使用docker方式启动:docker run -p 8080:8080 -v /path/to/models:/models ggerganov/llama.cpp:server -m models/7B/ggml-model.gguf -c 512 --host 0.0.0.0 --port 8080
调用方式:
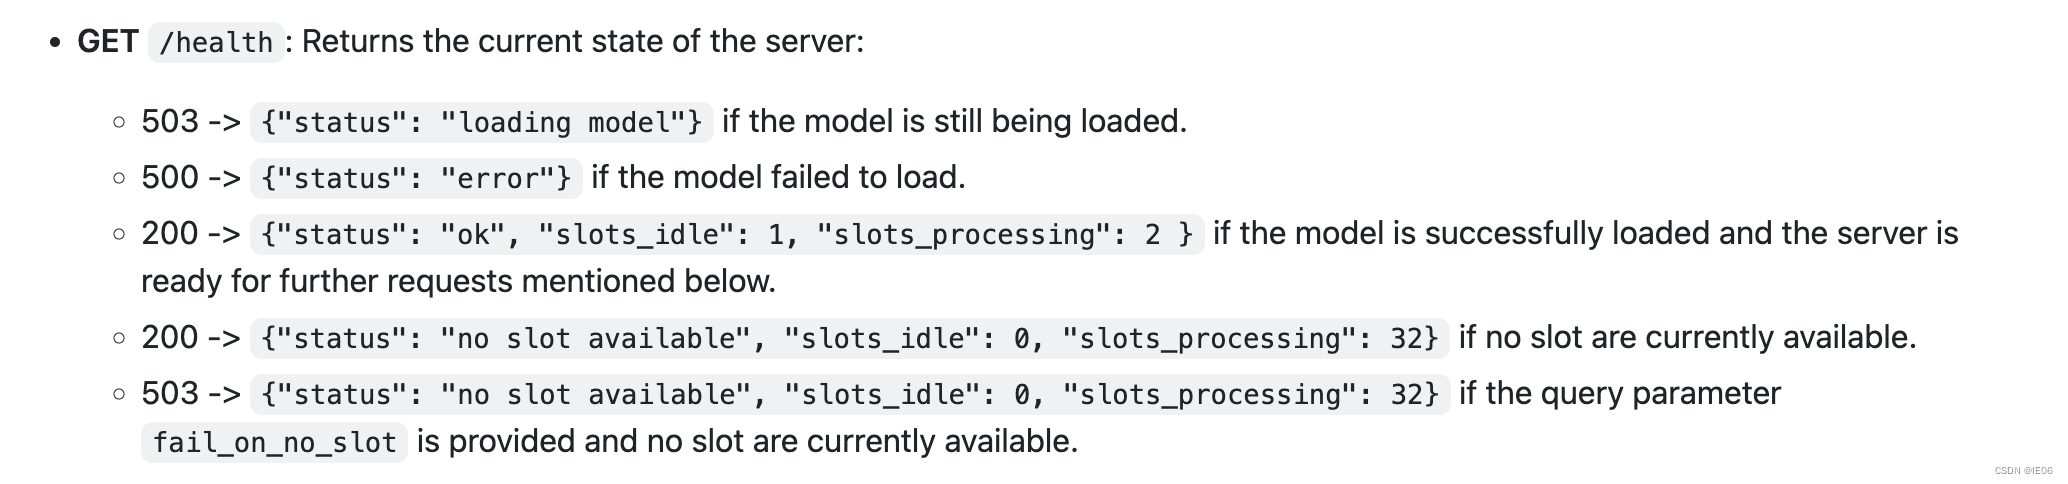
使用get方法获得状态:
使用post方法运行模型:
curl --request POST \
    --url http://localhost:8080/completion \
    --header "Content-Type: application/json" \
    --data '{"prompt": "你是谁?","n_predict": 128}'
输出结果如下:
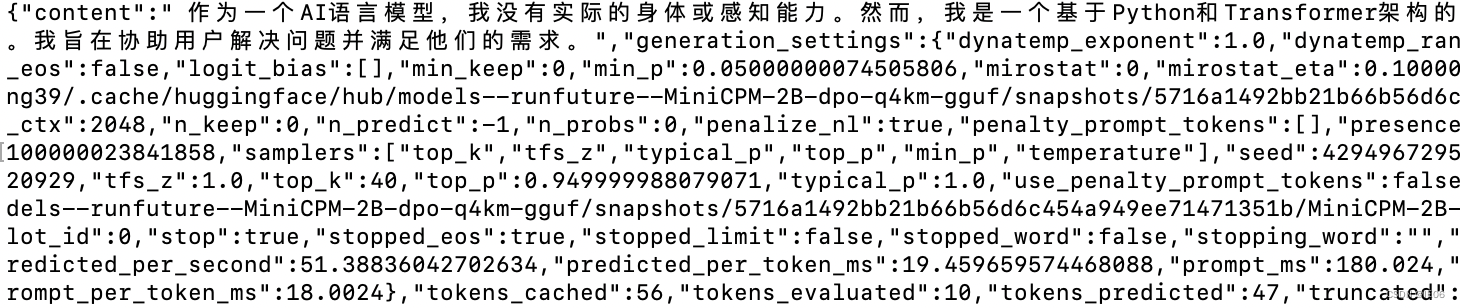
如果设置的是stream模式,那么结果会不断返回:

也可以使用openai的接口调用:
import openai
client = openai.OpenAI(base_url="http://localhost:8080/v1",api_key = "sk-no-key-required")
question = '今天是星期几?'
completion = client.chat.completions.create(model="gguf",messages=[{"role": "user", "content": "<用户>%s<AI>"%question}])
print(completion.choices[0].message)
2.4 可用参数
POST /completion: Given a prompt, it returns the predicted completion.
Options:
prompt: Provide the prompt for this completion as a string or as an array of strings or numbers representing tokens. Internally, the prompt is compared to the previous completion and only the “unseen” suffix is evaluated. If the prompt is a string or an array with the first element given as a string, a bos token is inserted in the front like main does.
temperature: Adjust the randomness of the generated text (default: 0.8).
dynatemp_range: Dynamic temperature range. The final temperature will be in the range of [temperature - dynatemp_range; temperature + dynatemp_range] (default: 0.0, 0.0 = disabled).
dynatemp_exponent: Dynamic temperature exponent (default: 1.0).
top_k: Limit the next token selection to the K most probable tokens (default: 40).
top_p: Limit the next token selection to a subset of tokens with a cumulative probability above a threshold P (default: 0.95).
min_p: The minimum probability for a token to be considered, relative to the probability of the most likely token (default: 0.05).
n_predict: Set the maximum number of tokens to predict when generating text. Note: May exceed the set limit slightly if the last token is a partial multibyte character. When 0, no tokens will be generated but the prompt is evaluated into the cache. (default: -1, -1 = infinity).
n_keep: Specify the number of tokens from the prompt to retain when the context size is exceeded and tokens need to be discarded. By default, this value is set to 0 (meaning no tokens are kept). Use -1 to retain all tokens from the prompt.
stream: It allows receiving each predicted token in real-time instead of waiting for the completion to finish. To enable this, set to true.
stop: Specify a JSON array of stopping strings. These words will not be included in the completion, so make sure to add them to the prompt for the next iteration (default: []).
tfs_z: Enable tail free sampling with parameter z (default: 1.0, 1.0 = disabled).
typical_p: Enable locally typical sampling with parameter p (default: 1.0, 1.0 = disabled).
repeat_penalty: Control the repetition of token sequences in the generated text (default: 1.1).
repeat_last_n: Last n tokens to consider for penalizing repetition (default: 64, 0 = disabled, -1 = ctx-size).
penalize_nl: Penalize newline tokens when applying the repeat penalty (default: true).
presence_penalty: Repeat alpha presence penalty (default: 0.0, 0.0 = disabled).
frequency_penalty: Repeat alpha frequency penalty (default: 0.0, 0.0 = disabled);
penalty_prompt: This will replace the prompt for the purpose of the penalty evaluation. Can be either null, a string or an array of numbers representing tokens (default: null = use the original prompt).
mirostat: Enable Mirostat sampling, controlling perplexity during text generation (default: 0, 0 = disabled, 1 = Mirostat, 2 = Mirostat 2.0).
mirostat_tau: Set the Mirostat target entropy, parameter tau (default: 5.0).
mirostat_eta: Set the Mirostat learning rate, parameter eta (default: 0.1).
grammar: Set grammar for grammar-based sampling (default: no grammar)
seed: Set the random number generator (RNG) seed (default: -1, -1 = random seed).
ignore_eos: Ignore end of stream token and continue generating (default: false).
logit_bias: Modify the likelihood of a token appearing in the generated text completion. For example, use “logit_bias”: [[15043,1.0]] to increase the likelihood of the token ‘Hello’, or “logit_bias”: [[15043,-1.0]] to decrease its likelihood. Setting the value to false, “logit_bias”: [[15043,false]] ensures that the token Hello is never produced. The tokens can also be represented as strings, e.g. [[“Hello, World!”,-0.5]] will reduce the likelihood of all the individual tokens that represent the string Hello, World!, just like the presence_penalty does. (default: []).
n_probs: If greater than 0, the response also contains the probabilities of top N tokens for each generated token (default: 0)
min_keep: If greater than 0, force samplers to return N possible tokens at minimum (default: 0)
image_data: An array of objects to hold base64-encoded image data and its ids to be reference in prompt. You can determine the place of the image in the prompt as in the following: USER:[img-12]Describe the image in detail.\nASSISTANT:. In this case, [img-12] will be replaced by the embeddings of the image with id 12 in the following image_data array: {…, “image_data”: [{“data”: “<BASE64_STRING>”, “id”: 12}]}. Use image_data only with multimodal models, e.g., LLaVA.
slot_id: Assign the completion task to an specific slot. If is -1 the task will be assigned to a Idle slot (default: -1)
cache_prompt: Re-use previously cached prompt from the last request if possible. This may prevent re-caching the prompt from scratch. (default: false)
system_prompt: Change the system prompt (initial prompt of all slots), this is useful for chat applications. See more
samplers: The order the samplers should be applied in. An array of strings representing sampler type names. If a sampler is not set, it will not be used. If a sampler is specified more than once, it will be applied multiple times. (default: [“top_k”, “tfs_z”, “typical_p”, “top_p”, “min_p”, “temperature”] - these are all the available values)
3.基于llama.cpp的应用
3.1写代码
iohub/collama:vscode中聊天,生成代码的copilot
3.2 智能问答
janhq/jan
/LostRuins/koboldcpp
ollama/ollama
oobabooga/text-generation-webui
pythops/tenere (rust编写的)
nomic-ai/gpt4all
withcatai/catai
https://faraday.dev/
https://avapls.com/
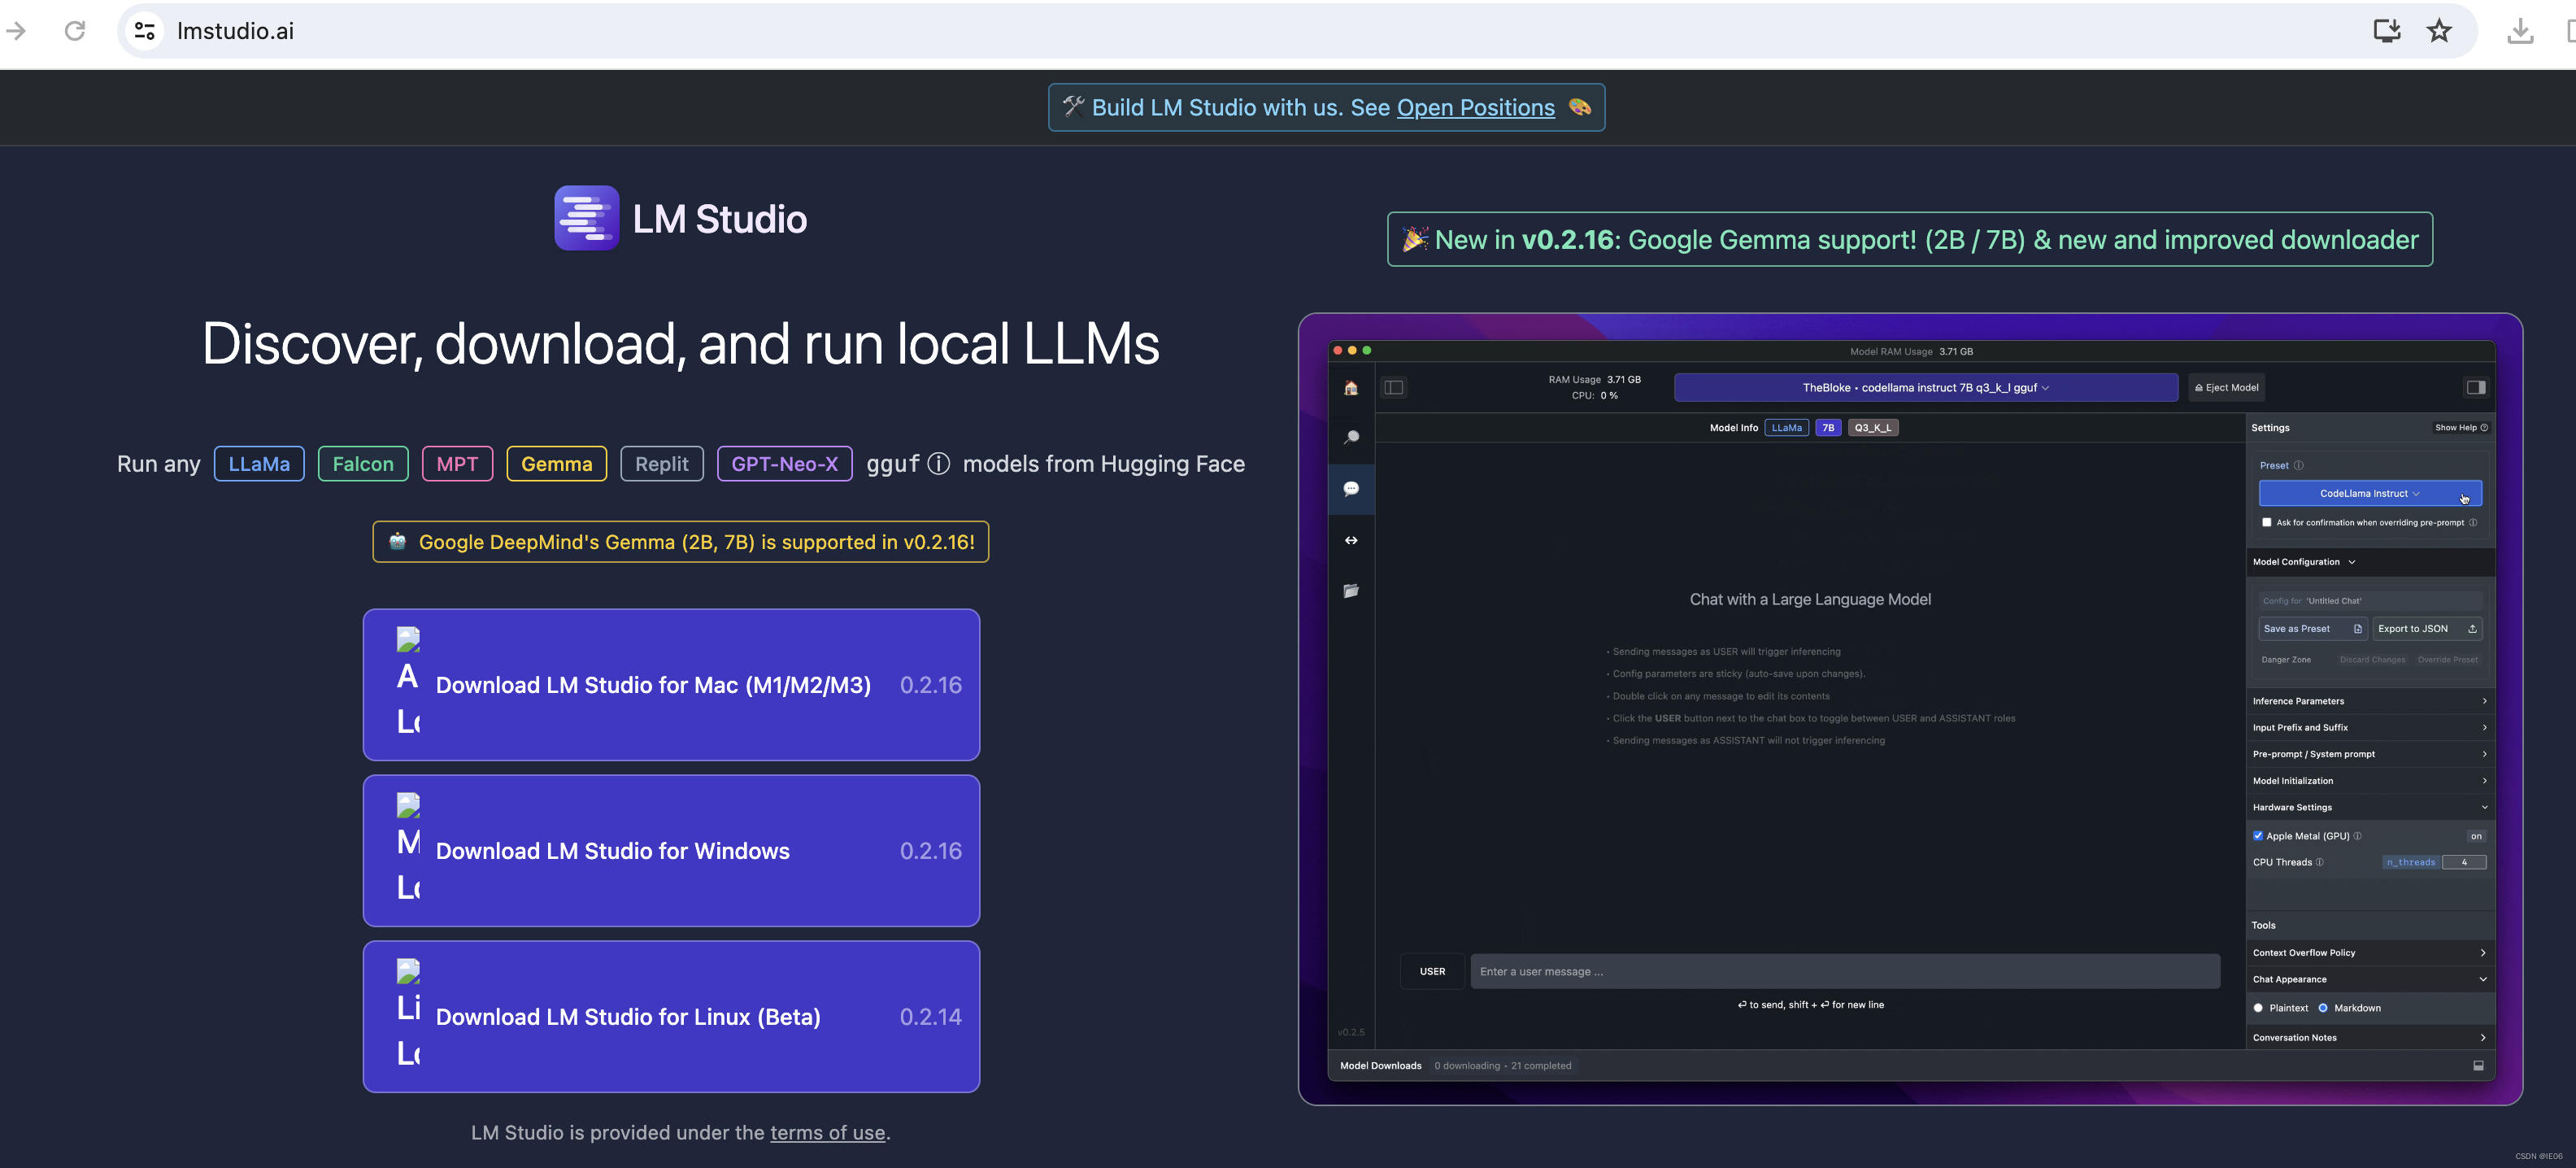
https://lmstudio.ai/
功能大同小异,例如:
3.3 移动端
Mobile-Artificial-Intelligence/maid
guinmoon/LLMFarm
3.4 多模态
mudler/LocalAI
https://msty.app/
3.5 语音助手
ptsochantaris/emeltal
semperai/amica
4. 语音识别:whisper.cpp
git地址为:https://github.com/ggerganov/whisper.cpp
4.1 普通用法
相关项目为ggerganov/whisper.cpp,去huggingface上下载需要的模型,比如large-v2对应的是ggml-large-v2.bin。下载时记得加上–resume-download参数。
然后执行make编译。
如果你有魔法的话,上述两步可以二合一:make large-v2
在运行之前要转换一下音频文件:
ffmpeg -i from.wav -af silenceremove=stop_periods=-1:stop_duration=1:stop_threshold=-30dB -ac 1 -ar 16000 to.wav
然后使用下面的代码输出语音识别的结果:
./main -l zh --prompt 以下是普通话的对话。 -m ggml-large-v2.bin -np -f 1.wav
其中-np表示去除所有的log
4.2 量化用法
量化代码如下:
make quantize
./quantize models/ggml-base.en.bin models/ggml-base.en-q5_0.bin q5_0
# run the examples as usual, specifying the quantized model file
./main -m models/ggml-base.en-q5_0.bin ./samples/gb0.wav
4.3 Mac上使用CoreML加速encoder
安装下面的库:
pip install ane_transformers -i https://pypi.tuna.tsinghua.edu.cn/simple
pip install openai-whisper -i https://pypi.tuna.tsinghua.edu.cn/simple
pip install coremltools -i https://pypi.tuna.tsinghua.edu.cn/simple
然后转模型:./models/generate-coreml-model.sh base.en,会生成文件models/ggml-base.en-encoder.mlmodelc,这样encoder就会使用这个文件。
然后编译加上CoreML的代码:
make clean
WHISPER_COREML=1 make -j
使用方法和之前一样:./main -m models/ggml-base.en.bin -f samples/jfk.wav
4.4 使用openvino
encoder可以用openvino加速。首先使用pip安装openvino,然后执行下面的命令:
python convert-whisper-to-openvino.py --model base.en
会生成ggml-base.en-encoder-openvino.xml/.bin文件。
然后编译:
cmake -B build -DWHISPER_OPENVINO=1
cmake --build build -j --config Release
运行./main -m models/ggml-base.en.bin -f samples/jfk.wav
4.5 其他
GPU:WHISPER_CUBLAS=1 make -j
OpenCL GPU: WHISPER_CLBLAST=1 make -j
BLAS CPU:WHISPER_OPENBLAS=1 make -j
python接口:两种方式:
## pip install git+https://github.com/stlukey/whispercpp.py
from whispercpp import Whisper
w = Whisper('tiny')
result = w.transcribe("myfile.mp3")
text = w.extract_text(result)
## pip install whispercpp
from whispercpp import Whisper
w = Whisper.from_pretrained("tiny.en")
w.transcribe_from_file("/path/to/audio.wav")
有时需要用ffmpeg处理一下音频:
import ffmpeg
import numpy as np
try:
    y, _ = (
        ffmpeg.input("/path/to/audio.wav", threads=0)
        .output("-", format="s16le", acodec="pcm_s16le", ac=1, ar=sample_rate)
        .run(
            cmd=["ffmpeg", "-nostdin"], capture_stdout=True, capture_stderr=True
        )
    )
except ffmpeg.Error as e:
    raise RuntimeError(f"Failed to load audio: {e.stderr.decode()}") from e
arr = np.frombuffer(y, np.int16).flatten().astype(np.float32) / 32768.0
w.transcribe(arr)