1. 安装pytest
目前我使用的python版本是3.10.8
pip install pytest命令会安装下面的包:
exceptiongroup-1.2.0-py3-none-any.whl
iniconfig-2.0.0-py3-none-any.whl
packaging-23.2-py3-none-any.whl
pluggy-1.4.0-py3-none-any.whl
pytest-8.0.2-py3-none-any.whl
tomli-2.0.1-py3-none-any.whl
2. 初步尝试
2.1 使用pytest,默认的测试用例的规则以及基础应用
- 模块名必须以test_开头或者_test结尾
- 测试类必须以Test开头,并且不能有init方法。
- 测试方法必须以test开头
init.py内容为空,
test_login.py内容如下:
import pytest
class TestLogin:
    def test_01_baili(self):
        print('测试百里')
if __name__ == '__main__':
    pytest.main(['-s'])
2.2 运行方式
用python运行这个test_login.py输出结果如下:

或者在pytest_rutorial目录下,命令行执行pytest也可以成功运行。
2.3 下面对项目结构修改

init.py为空文件。
test_login.py内容如下:
class TestLogin:
    def test_01_baili(self):
        print('测试百里')
test_product.py内容如下:
class TestProduct:
    def test_02_xingyao(self):
        print('测试星瑶')
all.py内容如下:
import pytest

if __name__ == '__main__':
    pytest.main(['-sv'])
运行all.py输出如下:
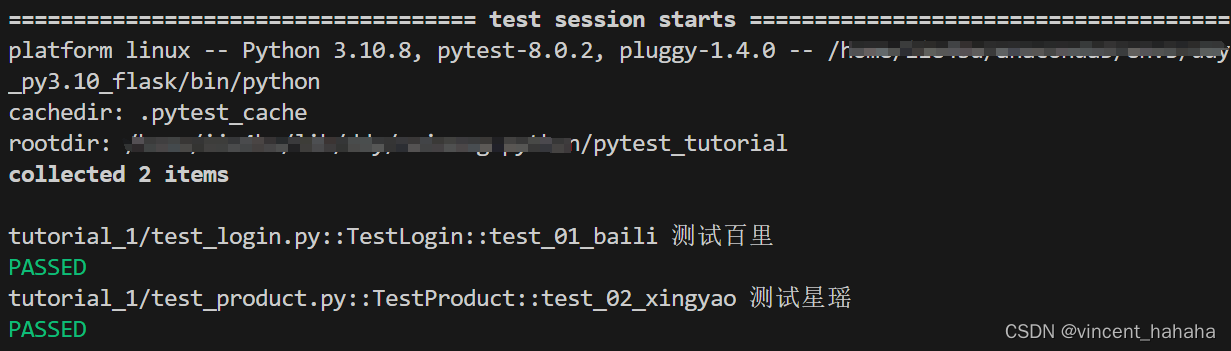
发现自动运行了test_product.py和test_login.py文件的内容。
2.4 参数详解
pytest.main()中可以有很多参数选项:
-s:表示输出测试方法里面的调试信息,包括print()-v:表示输出了详细的模块名、类名、模块名-x:如果有失败的,则停止运行
pytest.main(['-vs','test_product.py'])则会仅运行test_product.py文件的测试。
3 测试不同的项目
目录结构如下:

tutorial_1表示第一个项目,tutorial_2表示第二个项目,两个项目中的**init.py**文件内容都是空的。
test_login.py内容如下:
class TestLogin:
    def test_01_baili(self):
        print('测试百里')
test_product.py内容如下:
class TestProduct:
    def test_02_xingyao(self):
        print('测试星瑶')
test_web.py内容如下:
class TestWeb:
    def test_03_interface(self):
        print('测试接口')
all.py内容如下:
import pytest

if __name__ == '__main__':
    pytest.main(['-sv'])
运行all.py会输出如下:

也可以仅测试一个用例,修改all.py
import pytest

if __name__ == '__main__':
    pytest.main(['-sv', './tutorial_2'])
运行all.py,输出:

这样就仅仅执行tutorial_2下的测试用例了。
3.1 如何执行test_web.py下的某一个函数而不是类中的方法
test_web.py内容如下:
def test_04_interface():
    print('函数')
class TestWeb:
    def test_03_interface(self):
        print('测试接口')
如果我只想执行test_04_interface函数如何做?
解决办法:
修改all.py内容:
import pytest

if __name__ == '__main__':
    pytest.main(['-sv', './tutorial_2/test_web.py::test_04_interface'])
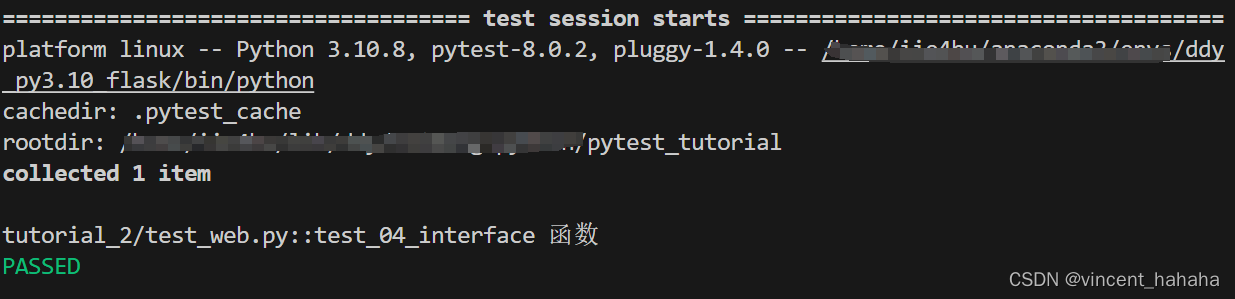
这就可以指定函数来进行测试了。
同理,也可以通过这个方式来指定某个类下的某个方法,例如:
import pytest

if __name__ == '__main__':
    pytest.main(['-sv', './tutorial_2/test_web.py::TestWeb::test_03_interface'])
就会执行TestWeb类下面的test_03_interface方法。
3.2 异步测试
如果某一个测试用例非常耗时,那么就会阻塞。解决办法就是异步进行。
新建文件夹tutorial_3,新建文件test_web3.py内容如下:
import time

class TestWeb3:
    def test_03_interface_1(self):
        time.sleep(3)
        print('第一个接口')
    def test_03_interface_2(self):
        time.sleep(3)
        print('第二个接口')
all.py内容如下:
import pytest

if __name__ == '__main__':
    pytest.main(['-sv', './tutorial_3'])
运行all.py输出如下:

可以看到用了6.03秒的时间。先执行了第一个接口,然后顺序执行第二个接口。
因此可以使用pytest中的多线程来执行。但是需要安装pytest-xdist。
首先执行pip install pytest-xdist,这个插件需要如下两个包:
execnet-2.0.2-py3-none-any.whl
pytest_xdist-3.5.0-py3-none-any.whl
然后修改all.py内容:
import pytest

if __name__ == '__main__':
    pytest.main(['-sv', './tutorial_3', '-n=2'])
这里的-n=2表示利用两个线程来执行。输出结果如下:
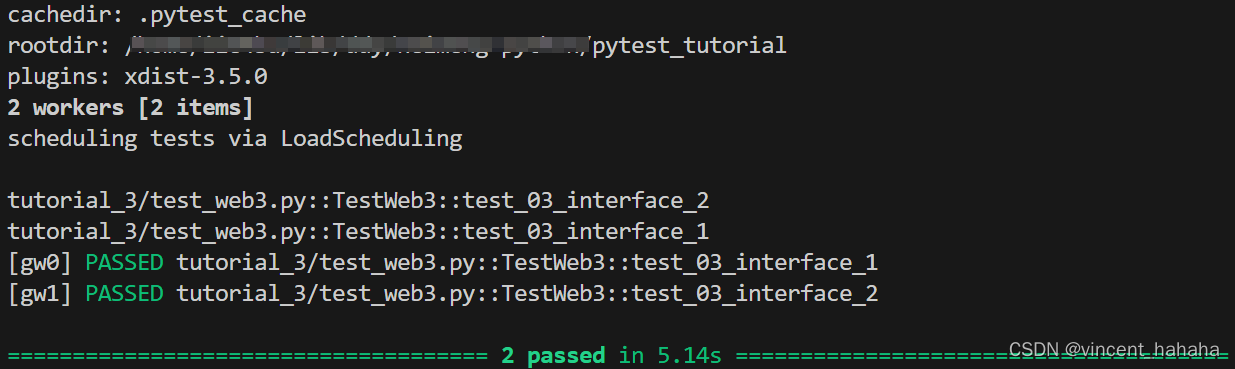
发现执行时间减少了。
4. 默认执行顺序
pytest默认的执行顺序是从上到下执行的。
例如下面的test_web3.py文件内容如下:
import time

class TestWeb3:
    def test_03_interface_1(self):
        time.sleep(3)
        print('第一个接口')
    def test_03_interface_3(self):
        time.sleep(3)
        print('第三个接口')
    def test_03_interface_2(self):
        time.sleep(3)
        print('第二个接口')
all.py内容如下:
import pytest

if __name__ == '__main__':
    pytest.main(['-sv', './tutorial_3'])
执行all.py输出结果如下:

4.1 修改执行顺序
要想修改执行顺序,需要安装pytest-ordering库,执行pip install pytest-ordering,需要的包:pytest_ordering-0.6-py3-none-any.whl。
修改test_web3.py内容:
import time
import pytest

class TestWeb3:
    @pytest.mark.run(order=2)
    def test_03_interface_1(self):
        time.sleep(3)
        print('第一个接口')
    @pytest.mark.run(order=1)
    def test_03_interface_3(self):
        time.sleep(3)
        print('第三个接口')
    @pytest.mark.run(order=3)
    def test_03_interface_2(self):
        time.sleep(3)
        print('第二个接口')
all.py内容如下:
import pytest

if __name__ == '__main__':
    pytest.main(['-sv', './tutorial_3'])
执行all.py输出如下:

5. 通过读取pytest.ini全局配置文件运行
pytest.ini这个文件它是pytest单元测试框架的核心配置文件。
pytest.ini文件位置:一般放在项目的根目录- 作用:改变pytest默认的行为。
- 运行的规则;不管是主函数的模式运行,命令行模式运行,都会去读取这个配置文件。
pytest.ini文件格式样例
[pytest]
addopts=-vs #命令行的参数,用空格分隔
testpaths=./pytest_tutorial #测试用例的路径
python_files=test_*.py #模块名的规则
python_classes=Test* #类名的规则
python_functions= test #方法名的规则