定位属性 position
可以将元素定位到你想要放到位置,使用方位值来进行移动(top,left,right,bottom)。
1.相对定位
position: relative; top: 20px; left: 20px;
以自身为定点进行移动,不会脱离文档流。
不会影响元素本身的性质;块级元素支持auto自适应居中。
2.绝对定位
position: absolute; top: 0px; left: 0px;
会脱离文档流,原本位置不会继续占有。
支持自定义高宽,元素高宽默认为0,暂不支持auto自适应居中。
找不到最近的定位父级,默认参考浏览器 (body) 来移动。
子绝父相
子级是绝对定位,父级是相对定位,子级参考父级来进行移动。
方位属性
left和top优先级高于right和bottom
若一个元素只拥有left和right属性,以left为准
3.固定定位
position: fixed;
以浏览器窗口为参考(滚动屏幕时固定不动)
元素高宽默认,margin: auto;失效
若在相同位置,看谁的优先级高,谁覆盖。
z-index:1; 定位为1级(改变级数来进行强制覆盖)
子元素在父级里面居中:
第一种:
position: absolute;
top: 0px;
left: 0px;
right: 0px;
bottom: 0px;
margin: auto;
第二种:
position: absolute;
top: 50%;
left: 50%;
/* 负自身宽度的一半 */
margin-left: -50px;
/* 负自身高度的一半 */
margin-top: -50px;
width: 100px;
height: 100px;
background-cololr: pink;
表格(浅谈)
<!DOCTYPE html>
<html lang="en">
<head>
    <meta charset="UTF-8">
    <meta name="viewport" content="width=device-width, initial-scale=1.0">
    <title>Document</title>
    <style>
        table{
            border: 1px solid palevioletred;
            background-color: blanchedalmond;
            border-collapse: collapse;
        }
        td,th,tr{
            border: 1px solid palevioletred;
            text-align: center;
        }
    </style>
</head>
<body>
    <!-- table: 定义表格标签 -->
    <table>
        <!-- caption: 表格标题 -->
        <caption>调查表</caption>
        <!-- tr: 表格里面的一行 -->
        <tr>
            <!-- th: 表头(自带加粗 居中) -->
            <th>姓名</th>
            <th>年龄</th>
            <th>爱好</th>
        </tr>
        <tr>
            <!-- td: 一行里面的单元格 -->
            <td>一花</td>
            <td>20</td>
            <td>演戏</td>
        </tr>
        <tr>
            <td>二乃</td>
            <td>20</td>
            <td>打游戏</td>
        </tr>
        <tr>
            <td>三玖</td>
            <td>20</td>
            <td>读历史</td>
        </tr>
        <tr>
            <td>四叶</td>
            <td>20</td>
            <td>运动</td>
        </tr>
        <tr>
            <td>五月</td>
            <td>20</td>
            <td>读书</td>
        </tr>
    </table>
    <!-- 规范:tr里面的标签只能是td或th
        一行里面单元格的高度取决于一行中最大的那个
        一行里面单元格的宽度是按照内容长度来分配的 -->
</body>
</html>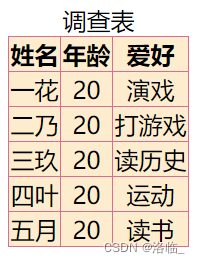
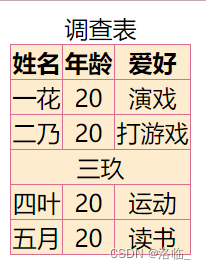
选一个将<td>20</td>改成:<td rowspan='3'>20</td> ,同时要将更改的这一行的下两段中的<td>20</td>删掉可以向下合并三行年龄。
也可以将某一段改为:
        <tr>
            <td colspan='3'>三玖</td>
        </tr>
可以合并那一行的三列:
表单样式
表单标签form
action: 表单的提交地址
method:提交格式
name:表单的名称
target:提交完这个表单后,新页面在哪里打开
<!DOCTYPE html>
<html lang="en">
<head>
    <meta charset="UTF-8">
    <meta name="viewport" content="width=device-width, initial-scale=1.0">
    <title>Document</title>
    <style>
        #form{
            width: 400px;
            height: 400px;
            background-color: antiquewhite;
            margin: auto;
        }
        input{
            width: 99px;
            height: 20px;
            background-color: darkgrey;
        }
    </style>
</head>
<body>
    <!-- form: 表单标签
        action: 表单的提交地址
        method: 提交格式  https请求格式:post/get等
            get请求:从指定的资源请求数据,用于获取数据,一般用于搜索排序和筛选之类的操作。
            post请求:向指定的资源提交要被处理的数据,用于将数据发送服务器,一般用于修改和写入数据。
        name: 表单的名称
        target: 提交这个表单后新页面在哪里打开 -->
    <form action="" method="" name="login" target="" id="form">
        <!-- 单行文本输入框 -->
        账号:<input type="text">
        <br>
        <!-- 密码输入框(输入的数据会隐藏为小黑点) -->
        密码:<input type="password">
    </form>
</body>
</html>
input输入控件
通过type属性展示不同的输入效果
- text --> 单行文本输入框
- password -> 密码输入框
- submit --> 提交按钮(具有刷新功能)
- radio --> 单选框
- checkbox --> 多选框
- reset --> 重置按钮
- button --> 空按钮(可以通过value来给这个按钮取名字)
- file --> 文件上传按钮
- number --> 数字输入框(e约等于2.71828..也可以输入)
- email --> 邮件输入框
placeholder属性 文本提示,告诉用户输入什么
name属性 控件名称
账号:<input type="text" placeholder="请输入账号" name="username">value属性 改变控件里面的值
radio
        <form action="">
            <input type="text">

            <input type="radio" name="sex">男

            <input type="radio" name="sex">
            <!-- label:一般用来放文字,规定input控件标题描述 -->
            <label for="">女</label>
            <!-- 单选的话name属性只能是一个 -->
</form>checked属性 默认被选中
<input type="radio" name="sex" checked>多行文本输入框
<textarea name="" id="" cols="30" rows="10"></textarea>下拉列表标签
        <select name="" id="">
            <!-- 下拉列表项 -->
            <option value="">星期一</option>
            <option value="">星期二</option>
            <option value="">星期三</option>
            <option value="">星期四</option>
            <option value="">星期五</option>
        </select>
高级选择器
属性选择器
选择标签来添加样式
选择a标签中带有target属性的a标签添加样式
a[target]{color: pink;}
给title为11的添加样式
a[title='11']{color: red;}
给a标签的herf属性中以h开头的添加样式
a[herf ^='h']{color: blue;}
给以k为结尾的添加样式
a[target $='k']{color: yellow;}
给包含字符中含有.com的添加样式
a[href *='.com']{color: skyblue;}
伪类选择器
可以改变元素状态
<!DOCTYPE html>
<html lang="en">
<head>
    <meta charset="UTF-8">
    <meta name="viewport" content="width=device-width, initial-scale=1.0">
    <title>Document</title>
    <style>
        .box{
            width: 200px;
            height: 300px;
            background-color: antiquewhite;
        }
        /* 鼠标悬停之后 改变背景颜色和宽(通用) */
        .box:hover{
            width: 300px;
            background-color: indianred;
        }
        /* 点击时改变背景颜色(通用) */
        .box:active{
            background-color: cadetblue;
        }
        /* 没有被访问的a标签 */
        a:link{
            color: darkseagreen;
        }
        /* 被访问过的a标签 */
        a:visited{
            color:bisque;
        }
        /* 点击input获取焦点 */
        .btn:focus{
            border: 1px solid pink;
        }
        .text{
            /* 消失 */
            display:none;
            width: 150px;
            height: 50px;
            background-color: rgb(190, 227, 250);
        }
        /* input和p标签是同级关系 */
        .btn:focus~.text{
            /* 显示 */
            display: block;
        }
        /* 点击勾选状态(只能单选或多选使用) */
        .rad:checked{
            width: 20px;
            height: 20px;
        }
        .pic{
            display: none;
        }
        .rad:checked~.pic{
            display: block;
        }
    </style>
</head>
<body>
    <div class="box"></div>
    <a href="https://www.bilibili.com/">这里是a标签</a>
    <a href="https://www.bilibili.com/" target="_blank" rel="zxcvbnm">这里是a标签2</a>
    <br>
    <input type="text" class="btn">
    <p class="text">点击后就看到我啦</p>
    <input type="radio" class="rad">
    <input type="checkbox" name="" id="" class="rad">
    <img src="./11.jpg" alt="" width="100px" class="pic">
</body>
</html>
结构选择器
子元素选择器
通过父级给子元素添加样式
.list>li:nth-child(1){color: pink}
给类为list的列表父级的第一个子级的字体设置为粉色。
可以简写为:.list>li:nth-child(1){color: pink}
全选:.list>li:nth-child(n+1){color: pink}
给第奇数个子级(1,3,5..)设置 (odd/2n-1)
.list>li:nth-child(odd){color: pink}
给第偶数个子级(2,4,6..)设置(even/2n)
.list>li:nth-child(2n){color: pink}
选择最后一个子元素添加样式
.list>li:last-child{color: blue}
注意:要满足父子关系。比如,ul的众多li标签之间有一个span标签,这个子元素选择器就起不了作用了。
同类别选择器
选择类为box的div标签下方的p标签
.box>p:nth-child(3){color: pink;}
如果p标签中间夹了span标签,这样写无视其他元素影响
.box>p:nth-of-type(3){color: red;}
选择最后一个p标签
p:last-of-type{color: blue;}
伪元素选择器
是一个行内元素,不支持设定高宽
/* 伪元素创建,在元素前进行插入 */
.box::before{
/* 伪元素必备 开启伪元素的一个钥匙 */
content: '你好!';
float: left;
width: 50px;
height: 50px;
background-color: antiquewhite;
}
/* 在元素内容后插入 */
.box::after{
/* 伪元素内容 */
content: '耶!';
color: cadetblue;
}
/* 父元素可以利用伪元素来清除浮动塌陷 */
.wrap::after{
content: '';
display: block;
clear: both;
}
阿里图标的使用:
1.进入阿里图标官网 https://www.iconfont.cn/
2.注册,登录
3.可以选择需要用到的图标,加入购物车
4.找到购物车,点击下载即可
5.解压文件,可以找到demo_index页面三种方式添加图标
第一种方式:
style标签中:
@font-face{font-family: 'iconfont';
src: url('./阿里图标/iconfont.ttf') format('truetype');}
.iconfont{
font-family: "iconfont" !important;
font-size: 16px;
font-style: normal;}
body标签中:
<span class="iconfont">(图标号)</span>
第二种方式:
引入外部格式使用阿里css样式
<link rel="stylesheet" href="./阿里图标/iconfont.css">
style中:
.iconfont{font-size: 30px;
color: red;}
body中:
<span class="iconfont"></span>
第三种方式(支持有颜色的图标):
引入js样式
<script src="./阿里图标/iconfont.js"></script>
style中:
.icon{width: 1em;
height:1em;
vertical-align: -0.15em;
fill: currentColor;
overflow: hidden;}
body中:
<svg class="icon" aria-hidden="true">
<use xlink:href="#icon-xxx"></use>
</svg>
flex布局(弹性盒模型)
传统布局:浮动 定位 行内块等
flex布局:方法简单,能自动分配父级里面子元素的对齐方式。可以适应不同屏幕的布局。
        .wrap{
            /* 开启flex布局 */
            display: flex;
            /* 规定子元素在x轴居中对齐 */
            justify-content: center;
            /* 规定子元素在y轴居中对齐 */
            align-items: center;
            width: 200px;
            height: 200px;
            background-color: antiquewhite;
        }
父级盒子开启flex(display: flex;) 后
子元素默认横向排列,假如总宽度大于父级盒子,不会换行排列,会等比例缩放。
行内元素在父级盒子里面支持写高宽,没写会默认分配。
flex布局属性
1.display: flex 给父级开启flex布局
2.flex-direction 控制子元素排列方式
控制子元素排列方式,默认从左至右。
flex-direction: row;
从右至左排列
flex-direction: row-reverse;
垂直方向 主轴向下排列
flex-direction: column;
主轴向上
flex-direction: column-reverse;
3.flex-wrap 控制子元素是否换行显示
默认不换行显示
flex-wrap: nowrap;
超出父级宽度就换行
flex-wrap: wrap;
主轴方向和换行显示 复合写法
flex-flow: row-reverse wrap;
4.justify-content 控制子元素在主轴的对齐方式(x轴)
默认子元素在起点左对齐
justify-content: flex-start;
右对齐(主轴终点对齐)
justify-content: flex-end;
在主轴居中对齐
justify-content: center;
两端对齐,中间间隔均分
justify-content: space-between;
所有子元素间隔相同且相等
justify-content: space-around;
所有间隔平均分配
justify-content: space-evenly;
5.align-items 控制子元素在侧轴的对齐方式(y轴)
侧轴默认值(若没写高度,则高度与父级相同)
align-items: stretch;
y轴顶部对齐(起点对齐)
align-items: flex-start;
y轴底部对齐(终点对齐)
align-items: flex-end
y轴方向垂直居中对齐
align-items: center;
与文本基线对齐
align-items: baseline;
6. align-content 控制行与行之间的对齐
行与行之间在起点对齐,上下没有间隔
align-content: flex-start;
行与行之间在底部对齐
align-content: flex-end;
行与行之间居中对齐
align-content: center;
行与行之间两端对齐
align-content: space-between;
行与行之间间隔平均分配
align-content: space-around;
所有行之间间隔相等
align-content: space-evenly;
子元素属性
order: 子元素展示顺序,值越小越先展示,默认是0。
flex-grow: 在主轴还有剩余空间时,子元素分配剩下的部分比例,如1,2..默认是0。
flex-shrink: 在主轴空间不足时,子元素缩小的比例,默认是1(均分缩小)。
align-self: flex-start/end/ center (顶部对齐、底部对齐、居中对齐)