转载请注明出处:https://blog.csdn.net/kong_gu_you_lan/article/details/135777170
本文出自 容华谢后的博客
0.写在前面
最近公司项目用到了消息推送功能,在技术选型的时候想要找一个轻量级的方案,偶然看到一篇文章讲ChatGPT的对话机制是基于SSE来实现的,但是这种协议是基于Web的,客户端能不能用呢,搜索一番发现老朋友OkHttp已经贴心的准备好了一个SSE依赖库,于是便有了这篇文章。
简单介绍下SSE协议,全称Server-Sent Events,2008年首次出现在HTML5规范中,在2014年随着HTML5被W3C推荐为标准,SSE也登上了舞台。作为HTML5的一部分,旨在提供一种简单的机制,用于服务器向客户端推送实时事件数据。
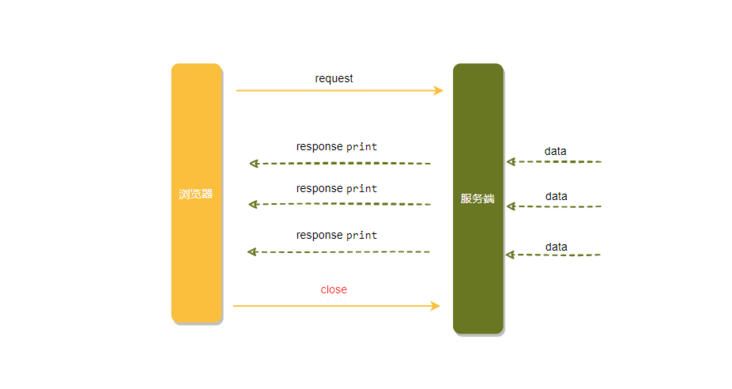
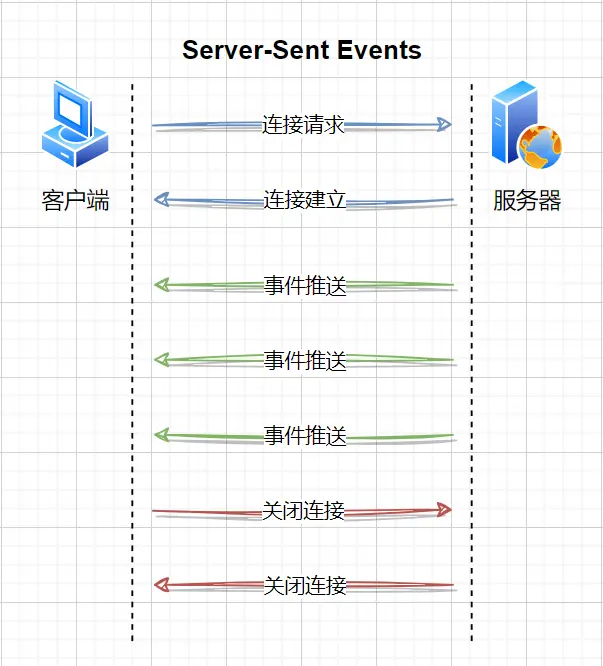
SSE建立在标准的HTTP协议之上,使用普通的HTTP连接,与WebSocket不同的是,SSE是一种单向通信协议,只能是服务器向客户端推送数据,客户端只需要建立连接,而后续的数据推送由服务器单方面完成。
SSE推送流程:
1.服务端实现
服务端使用Node.js和Express框架来实现:
const express = require('express');
const http = require('http');
const app = express();
const server = http.createServer(app);

// 静态文件目录,发送消息使用
const path = require('path');
app.use(express.static(path.join(__dirname, 'public')));

// 用于存储连接的客户端响应对象
const clients = [];

// SSE长连接
app.get('/events', (req, res) => {
  // 设置响应头,指定事件流的Content-Type
  res.setHeader('Content-Type', 'text/event-stream; charset=utf-8');
  res.setHeader('Cache-Control', 'no-cache');
  res.setHeader('Connection', 'keep-alive');

  // 发送初始数据
  res.write('data: SSE 已连接\n\n');

  // 将客户端的响应对象存储起来
  clients.push(res);

  // 当连接断开时从数组中移除响应对象
  req.on('close', () => {
    clients.splice(clients.indexOf(res), 1);
  });
});

// 用于接收字符串类型的消息并发送给所有连接的客户端
app.post('/push', express.urlencoded({ extended: true }), (req, res) => {
  const message = req.body.message;

  // 向所有连接的客户端发送消息
  clients.forEach(client => {
    client.write(`data: 收到消息: ${message},连接数:${clients.length}\n\n`);
  });

  res.status(200).send('Message sent successfully');
});

const PORT = process.env.PORT || 3000;
server.listen(PORT, () => {
  console.log(`Server listening on port ${PORT}`);
});
运行命令:
// 初始化项目
npm init -y

// 安装Express
npm install express

// 启动服务端
node server.js
在服务端中定义了两个接口,/events 接口用于客户端请求的长连接服务,/push 接口用于接收控制台发送的消息,然后转发给已连接的所有客户端。
可以注意到events接口中,和普通接口主要的区别在响应头的设置:
res.setHeader('Content-Type', 'text/event-stream; charset=utf-8');
res.setHeader('Cache-Control', 'no-cache');
res.setHeader('Connection', 'keep-alive');
Content-Type 指定了响应内容的类型为 text/event-stream,表明这是一个SSE响应。
Cache-Control 是控制缓存行为的HTTP头部之一。no-cache 意味着客户端不应该缓存响应。由于SSE是基于长连接的实时通信,而不是通过短轮询获得数据,因此不希望客户端缓存响应,以确保每次都能接收到实时的事件数据。
Connection 指示服务器保持与客户端的连接处于打开状态。keep-alive 表示持久连接,允许多个请求和响应在单个连接上交替发送,而不必为每个请求都重新建立连接。在SSE中,保持连接的状态使得服务器能够随时向客户端推送事件,而不必反复建立连接,提高了效率。
2.客户端实现
在项目的build.gradle中增加OkHttp的依赖:
dependencies {
    // OkHttp
    implementation("com.squareup.okhttp3:okhttp:4.12.0")
    implementation("com.squareup.okhttp3:okhttp-sse:4.12.0")
}
OkHttp提供了一个RealEventSource类来实现SSE连接,其中回调了连接、断开、错误和接收消息推送的方法,和普通的OkHttp请求没有太大区别:
val request = Request.Builder()
    .url(binding.etUrl.text.toString())
    .build()
val okHttpClient = OkHttpClient.Builder().also {
    it.connectTimeout(1, TimeUnit.DAYS)
    it.readTimeout(1, TimeUnit.DAYS)
}.build()
val realEventSource = RealEventSource(request, object : EventSourceListener() {
    override fun onOpen(eventSource: EventSource, response: Response) {
        super.onOpen(eventSource, response)
        showMessage("已连接")
    }

    override fun onEvent(
        eventSource: EventSource,
        id: String?,
        type: String?,
        data: String
    ) {
        super.onEvent(eventSource, id, type, data)
        showMessage(data)
    }

    override fun onClosed(eventSource: EventSource) {
        super.onClosed(eventSource)
        showMessage("已断开")
    }

    override fun onFailure(
        eventSource: EventSource,
        t: Throwable?,
        response: Response?
    ) {
        super.onFailure(eventSource, t, response)
        showMessage("连接失败 ${t?.message}")
    }
})
3.后台消息推送
有了服务端和客户端,我们再实现一个简单的控制台,用于给已连接的客户端推送消息:
<!DOCTYPE html>
<html lang="ch">
<head>
  <meta charset="UTF-8">
  <meta name="viewport" content="width=device-width, initial-scale=1.0">
  <title>Push</title>
</head>
<body>

  <div>
    <h2>Request:</h2>
    <input type="text" id="messageInput">
    <button onclick="sendMessage()">发送消息</button>
  </div>

  <div id="responseContainer">
    <h2>Response:</h2>
    <pre id="responseContent"></pre>
  </div>

  <script>
    function sendMessage() {
      const messageInput = document.getElementById('messageInput');
      const responseContent = document.getElementById('responseContent');

      // 发送 POST 请求到 /push 接口
      fetch('/push', {
        method: 'POST',
        headers: {
          'Content-Type': 'application/x-www-form-urlencoded',
        },
        body: `message=${encodeURIComponent(messageInput.value)}`,
      })
      .then(response => response.text())
      .then(data => {
        // 更新页面上的响应内容
        responseContent.textContent = data;
      })
      .catch(error => {
        console.error('Error:', error);
        responseContent.textContent = 'An error occurred.';
      });
    }
  </script>

</body>
</html>
看下效果:
不专业的简单测试了下,并发1万个客户端连接,服务端性能并没有什么明细波动,确实比较轻量级。
4.写在最后
GitHub地址:https://github.com/alidili/SSEDemo
到这里,Android消息推送SSE方案就介绍完了,如有问题可以给我留言评论或者在GitHub中提交Issues,谢谢!