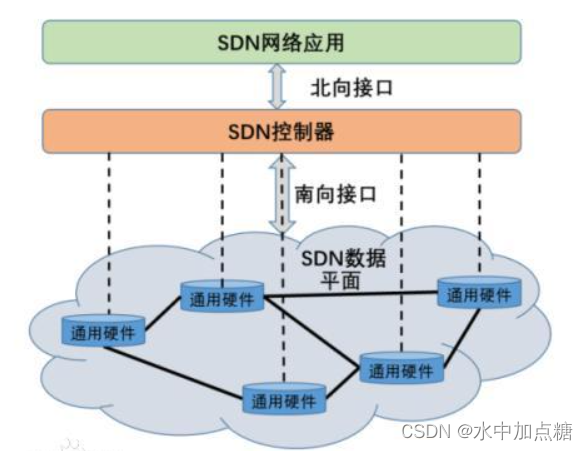
在SDN下路由交换与传统硬件集成方式的路由交换技术有许多相似之处。其中一个比较重要的点是传统交换机中ASIC (Application Specific Integrated Circuit,专用集成电路)决定了其数据平面所支持的功能,而在SDN中,实现了控制面与数据面的分离。
这里通过一个小示例来体验下SDN下两个主机通信的过程。
环境介绍

环境信息:
- onos-2.7.0
- mininet+ovs+openfllow
- idea
控制器-onos启动
SDN中的控制器很多,这里选择的是最新版本的onos,关于onos的入门编译教程可移步笔者的另一篇文章SDN控制器-ONOS源码编译与mininet快速入门
本地方式运行
onos支持多种方式运行,如为了调试与修改源码方便,可以直接在IDEA中运行onos,使用如下命令:
bazel run onos-local – clean debug
如由于网络原因导致无法编译,也可使用配置代理的方式运行onos
bazel run onos-local --action_env=HTTP_PROXY=$http_proxy – clean debug
启动成功后输出的样子如下:

关于如何在idea中调试onos可参考官方文档Using an IDE with ONOS 1.14 or higher (Bazel build)
docker方式运行
如果仅需要快速运行ONOS,可直接使用官方的docker方式运行,官方链接地址为:https://hub.docker.com/r/onosproject/onos
运行命令可参考如下:
docker run -d --network=host -e TZ=Asia/Shanghai --name onos onosproject/onos:2.7.0
这里为了方便将容器网络设置为了主机网络,可能占用的端口有:
- 8181 for REST API and GUI
- 8101 to access the ONOS CLI
- 9876 for intra-cluster communication (communication between target machines)
- 6653/6633 optional, for OpenFlow
- 6640 optional, for OVSDB
WEB验证
启动完成之后访问web控制台验证一下
浏览器中访问:http://127.0.0.1:8181/onos/ui ,输入用户名和密码karaf/karaf,随便点几个按钮看看。


当没有设备连接时,拓扑图也是空的,如上图所示,一切正常。
mininet运行
控制器就绪后,就可以让连了主机的sdn交换机连到控制器上去了。
为了方便,此部分使用模拟器方式来完成。(关于mininet的详细信息可访问mininet的官网:https://mininet.org/)
miniedit介绍
mininet提供了多种方式模拟openfllow交换机与主机,如命令行和python脚本方式。另外还可使用mininet源码中的miniedit构建需要模拟的拓扑信息,miniedit软件截图如下:


如要使用miniedit,可将mininet代码clone,https://github.com/mininet/mininet.git,运行对应位置的miniediy.py即可。miniedit位于mininet的examples目录下:

mininet安装
这里为了方便就直接使用命令方式了。以ubuntu系统为例,安装步骤如下:
#安装mininet
sudo apt-get update
sudo apt-get install mininet bridge-utils
#查看mininet版本
mn --version
安装好后使用mn随便运行一下,没有报错就代表mininet安装成功啦
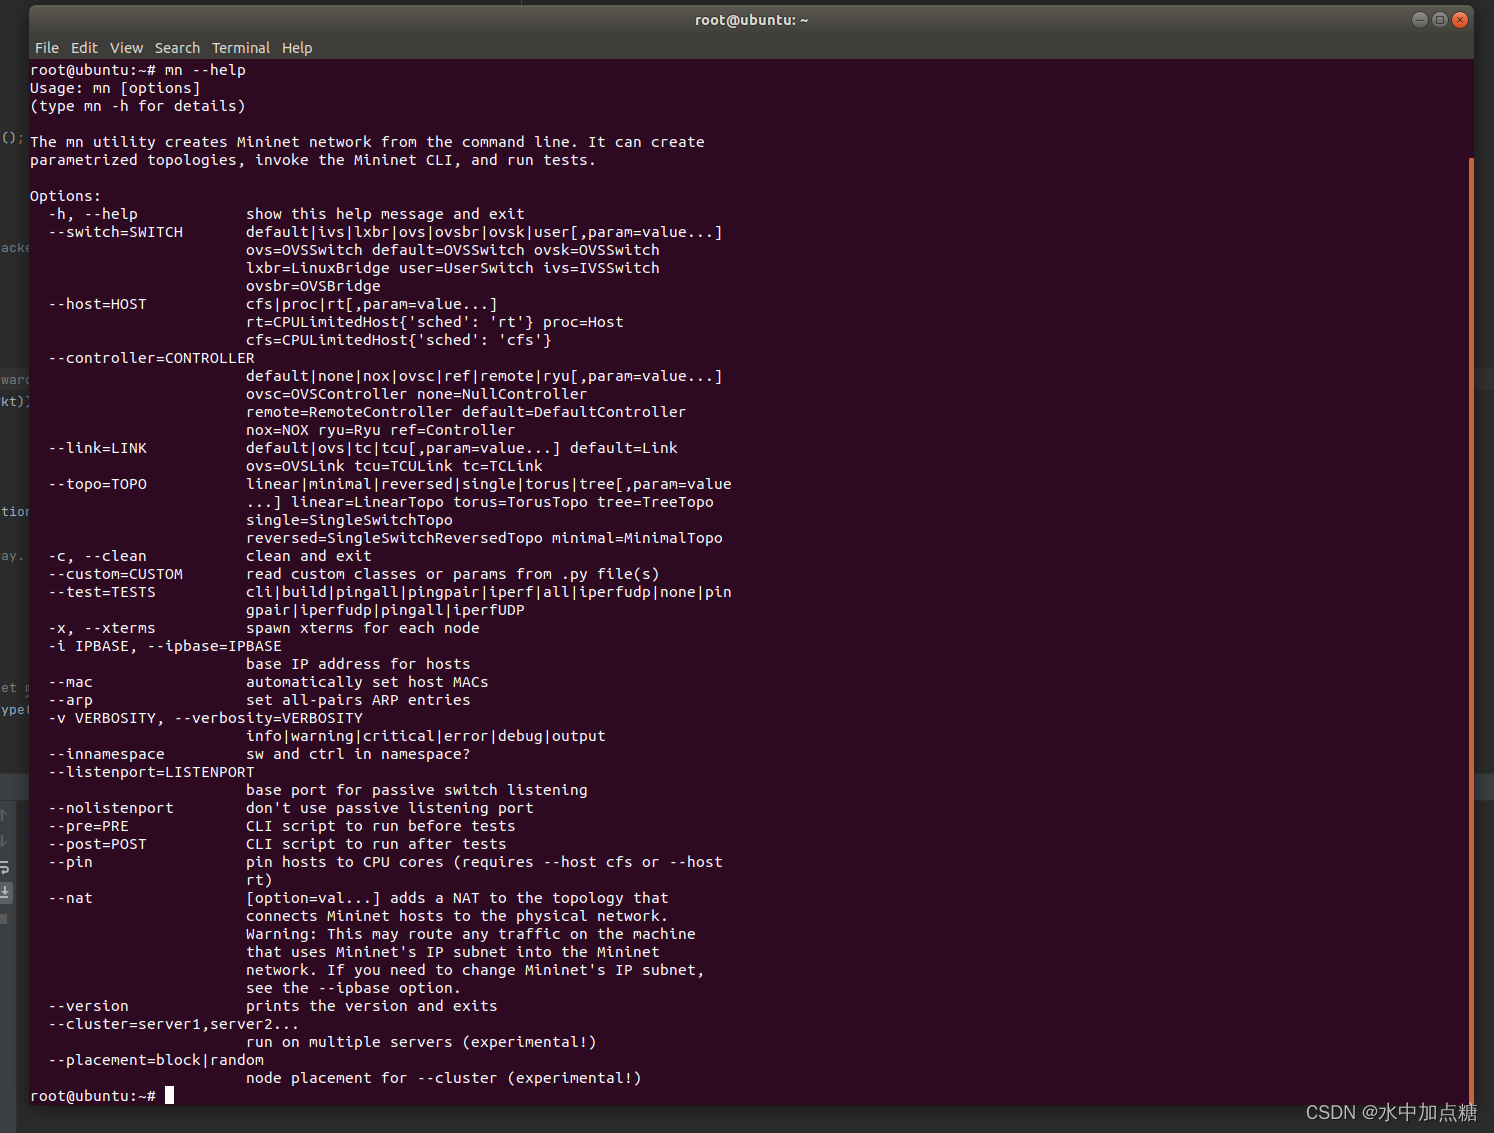
mininet常用命令
nodes查看可用节点

c代表controller
h代表host
s代表switch
dump命令输出每个node的具体信息

使用links查看各node的连接信息

dpctl-数据面控制器,支持的命令比较多可以使用dpctl --help查看一下

如导出交换机的流表信息使用如下命令
dpctl dump-tables

导出表项信息使用如下命令
dpctl dump-flows
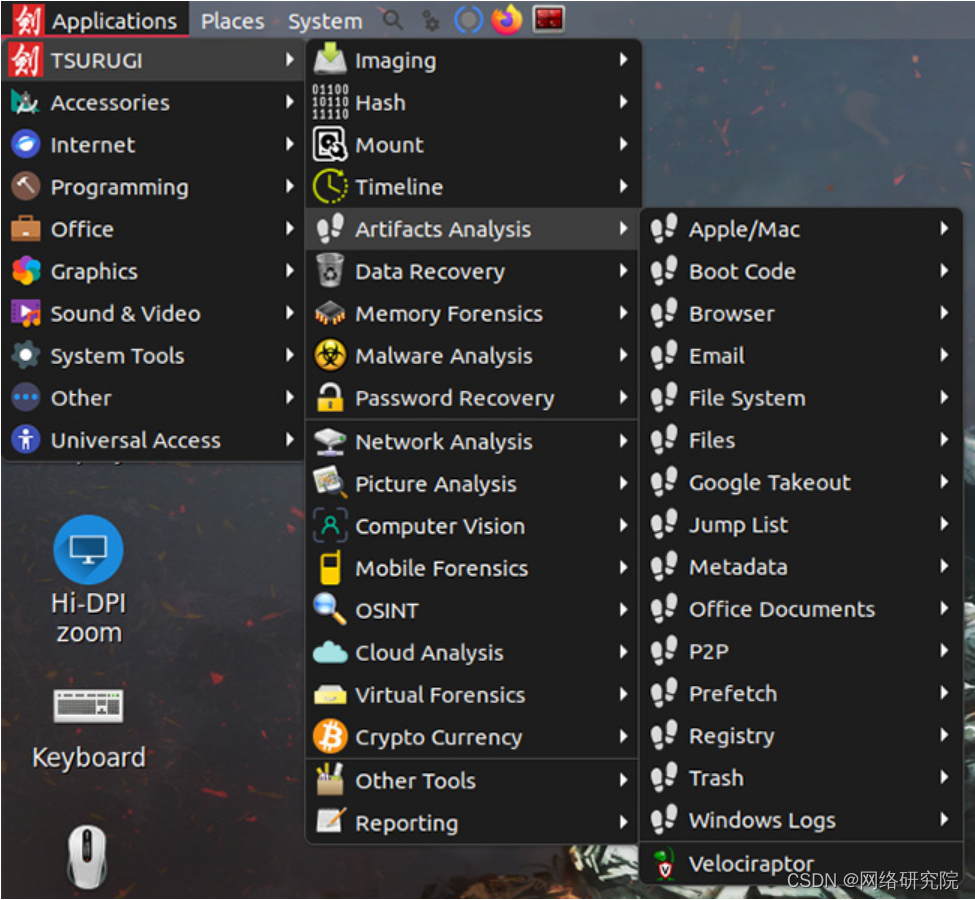
控制器openflow应用启动
一切就绪后,开始启动onos中自带的openflow应用。在Applications菜单中找到org.onosproject.openflow包,点击运行即可:

也可使用ssh输入app activate命令进行启动:
app activate org.onosproject.openflow
openflow应用启动成功后会占用6653和6633端口以等待openflow交换机连接的到来

运行mininet
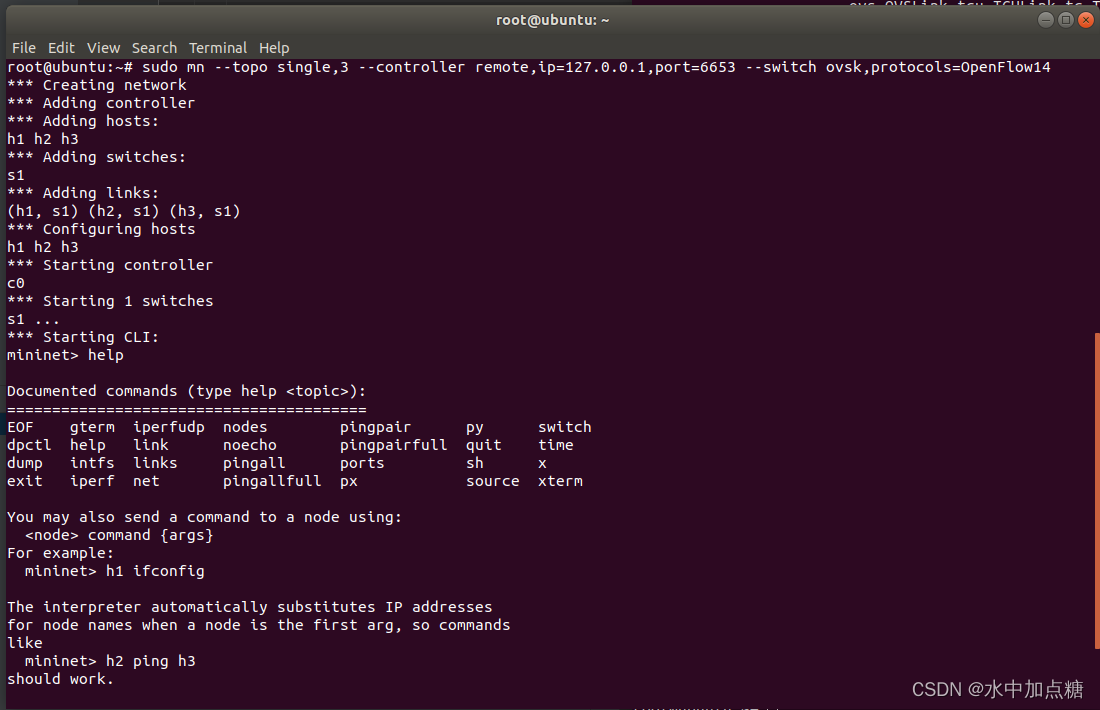
最后一步,运行mininet连接到控制器。搞一个默认最简单的拓扑:
sudo mn --topo single,3 --controller remote,ip=127.0.0.1,port=6653 --switch ovsk,protocols=OpenFlow14
简化一点:
sudo mn --topo single,3 --controller remote,ip=127.0.0.1,port=6653
参数说明:
- topo=single,3为1台交换机下3个主机
- protocol=OpenFlow14为交换机使用openflow1.4协议
- switch ovsk为使用openvswitch交换机
- controller、ip、port参数指定了心中控制器的ip和端口(By default, --controller=remote will use 127.0.0.1 and will try ports 6653 and 6633)
查看一下端口连接情况

回到中心控制器的界面上,显示设备在线就成功了

也可使用onos-cli中的devices命令可查看连到控制器中的设备信息

主机ping通
接下来进行通信部分:让交换机下的每个主机可相互通信。
在mininet中输入pingall命令验证一下。

包全丢了。再试一下单独让h1与h2通信,仍然不通

不可达分析
拿着当前拓扑图,一起回忆下大学时《计算机网络》中的知识点:位于同一网段的两个主机,使用交换机二层转发进行通信(mac地址)

也就是h1想要与h2通信,h1和h2必须知道双方的mac地址。如果不知道,就要发arp包学习对端的mac地址。
具体为:主机1向主机2发送icmp包之前查看本地arp列表,如未找到主机2的mac地址则需要发送arp广播包以获取到主机2的mac地址,当学到对端主机2的mac地址后再发送icmp包。
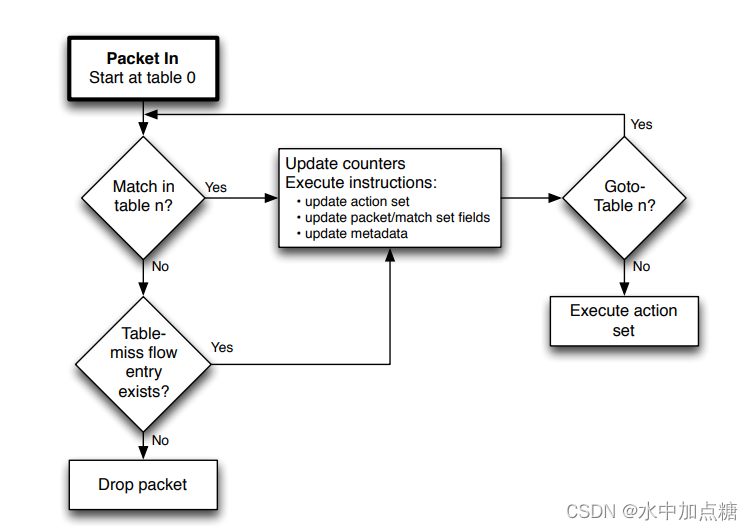
那么如何将h1发的arp包让交换机发给h2呢?答案就是下发表项,让交换机根据所配置的表项规则来指导数据的流转。
openflow包转发过程如下图:

具体如何下发呢?有多种方式,其中比较简单的是调用ovs交换机提供的命令进行下发。此处很幸亏的是,在onos的openflow应用中默认已经帮我们下发了arp这些基础表项了。
可以使用mininet中导出流表的命令查看一下当前设备的流表情况:
mininet> dpctl dump-flows
*** s1 ------------------------------------------------------------------------
cookie=0x100009465555a, duration=5653.523s, table=0, n_packets=0, n_bytes=0, priority=40000,dl_type=0x88cc actions=CONTROLLER:65535
cookie=0x100007a585b6f, duration=5653.523s, table=0, n_packets=0, n_bytes=0, priority=40000,dl_type=0x8942 actions=CONTROLLER:65535
cookie=0x10000ea6f4b8e, duration=5653.523s, table=0, n_packets=72, n_bytes=3024, priority=40000,arp actions=CONTROLLER:65535

可以看到已经下发了3个表项,分别用来匹配lldp、bddp、arp的数据包,并将其packetIn到控制器。
交换机上的表项也可以在onos界面查看对比一下:

流表匹配流程如下图(此部分的详细介绍可查看openflow相关资料,如此处使用到的openflow1.4协议官方链接为:https://opennetworking.org/wp-content/uploads/2014/10/openflow-spec-v1.4.0.pdf)
交换机的表项有了之后,再根据流表的匹配过程进行匹配最终会将arp包发送到控制器,抓包验证一下:
tcpdump -i any port 6633 -w /home/6633.pcap
使用wireshark打开看一下,可看到h1一直在发广播arp包,targetIp为h2的ip。

host学习机制
上面说到h1所发送的arp包将会到达控制器。当控制器收到数据包后将会由onos中的PacetManager进行分发处理,其中与arp包息息相关的包处理器有两个,分别为:
NeighbourResolutionManager和HostLocationProvider中的InternalHostProvider,这里主要探究一下后者。
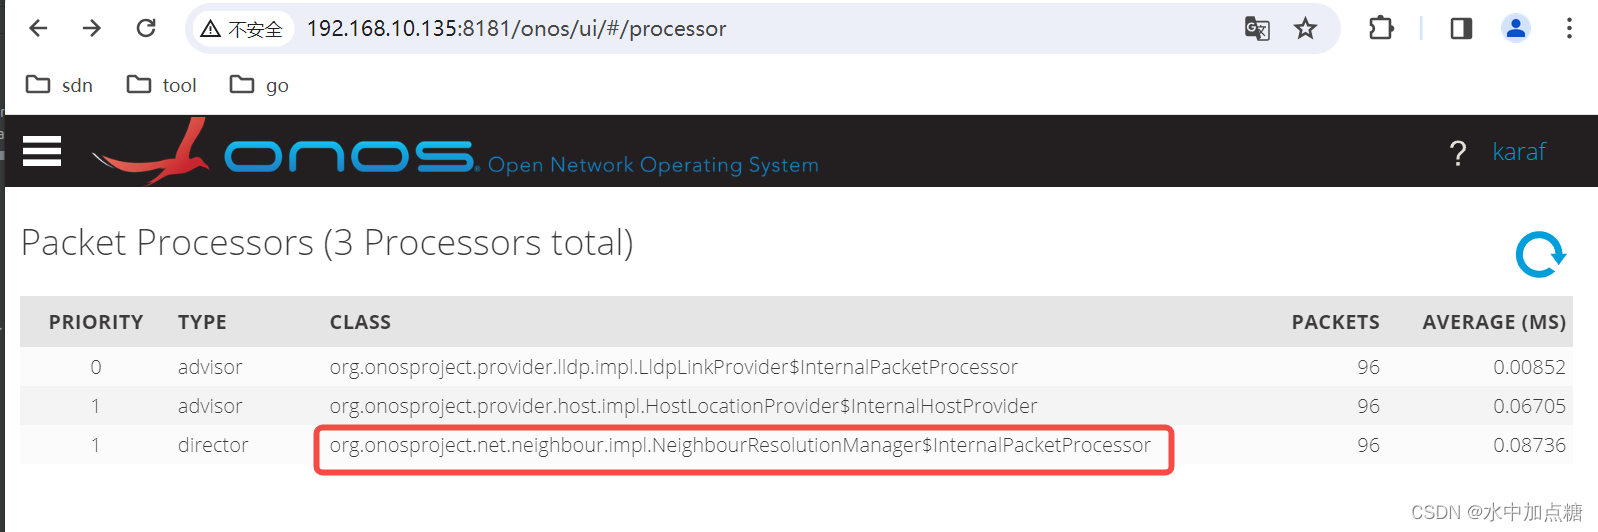
在org.onosproject.provider.host.impl.HostLocationProvider中注册了一个高优先级type为advisor的packetProcessor
顺便提一下onos中packetProcessor两个type的区别:
Advisor 主要用于监视和分析数据包,但不会阻止或修改数据包的流向。
Director 允许处理器在处理数据包时对其进行修改,并且可以决定是否阻止数据包的流动。
    private final InternalHostProvider processor = new InternalHostProvider();
    @Activate
    public void activate(ComponentContext context) {

        ……
        packetService.addProcessor(processor, PacketProcessor.advisor(1));
        deviceService.addListener(deviceListener);
        ……
        log.info("Started with Application ID {}", appId.id());
    }
当收到一个packet时,HostLocationProvider中的process方法会解析出包的信息并根据情况更新host的信息,代码片段如下:
@Override
public void process(PacketContext context) {
// Verify valid context
if (context == null) {
return;
}
// Verify valid Ethernet packet
Ethernet eth = context.inPacket().parsed();
if (eth == null) {
return;
}
// Dispatch to a worker thread
HostId hostId = HostId.hostId(eth.getSourceMAC(), VlanId.vlanId(eth.getVlanID()));
packetWorkers.execute(() -> processPacketInternal(context), hostId.hashCode());
}
private void processPacketInternal(PacketContext context) {
Ethernet eth = context.inPacket().parsed();
MacAddress srcMac = eth.getSourceMAC();
if (srcMac.isBroadcast() || srcMac.isMulticast()) {
return;
}
VlanId vlan = VlanId.vlanId(eth.getVlanID());
VlanId outerVlan = VlanId.vlanId(eth.getQinQVID());
VlanId innerVlan = VlanId.NONE;
EthType outerTpid = EthType.EtherType.UNKNOWN.ethType();
// Set up values for double-tagged hosts
if (outerVlan.toShort() != Ethernet.VLAN_UNTAGGED) {
innerVlan = vlan;
vlan = outerVlan;
outerTpid = EthType.EtherType.lookup(eth.getQinQTPID()).ethType();
}
ConnectPoint heardOn = context.inPacket().receivedFrom();
// If this arrived on control port, bail out.
if (heardOn.port().isLogical()) {
return;
}
// If this is not an edge port, bail out.
Topology topology = topologyService.currentTopology();
if (topologyService.isInfrastructure(topology, heardOn)) {
return;
}
HostLocation hloc = new HostLocation(heardOn, System.currentTimeMillis());
HostId hid = HostId.hostId(eth.getSourceMAC(), vlan);
MacAddress destMac = eth.getDestinationMAC();
// Ignore location probes
if (multihomingEnabled && destMac.isOnos() && !MacAddress.NONE.equals(destMac)) {
return;
}
HostLearningConfig cfg = netcfgService.getConfig(heardOn, HostLearningConfig.class);
// if learning is disabled bail out.
if ((cfg != null) && (!cfg.hostLearningEnabled())) {
log.debug("Learning disabled for {}, abort.", heardOn);
return;
}
// ARP: possible new hosts, update both location and IP
if (eth.getEtherType() == Ethernet.TYPE_ARP) {
ARP arp = (ARP) eth.getPayload();
IpAddress ip = IpAddress.valueOf(IpAddress.Version.INET,
arp.getSenderProtocolAddress());
createOrUpdateHost(hid, srcMac, vlan, innerVlan, outerTpid, hloc, ip);
// IPv4: update location only
} else if (eth.getEtherType() == Ethernet.TYPE_IPV4) {
// Update host location
createOrUpdateHost(hid, srcMac, vlan, innerVlan, outerTpid, hloc, null);
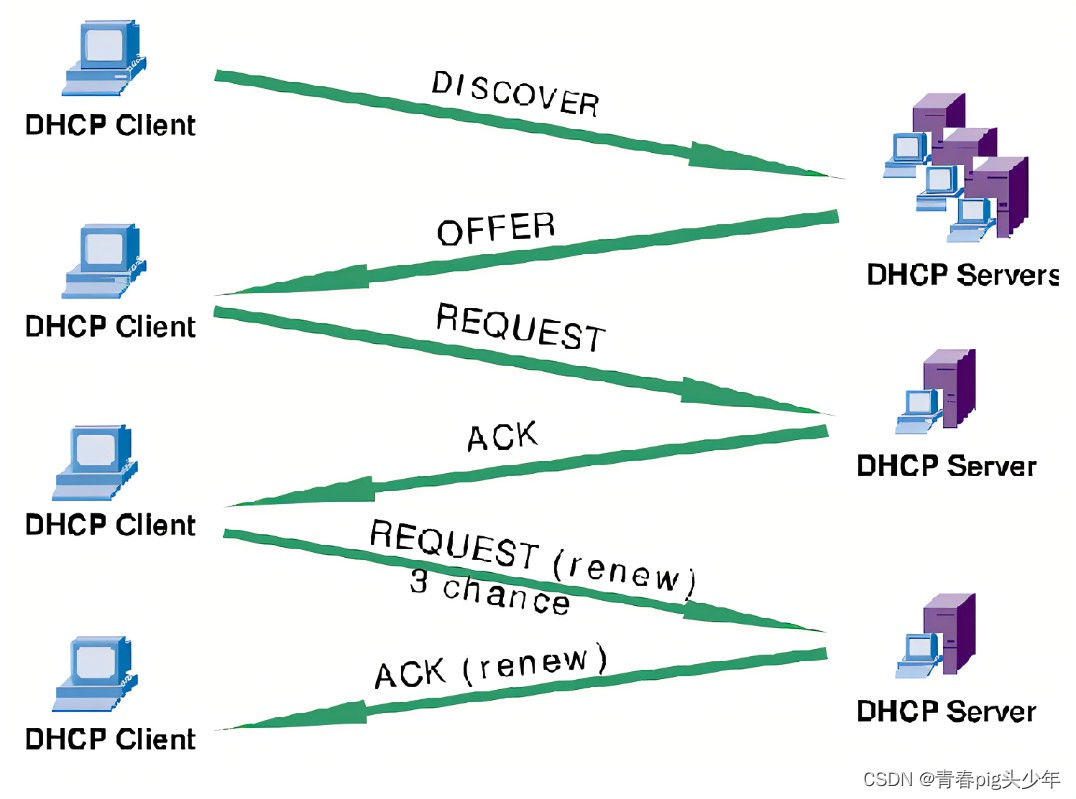
if (useDhcp) {
DHCP dhcp = findDhcp(eth).orElse(null);
// DHCP ACK: additionally update IP of DHCP client
if (dhcp != null && dhcp.getPacketType().equals(DHCP.MsgType.DHCPACK)) {
MacAddress hostMac = MacAddress.valueOf(dhcp.getClientHardwareAddress());
VlanId hostVlan = VlanId.vlanId(eth.getVlanID());
HostId hostId = HostId.hostId(hostMac, hostVlan);
updateHostIp(hostId, IpAddress.valueOf(dhcp.getYourIPAddress()));
}
}
// NeighborAdvertisement and NeighborSolicitation: possible
// new hosts, update both location and IP.
//
// IPv6: update location only
} else if (eth.getEtherType() == Ethernet.TYPE_IPV6) {
……
//process ipv6
……
}
}
上面方法中会对包进行解包,提取出包的mac地址、ip、vlan等信息,最终并调用createOrUpdateHost方法对host的信息进行更新
        /**
         * Create or update host information.
         * Will not update IP if IP is null, all zero or self-assigned.
         *
         * @param ip        source IP address or null if not updating
         */
        private void createOrUpdateHost(HostId hid, MacAddress mac, VlanId vlan,
                                        VlanId innerVlan, EthType outerTpid,
                                        HostLocation hloc, IpAddress ip) {

            log.debug("Creating Host {} based on Location {}", hid, hloc);
            Set<HostLocation> newLocations = Sets.newHashSet(hloc);
            ……
            HostDescription desc = ip == null || ip.isZero() || ip.isSelfAssigned() ?
                    new DefaultHostDescription(mac, vlan, newLocations, Sets.newHashSet(),
                                               innerVlan, outerTpid, false) :
                    new DefaultHostDescription(mac, vlan, newLocations, Sets.newHashSet(ip),
                                               innerVlan, outerTpid, false);
            try {

                providerService.hostDetected(hid, desc, false);
            } catch (IllegalStateException e) {

                log.debug("Host {} suppressed", hid);
            }
        }

        /** Enable/Disable tracking of rogue host moves. */
        private boolean hostMoveTrackerEnabled = HM_HOST_MOVE_TRACKER_ENABLE_DEFAULT;
        public static final boolean HM_HOST_MOVE_TRACKER_ENABLE_DEFAULT = false;

        @Override
        public void hostDetected(HostId hostId, HostDescription initialHostDescription, boolean replaceIps) {

            log.debug("Host Detected {}, {}", hostId, initialHostDescription);
            HostDescription hostDescription = initialHostDescription;
            checkNotNull(hostId, HOST_ID_NULL);
            checkValidity();

            …………

            if (!allowDuplicateIps) {

                removeDuplicates(hostId, hostDescription);
            }

            if (!hostMoveTrackerEnabled) {

                store.createOrUpdateHost(provider().id(), hostId,
                        hostDescription, replaceIps);
            }
            …………
        }
Host更新时机
需要注意的是,不是每次有arp包发往了控制器都要对onos中的host进行更新,是否需要更新host由其中的shouldUpdate方法决定,代码如下:
    @Override
    public HostEvent createOrUpdateHost(ProviderId providerId,
                                        HostId hostId,
                                        HostDescription hostDescription,
                                        boolean replaceIPs) {

        hostsConsistentMap.computeIf(hostId,
                existingHost -> shouldUpdate(existingHost, providerId,
                        hostDescription, replaceIPs),
                (id, existingHost) -> {


                    final Set<IpAddress> addresses;
                    if (existingHost == null || replaceIPs) {

                        //ip覆盖
                        addresses = ImmutableSet.copyOf(hostDescription.ipAddress());
                    } else {

                        //ip累加
                        addresses = Sets.newHashSet(existingHost.ipAddresses());
                        addresses.addAll(hostDescription.ipAddress());
                    }

                    final Annotations annotations;
                    if (existingHost != null) {

                        annotations = merge((DefaultAnnotations) existingHost.annotations(),
                                hostDescription.annotations());
                    } else {

                        annotations = hostDescription.annotations();
                    }

                    return new DefaultHost(providerId,
                            hostId,
                            hostDescription.hwAddress(),
                            hostDescription.vlan(),
                            hostDescription.locations(),
                            hostDescription.auxLocations(),
                            addresses,
                            hostDescription.innerVlan(),
                            hostDescription.tpid(),
                            hostDescription.configured(),
                            false,
                            annotations);
                });
        return null;
    }

    private boolean shouldUpdate(DefaultHost existingHost,
                                 ProviderId providerId,
                                 HostDescription hostDescription,
                                 boolean replaceIPs) {

        if (existingHost == null) {

            return true;
        }

        // Avoid overriding configured host with learnt host
        if (existingHost.configured() && !hostDescription.configured()) {

            return false;
        }

        if (!Objects.equals(existingHost.providerId(), providerId) ||
                !Objects.equals(existingHost.mac(), hostDescription.hwAddress()) ||
                !Objects.equals(existingHost.vlan(), hostDescription.vlan()) ||
                !Objects.equals(existingHost.innerVlan(), hostDescription.innerVlan()) ||
                !Objects.equals(existingHost.tpid(), hostDescription.tpid()) ||
                !Objects.equals(existingHost.locations(), hostDescription.locations()) ||
                !Objects.equals(existingHost.auxLocations(), hostDescription.auxLocations())) {

            return true;
        }

        if (replaceIPs) {

            if (!Objects.equals(hostDescription.ipAddress(),
                    existingHost.ipAddresses())) {

                return true;
            }
        } else {

            if (!existingHost.ipAddresses().containsAll(hostDescription.ipAddress())) {

                return true;
            }
        }

        // check to see if any of the annotations provided by hostDescription
        // differ from those in the existing host
        return hostDescription.annotations().keys().stream()
                .anyMatch(k -> !Objects.equals(hostDescription.annotations().value(k),
                        existingHost.annotations().value(k)));
    }
HostEvent
host信息的存储使用DistributedHostStore进行实现,每次host的更新会触发相应的hostEvent,实现代码位于org.onosproject.store.host.impl.HostLocationTracker中,主要片段如下:
    private class HostLocationTracker implements MapEventListener<HostId, DefaultHost> {

        @Override
        public void event(MapEvent<HostId, DefaultHost> event) {

            DefaultHost host = Versioned.valueOrNull(event.newValue());
            DefaultHost prevHost = Versioned.valueOrNull(event.oldValue());
            switch (event.type()) {

                case INSERT:
                    updateHostsByIp(host, prevHost);
                    notifyDelegate(new HostEvent(HOST_ADDED, host));
                    break;
                case UPDATE:
                    updateHostsByIp(host, prevHost);
                    if (host.suspended() && !prevHost.suspended()) {

                        notifyDelegate(new HostEvent(HOST_SUSPENDED, host, prevHost));
                    } else if (!host.suspended() && prevHost.suspended()) {

                        notifyDelegate(new HostEvent(HOST_UNSUSPENDED, host, prevHost));
                    } else if (!Objects.equals(prevHost.locations(), host.locations())) {

                        //连接设备或端口变更,触发HOST_MOVED
                        notifyDelegate(new HostEvent(HOST_MOVED, host, prevHost));
                    } else if (!Objects.equals(prevHost.auxLocations(), host.auxLocations())) {

                        notifyDelegate(new HostEvent(HOST_AUX_MOVED, host, prevHost));
                    } else if (!Objects.equals(prevHost, host)) {

                        //host其他信息不一致,触发HOST_UPDATED
                        notifyDelegate(new HostEvent(HOST_UPDATED, host, prevHost));
                    }
                    break;
                case REMOVE:
                    removeHostsByIp(prevHost);
                    notifyDelegate(new HostEvent(HOST_REMOVED, prevHost));
                    break;
                default:
                    log.warn("Unknown map event type: {}", event.type());
            }
        }
    }

    private void updateHostsByIp(DefaultHost host, DefaultHost prevHost) {

        // Let's update first the current ips
        host.ipAddresses().forEach(
                ip -> hostsByIp.compute(ip, (k, v) -> v == null ? addHosts(host) : updateHosts(v, host)));

        // Let's remove then each old ip
        Set<IpAddress> oldIps = prevHost != null ? prevHost.ipAddresses() : Collections.emptySet();
        Sets.difference(oldIps, host.ipAddresses()).forEach(
                ip -> hostsByIp.computeIfPresent(ip, (k, v) -> removeHosts(v, host)));
    }

    private Set<Host> addHosts(Host host) {

        Set<Host> hosts = Sets.newConcurrentHashSet();
        hosts.add(host);
        return hosts;
    }

    private Set<Host> updateHosts(Set<Host> existingHosts, Host host) {

        existingHosts.removeIf(existingHost -> existingHost.id().equals(host.id()));
        existingHosts.add(host);
        return existingHosts;
    }
以上代码便是host学习机制的核心代码了。
了解了这些知识后,我们便知道:当控制器收到arp包后会产生出对应的host进行存储到onos中,如需查看可使用hosts命令:

onos@root > hosts
id=AA:5A:21:9C:1B:34/None, mac=AA:5A:21:9C:1B:34, locations=[of:0000000000000001/1], auxLocations=null, vlan=None, ip(s)=[10.0.0.1], innerVlan=None, outerTPID=unknown, provider=of:org.onosproject.provider.host, configured=false
如上所示,便显示出了host1的关键信息,如所连设备的port、ip、vlan、mac信息一目了然。
初始表项下发原理
上面带大家一起过了下host学习机制的过程,这里再一起过一下初始表项下发的具体细节。
下发的代码详细位置可通过openflow应用源码中寻找:
下发arp表项的代码位于 org.onosproject.provider.host.impl.HostLocationProvider#requestIntercepts() 方法中

主要代码为:
    …………
    /** Request ARP packets for neighbor discovery by the Host Location Provider; default is true. */
    private boolean requestArp = true;
    /** Requests IPv6 NDP Neighbor Solicitation and Advertisement by the Host Location Provider; default is false. */
    private boolean requestIpv6ND = false;
    /** Requests IPv6 NDP Router Solicitation and Advertisement by the Host Location Provider; default is false. */
    private boolean requestIpv6NdpRsRa = false;
    …………
    /**
     * Request packet intercepts.
     */
    private void requestIntercepts() {

        // Use ARP
        TrafficSelector.Builder selector = DefaultTrafficSelector.builder()
                .matchEthType(Ethernet.TYPE_ARP);
        if (requestArp) {

            packetService.requestPackets(selector.build(), PacketPriority.CONTROL, appId);
        } else {

            packetService.cancelPackets(selector.build(), PacketPriority.CONTROL, appId);
        }

        // Use IPv6 NDP Neighbor Solicitation and Advertisement
        selector.matchEthType(Ethernet.TYPE_IPV6)
                .matchIPProtocol(IPv6.PROTOCOL_ICMP6);
        if (requestIpv6ND) {

            selector.matchIcmpv6Type(ICMP6.NEIGHBOR_SOLICITATION);
            packetService.requestPackets(selector.build(), PacketPriority.CONTROL, appId);
            selector.matchIcmpv6Type(ICMP6.NEIGHBOR_ADVERTISEMENT);
            packetService.requestPackets(selector.build(), PacketPriority.CONTROL, appId);
        } else {

            selector.matchIcmpv6Type(ICMP6.NEIGHBOR_SOLICITATION);
            packetService.cancelPackets(selector.build(), PacketPriority.CONTROL, appId);
            selector.matchIcmpv6Type(ICMP6.NEIGHBOR_ADVERTISEMENT);
            packetService.cancelPackets(selector.build(), PacketPriority.CONTROL, appId);
        }

        // Use IPv6 NDP Router Solicitation and Advertisement
        if (requestIpv6NdpRsRa) {

            selector.matchIcmpv6Type(ICMP6.ROUTER_SOLICITATION);
            packetService.requestPackets(selector.build(), PacketPriority.CONTROL, appId);
            selector.matchIcmpv6Type(ICMP6.ROUTER_ADVERTISEMENT);
            packetService.requestPackets(selector.build(), PacketPriority.CONTROL, appId);
        } else {

            selector.matchIcmpv6Type(ICMP6.ROUTER_SOLICITATION);
            packetService.cancelPackets(selector.build(), PacketPriority.CONTROL, appId);
            selector.matchIcmpv6Type(ICMP6.ROUTER_ADVERTISEMENT);
            packetService.cancelPackets(selector.build(), PacketPriority.CONTROL, appId);
        }
    }
下发的过程为使用requestPackets的方式进行实现,在onos中可以使用如下命令查看期望下发的表项信息
packet-requests

org.onosproject.net.packet.impl.PacketManager.InternalDeviceListener#event() 负责设备可用时对packet-requests的流表进行下发。
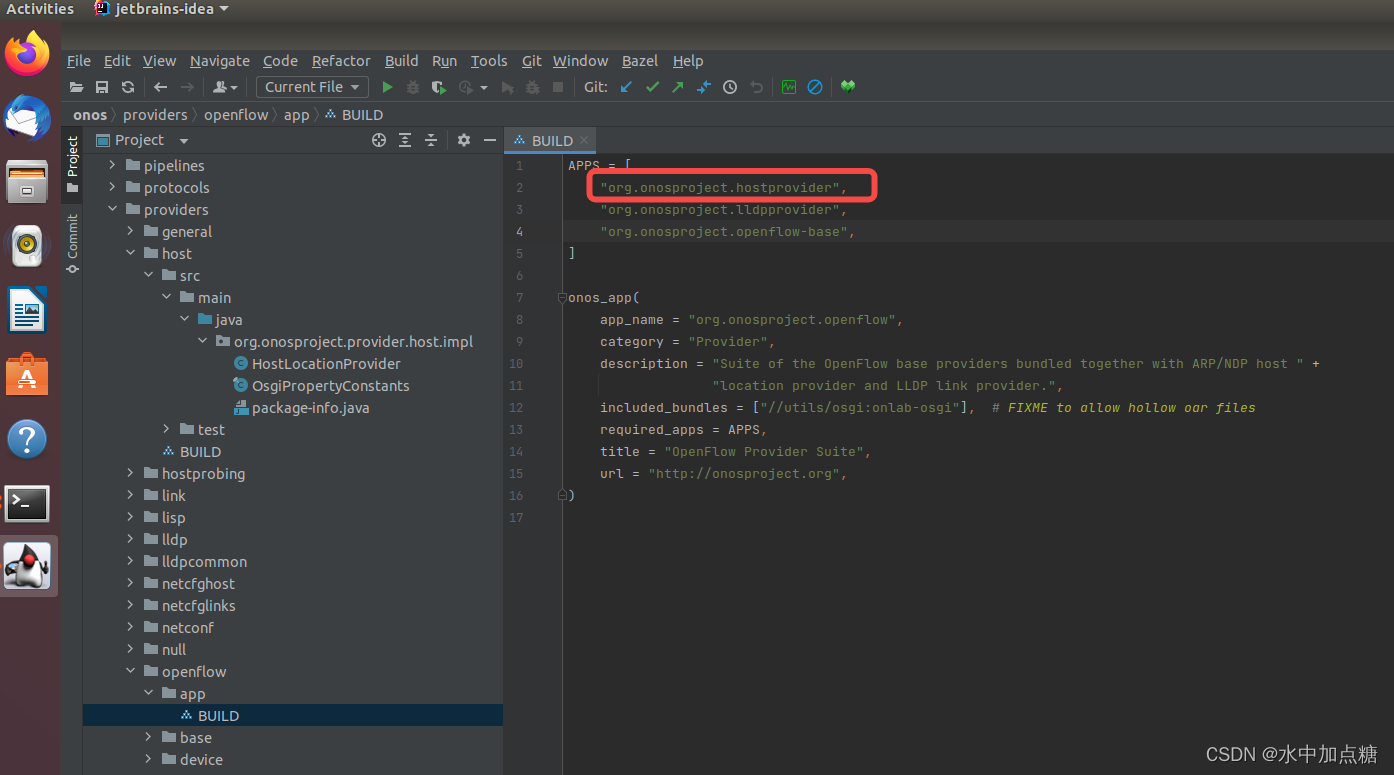
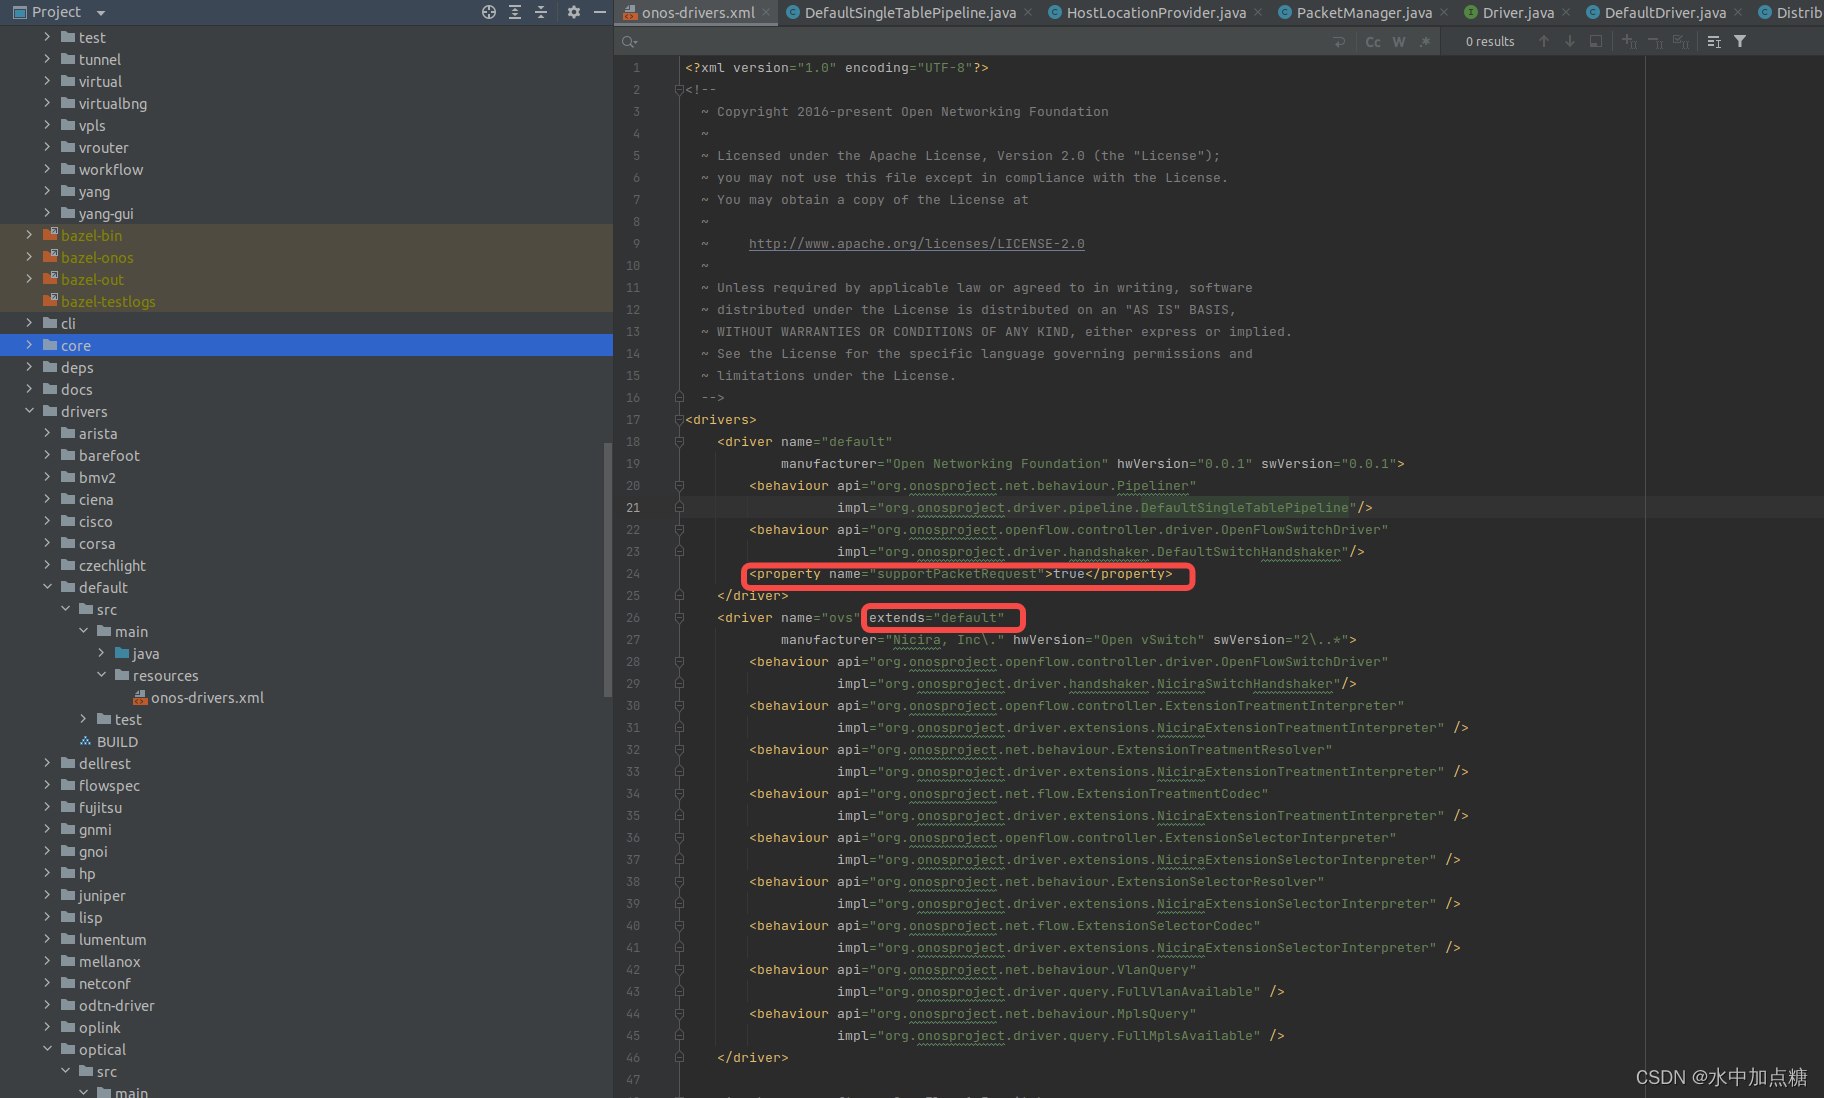
当某种类似的设备接入onos时需要在onos/drivers/default/src/main/resources/onos-drivers.xml中定义各自的drivier信息,如ovs交换机定义了supportPacketRequest的属性为true,代表启用packetRequest。
这里许多实现细节不详细展开,对于openflow设备而言可查看DefaultSingleTablePipeline.forward方法,方法如下:
 @Override
    public void forward(ForwardingObjective fwd) {

        TrafficSelector selector = fwd.selector();
        if (fwd.treatment() != null) {

            // Deal with SPECIFIC and VERSATILE in the same manner.
            FlowRule.Builder ruleBuilder = DefaultFlowRule.builder()
                    .forDevice(deviceId)
                    .withSelector(selector)
                    .fromApp(fwd.appId())
                    .withPriority(fwd.priority())
                    .withTreatment(fwd.treatment());

            if (fwd.permanent()) {

                ruleBuilder.makePermanent();
            } else {

                ruleBuilder.makeTemporary(fwd.timeout());
            }
            installObjective(ruleBuilder, fwd);

        } else {

            NextObjective nextObjective;
            NextGroup next;
            TrafficTreatment treatment;
            if (fwd.op() == ADD) {

                // Give a try to the cache. Doing an operation
                // on the store seems to be very expensive.
                nextObjective = pendingAddNext.getIfPresent(fwd.nextId());
                // If the next objective is not present
                // We will try with the store
                if (nextObjective == null) {

                    next = flowObjectiveStore.getNextGroup(fwd.nextId());
                    // We verify that next was in the store and then de-serialize
                    // the treatment in order to re-build the flow rule.
                    if (next == null) {

                        fwd.context().ifPresent(c -> c.onError(fwd, ObjectiveError.GROUPMISSING));
                        return;
                    }
                    treatment = appKryo.deserialize(next.data());
                } else {

                    pendingAddNext.invalidate(fwd.nextId());
                    treatment = getTreatment(nextObjective);
                    if (treatment == null) {

                        fwd.context().ifPresent(c -> c.onError(fwd, ObjectiveError.UNSUPPORTED));
                        return;
                    }
                }
            } else {

                // We get the NextGroup from the remove operation.
                // Doing an operation on the store seems to be very expensive.
                next = flowObjectiveStore.getNextGroup(fwd.nextId());
                treatment = (next != null) ? appKryo.deserialize(next.data()) : null;
            }
            // If the treatment is null we cannot re-build the original flow
            if (treatment == null)  {

                fwd.context().ifPresent(c -> c.onError(fwd, ObjectiveError.GROUPMISSING));
                return;
            }
            // Finally we build the flow rule and push to the flow rule subsystem.
            FlowRule.Builder ruleBuilder = DefaultFlowRule.builder()
                    .forDevice(deviceId)
                    .withSelector(selector)
                    .fromApp(fwd.appId())
                    .withPriority(fwd.priority())
                    .withTreatment(treatment);
            if (fwd.permanent()) {

                ruleBuilder.makePermanent();
            } else {

                ruleBuilder.makeTemporary(fwd.timeout());
            }
            installObjective(ruleBuilder, fwd);
        }
    }

    private void installObjective(FlowRule.Builder ruleBuilder, Objective objective) {

        FlowRuleOperations.Builder flowBuilder = FlowRuleOperations.builder();
        switch (objective.op()) {

            case ADD:
                flowBuilder.add(ruleBuilder.build());
                break;
            case REMOVE:
                flowBuilder.remove(ruleBuilder.build());
                break;
            default:
                log.warn("Unknown operation {}", objective.op());
        }

        flowRuleService.apply(flowBuilder.build(new FlowRuleOperationsContext() {

            @Override
            public void onSuccess(FlowRuleOperations ops) {

                objective.context().ifPresent(context -> context.onSuccess(objective));
            }

            @Override
            public void onError(FlowRuleOperations ops) {

                objective.context()
                        .ifPresent(context -> context.onError(objective, ObjectiveError.FLOWINSTALLATIONFAILED));
            }
        }));
    }
从上面可以看出openflow-driver最终执行的flowRuleService的apply方法对packet-requests所需要的表项进行了下发。
ipv4-ping通
继续上文中,以上面的h1 ping h2为例,梳理一下流程:
- h1 ping h2,h1不知道h2的mac,发送arp到交换机
- 交换机收到h1发来的arp,匹配arp表项将包packetIn到controller
- controller收到s1发来的arp包,解析arp包中的信息并记录h1的host信息(ip、mac、vlan、connectPoint)
然后就没有然后了,抓包也看到了arp包到达控制器之后就没有再次转发了。
如何解决?有两种方式:
- 手动下发表项,将所有h1所连口的包直接转到h2所连的口(不灵活,太具有局限性)
- 将数据包转由控制器来控制,到达控制器的数据包根据代码逻辑进行转发
那么代码要具体怎么写呢?很巧,这些都由onos自带的fwd应用实现了。如仅想让ipv4能ping通直接启动它即可。启动命令如下:
app activate org.onosproject.fwd
启动好了之后再ping一下

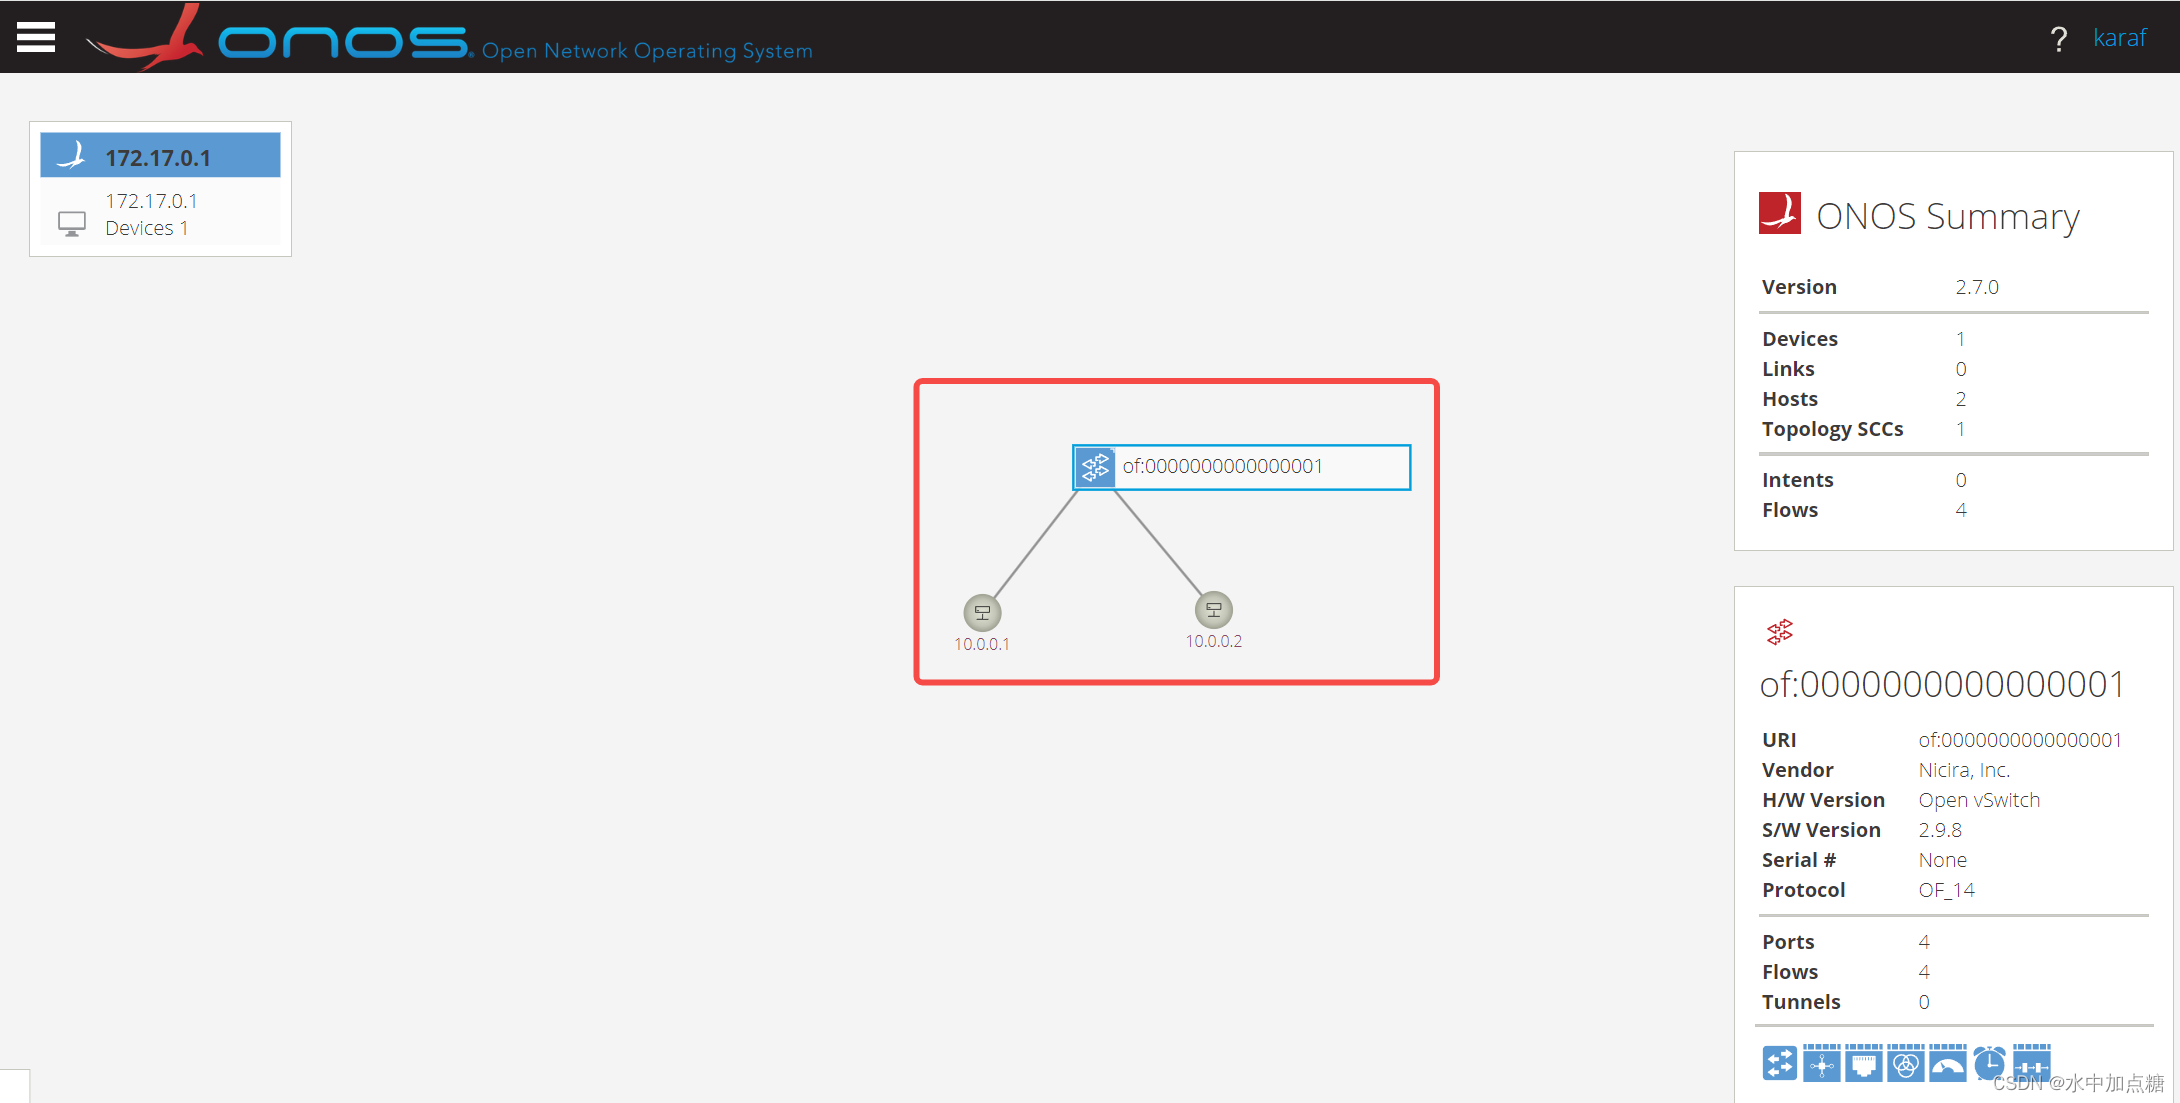
ping成功了。拓扑图也有了变化,两个主机信息都展示在了界面中。
再整理一下两个主机发送arp与ping包的过程,时序图画起来:
arp包转发过程

结合抓包一起看一下:

如想要了解arp回包的详细过程,onos中也提供了ArpProxy应用可实现代理回包。
应用包名为:org.onosproject.proxyarp
其主要原理是利用系统中自带的NeighbourResolutionManager实现的,如想要自行实现一套自己arp/ndp回包机制了解其中的代码具有一定的帮助。
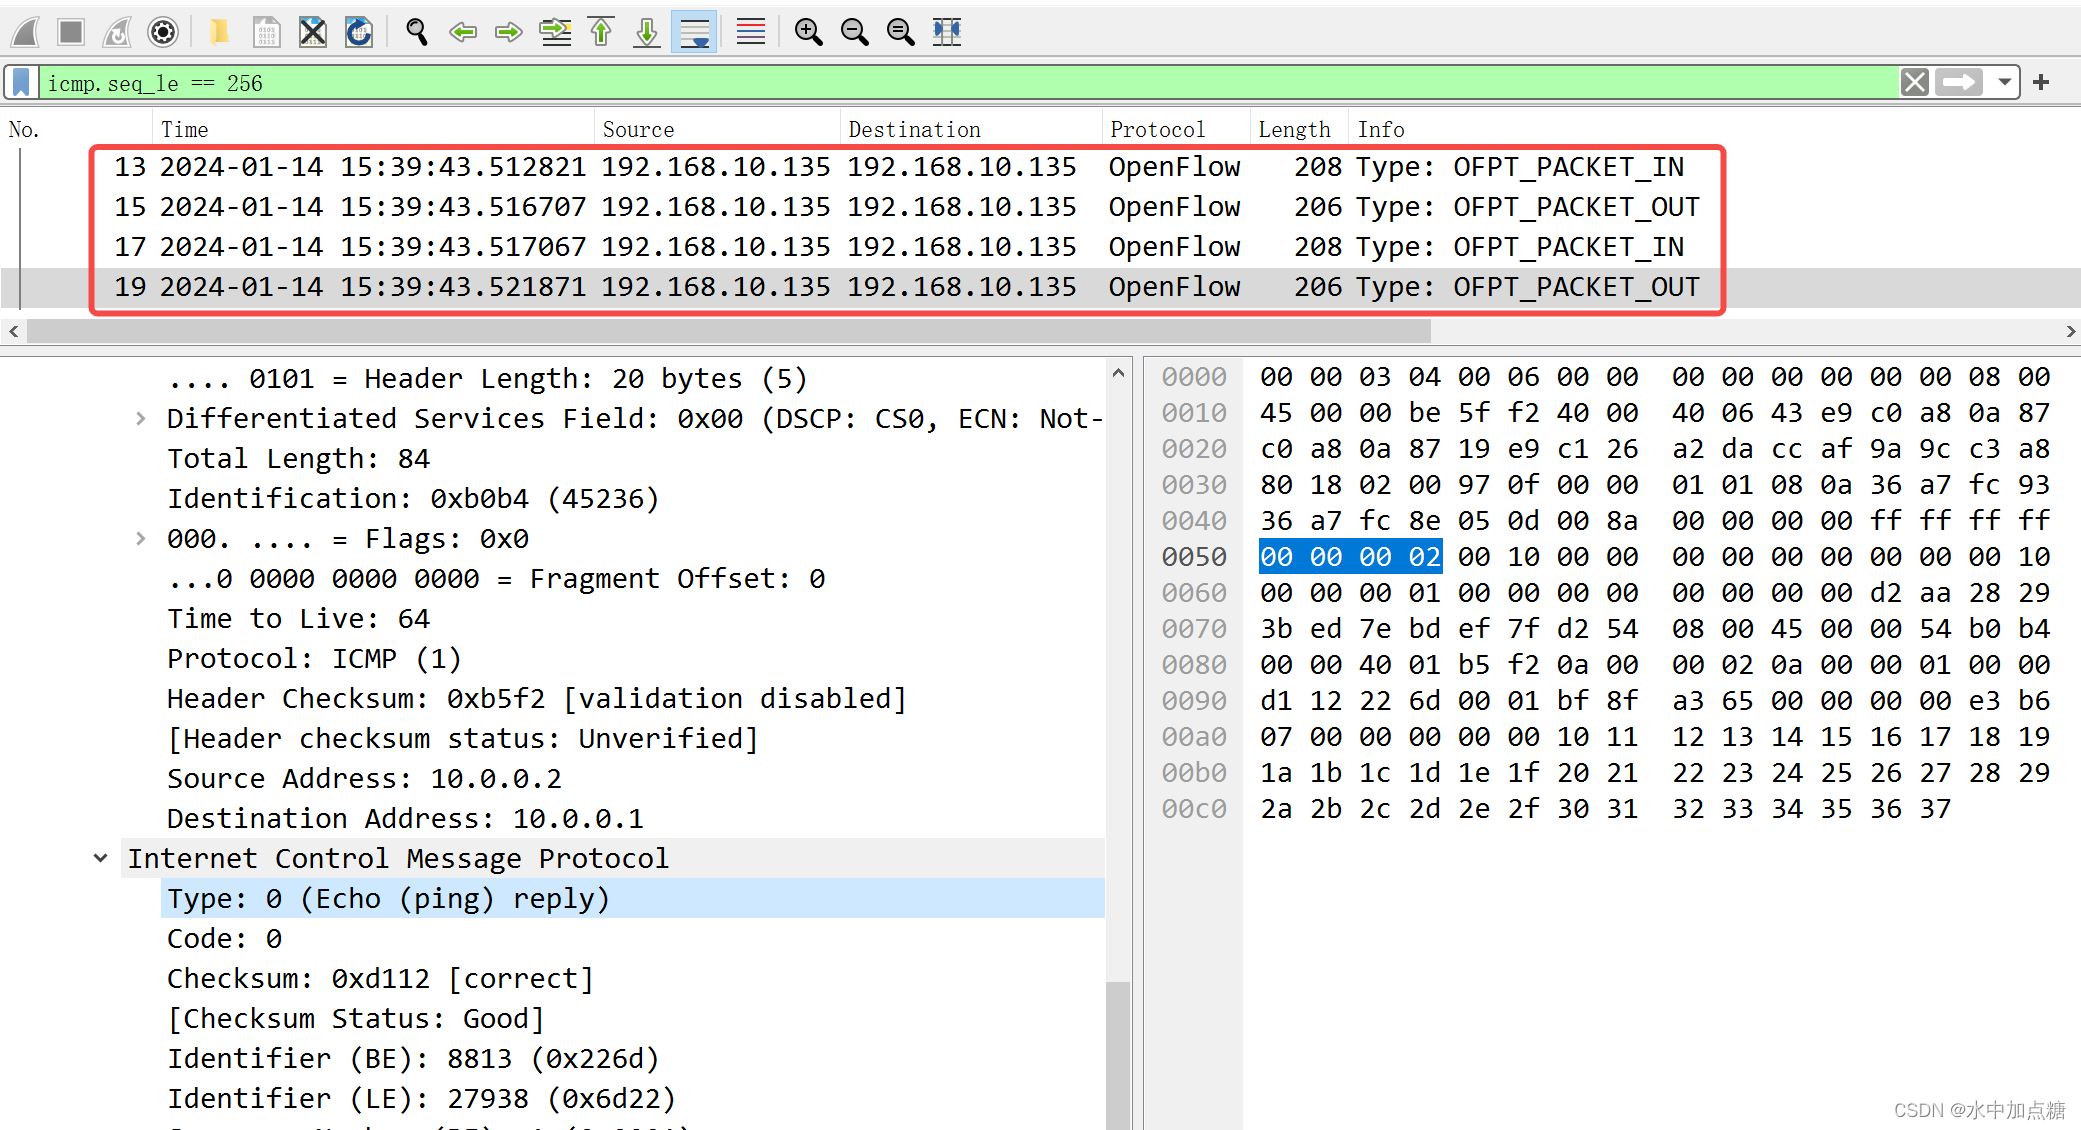
icmp包转发过程

icmp包抓包信息:
fwd应用包处理过程
通过前面的步骤,目前我们已经完成了同一个设备下不同主机间的通信,现在再来看一下fwd应用具体是如何实现的。
直接查看org.onosproject.fwd.ReactiveForwarding内部类:ReactivePacketProcessor

查看它的process方法:
    public void process(PacketContext context) {

        // Stop processing if the packet has been handled, since we
        // can't do any more to it.

        if (context.isHandled()) {

            return;
        }

        InboundPacket pkt = context.inPacket();
        Ethernet ethPkt = pkt.parsed();
        ……
        HostId id = HostId.hostId(ethPkt.getDestinationMAC(), VlanId.vlanId(ethPkt.getVlanID()));
        ……
        // Do we know who this is for? If not, flood and bail.
        Host dst = hostService.getHost(id);
        if (dst == null) {

            flood(context, macMetrics);
            return;
        }

        // Are we on an edge switch that our destination is on? If so,
        // simply forward out to the destination and bail.
        if (pkt.receivedFrom().deviceId().equals(dst.location().deviceId())) {

            if (!context.inPacket().receivedFrom().port().equals(dst.location().port())) {

                installRule(context, dst.location().port(), macMetrics);
            }
            return;
        }
        ……
        // Otherwise forward and be done with it.
        installRule(context, path.src().port(), macMetrics);
    }

     // Install a rule forwarding the packet to the specified port.
    private void installRule(PacketContext context, PortNumber portNumber, ReactiveForwardMetrics macMetrics) {

        //
        // We don't support (yet) buffer IDs in the Flow Service so
        // packet out first.
        //
        Ethernet inPkt = context.inPacket().parsed();
        TrafficSelector.Builder selectorBuilder = DefaultTrafficSelector.builder();

        // If PacketOutOnly or ARP packet than forward directly to output port
        if (packetOutOnly || inPkt.getEtherType() == Ethernet.TYPE_ARP) {

            packetOut(context, portNumber, macMetrics);
            return;
        }

        //
        // If matchDstMacOnly
        //    Create flows matching dstMac only
        // Else
        //    Create flows with default matching and include configured fields
        //
        if (matchDstMacOnly) {

            selectorBuilder.matchEthDst(inPkt.getDestinationMAC());
        } else {

            selectorBuilder.matchInPort(context.inPacket().receivedFrom().port())
                    .matchEthSrc(inPkt.getSourceMAC())
                    .matchEthDst(inPkt.getDestinationMAC());

            // If configured Match Vlan ID
            if (matchVlanId && inPkt.getVlanID() != Ethernet.VLAN_UNTAGGED) {

                selectorBuilder.matchVlanId(VlanId.vlanId(inPkt.getVlanID()));
            }
            ……
        }
        TrafficTreatment treatment;
        if (inheritFlowTreatment) {

            treatment = context.treatmentBuilder()
                    .setOutput(portNumber)
                    .build();
        } else {

            treatment = DefaultTrafficTreatment.builder()
                    .setOutput(portNumber)
                    .build();
        }

        ForwardingObjective forwardingObjective = DefaultForwardingObjective.builder()
                .withSelector(selectorBuilder.build())
                .withTreatment(treatment)
                .withPriority(flowPriority)
                .withFlag(ForwardingObjective.Flag.VERSATILE)
                .fromApp(appId)
                .makeTemporary(flowTimeout)
                .add();

        flowObjectiveService.forward(context.inPacket().receivedFrom().deviceId(),
                                     forwardingObjective);
        forwardPacket(macMetrics);
        //
        // If packetOutOfppTable
        //  Send packet back to the OpenFlow pipeline to match installed flow
        // Else
        //  Send packet direction on the appropriate port
        //
        if (packetOutOfppTable) {

            packetOut(context, PortNumber.TABLE, macMetrics);
        } else {

            packetOut(context, portNumber, macMetrics);
        }
    }
咱们先只关注arp与imcp包的处理流程:对于未学到目的ip的host,arp包将进行arp泛洪
        // Do we know who this is for? If not, flood and bail.
        Host dst = hostService.getHost(id);
        if (dst == null) {

            flood(context, macMetrics);
            return;
        }

        private void flood(PacketContext context, ReactiveForwardMetrics macMetrics) {

            if (topologyService.isBroadcastPoint(topologyService.currentTopology(),
                                                 context.inPacket().receivedFrom())) {

                packetOut(context, PortNumber.FLOOD, macMetrics);
            } else {

                context.block();
            }
        }
对于icmp包,将解析出目的mac地址并查询出目的host信息,并将icmp包直接转发至对端主机。同时为了避免每次都将包转发给控制器,还会下发超时时间为10秒的表项,这样以达到性能最佳。
处理icmp包时控制器上设备所拥有的表项如下:

与设备上的流表也对比一下

ipv6-ping通
上面我们一起将同一个交换机下的3台主机ping通了,都用上SDN中ipv6是必不可少的。最后再将h1和h2配置上ipv6地址让它们也能用ipv6地址通信。
前面启动的mininet默认不会给host配置ipv6地址,需要手动配置一下,直接在mininet的命令行中操作:
#配置ipv6地址
h1 ip addr add 2001::1/64 dev h1-eth0
h2 ip addr add 2001::2/64 dev h2-eth0
配置好后试一下h1 ping6 h2能否ping通
h1 ping6 2001::2 -c 3
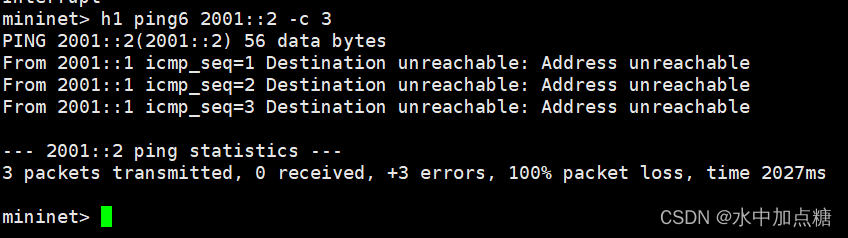
不出意外的话,第一次ping失败了。
分析原因:与ipv4类似的,在同一个二层域中的ipv6主机进行通信仍然使用mac进行通信,初步判断为仍然没有学到对端的mac地址。
在mininet中用ip neighbor查看一下
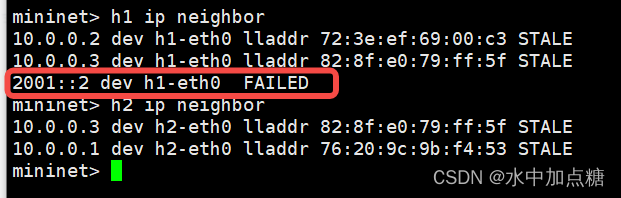
猜想正确,h1的邻居表中没有h2的ipv6地址对应的mac地址,ipv6时发icmpv6包之前则会发送NDP包以获取h2的mac信息。
查看一下当前设备表项:
dpctl dump-flows

查看表项没有看到对ipv6处理的表项。根据前面对openflow的了解,我们知道如果想要处理ipv6类似的包是需要给设备下对应的ipv6表项的。
在翻看fwd应用源码和配置时看到其中有这样一条配置:
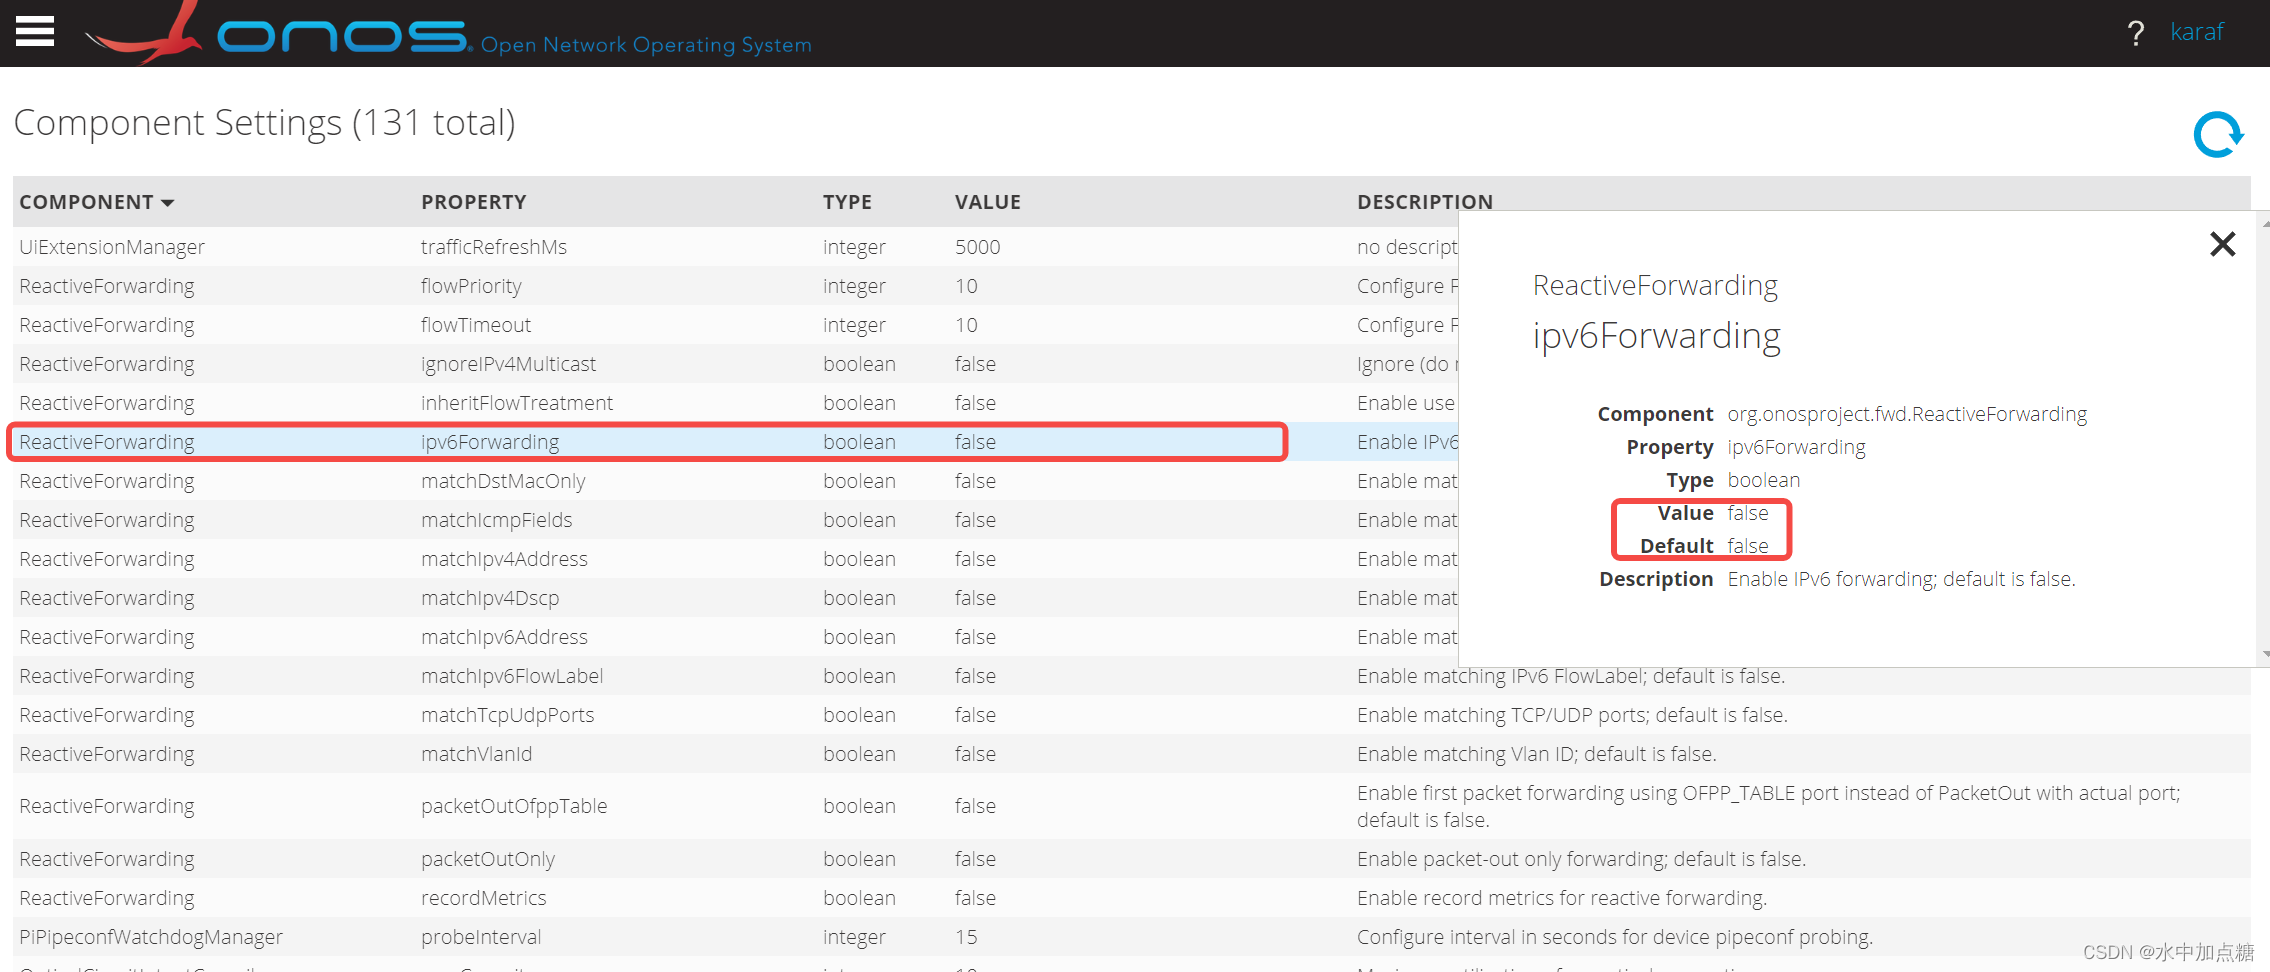
ReactiveForwarding下的ipv6Forwarding默认处于关闭状态,则代表默认不转发ipv6数据包。咱们将其打开即可,控制器的控制台中输入以下命令即可:
cfg set org.onosproject.fwd.ReactiveForwarding ipv6Forwarding true
再次查看表项,发现立马多了转发ipv6的表项。

再ping6试一下,ipv6下也ping成功了

查看h1和h2的邻居信息,都学到了对端的MAC

结合抓包再看一下:
NS包

NA包

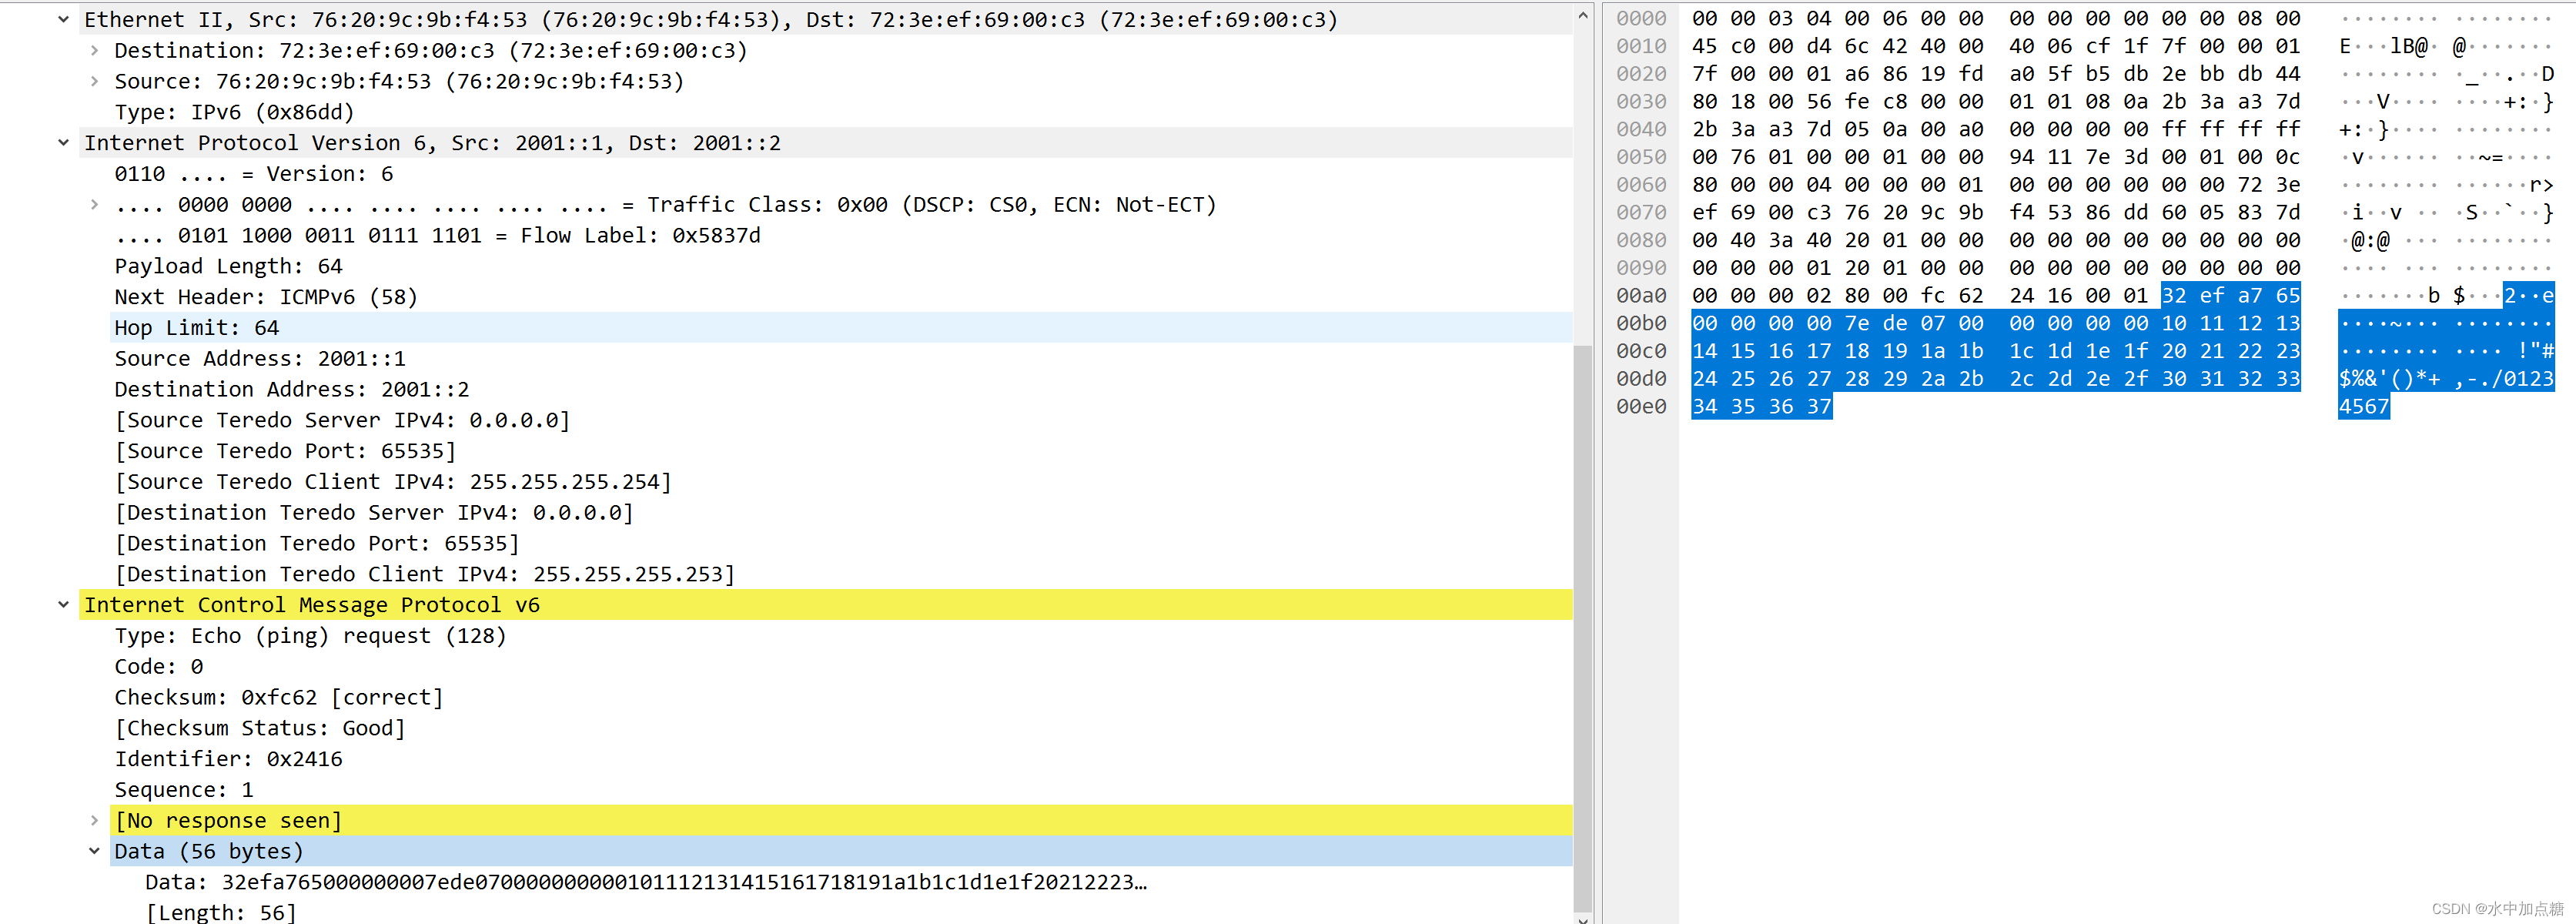
ICMPV6-request
ICMPV6-reply

最终ONOS控制器上的拓扑图如下:

fwd关于ipv6部分转发的源码与前面ipv4部分的结构大体类似,感觉还是挺不错的。