- IOC控制反转将对象的创建任务,“反转”交给了spring框架来做,而不是程序中来做。让程序员将更多精力放置在业务逻辑的实现上。
- spring框架创建并管理的对象被称为bean对象。
spring框架负责bean对象的创建和装配
- 创建:根据bean.xml文件中的约定来创建bean对象(new对象)。
- 装配:根据bean.xml文件中的约定来为bean对象设置属性值(初始化/set对象属性)。
根据xml文件创建bean对象
xml文件中约定创建的bean对象:
<?xml version="1.0" encoding="UTF-8"?>
<beans xmlns="http://www.springframework.org/schema/beans"
		xmlns:xsi="http://www.w3.org/2001/XMLSchema-instance"
		xsi:schemaLocation="http://www.springframework.org/schema/beans
		http://www.springframework.org/schema/beans/spring-beans.xsd">

	<!--bean就是java对象 , 由Spring创建和管理-->
	<bean id="MysqlImpl" class="com.kuang.dao.impl.UserDaoMySqlImpl"/>
	<bean id="OracleImpl" class="com.kuang.dao.impl.UserDaoOracleImpl"/>

	<bean id="ServiceImpl" class="com.kuang.service.impl.UserServiceImpl">
		<!--注意: 这里的name并不是属性 , 而是set方法后面的那部分 , 首字母小写-->
		<!--引用另外一个bean , 不是用value 而是用 ref-->
		<property name="userDao" ref="OracleImpl"/>
	</bean>

	<!--
	id 是bean的标识符,要唯一,如果没有配置id,name就是默认标识符
	如果配置id,又配置了name,那么name是别名
	name可以设置多个别名,可以用逗号,分号,空格隔开
	如果不配置id和name,可以根据applicationContext.getBean(.class)获取对象;
	class是bean的全限定名=包名+类名
	-->
	<bean id="hello" name="hello2 h2,h3;h4" class="com.kuang.pojo.Hello">
		<property name="name" value="Spring"/>
	</bean>

	<!--设置别名:在获取Bean的时候可以使用别名获取-->
	<alias name="userT" alias="userNew"/>

</beans>
使用方式,如何获取bean对象:
@Test
public void test(){

	//解析beans.xml文件 , 生成管理相应的Bean对象
	ApplicationContext context = new ClassPathXmlApplicationContext("beans.xml");
	//getBean: 参数即为spring配置文件中bean的id
	UserServiceImpl serviceImpl = (UserServiceImpl)context.getBean("ServiceImpl");
	serviceImpl.getUser();
}
bean对象作用域设置
作用域有单例模式Singleton和多例模式Prototype两种.
Singleton:
bean容器中只有一个bean实例。
<bean id="ServiceImpl" class="cn.csdn.service.ServiceImpl" scope="singleton">
Prototype:
bean容器中可以有多个bean实例。
<bean id="account" class="com.foo.DefaultAccount" scope="prototype"/>
或者
<bean id="account" class="com.foo.DefaultAccount" singleton="false"/>
spring创建bean对象的方式有两种(知道即可)
- 通过无参构造方法创建(默认的方式)
- 通过有参构造方法创建
通过无参构造:
// 类的定义 只提供了无参构造函数
public class User {

	private String name;

	public User() {

		System.out.println("user无参构造方法");
	}

	public void setName(String name) {

		this.name = name;
	}

	public void show(){

		System.out.println("name="+ name );
	}
}
<?xml version="1.0" encoding="UTF-8"?>
<beans xmlns="http://www.springframework.org/schema/beans"
	xmlns:xsi="http://www.w3.org/2001/XMLSchema-instance"
	xsi:schemaLocation="http://www.springframework.org/schema/beans
	http://www.springframework.org/schema/beans/spring-beans.xsd">

	<!--spring框架默认就是通过无参构造方法来创建的对象 -->
	<bean id="user" class="com.kuang.pojo.User">
		<property name="name" value="kuangshen"/>
	</bean>

</beans>
通过有参构造:
// 定义类 有参构造函数
public class UserT {

	private String name;

	public UserT(String name) {

		this.name = name;
	}

	public void setName(String name) {

		this.name = name;
	}

	public void show(){

		System.out.println("name="+ name );
	}

}
<!-- xml中有三种编写方式 -->

<!-- 第一种根据index参数下标设置 -->
<bean id="userT" class="com.kuang.pojo.UserT">
	<!-- index指构造方法 , 下标从0开始 -->
	<constructor-arg index="0" value="kuangshen2"/>
</bean>

<!-- 第二种根据参数名字设置 -->
<bean id="userT" class="com.kuang.pojo.UserT">
	<!-- name指参数名 -->
	<constructor-arg name="name" value="kuangshen2"/>
</bean>

<!-- 第三种根据参数类型设置 -->
<bean id="userT" class="com.kuang.pojo.UserT">
	<constructor-arg type="java.lang.String" value="kuangshen2"/>
</bean>
根据xml文件手动装配bean对象
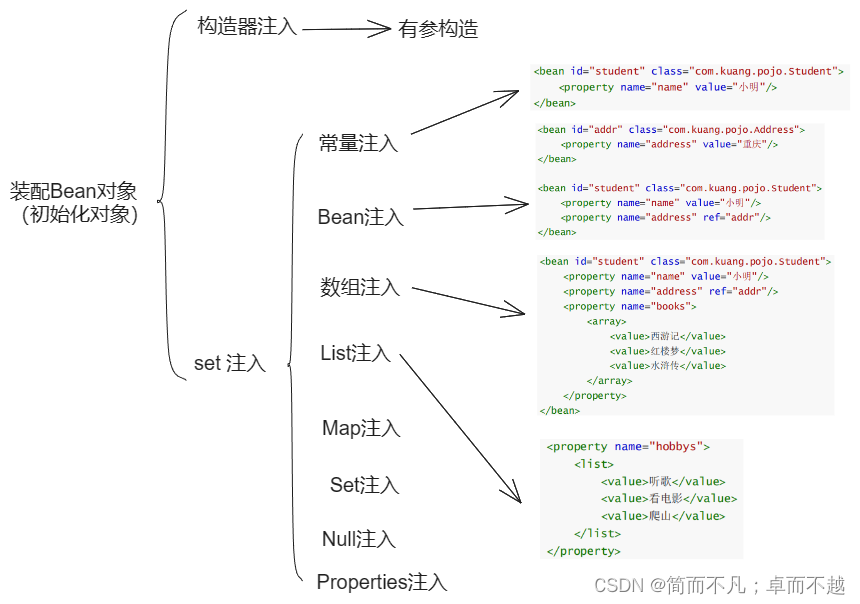
装配对象,也就是初始化对象的各种属性。依靠的方法叫做依赖注入DI。简单来说也就是通过构造方法、set方法等方式初始化对象属性。
- 构造器注入(也就是有参构造方式创建并且初始化对象)
- set注入
构造器注入:
同上面通过有参构造创建bean对象的方式。set注入:
// 创建两个类,Address类和Student类,而且Student类依赖Address类。全都有set方法
public class Address {


	private String address;
	public String getAddress() {

		return address;
	}

	public void setAddress(String address) {

		this.address = address;
	}
}

package com.kuang.pojo;
import java.util.List;
import java.util.Map;
import java.util.Properties;
import java.util.Set;

public class Student {

	private String name;
	private Address address;
	private String[] books;
	private List<String> hobbys;
	private Map<String,String> card;
	private Set<String> games;
	private String wife;
	private Properties info;

	public void setName(String name) {

		this.name = name;
	}

	public void setAddress(Address address) {

		this.address = address;
	}

	public void setBooks(String[] books) {

		this.books = books;
	}

	public void setHobbys(List<String> hobbys) {

		this.hobbys = hobbys;
	}

	public void setCard(Map<String, String> card) {

		this.card = card;
	}

	public void setGames(Set<String> games) {

		this.games = games;
	}

	public void setWife(String wife) {

		this.wife = wife;
	}

	public void setInfo(Properties info) {

		this.info = info;
	}
}
<!-- 1.常量注入 -->
<bean id="student" class="com.kuang.pojo.Student">
	<property name="name" value="小明"/>
</bean>

<!-- 2.Bean注入 -->
<bean id="addr" class="com.kuang.pojo.Address">
	<property name="address" value="重庆"/>
</bean>

<bean id="student" class="com.kuang.pojo.Student">
	<property name="name" value="小明"/>
	<property name="address" ref="addr"/>
</bean>

<!-- 3.数组注入 -->
<bean id="student" class="com.kuang.pojo.Student">
	<property name="name" value="小明"/>
	<property name="address" ref="addr"/>

	<property name="books">
		<array>
			<value>西游记</value>
			<value>红楼梦</value>
			<value>水浒传</value>
		</array>
	</property>
</bean>

<!-- 4.List注入 -->
<property name="hobbys">
	<list>
		<value>听歌</value>
		<value>看电影</value>
		<value>爬山</value>
	</list>
</property>

<!-- 5.Map注入 -->
<property name="card">
	<map>
		<entry key="中国邮政" value="456456456465456"/>
		<entry key="建设" value="1456682255511"/>
	</map>
</property>

<!-- 6.Set注入 -->
<property name="games">
	<set>
		<value>LOL</value>
		<value>BOB</value>
		<value>COC</value>
	</set>
</property>

<!-- 7.Null注入 -->
<property name="wife"><null/></property>

<!-- 8.properties注入 -->
<property name="info">
	<props>
		<prop key="学号">20190604</prop>
		<prop key="性别">男</prop>
		<prop key="姓名">小明</prop>
	</props>
</property>
自动装配bean对象
上述使用xml文件来装配bean对象时,对于属性也是bean对象的,需要手动写出来,比较麻烦。
能不能自动通过类的类型来寻找对应的bean对象呢?
两种自动装配的方式:
- byName 根据名称自动装配
- byType 根据类型自动装配
- byName:
<!--传统手动装配方式-->
<bean id="dog" class="com.kuang.pojo.Dog"/>

<bean id="cat" class="com.kuang.pojo.Cat"/>

<bean id="user" class="com.kuang.pojo.User">
	<!--cat和dog这两个bean对象需要手动编写出来,能不能框架自动帮我装配呢-->
	<property name="cat" ref="cat"/>
	<property name="dog" ref="dog"/>
	<property name="str" value="qinjiang"/>
</bean>

<!--自动装配方式-->
<bean id="dog" class="com.kuang.pojo.Dog"/>

<bean id="cat" class="com.kuang.pojo.Cat"/>

<bean id="user" class="com.kuang.pojo.User" autowire="byName">
	<!--autowire为byName,就会根据类中定义的cat名字去找bean容器中的对象-->
	<property name="str" value="qinjiang"/>
</bean>
- byType:
<bean id="dog" class="com.kuang.pojo.Dog"/>

<bean id="cat" class="com.kuang.pojo.Cat"/>

<!--<bean id="cat2" class="com.kuang.pojo.Cat"/> 如果有重复类型的bean对象,就会报错-->

<bean id="user" class="com.kuang.pojo.User" autowire="byType">
	<!--autowire为byType,就会根据类型com.kuang.pojo.Cat去找bean容器中相应的对象-->
	<property name="str" value="qinjiang"/>
</bean>
使用注解的方式实现自动装配bean对象
首先在spring的配置文件中引入context文件头:
xmlns:context="http://www.springframework.org/schema/context"
http://www.springframework.org/schema/context
http://www.springframework.org/schema/context/spring-context.xsd
然后添加属性注解支持:
<context:annotation-config/>
@Autowired
- 按类型自动装配
- 需要导入spring-aop的包
public class User {


	@Autowired  // 根据类型Cat从当前的bean容器中寻找这个类型的对象并装配给User对象
	private Cat cat;

	//如果允许对象为null,设置required = false,默认为true
	@Autowired(required = false)
	private Dog dog;

	private String str;

	public Cat getCat() {

		return cat;
	}

	public Dog getDog() {

		return dog;
	}

	public String getStr() {

		return str;
	}
}
对应的xml文件内容:
<context:annotation-config/>
<bean id="dog" class="com.kuang.pojo.Dog"/>
<bean id="cat" class="com.kuang.pojo.Cat"/>
<bean id="user" class="com.kuang.pojo.User"/>
@Qualifier配合@Autowired
- 配合后可以byName根据名字自动装配
<bean id="dog1" class="com.kuang.pojo.Dog"/>
<bean id="dog2" class="com.kuang.pojo.Dog"/>
<bean id="cat1" class="com.kuang.pojo.Cat"/>
<bean id="cat2" class="com.kuang.pojo.Cat"/>
@Autowired
@Qualifier(value = "cat2") // 指定了名称为cat2
private Cat cat;

@Autowired
@Qualifier(value = "dog2")
private Dog dog;
@Resource
- 按照指定name进行byName属性装配,未指定,则按照默认name自动装配,否则按照byType装配
public class User {


	//如果允许对象为null,设置required = false,默认为true
	@Resource(name = "cat2") // 指定了name
	private Cat cat;

	@Resource // 未指定name,则默认以name为dog寻找对象
	private Dog dog;

	private String str;

}
<bean id="dog" class="com.kuang.pojo.Dog"/>
<bean id="cat1" class="com.kuang.pojo.Cat"/>
<bean id="cat2" class="com.kuang.pojo.Cat"/>
<bean id="user" class="com.kuang.pojo.User"/>
感谢
参考 狂神说讲java 的课做的笔记


![[<span style='color:red;'>Spring</span>] <span style='color:red;'>IoC</span> <span style='color:red;'>控制</span><span style='color:red;'>反</span><span style='color:red;'>转</span>和DI依赖注入和<span style='color:red;'>Spring</span><span style='color:red;'>中</span><span style='color:red;'>的</span>实现以及常见面试题](https://img-blog.csdnimg.cn/direct/460599a273d84500bdb18ae3f7085ee6.png)


