经典目标检测YOLO系列(一)复现YOLOV1(2)反解边界框及后处理
在上个博客,我们提出了新的YOLOV1架构,这次我们解决前向推理过程中的两个问题。
经典目标检测YOLO系列(一)YOLOV1的复现(1)总体架构
1、边界框的计算
1.1 反解边界框公式的改变
1.1.1 原版YOLOV1的中心点量化误差的计算公式
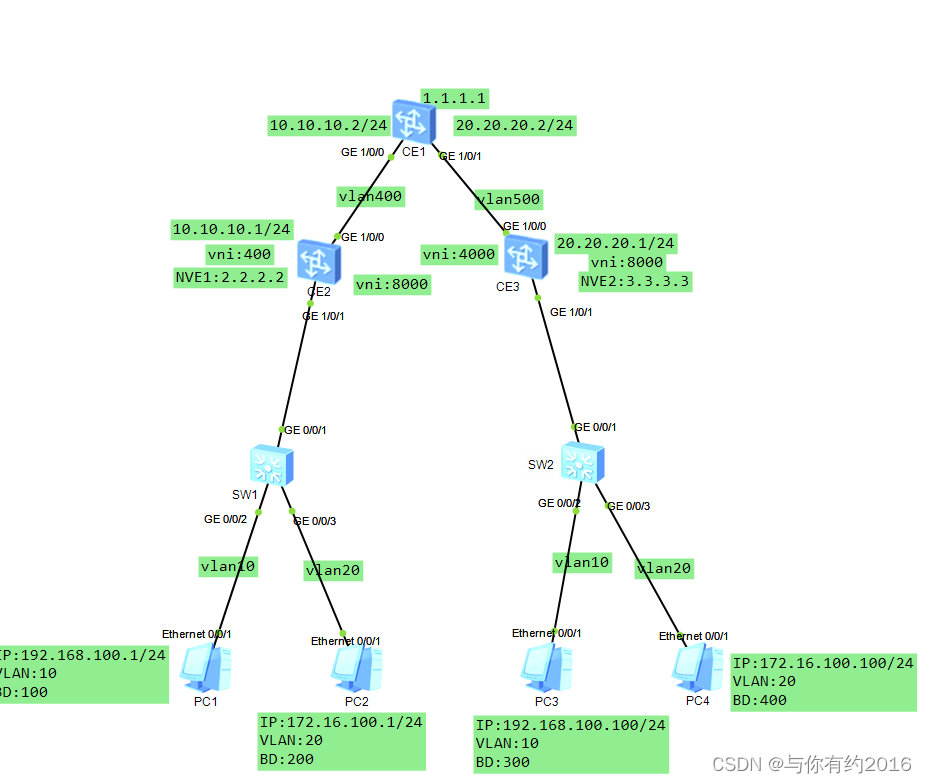
如下图,目标狗的中心点所在网格为黄色部分,中心点为图中红点。
在原版的YOLOV1中,我们发现中心点【红点】距离黄色网格左上角处【坐标为(1, 4)】是有差距的,这其实就是由于降采样带来的量化误差,因此,我们只要获得了这个量化误差,就能获得中心点的准确坐标了。

YOLOv1原版中计算这个量化误差的过程如下:

在上图中计算出grid_x,grid_y的坐标,我们可以用矩阵进行表示,我们不妨称这个矩阵为G,矩阵的值如下
[
  [0., 0.],[1., 0.],[2., 0.],[3., 0.],[4., 0.],[5., 0.],[6., 0.],
  [0., 1.],[1., 1.],[2., 1.],[3., 1.],[4., 1.],[5., 1.],[6., 1.],
  [0., 2.],[1., 2.],[2., 2.],[3., 2.],[4., 2.],[5., 2.],[6., 2.],
  [0., 3.],[1., 3.],[2., 3.],[3., 3.],[4., 3.],[5., 3.],[6., 3.],
  [0., 4.],[1., 4.],[2., 4.],[3., 4.],[4., 4.],[5., 4.],[6., 4.],
  [0., 5.],[1., 5.],[2., 5.],[3., 5.],[4., 5.],[5., 5.],[6., 5.],
  [0., 6.],[1., 6.],[2., 6.],[3., 6.],[4., 6.],[5., 6.],[6., 6.]
]
计算出来的量化误差,其实就是中心点【红点】距离【黄色网格左上角点】的X轴和Y轴方向的偏移量。

1.1.2 原版YOLOV1反解边界框的公式
YOLOv1原版中根据预测值反解边界框的过程如下:
c e n t e r x = ( g r i d x + c x ) × s t r i d e c e n t e r y = ( g r i d y + c y ) × s t r i d e w = w p r e d × w i m a g e h = h p r e d × h i m a g e center_x = (grid_x + c_x)×stride \\ center_y = (grid_y + c_y)×stride \\ w = w_{pred} × w_{image} \\ h = h_{pred} × h_{image} centerx=(gridx+cx)×stridecentery=(gridy+cy)×stridew=wpred×wimageh=hpred×himage
1.1.3 改进YOLOV1
在原版的YOLOv1中,bbox预测主要包括目标中心点的偏移量 cx,cy 和归一化的边界框的宽高 w,h ,但是不论是哪个量,原版的YOLOv1均使用线性函数来输出,未加任何约束限制,很明显会有以下两点问题:
由于偏移量cx,cy是介于01范围内的数,因此,其本身就是有上下界的,而线性输出并没有上下界,这就容易导致在学习的初期,网络可能预测的值非常大,导致bbox分支学习不稳定。
边界框的宽高显然是个非负数,而线性输出不能保证这一点,这也可能造成训练过程中的不稳定,一些输出一些不合理的数值(比如负数)。
因此对于这两个问题,我们进行改进:
第一个问题:假设模型的输出为 tx,ty ,我们使用sigmoid函数将其映射到0~1的范围内,保证网络的输出值是合理的,使得训练更加稳定。
第二个问题:采用
log-exp方法来处理。- YOLOv1所要预测的不是归一化的边界框宽高,而是经过log函数压缩后的宽高。
- 由于log函数的指数级的压缩特性,在一定程度上可以拉近大目标和小目标之间的尺寸量级,因此,对于平衡不同尺度的目标的检测问题还能起到一定的缓解作用。
- 为了更好地学习这一标签,
会将目标框的坐标先映射到网格的尺度上:ws=w/stride,hs=h/stride ,然后再做log处理
t w = l o g ( w s ) t h = l o g ( h s ) t_w = log(w_s) \\ t_h = log(h_s) tw=log(ws)th=log(hs)
- 在推理阶段,使用exp函数即可将预测恢复到正常的尺度上。
w = e ( t w ) ∗ s t r i d e h = e ( t h ) ∗ s t r i d e w = e^{(t_w)}*stride \\ h = e^{(t_h)}*stride w=e(tw)∗strideh=e(th)∗stride
因此,改进后根据预测值反解边界框的公式如下:
c e n t e r x = ( g r i d x + c x ) × s t r i d e c e n t e r y = ( g r i d y + c y ) × s t r i d e w = e ( t w ) ∗ s t r i d e h = e ( t h ) ∗ s t r i d e center_x = (grid_x + c_x)×stride \\ center_y = (grid_y + c_y)×stride \\ w = e^{(t_w)}*stride \\ h = e^{(t_h)}*stride centerx=(gridx+cx)×stridecentery=(gridy+cy)×stridew=e(tw)∗strideh=e(th)∗stride
1.2 反解边界框代码实现
前向推理过程中,我们通过yoloV1网络得到置信度、分类以及回归的预测值。然后,对其进行一些调整,方便后续处理。
    # RT-ODLab/models/detectors/yolov1/yolov1.py
    @torch.no_grad()
    def inference(self, x):
        # 测试阶段的前向推理代码

        # 主干网络
        feat = self.backbone(x)

        # 颈部网络
        feat = self.neck(feat)

        # 检测头
        cls_feat, reg_feat = self.head(feat)

        # 预测层
        obj_pred = self.obj_pred(cls_feat)
        cls_pred = self.cls_pred(cls_feat)
        reg_pred = self.reg_pred(reg_feat)
        fmp_size = obj_pred.shape[-2:]

        # 对 pred 的size做一些view调整,便于后续的处理
        # [B, C, H, W] -> [B, H, W, C] -> [B, H*W, C]
        obj_pred = obj_pred.permute(0, 2, 3, 1).contiguous().flatten(1, 2)
        cls_pred = cls_pred.permute(0, 2, 3, 1).contiguous().flatten(1, 2)
        reg_pred = reg_pred.permute(0, 2, 3, 1).contiguous().flatten(1, 2)

        # 测试时,笔者默认batch是1,
        # 因此,我们不需要用batch这个维度,用[0]将其取走。
        obj_pred = obj_pred[0]       # [H*W, 1]
        cls_pred = cls_pred[0]       # [H*W, NC]
        reg_pred = reg_pred[0]       # [H*W, 4]

        # 每个边界框的得分
        scores = torch.sqrt(obj_pred.sigmoid() * cls_pred.sigmoid())

        # 解算边界框, 并归一化边界框: [H*W, 4]
        bboxes = self.decode_boxes(reg_pred, fmp_size)

        ......
然后,我们通过回归参数,反解边界框。要想反解边界框,首先,我们需要一个由grid_x,grid_y组成的矩阵G。
    # RT-ODLab/models/detectors/yolov1/yolov1.py
    def create_grid(self, fmp_size):
        """
            用于生成G矩阵,其中每个元素都是特征图上的像素坐标。
        """
        # 特征图的宽和高
        ws, hs = fmp_size

        # 生成网格的x坐标和y坐标
        grid_y, grid_x = torch.meshgrid([torch.arange(hs), torch.arange(ws)])

        # 将xy两部分的坐标拼起来:[H, W, 2]
        grid_xy = torch.stack([grid_x, grid_y], dim=-1).float()

        # [H, W, 2] -> [HW, 2] -> [HW, 2]
        grid_xy = grid_xy.view(-1, 2).to(self.device)

        return grid_xy
不了解torch.meshgrid()函数的可以参考:
np.meshgrid()和torch.meshgrid()函数解析
然后,我们按照改进后的公式,得到边界框中心坐标以及宽高,最后转换为(xmin,ymin,xmax,ymax)的格式。
    # RT-ODLab/models/detectors/yolov1/yolov1.py
    def decode_boxes(self, pred, fmp_size):
        """
            将txtytwth转换为常用的x1y1x2y2形式。

            pred:回归预测参数
            fmp_size:特征图宽和高
        """
        # 生成网格坐标矩阵
        grid_cell = self.create_grid(fmp_size)

        # 计算预测边界框的中心点坐标和宽高
        pred_ctr = (torch.sigmoid(pred[..., :2]) + grid_cell) * self.stride
        pred_wh = torch.exp(pred[..., 2:]) * self.stride

        # 将所有bbox的中心带你坐标和宽高换算成x1y1x2y2形式
        pred_x1y1 = pred_ctr - pred_wh * 0.5
        pred_x2y2 = pred_ctr + pred_wh * 0.5
        pred_box = torch.cat([pred_x1y1, pred_x2y2], dim=-1)

        return pred_box
2、后处理
反解边界框后,我们会遇到两个问题:
- 一些边界框的score过低,我们需要剔除。
- 边界框有很多冗余,即多个box检测到了同一个物体,而我们对于每一个物体只需要一个框就够了。因此,我们有必要去剔除掉多余的结果(通过非极大值抑制nms)。
2.1 非极大值抑制
非极大值抑制的步骤:
首先挑选出得分score最高的框;
依次计算其他框与这个得分最高的框的 IoU ,超过给定 IoU 阈值的框舍掉。
对每一类别都进行以上的操作,直到无框可剔除为止。
非极大值抑制的python实现:
def nms(bboxes, scores):
    # 1、将xmin,ymin,xmax,ymax拿出
    xmin = bboxes[:, 0]
    ymin = bboxes[:, 1]
    xmax = bboxes[:, 2]
    ymax = bboxes[:, 3]

    # 2、置信度从大到小的下标
    order = scores.argsort()[::-1]
    print(order)

    # 3、每个bbox的面积
    area = (ymax - ymin) * (xmax - xmin)
    print(area)
    keep = [] # 保存框的索引
    while order.size > 0:
        i = order[0]
        keep.append(i)

        # 4、求当前置信度最大的bbox与其他bbox的iou
        # 4.1 计算交集的坐上角的点 和  右下角的点
        x1 = np.maximum(xmin[i], xmin[order[1:]])
        y1 = np.maximum(ymin[i], ymin[order[1:]])
        x2 = np.minimum(xmax[i], xmax[order[1:]])
        y2 = np.minimum(ymax[i], ymax[order[1:]])

        # 4.2 计算交集的宽和高
        w = np.maximum(1e-10, x2 - x1)
        h = np.maximum(1e-10, y2 - y1)

        # 4.3 计算iou
        inter = w * h
        iou = inter / (area[i] + area[order[1:]]  - inter)
        print('iou = ', iou)

        # 滤除超过nms阈值的检测框
        nms_thresh = 0.4
        inds = np.where(iou <= nms_thresh)[0]
        print(inds + 1)
        order = order[inds + 1]
    return keep


if __name__ == '__main__':
    bboxes = np.asarray([
        [1, 1, 3, 3],
        [1, 1, 4, 4],
        [0, 0, 1.9, 1.9],
        [0, 0, 2, 2],
    ]) * 100
    scores = np.asarray([0.6, 0.7, 0.9, 0.1])
    keep = nms(bboxes, scores)
    print(keep)
    print(bboxes[[2, 1]])
[2, 1]
[[  0.   0. 190. 190.]
 [100. 100. 400. 400.]]
2.2 后处理代码实现
了解非极大值后,我们就可以进行后处理了。
    # RT-ODLab/models/detectors/yolov1/yolov1.py

    def postprocess(self, bboxes, scores):
        """
        后处理代码,包括阈值筛选和非极大值抑制

        1、滤掉低得分(边界框的score低于给定的阈值)的预测边界框;
        2、滤掉那些针对同一目标的冗余检测。
        Input:
            bboxes: [HxW, 4]
            scores: [HxW, num_classes]
        Output:
            bboxes: [N, 4]
            score:  [N,]
            labels: [N,]
        """
        # 获取最大分数
        labels = np.argmax(scores, axis=1)
        scores = scores[(np.arange(scores.shape[0]), labels)]

        # threshold
        # 1、滤掉低得分(边界框的score低于给定的阈值)的预测边界框;
        keep = np.where(scores >= self.conf_thresh)
        bboxes = bboxes[keep]
        scores = scores[keep]
        labels = labels[keep]

        # nms
        # 2、滤掉那些针对同一目标的冗余检测。
        scores, labels, bboxes = multiclass_nms(
            scores, labels, bboxes, self.nms_thresh, self.num_classes, self.nms_class_agnostic)

        return bboxes, scores, labels
# RT-ODLab/utils/misc.py


# ---------------------------- NMS ----------------------------
## basic NMS
def nms(bboxes, scores, nms_thresh):
    """"Pure Python NMS."""
    x1 = bboxes[:, 0]  #xmin
    y1 = bboxes[:, 1]  #ymin
    x2 = bboxes[:, 2]  #xmax
    y2 = bboxes[:, 3]  #ymax

    areas = (x2 - x1) * (y2 - y1)
    order = scores.argsort()[::-1]

    keep = []
    while order.size > 0:
        i = order[0]
        keep.append(i)
        # compute iou
        xx1 = np.maximum(x1[i], x1[order[1:]])
        yy1 = np.maximum(y1[i], y1[order[1:]])
        xx2 = np.minimum(x2[i], x2[order[1:]])
        yy2 = np.minimum(y2[i], y2[order[1:]])

        w = np.maximum(1e-10, xx2 - xx1)
        h = np.maximum(1e-10, yy2 - yy1)
        inter = w * h

        iou = inter / (areas[i] + areas[order[1:]] - inter + 1e-14)
        #reserve all the boundingbox whose ovr less than thresh
        inds = np.where(iou <= nms_thresh)[0]
        order = order[inds + 1]

    return keep

## class-agnostic NMS
def multiclass_nms_class_agnostic(scores, labels, bboxes, nms_thresh):
    # nms
    # 在所有的检测结果上执行的,不会考虑类别的差异
    keep = nms(bboxes, scores, nms_thresh)
    scores = scores[keep]
    labels = labels[keep]
    bboxes = bboxes[keep]

    return scores, labels, bboxes

## class-aware NMS
def multiclass_nms_class_aware(scores, labels, bboxes, nms_thresh, num_classes):
    # nms
    # 逐类别地去做NMS操作,不同类别之间的检测不会相互影响
    keep = np.zeros(len(bboxes), dtype=np.int32)
    for i in range(num_classes):
        inds = np.where(labels == i)[0]
        if len(inds) == 0:
            continue
        c_bboxes = bboxes[inds]
        c_scores = scores[inds]
        c_keep = nms(c_bboxes, c_scores, nms_thresh)
        keep[inds[c_keep]] = 1
    keep = np.where(keep > 0)
    scores = scores[keep]
    labels = labels[keep]
    bboxes = bboxes[keep]

    return scores, labels, bboxes

## multi-class NMS
def multiclass_nms(scores, labels, bboxes, nms_thresh, num_classes, class_agnostic=False):
    if class_agnostic:
        return multiclass_nms_class_agnostic(scores, labels, bboxes, nms_thresh)
    else:
        return multiclass_nms_class_aware(scores, labels, bboxes, nms_thresh, num_classes)
如此,yolov1的推理过程就已经介绍完毕。
接下来,在训练过程中,我们需要改进损失函数,训练过程中,如何确定正负样本呢?


![[BJDCTF2020]BJD hamburger competition-buuctf](https://img-blog.csdnimg.cn/direct/34c9a13bc53243ce90a87348b5572408.png)