文章目录
- 实验部分
-
- 一、 HBase 的基本操作
-
- 1. HBase Shell入门
- 2. HBase创建数据库表
- 3. HBase数据操作
- 4. HBase删除数据库表
- 5. HBase Python基本编程
- before
- 二、 HBase 过滤器操作
-
- 1.创建表和插入数据
- 2.行键过滤器
- 3.列族与列过滤器
- 4.值过滤器
- 5.其他过滤器
- 6.python hbase 过滤器编程。
- 7.hadoop 批量数据导入
- before
- 三、 MongoDB 数据库操作
-
- 0.启动集群服务
- 1.MongoDB创建数据库
- 2.MongoDB删除数据库
- 3.集合操作
-
- 相关操作
- 4. 使用游标和 printjson 输出 testdb 数据库 c3 集合中所有结果集。
- 5.使用 PyMongo 的 Python 代码:
- before
- 四、 MongoDB 文档操作
-
- 第一部分:基本文档操作
-
- 1. 插入文档:
- 2. 更新文档:
- 3. 删除文档:
- 第二部分:高级文档操作
-
- 1. 创建集合并插入数据:
- 2. 查询和聚合:
- before
- 五、 Python 操作 MongoDB
-
- 题目一:编写 Python 程序 pyinsert.py
- 题目二:在 mongodb shell 终端查询
-
- 查看插入的数据:
- 题目三:编写 Python 程序 pybbs.py
- 题目四:在 mongodb shell 终端查询
-
- 查看插入的数据:
- before
- 六、 MongoDB 聚合函数 MapReduce
-
-
- 第一部分:导入数据
- 第二部分:导入数据
- 题目一:查询每个 cust_id 的所有 price 总和
- 题目二:计算所有 items 的平均库存
-
- before
- 作业部分
-
- 一. 简答题(共8题)
-
- 1. (简答题)此题为mongodb操作题,使用在线平台或分享的虚拟机平台软件,写出命令,并把结果截图一起提交。对testdb数据库items集合进行聚合分组,然后在统计卖出的平均数量(“quantity”)。
- 2. (简答题)此题为HBase操作题,使用在线平台或分享的虚拟机平台软件,查询student表中StuInfo列族Age列中值等于19的所有键值对。
- 3. (简答题)此题为mongodb操作题,使用在线平台或分享的虚拟机平台软件,写出命令,并把结果截图一起提交。使用游标,输出testdb数据库book集合中“price”>=60的所有文档信息。
- 4. (简答题)此题为mongodb操作题,使用在线平台或分享的虚拟机平台软件,写出命令,并把结果截图一起提交。修改test数据库sales集合中所有quantity键值为10的文档改成quantity键值为80。
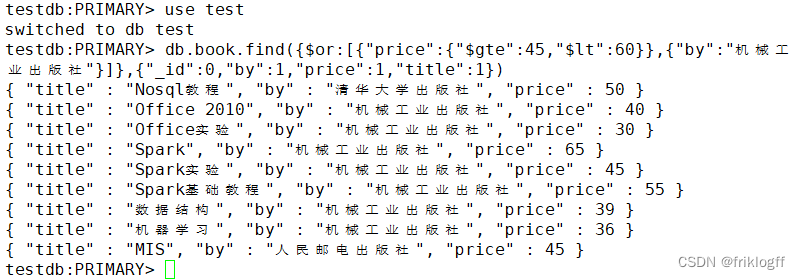
- 5. (简答题)此题为mongodb操作题,使用在线平台或分享的虚拟机平台软件,写出命令,并把结果截图一起提交。查询test数据库book集合中price在[45,60)范围、或者出版社是“机械工业出版社”的图书信息(即45=<price<60),要求返回by、price、title键值对,其他键值对不显示。
- 6. (简答题)此题为mongodb操作题,使用在线平台或分享的虚拟机平台软件,写出命令,并把打开result.txt结果截图一起提交。把testdb数据库book集合中的文档数据导出,保存到/home/hadoop/result.txt。
- 7. (简答题)
- 8. (简答题)此题为mongodb操作题,使用在线平台或分享的虚拟机平台软件,在testdb数据库中c3集合中第一条文档里的fruit数组添加信息:grape。写出命令,并把结果截图一起提交。
- 二. 应用题(共4题)
-
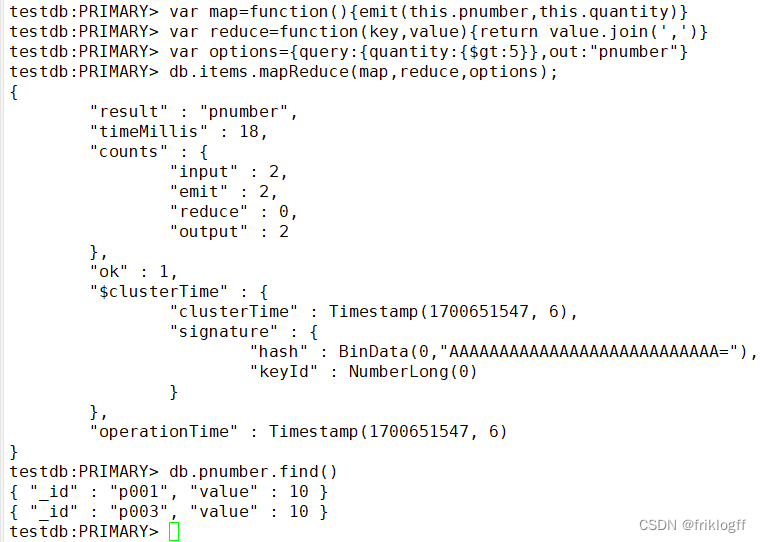
- 9. (应用题)使用在线平台或分享的虚拟机平台软件,写出命令,并把运行结果截图一起提交。使用MongoDB中的MapReduce查询testdb数据库items集合中数量“quantity”大于5的商品编号("pnumber")。
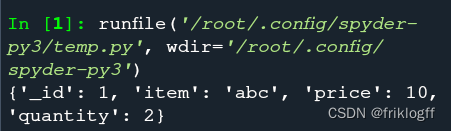
- 10. (应用题)MongoDB python编程。使用在线平台或分享的虚拟机平台软件,写出程序,并把运行结果截图一起提交。Python编程新建runoobdb数据库中并在runoobdb数据库新建commodity集合,并插入文档{ "_id" : 1, "item" : "abc", "price" : 10, "quantity" : 2 },并打印出该集合中的文档数据。
- 11. (应用题)
- 12. (应用题)HBase python编程,使用在线平台或分享的虚拟机平台软件,写出程序,并把运行结果截图一起提交。编程在HBase数据库中新建test数据表,列族为:cf,并打印出所有数据库表名。
- 拓展
-
- hbase 启动步骤
- hbase 关闭步骤
- Mongodb的启动与关闭
-
- 一、启动步骤
- 二、关闭步骤:
- Neo4j的启动与关闭
-
- 一、服务启动:
- 二、服务关闭:
- HBase批量数据导入与导出
-
- 一、MapReduce与HBase集成条件:
-
- 1. 在master上修改 `~/hadoop/etc/hadoop/hadoop-env.sh`:
- 2. 将`hbase-site.xml`复制到 `$HADOOP_HOME/etc/hadoop/` 下:
- 3. 将HBase相关的jar文件拷贝到Hadoop对应的目录下:
- 4. 启动服务:
- 5. HBase shell:
- 6. Hadoop命令行操作:
- 7. 执行数据导入:
- 8. 查看表数据:
- 二、HBase批量csv数据导入
- 三、数据导出
-
- 1. 表深度拷贝:
- 2. 集群间拷贝:
- 3. 增量备份:
- 4. 部分表备份:
- HBase Java 编程
-
- 1. Centos Java 本地批量输入 HBase 数据
- 2. Windows Java 远程批量输入 HBase 数据
-
- 1. 本地导入 jar 包,具体步骤请参考上述提供的网址。
- 2. 配置 `C:\Windows\System32\drivers\etc\hosts` 文件,添加以下内容:
- 3. 在提供的网址中,加入以下两行代码:
- 4. 在 HBase Shell 中运行 `scan ‘student’`,可查看相应结果。
- Java 代码示例
- Phoenix操作HBase
-
- 表结构定义
- 1. 建立映射视图和映射表时需遵循以下几点:
- 2. 删除表格
- 3. 查看所有表
- 4. 查看表结构和列出metadata信息
- 5. 修改表结构,添加列
- 6. 插入数据
- 7. 查询数据
- 8. 修改数据
- 9. 删除记录
- 10. 创建索引
- 11. 删除索引
- HBase查看不同版本数据
-
- 1.表结构定义
- 2.输入数据
- 3.查询
- 4.studentinfo
- MongoDB常见数据输入示例
-
- 1. 普通数据输入
- 2. 批量数据输入
- 3. 数组数据输入
- 4. 演示用常见数据
实验部分
一、 HBase 的基本操作
1. HBase Shell入门
# 进入HBase Shell环境
hbase shell
2. HBase创建数据库表
# 创建表命令
create 'user', 'info1', 'info2'
# 查看所有表
list
# 查看表结构
describe 'user'
3. HBase数据操作
数据插入
put 'user', '0001', 'info1:name', 'jack'
put 'user', '0001', 'info2:age', '18'
put 'user', '0002', 'info1:name', 'tom'
数据查询
# 查询所有记录
scan 'user'
# 查询某个rowKey
get 'user', '0001'
# 查看某个rowKey列族的所有记录
get 'user', '0001', 'info1'
# 查看某个rowKey列族的某个列的记录
get 'user', '0001', 'info1:name'
# 查询表中的所有记录的数量(根据 rowKey 来计算)
count 'user'
数据删除
# 删除某个记录
delete 'user', '0001', 'info1:name'

# 删除整行记录
deleteall 'user', '0001'
数据更新
put 'user', '0001', 'info1:name', 'zhangsan'
4. HBase删除数据库表
# 删除表命令
disable 'user'
drop 'user'

# 检查表是否可用
is_enabled 'user'

# 检查是否删除成功
list
5. HBase Python基本编程
hbase thrift start
spyder
from thrift.transport import TSocket
from thrift.protocol import TBinaryProtocol
from hbase import Hbase
transport = TSocket.TSocket('192.168.226.132', 9090) #IP 地址为本机实际 IP 地址, thrift 默认端口是 9090
protocol = TBinaryProtocol.TBinaryProtocol(transport)
client = Hbase.Client(protocol)
transport.open()
result=client.getTableNames()
print (result)
from thrift import Thrift
from thrift.tranaport import TSocket

from thrift.transport import TTransport
from thrift.protocol import TBinaryProtocol

from hbase import Hbase
from hbase.ttypes import *

transport = TSocket.Tsocket('192.168.226.132', 9090)

transport = TTransport.TBufferedTransport(transport)

protocol = TBinaryProtoco1.TBinaryProtocol(transport)

client = Hbase.client(protocol)
transport.open()
row = '0003'
mutations = [Mutation(column="info1 : name ", value='lisi')]

client.mutateRow('user3', row, mutations)
before
# 创建表命令
create 'userx', 'info1', 'info2'
# 查看所有表
list
# 查看表结构
describe 'userx'
put 'userx', '0001', 'info1:name', 'jack'
put 'userx', '0001', 'info2:age', '18'
put 'userx', '0002', 'info1:name', 'tom'

# 查询所有记录
scan 'userx'
# 查询某个rowKey
get 'userx', '0001'
# 查看某个rowKey列族的所有记录
get 'userx', '0001', 'info1'
# 查看某个rowKey列族的某个列的记录
get 'userx', '0001', 'info1:name'
# 查询表中的所有记录的数量(根据 rowKey 来计算)
count 'userx'

# 删除某个记录
delete 'userx', '0001', 'info1:name'

# 删除整行记录
deleteall 'userx', '0001'
二、 HBase 过滤器操作
1.创建表和插入数据
# 创建表
create 'Student', 'StuInfo', 'Grades'

# 插入数据
put 'Student', '001', 'StuInfo:name', 'alice'
put 'Student', '001', 'StuInfo:age', '18'
put 'Student', '001', 'StuInfo:sex', 'female'
put 'Student', '001', 'Grades:english', '80'
put 'Student', '001', 'Grades:math', '90'
# 插入其他数据...
2.行键过滤器
# 行键包含子串 '001' 的过滤器
scan 'Student', {
   FILTER => "RowFilter(=,'substring:001')"}

# 显示行键字节顺序大于 002 的键值对;
scan 'student',FILTER=>"RowFilter(>,'binary:002')"

# 行键前缀为 '001' 的过滤器
scan 'student', {
   FILTER => "PrefixFilter('001')"}

# 只显示每行的第一个键值对
scan 'student', {
   FILTER => "FirstKeyOnlyFilter()"}
# 扫描显示行键 001 到 002 范围内的键值对
scan 'student', {
   STARTROW =>'001',FILTER =>"InclusiveStopFilter('002')"}
# 此条命令等同于:
scan 'student', {
   STARTROW =>'001',ENDROW => '003'}
3.列族与列过滤器
# 列族名包含子串 'stu' 的过滤器
scan 'student', {
   FILTER => "FamilyFilter(=,'substring:stu')"}
scan 'student',FILTER=>"FamilyFilter(>=,'binary:Stu')"


# 列名包含子串 'name' 的过滤器
scan 'student', {
   FILTER => "QualifierFilter(=,'substring:name')"}

# 列名以 'name' 开头的过滤器
scan 'student', {
   FILTER => "ColumnPrefixFilter('Name')"}
scan 'student',FILTER=>"QualifierFilter(=,'substring:name')"

# 显示列名为 name 和 age 的记录;
scan 'student',FILTER=>"MultipleColumnPrefixFilter('Name','Age')"

# 指定列名在 'bi' 和 'na' 之间的过滤器
scan 'student', {
   FILTER => "ColumnRangeFilter('Bi', true, 'Na', true)"}
4.值过滤器
# 值为二进制 '19' 的过滤器
scan 'Student', {
   FILTER => "ValueFilter(=,'binary:19')"}

# 在指定列族和列中,值为二进制 '19' 的过滤器
scan 'student', {
   COLUMN => 'StuInfo:Age', FILTER => "SingleColumnValueFilter('StuInfo','Age',=,'binary:19')"}
5.其他过滤器
# 每行返回的键值对数量限制为 3
get 'Student', '001', FILTER => "ColumnCountGetFilter(3)"

# 基于行的分页过滤器,返回一行
scan 'Student', {
   FILTER => "PageFilter(1)"}

# 基于列的分页过滤器,返回每行的第 2 个键值对后的 1 个键值对
scan 'Student', {
   FILTER => "ColumnPaginationFilter(2,1)"}
6.python hbase 过滤器编程。
from thrift import Thrift

from thrift.transport import TSocket

from thrift.transport import TTransport

from thrift.protocol import TBinaryProtocol

from hbase import Hbase

from hbase.ttypes import *

host = '192.168.226.132'

port = 9090

table = 'Student1'

transport = TSocket.TSocket(host, port)

transport = TTransport.TBufferedTransport(transport)

protocol = TBinaryProtocol.TBinaryProtocol(transport)

client = Hbase.Client(protocol)

transport.open()

ss = client.scannerOpenWithPrefix("Student1","00",["StuInfo:Name"])

print("ss:",client.scannerGetList(ss,10))

#关闭 scannerId

client.scannerClose(ss)
7.hadoop 批量数据导入
hbase shell
# 建表
create 'ms', 'info'
exit
cd /home/datafile
# 将数据放入HDFS
hadoop fs -mkdir /user
hadoop fs -mkdir /user/hduser
hadoop fs -mkdir /user/hduser/ms

hadoop fs -put music1.txt music2.txt music3.txt /user/hduser/ms

# 数据导入到HBase表
hbase org.apache.hadoop.hbase.mapreduce.ImportTsv -Dimporttsv.columns=tmp -Dimporttsv.columns=HBASE_ROW_KEY,info:name,info:singer,info:gender,info:ryghme,info:terminal ms /user/hduser/ms


hbase shell

# 查看表数据
scan 'ms'
before
# 创建表
create 'Student', 'StuInfo', 'Grades'

# 插入数据
put 'Student', '001', 'StuInfo:name', 'alice'
put 'Student', '001', 'StuInfo:age', '18'
put 'Student', '001', 'StuInfo:sex', 'female'
put 'Student', '001', 'Grades:english', '80'
put 'Student', '001', 'Grades:math', '90'
# 插入其他数据...

# 扫描显示行键 001 到 002 范围内的键值对
scan 'student', {
   STARTROW =>'001',FILTER =>"InclusiveStopFilter('002')"}
# 此条命令等同于:
scan 'student', {
   STARTROW =>'001',ENDROW => '003'}


# 行键包含子串 '001' 的过滤器
scan 'student', {
   FILTER => "RowFilter(=,'substring:001')"}

# 显示行键字节顺序大于 002 的键值对;
scan 'student',FILTER=>"RowFilter(>,'binary:002')"

# 行键前缀为 '001' 的过滤器
scan 'student', {
   FILTER => "PrefixFilter('001')"}

# 只显示每行的第一个键值对
scan 'student', {
   FILTER => "FirstKeyOnlyFilter()"}

# 扫描显示行键 001 到 002 范围内的键值对
scan 'student', {
   STARTROW =>'001',FILTER =>"InclusiveStopFilter('002')"}
# 此条命令等同于:
scan 'student', {
   STARTROW =>'001',ENDROW => '003'}


# 列族名包含子串 'stu' 的过滤器
scan 'student', {
   FILTER => "FamilyFilter(=,'substring:stu')"}
scan 'student',FILTER=>"FamilyFilter(>=,'binary:Stu')"

# 列名包含子串 'name' 的过滤器
scan 'student', {
   FILTER => "QualifierFilter(=,'substring:name')"}

# 列名以 'name' 开头的过滤器
scan 'student', {
   FILTER => "ColumnPrefixFilter('Name')"}
scan 'student',FILTER=>"QualifierFilter(=,'substring:name')"

# 显示列名为 name 和 age 的记录;
scan 'student',FILTER=>"MultipleColumnPrefixFilter('Name','Age')"

# 指定列名在 'bi' 和 'na' 之间的过滤器
scan 'student', {
   FILTER => "ColumnRangeFilter('Bi', true, 'Na', true)"}


# 值为二进制 '19' 的过滤器
scan 'student', {
   FILTER => "ValueFilter(=,'binary:19')"}

# 在指定列族和列中,值为二进制 '19' 的过滤器
scan 'student', {
   COLUMN => 'StuInfo:Age', FILTER => "SingleColumnValueFilter('StuInfo','Age',=,'binary:19')"}


# 每行返回的键值对数量限制为 3
get 'student', '001', FILTER => "ColumnCountGetFilter(3)"

# 基于行的分页过滤器,返回一行
scan 'student', {
   FILTER => "PageFilter(1)"}

# 基于列的分页过滤器,返回每行的第 2 个键值对后的 1 个键值对
scan 'student', {
   FILTER => "ColumnPaginationFilter(2,1)"}
三、 MongoDB 数据库操作
0.启动集群服务
# Master节点
mongod -f /home/app/mongodb/master.conf

# Slave1节点
mongod -f /home/app/mongodb/slave1.conf

# Arbiter节点
mongod -f /home/app/mongodb/arbiter.conf
# 进入MongoDB Shell
mongo 192.168.226.132
1.MongoDB创建数据库
# MongoDB创建数据库,如果存在则使用数据库,没有则创建。

use "aa"
# 查看所有数据库
show dbs
2.MongoDB删除数据库
db.dropDatabase()
3.集合操作
# 创建集合
db.createCollection("myCollection")
# 查询集合列表
show collections
# 对集合重命名
db.myCollection.renamecolle("myColl")
# 删除集合
db.myColl.drop()
相关操作
(1) 插入数据:
# 插入数据
db.myColl.insert({
   'username':'zhangyu','age':13,'salary':500});

db.myColl.insert({
   'username':'zhangyu','age':13,'salary':500});

db.myColl.insert({
   'username':'laohu','age':20,'salary':200});

db.myColl.insert({
   'username':'banma','age':13,'salary':300});

db.myColl.insert({
   'username':'xiongmao','age':8,'salary':300});
(2) 统计数据条数:
db.myColl.count()
(3) 查询第一条数据:
db.myColl.findOne()
(4) 查询第一条以后的所有数据:
db.myColl.find().skip(1)
(5) 跳过第二条,查询后两条数据:
db.myColl.find().limit(2).skip(2)
(6) 限定查询3条数据:
db.myColl.find().limit(3)
(7) 查询结果集的记录数(查询salary小于300或大于400的个数):
db.myColl.find({
   $or:[{
   salary:{
   $lt:300}},{
   salary:{
   $gt:400}}]}).count()
(8) 查询指定列的数据 (‘age’ 和 ‘salary’):
db.mycollection.find({
   }, {
   age:1, salary:1})
(9) 按salary升序排序:
db.myColl.find().sort({
   salary:1})
(10) 查询username列,并去掉重复数据:
db.myColl.distinct('username')
(11-14) 按年龄进行不同的查询:
db.myColl.find({
   'age':13})
db.myColl.find({
   age:{
   $lt:13}})
db.myColl.find({
   age:{
   $gt:15}})
db.myColl.find({
   'age':{
   $ne:13}})
(15) 查询年龄和工资:
db.myColl.find({
   'age':20,'salary':200})
(16) 查询年龄小于13,工资大于等于200的数据:
db.myColl.find({
   $and:[{
   age:{
   $lt:13}},{
   salary:{
   $gte:200}}]})
(18) OR条件:
db.myColl.find({
   $or:[{
   salary:{
   $gt:300}},{
   age:{
   $lte:13}}]})
(19) AND和OR结合使用:
db.myColl.find({
   'salary': {
   $gte:300}, $or: [{
   'username': 'banma'}, {
   'age': 8}]})
(21) $type操作符:
db.myColl.find({
   username: {
   $type: 2}})
(22) 正则表达式:
db.myColl.find({
   username: /m/})
4. 使用游标和 printjson 输出 testdb 数据库 c3 集合中所有结果集。
var cursor = db.c3.find()

while(cursor.hasNext()){
   printjson(cursor.next())}
5.使用 PyMongo 的 Python 代码:
(1) 检查 ‘employs’ 集合是否存在:
import pymongo

myclient = pymongo.MongoClient('mongodb://192.168.126.140:27017/')
mydb = myclient["testdb"]
collist = mydb.list_collection_names()

if "employs" in collist:
    print("集合已存在!")
else:
    print("集合不存在!")
(2) 更新 ‘sales’ 集合中文档的价格:
import pymongo

myclient = pymongo.MongoClient("mongodb://192.168.126.140:27017/")
mydb = myclient["testdb"]
mycol = mydb["sales"]

myquery = {
   "_id": 3}
newvalues = {
   "$set": {
   "price": 20}}

mycol.update_one(myquery, newvalues)

for x in mycol.find({
   "_id": 3}):
    print(x)
before
mongo 192.168.226.132


show dbs

db.dropDatabase()

# 创建集合
db.createCollection("myCollection")

# 查询集合列表
show collections

# 对集合重命名
db.myCollection.renameCollection("myColl")


# 删除集合
db.myColl.drop()

# 插入数据
db.myColl.insert({
   'username':'zhangyu','age':13,'salary':500});

db.myColl.insert({
   'username':'zhangyu','age':13,'salary':500});

db.myColl.insert({
   'username':'laohu','age':20,'salary':200});

db.myColl.insert({
   'username':'banma','age':13,'salary':300});

db.myColl.insert({
   'username':'xiongmao','age':8,'salary':300});

db.myColl.count()

db.myColl.findOne()

db.myColl.find().skip(1)

db.myColl.find().limit(2).skip(2)

db.myColl.find().limit(3)

db.myColl.find({
   $or:[{
   salary:{
   $lt:300}},{
   salary:{
   $gt:400}}]}).count()

db.mycollection.find({
   }, {
   age:1, salary:1})

db.myColl.find().sort({
   salary:1})

db.myColl.distinct('username')

db.myColl.find({
   'age':13})
db.myColl.find({
   age:{
   $lt:13}})
db.myColl.find({
   age:{
   $gt:15}})
db.myColl.find({
   'age':{
   $ne:13}})

db.myColl.find({
   'age':20,'salary':200})

db.myColl.find({
   $and:[{
   age:{
   $lt:13}},{
   salary:{
   $gte:200}}]})


db.myColl.find({
   $or:[{
   salary:{
   $gt:300}},{
   age:{
   $lte:13}}]})


db.myColl.find({
   'salary': {
   $gte:300}, $or: [{
   'username': 'banma'}, {
   'age': 8}]})


db.myColl.find({
   username: {
   $type: 2}})

db.myColl.find({
   username: /m/})

var cursor = db.c3.find();
while (cursor.hasNext()) {
   printjson(cursor.next());}
四、 MongoDB 文档操作
第一部分:基本文档操作
1. 插入文档:
# 示例插入方法
db.stuinfo.insert({
   _id:001, name:'alice', age:18})
db.stuinfo.save({
   _id:002, name:'nancy', age:19})
db.stuinfo.insert([
  {
   _id:003, name:'harry', age:18},
  {
   _id:004, name:'curry', age:19}
])

# 使用变量插入
s={
   _id:5, name:'张三', age:19}
db.stuinfo.insert(s)
2. 更新文档:
# 使用update()方法进行更新
db.stuinfo.update({
   name:'curry'}, {
   $set:{
   name:'王五'}})

# 更新多个文档
db.stuinfo.update({
   name:'nancy'}, {
   $set:{
   name:'王五'}}, false, true)

# 使用save()方法进行替换
db.stuinfo.save({
   _id:2, name:'curry', age:20})
# 更多示例:(选做)
for(var i=1;i<10;i++) db.col.insert({
   count:i,test2:false,test5:true})

# 只更新第一条记录:
db.col.update( {
    "count" : {
    $gt : 1 } } , {
    $set : {
    "test2" : "OK"} } );

# 全部更新:
db.col.update( {
    "count" : {
    $gt : 3 } } , {
    $set : {
    "test2" : "OK"} },false,true );

# 只添加第一条:
db.col.update( {
    "count" : {
    $gt : 4 } } , {
    $set : {
    "test5" : "OK"} },true,false );

# 全部添加加进去:
db.col.update( {
    "count" : {
    $gt : 5 } } , {
    $set : {
    "test5" : "OK"} },true,true );

# 全部更新:
db.col.update( {
    "count" : {
    $gt : 15 } } , {
    $inc : {
    "count" : 1} },false,true );

# 只更新第一条记录:
db.col.update( {
    "count" : {
    $gt : 10 } } , {
    $inc : {
    "count" : 1} },false,false );
3. 删除文档:
# 移除集合中的所有文档
db.col.deleteMany({
   })
# 或
db.col.remove({
   })

# 根据条件删除文档
db.stuinfo.deleteMany({
   name:'王五'})
db.stuinfo.deleteOne({
   age:18})
第二部分:高级文档操作
1. 创建集合并插入数据:
# 创建集合
db.createCollection("items")

# 向'items'集合插入数据
db.items.insert([
{
   "quantity":2,price:5.0,pnumber:"p003"},
{
   quantity:2,price:8.0,pnumber:"p002"},
{
   quantity:1,price:4.0,pnumber:"p002"},
{
   quantity:2,price:4.0,pnumber:"p001"},
{
   "quantity":4,price:10.0,pnumber:"p003"},
{
   quantity:10,price:20.0,pnumber:"p001"},
{
   quantity:10,price:20.0,pnumber:"p003"},
{
   quantity:5,price:10.0,pnumber:"p002"}
])
2. 查询和聚合:
# 查找'items'集合中的所有文档
db.items.find().pretty()

# 统计'items'中的文档数量
db.items.count()

# 查询价格大于5的商品数据
db.items.find({
   price:{
   $gt:5}})

# 多条件查询
db.items.find({
   quantity:10, price:{
   $gte:5}})

# OR条件查询
db.items.find({
   $or:[{
   quantity:10},{
   price:{
   $gte:5}}]})

# AND和OR联合查询
db.items.find({
   pnumber:"p003",$or:[{
   quantity:10},{
   price:{
   $gte:5}}]})

# 聚合示例

# 例:统计订单中所有商品的数量,即统计 quantity 的总和。
db.items.aggregate([{
   $group:{
   _id:null,total:{
   $sum:"$quantity"}}}])

# 例:通过产品类型来进行分组,然后在统计卖出的数量
db.items.aggregate([{
   $group:{
   _id:"$pnumber",total:{
   $sum:"$quantity"}}}])

# 例:通过相同的产品类型来进行分组,然后查询相同产品类型卖出最多的订单详情。
db.items.aggregate([{
   $group:{
   _id:"$pnumber",max:{
   $max:"$quantity"}}}])

# 例:通过相同的产品类型来进行分组,然后查询每个订单详情相同产品类型卖出的平均价格
db.items.aggregate([{
   $group:{
   _id:"$pnumber",price:{
   $avg:"$price"}}}])

# 聚合管道例:通过相同的产品类型来进行分组,统计各个产品数量,然后获取最大的数量。
db.items.aggregate([
  {
   $group:{
   _id:"$pnumber",total:{
   $sum:"$quantity"}}},
  {
   $group:{
   _id:null, max:{
   $max:"$total"}}}
])
before
# 示例插入方法
db.stuinfo.insert({
   _id:001, name:'alice', age:18})
db.stuinfo.save({
   _id:002, name:'nancy', age:19})
db.stuinfo.insert([
  {
   _id:003, name:'harry', age:18},
  {
   _id:004, name:'curry', age:19}
])

# 使用变量插入
s={
   _id:5, name:'张三', age:19}
db.stuinfo.insert(s)

# 使用update()方法进行更新
db.stuinfo.update({
   name:'curry'}, {
   $set:{
   name:'王五'}})

# 更新多个文档
db.stuinfo.update({
   name:'nancy'}, {
   $set:{
   name:'王五'}}, false, true)

# 使用save()方法进行替换
db.stuinfo.save({
   _id:2, name:'curry', age:20})

# 更多示例:(选做)
for(var i=1;i<10;i++) db.col.insert({
   count:i,test2:false,test5:true})

# 只更新第一条记录:
db.col.update( {
    "count" : {
    $gt : 1 } } , {
    $set : {
    "test2" : "OK"} } );

# 全部更新:
db.col.update( {
    "count" : {
    $gt : 3 } } , {
    $set : {
    "test2" : "OK"} },false,true );

# 只添加第一条:
db.col.update( {
    "count" : {
    $gt : 4 } } , {
    $set : {
    "test5" : "OK"} },true,false );

# 全部添加加进去:
db.col.update( {
    "count" : {
    $gt : 5 } } , {
    $set : {
    "test5" : "OK"} },true,true );

# 全部更新:
db.col.update( {
    "count" : {
    $gt : 15 } } , {
    $inc : {
    "count" : 1} },false,true );

# 只更新第一条记录:
db.col.update( {
    "count" : {
    $gt : 10 } } , {
    $inc : {
    "count" : 1} },false,false );

# 移除集合中的所有文档
db.col.deleteMany({
   })
# 或
db.col.remove({
   })

# 根据条件删除文档
db.stuinfo.deleteMany({
   name:'王五'})
db.stuinfo.deleteOne({
   age:18})

# 创建集合
db.createCollection("items")

# 向'items'集合插入数据
db.items.insert([
{
   "quantity":2,price:5.0,pnumber:"p003"},
{
   quantity:2,price:8.0,pnumber:"p002"},
{
   quantity:1,price:4.0,pnumber:"p002"},
{
   quantity:2,price:4.0,pnumber:"p001"},
{
   "quantity":4,price:10.0,pnumber:"p003"},
{
   quantity:10,price:20.0,pnumber:"p001"},
{
   quantity:10,price:20.0,pnumber:"p003"},
{
   quantity:5,price:10.0,pnumber:"p002"}
])

# 查找'items'集合中的所有文档
db.items.find().pretty()

# 统计'items'中的文档数量
db.items.count()

# 查询价格大于5的商品数据
db.items.find({
   price:{
   $gt:5}})

# 多条件查询
db.items.find({
   quantity:10, price:{
   $gte:5}})

# OR条件查询
db.items.find({
   $or:[{
   quantity:10},{
   price:{
   $gte:5}}]})

# AND和OR联合查询
db.items.find({
   pnumber:"p003",$or:[{
   quantity:10},{
   price:{
   $gte:5}}]})

# 聚合示例

# 例:统计订单中所有商品的数量,即统计 quantity 的总和。
db.items.aggregate([{
   $group:{
   _id:null,total:{
   $sum:"$quantity"}}}])

# 例:通过产品类型来进行分组,然后在统计卖出的数量
db.items.aggregate([{
   $group:{
   _id:"$pnumber",total:{
   $sum:"$quantity"}}}])

# 例:通过相同的产品类型来进行分组,然后查询相同产品类型卖出最多的订单详情。
db.items.aggregate([{
   $group:{
   _id:"$pnumber",max:{
   $max:"$quantity"}}}])

# 例:通过相同的产品类型来进行分组,然后查询每个订单详情相同产品类型卖出的平均价格
db.items.aggregate([{
   $group:{
   _id:"$pnumber",price:{
   $avg:"$price"}}}])

# 聚合管道例:通过相同的产品类型来进行分组,统计各个产品数量,然后获取最大的数量。
db.items.aggregate([
  {
   $group:{
   _id:"$pnumber",total:{
   $sum:"$quantity"}}},
  {
   $group:{
   _id:null, max:{
   $max:"$total"}}}
])
五、 Python 操作 MongoDB
题目一:编写 Python 程序 pyinsert.py
hbase thrift start
spyder
from pymongo import MongoClient
from random import randint

name1 = ["yang ", "li ", "zhou "]
name2 = [
    "chao",
    "hao",
    "gao",
    "qi gao",
    "hao hao",
    "gao gao",
    "chao hao",
    "ji gao",
    "ji hao",
    "li gao",
    "li hao",
]

provinces = [
    "guang dong",
    "guang xi",
    "shan dong",
    "shan xi",
    "he nan"
]
client = MongoClient('mongodb://192.168.226.132:27017/')
db = client.student
sm = db.smessage
sm.delete_many({
   })
for i in range(1, 100):
    name = name1[randint(0, 2)] + name2[randint(0, 10)]
    province = provinces[randint(0, 4)]
    new_student = {

        "name": name,
        "age": randint(1, 30),
        "province": province,
        "subject": [
            {
   "name": "chinese", "score": randint(0, 100)},
            {
   "name": "math", "score": randint(0, 100)},
            {
   "name": "english", "score": randint(0, 100)},
            {
   "name": "chemic", "score": randint(0, 100)},
        ]}
    print(new_student)
    sm.insert_one(new_student)
print(sm.count_documents({
   }))
题目二:在 mongodb shell 终端查询
查看插入的数据:
mongo 192.168.226.132
use student
db.smessage.findOne()
查询广东学生的平均年龄:
db.smessage.aggregate({
   $match: {
   province: "guang dong"}},{
   $group: {
   _id: "$province", age:{
   $avg:"$age"}}})
查询所有省份的平均年龄:
db.smessage.aggregate({
   $group: {
   _id: "$province", age:{
   $avg:"$age"}}})
查询广东省所有科目的平均成绩:
db.smessage.aggregate({
   $match: {
   province: "guang dong"}},{
   $unwind: "$subject"},{
   $group: {
    _id: {
   province:"$province",sujname:"$subject.name"}, per:{
   $avg:"$subject.score"}}})
在题目 2 的基础上进行排序:
db.smessage.aggregate({
   $match: {
   province: "guang dong"}},{
   $unwind:"$subject"},{
   $group:{
    _id:{
   province:"$province",sujname:"$subject.name"}, per:{
   $avg:"$subject.score"}}},{
   $sort:{
   per:1}})
题目三:编写 Python 程序 pybbs.py
from pymongo import MongoClient
from random import randint

name = [
    'yangx',
    'yxxx',
    'laok',
    'kkk',
    'ji',
    'gaoxiao',
    'laoj',
    'meimei',
    'jj',
    'manwang',
]
title = [
    '123',
    '321',
    '12',
    '21',
    'aaa',
    'bbb',
    'ccc',
    'sss',
    'aaaa',
    'cccc',
]

client = MongoClient('mongodb://192.168.226.132:27017/')
db = client.test
bbs = db.bbs
bbs.delete_many({
   })  # Remove all documents from the collection

for i in range(1, 10000):
    na = name[randint(0, 9)]
    ti = title[randint(0, 9)]
    newcard = {

        'author': na,
        'title': ti,
    }
    bbs.insert_one(newcard)

print(bbs.count_documents({
   }))  # Count the number of documents in the collection
题目四:在 mongodb shell 终端查询
查看插入的数据:
use test
db.bbs.findOne()
查询每条记录的作者:
db.bbs.aggregate({
   "$project":{
   "author":1}})
用 group 将作者名称分组:
db.bbs.aggregate({
   "$group":{
   "_id":"$author","count":{
   "$sum":1}}})
在题目 4 的基础上进行排序:
db.bbs.aggregate({
   "$group":{
   "_id":"$author","count":{
   "$sum":1}}},{
   "$sort":{
   "count":-1}})
在 4 的基础上限制输出结果为 5 个:
db.bbs.aggregate({
   "$group":{
   "_id":"$author","count":{
   "$sum":1}}},{
   "$sort":{
   "count":-1}}, {
   "$limit":5})
before
mongo 192.168.226.132
use student

db.smessage.findOne()

db.smessage.aggregate({
   $match: {
   province: "guang dong"}},{
   $group: {
   _id: "$province", age:{
   $avg:"$age"}}})

db.smessage.aggregate({
   $group: {
   _id: "$province", age:{
   $avg:"$age"}}})

db.smessage.aggregate({
   $match: {
   province: "guang dong"}},{
   $unwind: "$subject"},{
   $group: {
    _id: {
   province:"$province",sujname:"$subject.name"}, per:{
   $avg:"$subject.score"}}})

db.smessage.aggregate({
   $match: {
   province: "guang dong"}},{
   $unwind:"$subject"},{
   $group:{
    _id:{
   province:"$province",sujname:"$subject.name"}, per:{
   $avg:"$subject.score"}}},{
   $sort:{
   per:1}})
use test

db.bbs.findOne()

db.bbs.aggregate({
   "$project":{
   "author":1}})

db.bbs.aggregate({
   "$group":{
   "_id":"$author","count":{
   "$sum":1}}})

db.bbs.aggregate({
   "$group":{
   "_id":"$author","count":{
   "$sum":1}}},{
   "$sort":{
   "count":-1}})

db.bbs.aggregate({
   "$group":{
   "_id":"$author","count":{
   "$sum":1}}},{
   "$sort":{
   "count":-1}}, {
   "$limit":5})
六、 MongoDB 聚合函数 MapReduce
第一部分:导入数据
建立集合 sang_books,输入以下数据:
{
   "_id": 1, "name": "鲁迅", "book": "呐喊", "price": 38.0, "publisher": "人民文学出版社"}
{
   "_id": 2, "name": "曹雪芹", "book": "红楼梦", "price": 22.0, "publisher": "人民文学出版社"}
{
   "_id": 3, "name": "钱钟书", "book": "宋诗选注", "price": 99.0, "publisher": "人民文学出版社"}
{
   "_id": 4, "name": "钱钟书", "book": "谈艺录", "price": 66.0, "publisher": "三联书店"}
{
   "_id": 5, "name": "鲁迅", "book": "彷徨", "price": 55.0, "publisher": "花城出版社"}
要建立集合 sang_books 并输入以下数据,可以使用 MongoDB 的 shell 或者 MongoDB Compass 进行操作。以下是在 MongoDB shell 中的具体步骤:
打开 MongoDB shell。
使用以下命令创建名为
sang_books的集合:
db.createCollection("sang_books")
- 使用以下命令插入数据:
db.sang_books.insertMany([
    {
   "_id": 1, "name": "鲁迅", "book": "呐喊", "price": 38.0, "publisher": "人民文学出版社"},
    {
   "_id": 2, "name": "曹雪芹", "book": "红楼梦", "price": 22.0, "publisher": "人民文学出版社"},
    {
   "_id": 3, "name": "钱钟书", "book": "宋诗选注", "price": 99.0, "publisher": "人民文学出版社"},
    {
   "_id": 4, "name": "钱钟书", "book": "谈艺录", "price": 66.0, "publisher": "三联书店"},
    {
   "_id": 5, "name": "鲁迅", "book": "彷徨", "price": 55.0, "publisher": "花城出版社"}
])
这样,集合 sang_books 就被创建,并包含了给定的数据。您可以通过以下命令验证数据是否成功插入:
db.sang_books.find()
这将显示 sang_books 集合中的所有文档,以确保数据正确导入。
(1) 查询每位作者所出的书的总价:
var map = function() {
    emit(this.name, this.price) };
var reduce = function(key, value) {
    return Array.sum(value) };
var options = {
    out: "totalPrice" };
db.sang_books.mapReduce(map, reduce, options);
db.totalPrice.find();
(2) 查询每个人售价在¥40以上的书:
var map = function() {
    emit(this.name, this.book) };
var reduce = function(key, value) {
    return value.join(',') };
var options = {
    query: {
    price: {
    $gt: 40 } }, out: "books" };
db.sang_books.mapReduce(map, reduce, options);
db.books.find();
第二部分:导入数据
编写 Python 程序导入数据至数据库 taobao,集合为 order_info。
from pymongo import MongoClient
from random import randint
import datetime

client = MongoClient('mongodb://192.168.226.132:27017/')
db = client.taobao
order = db.order_info

status = ['A', 'B', 'C']
cust_id = ['A123', 'B123', 'C123']
price = [500, 200, 250, 300]
sku = ['mmm', 'nnn']

for i in range(1, 100):
    items = []
    item_count = randint(2, 6)
    for n in range(item_count):
        items.append({
   "sku": sku[randint(0, 1)], "qty": randint(1, 10), "price": randint(0, 5)})
    new_order = {

        "status": status[randint(0, 2)],
        "cust_id": cust_id[randint(0, 2)],
        "price": price[randint(0, 3)],
        "ord_date": datetime.datetime.utcnow(),
        "items": items
    }
    order.insert_one(new_order)

print(order.estimated_document_count())
题目一:查询每个 cust_id 的所有 price 总和
- 定义 Map 函数:
var mapFunction1 = function() {

    emit(this.cust_id, this.price);
};
- 定义 Reduce 函数:
var reduceFunction1 = function(keyCustId, valuesPrices) {

    return Array.sum(valuesPrices);
};
- 执行 MapReduce,输出结果到当前 db 的
map_reduce_example集合中:
db.order_info.mapReduce(
    mapFunction1,
    reduceFunction1,
    {
    out: "map_reduce_example" }
);
- 查询结果:
// 查询结果
db.map_reduce_example.find();
题目二:计算所有 items 的平均库存
- Map 函数:
var mapFunction2 = function() {

    for (var idx = 0; idx < this.items.length; idx++) {

        var key = this.items[idx].sku;
        var value = {

            count: 1,
            qty: this.items[idx].qty
        };
        emit(key, value);
    }
};
- Reduce 函数:
var reduceFunction2 = function(keySKU, countObjVals) {

    reducedVal = {
    count: 0, qty: 0 };
    for (var idx = 0; idx < countObjVals.length; idx++) {

        reducedVal.count += countObjVals[idx].count;
        reducedVal.qty += countObjVals[idx].qty;
    }
    return reducedVal;
};
- Finalize 函数:
var finalizeFunction2 = function(key, reducedVal) {

    reducedVal.avg = reducedVal.qty / reducedVal.count;
    return reducedVal;
};
- 执行 MapReduce:
db.order_info.mapReduce(
    mapFunction2,
    reduceFunction2,
    {

        out: {
    merge: "map_reduce_example" },
        finalize: finalizeFunction2
    }
);
- 查看执行结果:
// 查看执行结果
db.map_reduce_example.find();
before
db.createCollection("sang_books")

db.sang_books.insertMany([
    {
   "_id": 1, "name": "鲁迅", "book": "呐喊", "price": 38.0, "publisher": "人民文学出版社"},
    {
   "_id": 2, "name": "曹雪芹", "book": "红楼梦", "price": 22.0, "publisher": "人民文学出版社"},
    {
   "_id": 3, "name": "钱钟书", "book": "宋诗选注", "price": 99.0, "publisher": "人民文学出版社"},
    {
   "_id": 4, "name": "钱钟书", "book": "谈艺录", "price": 66.0, "publisher": "三联书店"},
    {
   "_id": 5, "name": "鲁迅", "book": "彷徨", "price": 55.0, "publisher": "花城出版社"}
])

db.sang_books.find()

var map = function() {
    emit(this.name, this.price) };
var reduce = function(key, value) {
    return Array.sum(value) };
var options = {
    out: "totalPrice" };
db.sang_books.mapReduce(map, reduce, options);
db.totalPrice.find();

var map = function() {
    emit(this.name, this.book) };
var reduce = function(key, value) {
    return value.join(',') };
var options = {
    query: {
    price: {
    $gt: 40 } }, out: "books" };
db.sang_books.mapReduce(map, reduce, options);
db.books.find();


var mapFunction1 = function() {

    emit(this.cust_id, this.price);
};

var reduceFunction1 = function(keyCustId, valuesPrices) {

    return Array.sum(valuesPrices);
};

db.order_info.mapReduce(
    mapFunction1,
    reduceFunction1,
    {
    out: "map_reduce_example" }
);

db.map_reduce_example.find();

var mapFunction2 = function() {

    for (var idx = 0; idx < this.items.length; idx++) {

        var key = this.items[idx].sku;
        var value = {

            count: 1,
            qty: this.items[idx].qty
        };
        emit(key, value);
    }
};

var reduceFunction2 = function(keySKU, countObjVals) {

    reducedVal = {
    count: 0, qty: 0 };
    for (var idx = 0; idx < countObjVals.length; idx++) {

        reducedVal.count += countObjVals[idx].count;
        reducedVal.qty += countObjVals[idx].qty;
    }
    return reducedVal;
};

var finalizeFunction2 = function(key, reducedVal) {

    reducedVal.avg = reducedVal.qty / reducedVal.count;
    return reducedVal;
};

db.order_info.mapReduce(
    mapFunction2,
    reduceFunction2,
    {

        out: {
    merge: "map_reduce_example" },
        finalize: finalizeFunction2
    }
);

db.map_reduce_example.find();
作业部分
- (简答题)此题为操作题,使用在线平台或分享的虚拟机平台软件,查询Student1表中列标识为Name且行键为003的所有数据。要求写出相关命令,并把结果截图和相关命令一起提交。
正确答案:
scan 'Student1', {
   FILTER => "QualifierFilter(=,'substring:Name') AND KeyOnlyFilter()"}
- (简答题)
此题为操作题,使用在线平台或分享的虚拟机平台软件,
(1)新建表studentCopy,列族为Grades。
(2)把数据表Student1中的Grades列族的数据复制到studentCopy中。
(3)查看studentCopy中数据。
把运行结果截图和相关命令一起提交。
正确答案:
(1)
create 'studentCopy','Grades'
(2)
hbase org.apache.hadoop.hbase.mapreduce.CopyTable –families=Grades --new.name=studentCopy Student1
(3)
scan 'studentCopy'
- (简答题)
此题为操作题,使用在线平台或分享的虚拟机平台软件,
(1)新建表stucopy,列族为Grades、StuInfo,版本都设置为4,用于存放多版本数据。
(2)把数据表StudentInfo中第2-4个版本的数据复制到stucopy表中。
(3)然后查看stucopy表中的所有数据。
并把结果截图和相关命令一起提交。
正确答案:
(1)
create 'stucopy',{
   NAME=>'Grades',VERSIONS=>4},{
   NAME=>'StuInfo',VERSIONS=>4}
(2)
hbase org.apache.hadoop.hbase.mapreduce.CopyTable --starttime=2 --endtime=5 --versions=3 --new.name=stucopy StudentInfo
(3)
scan 'stucopy',VERSIONS=>3
- (简答题)
此题为操作题,使用在线平台或分享的虚拟机平台软件,查询StudentInfo表中行键为“001”、列族为“StuInfo”、时间戳为1和2的版本数据。要求写出相关命令,并把结果截图和相关命令一起提交。
正确答案:
get 'StudentInfo','001',{
   COLUMN=>'StuInfo',TIMERANGE=>[1,3],VERSIONS=>2}
一. 简答题(共8题)
1. (简答题)此题为mongodb操作题,使用在线平台或分享的虚拟机平台软件,写出命令,并把结果截图一起提交。对testdb数据库items集合进行聚合分组,然后在统计卖出的平均数量(“quantity”)。
正确答案:
db.items.aggregate([{
   $group:{
   _id:"$pnumber",average:{
   $avg:"$quantity"}}}])

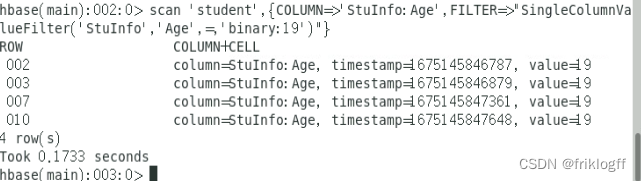
2. (简答题)此题为HBase操作题,使用在线平台或分享的虚拟机平台软件,查询student表中StuInfo列族Age列中值等于19的所有键值对。
正确答案:
scan 'student',{
   COLUMN=>'StuInfo:Age',FILTER=>"SingleColumnValueFilter('StuInfo','Age',=,'binary:19')"}
3. (简答题)此题为mongodb操作题,使用在线平台或分享的虚拟机平台软件,写出命令,并把结果截图一起提交。使用游标,输出testdb数据库book集合中“price”>=60的所有文档信息。
正确答案:
var cursor = db.book.find({
   "price":{
   $gte:60}})

while(cursor.hasNext()) {
   printjson(cursor.next())}

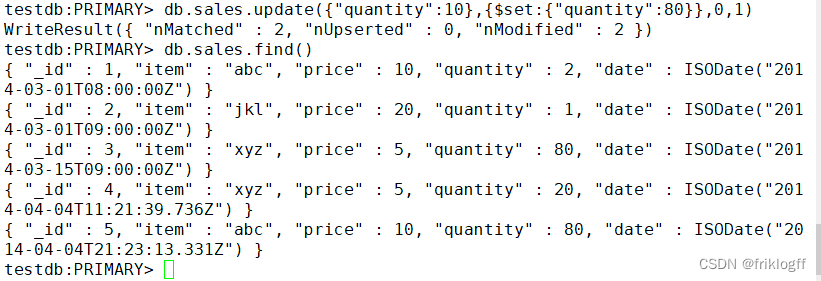
4. (简答题)此题为mongodb操作题,使用在线平台或分享的虚拟机平台软件,写出命令,并把结果截图一起提交。修改test数据库sales集合中所有quantity键值为10的文档改成quantity键值为80。
正确答案:
db.sales.update({
   "quantity":10},{
   $set:{
   "quantity":80}},0,1)

db.sales.find()
5. (简答题)此题为mongodb操作题,使用在线平台或分享的虚拟机平台软件,写出命令,并把结果截图一起提交。查询test数据库book集合中price在[45,60)范围、或者出版社是“机械工业出版社”的图书信息(即45=<price<60),要求返回by、price、title键值对,其他键值对不显示。
正确答案:
db.book.find({
   $or:[{
   "price":{
   "$gte":45,"$lt":60}},{
   "by":"机械工业出版社"}]},{
   "_id":0,"by":1,"price":1,"title":1})
6. (简答题)此题为mongodb操作题,使用在线平台或分享的虚拟机平台软件,写出命令,并把打开result.txt结果截图一起提交。把testdb数据库book集合中的文档数据导出,保存到/home/hadoop/result.txt。
正确答案:
mongoexport -h 192.168.226.132:27017 -d testdb -c book -o /home/hadoop/result.txt

7. (简答题)
建立mytest数据库,建立fruit集合,键值对输入如下表文档,并截图输入结果。

正确答案:
db.fruit.insert({
   "_id":1,"fruits":["apple", "banana", "peach"]})

db.fruit.insert({
   "_id":2,"fruits":[ "apple","cherry","orange"]})

8. (简答题)此题为mongodb操作题,使用在线平台或分享的虚拟机平台软件,在testdb数据库中c3集合中第一条文档里的fruit数组添加信息:grape。写出命令,并把结果截图一起提交。
正确答案:
db.c3.update({
   "_id": ObjectId("610d803f8bbd7614abe4ad36")},{
   $addToSet:{
   fruit:"grape"}})

db.c3.find()

二. 应用题(共4题)
9. (应用题)使用在线平台或分享的虚拟机平台软件,写出命令,并把运行结果截图一起提交。使用MongoDB中的MapReduce查询testdb数据库items集合中数量“quantity”大于5的商品编号(“pnumber”)。
正确答案:
var map=function(){
   emit(this.pnumber,this.quantity)}

var reduce=function(key,value){
   return value.join(',')}

var options={
   query:{
   quantity:{
   $gt:5}},out:"pnumber"}

db.items.mapReduce(map,reduce,options);

db.pnumber.find()
10. (应用题)MongoDB python编程。使用在线平台或分享的虚拟机平台软件,写出程序,并把运行结果截图一起提交。Python编程新建runoobdb数据库中并在runoobdb数据库新建commodity集合,并插入文档{ “_id” : 1, “item” : “abc”, “price” : 10, “quantity” : 2 },并打印出该集合中的文档数据。
正确答案:
import pymongo

myclient = pymongo.MongoClient("mongodb://192.168.126.140:27017/")

mydb = myclient["runoobdb"]

mycol = mydb["commodity"]

mydict = {
   "_id" : 1, "item" : "abc", "price" : 10, "quantity" : 2 }

x = mycol.insert_one(mydict)

for result in mycol.find():

  print(result)
11. (应用题)
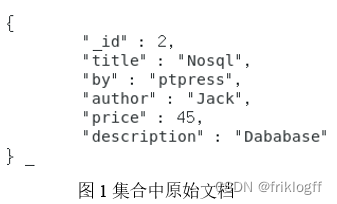
此题为操作题,使用在线平台或分享的虚拟机平台软件。文档替换,把mytest数据库中mybook集合中如图1所示的文档替换成图2的新文档,如集合不存在,自行创建并录入数据。列出相关命令或程序,结果截图。(7分)
正确答案:
use mytest

db.mybook.insert({
   "_id":2,"title":"Nosql","by":"ptpress","author":"Jack","price":45,"description":"Database"})


var u=db.mybook.findOne({
   "title":"Nosql"})

u.bookinfo={
   "author":u.author,"price":u.price}

u.bookname=u.title

delete u.author

delete u.price

delete u.title

db.mybook.update({
   "title":"Nosql"},u)

db.mybook.find().pretty()
12. (应用题)HBase python编程,使用在线平台或分享的虚拟机平台软件,写出程序,并把运行结果截图一起提交。编程在HBase数据库中新建test数据表,列族为:cf,并打印出所有数据库表名。
正确答案:
(1)启动驱动程序命令:
hbase thrift start
(2)参考程序如下:
from thrift.transport import TSocket

from thrift.protocol import TBinaryProtocol

from thrift.transport import TTransport

from hbase import Hbase

from hbase.ttypes import *

transport = TSocket.TSocket('192.168.126.140',9090)

transport = TTransport.TBufferedTransport(transport)

protocol = TBinaryProtocol.TBinaryProtocol(transport)

client = Hbase.Client(protocol)

transport.open()

contents = ColumnDescriptor(name='cf:', maxVersions=1)

client.createTable('test', [contents])

result=client.getTableNames()

print (result)
(3)运行结果:

拓展
修改大数据在线平台的IP地址配置
1.更新 /etc/hosts 文件打开 hosts 文件:vi /etc/hosts
修改主节点(master)、从节点1(slave1)、从节点2(slave2)的IP地址。
2. 更新 Hive 配置打开 hive-site.xml:vi /home/app/hive/conf/hive-site.xml 修改主节点的
javax.jdo.option.ConnectionURL。
3. 更新 MongoDB 配置主节点:vi /home/app/mongodb/master.conf 修改:bind_ip=192.168.126.140
从节点1:vi /home/app/mongodb/slave1.conf 修改:bind_ip=192.168.126.141
从节点2:vi /home/app/mongodb/arbiter.conf 修改:bind_ip=192.168.126.142
4. 启动 MongoDB 服务主节点:mongod --journal -f /home/app/mongodb/master.conf 从节点1:mongod
–journal -f /home/app/mongodb/slave1.conf 从节点2:mongod --journal -f /home/app/mongodb/arbiter.conf
5. 打开 MongoDB 数据库主节点:mongo 192.168.126.140
6. 更新 MongoDB 副本集配置在 MongoDB shell 中执行以下命令: show dbs rs.status() rs.conf() 修改配置中的IP地址。
rs.reconfig(config, { force: true }) 检查状态:rs.status()
7. 更新 Neo4j 配置主节点/从节点1/从节点2:vi /home/app/neo4j/conf/neo4j.conf 为不同设置更新IP地址。
例如从节点1的示例: ha.server_id=2
ha.initial_hosts=192.168.126.140:5001,192.168.126.141:5001,192.168.126.142:5001
dbms.mode=HA dbms.connectors.default_listen_address=192.168.126.141
ha.server=192.168.126.140:6362 ha.cluster_server=192.168.126.140:5001
hbase 启动步骤
1、启动 hadoop,master 虚拟机,切换 root 用户,输入终端命令:start-all.sh 2、启动
zookeeper,分别在 master、slave1、slave2 虚拟机终端命令执行:zkServer.sh start 3、启动
hbase,master 虚拟机终端输入命令:start-hbase.sh 4、输入 hbase shell,进入 hbase 操作命令。
hbase 关闭步骤
1、hbase shell 中输入 exit; 2、关闭 hbase,master 终端命令输入:stop-hbase.sh 3、关闭
zookeeper,分别在 master、slave1、slave2 虚拟机终端命令执行:zkServer.sh stop 4、关闭
hadoop,master 终端输入命令:stop-all.sh
Mongodb的启动与关闭
一、启动步骤
1、mongodb服务启动: (1)master输入终端命令:mongod --journal -f
/home/app/mongodb/master.conf (2)slave1输入终端命令:mongod --journal -f
/home/app/mongodb/slave1.conf (3)slave2输入终端命令:mongod --journal -f
/home/app/mongodb/arbiter.conf 2、打开数据库: master输入终端命令:mongo
192.168.226.132
二、关闭步骤:
1、master中mongodb数据库操作中输入:exit; 可以退出mongodb; 2、关闭mongodb服务:
(1)master输入终端命令:mongod --journal --shutdown -f
/home/app/mongodb/master.conf (2)slave1输入终端命令:mongod --journal
–shutdown -f /home/app/mongodb/slave1.conf (3)slave2输入终端命令:mongod --journal --shutdown -f /home/app/mongodb/arbiter.conf
Neo4j的启动与关闭
一、服务启动:
1、打开master、slave1、slave2虚拟机终端,输入:cd /home/app/neo4j/bin
2、master、slave1、slave2虚拟机终端分别输入: ./neo4j start
3、master中打开浏览器输入网址:192.168.226.132:7474 4、用户名:neo4j,密码:123456
二、服务关闭:
master、slave1、slave2虚拟机终端分别输入: ./neo4j stop
Redis集群启动与关闭
一、服务启动:开机即启动Redis服务。
二、查看集群状态:redis-cli -h 192.168.126.140 -a 123456 #数据库密码:123456
info replication
HBase批量数据导入与导出
一、MapReduce与HBase集成条件:
1. 在master上修改 ~/hadoop/etc/hadoop/hadoop-env.sh:
```
export HADOOP_CLASSPATH=/usr/local/hbase/lib/*
```
2. 将hbase-site.xml复制到 $HADOOP_HOME/etc/hadoop/ 下:
```
cp /usr/local/hbase/conf/hbase-site.xml /usr/local/hadoop/etc/hadoop/
```
3. 将HBase相关的jar文件拷贝到Hadoop对应的目录下:
```
cp /usr/local/hbase/lib/hbase-server-2.1.6.jar /usr/local/hadoop/lib/
cp /usr/local/hbase/lib/hbase-server-2.1.6-tests.jar /usr/local/hadoop/lib/
cp /usr/local/hbase/lib/zookeeper-3.4.10.jar /usr/local/hadoop/lib/
cp /usr/local/hbase/lib/guava-11.0.2.jar /usr/local/hadoop/lib/
cp /usr/local/hbase/lib/protobuf-java-2.5.0.jar /usr/local/hadoop/lib/

cp /home/app/hbase/conf/hbase-site.xml /usr/local/hadoop/etc/hadoop/
cp /home/app/hbase/lib/hbase-server-2.2.4.jar /usr/local/hadoop/lib/
cp /home/app/hbase/lib/hbase-server-2.2.4-tests.jar /usr/local/hadoop/lib/
cp /home/app/hbase/lib/zookeeper-3.4.10.jar /usr/local/hadoop/lib/
cp /home/app/hbase/lib/guava-11.0.2.jar /usr/local/hadoop/lib/
cp /home/app/hbase/lib/protobuf-java-2.5.0.jar /usr/local/hadoop/lib/
```
4. 启动服务:
- `zkServer.sh start`(所有节点启动)
- `start-hbase.sh`
5. HBase shell:
```
create 'music', 'info'
```
6. Hadoop命令行操作:
```
cd home/datafile
hadoop fs -mkdir /user
hadoop fs -mkdir /user/hduser
hadoop fs -mkdir /user/hduser/music1
hadoop fs -put music1.txt music2.txt music3.txt /user/hduser/music1
```
7. 执行数据导入:
```
hbase org.apache.hadoop.hbase.mapreduce.ImportTsv -Dimporttsv.columns=tmp -Dimporttsv.columns=HBASE_ROW_KEY,info:name,info:singer,info:gender,info:ryghme,info:terminal music /user/hduser/music1
```
8. 查看表数据:
```
hbase shell
scan 'music'
```
二、HBase批量csv数据导入
create 'hour1', 'info'

hadoop fs -mkdir /user
hadoop fs -mkdir /user/hduser
hadoop fs -mkdir /user/hduser/hour
hadoop fs -put hour.csv hour1.csv /user/hduser/hour
hbase org.apache.hadoop.hbase.mapreduce.ImportTsv -Dimporttsv.separator=',' -Dimporttsv.columns=HBASE_ROW_KEY,info:dteday,info:season,info:yr,info:mnth,info:hr,info:holiday,info:weekday,info:workingday,info:weathersit,info:temp,info:atemp,info:hum,info:windspeed,info:casual,info:registered,info:label hour1 /user/hduser/hour
参数Dimporttsv.separator为定义分隔符为’,’,Dimporttsv.columns定义对应的列名。
三、数据导出
hadoop fs -mkdir /user/hduser/stu
hbase org.apache.hadoop.hbase.mapreduce.Export student /user/hduser/stu
1. 表深度拷贝:
```bash
create 'studentCopy', 'score'
hbase org.apache.hadoop.hbase.mapreduce.CopyTable --new.name=studentCopy student
```
2. 集群间拷贝:
```
# 集群1
create 'test_table', 'f'
put 'test_table', '1', 'f:q1', 'test1'
put 'test_table', '2', 'f:q1', 'test2'

# 集群2
create 'test_table_copy', 'f'

# 跨集群复制表,从集群1复制到集群2
hbase org.apache.hadoop.hbase.mapreduce.CopyTable --peer.adr=master,slave1,slave2:2181:/hbase --new.name=test_table_copy test_table

# 集群2查看表
scan 'test_table_copy'
```

数据导出命令:
```
# 集群1
hbase org.apache.hadoop.hbase.mapreduce.Export studentCopy hdfs://192.168.90.224:9000/user/hduser/testcopy
exit
# 集群2
create 'testcopy', 'stuinfo'
hbase org.apache.hadoop.hbase.mapreduce.Import testcopy /user/hduser/testcopy
```
3. 增量备份:
```bash
# 创建表方法一或方法二
create 'studentCopy', 'Grades', {NAME=>'StuInfo', VERSIONS=>5}
hbase org.apache.hadoop.hbase.mapreduce.CopyTable ... --starttime=start_timestamp --endtime=end_timestamp --new.name=test_table_copy test_table
```

例子:
```
hbase org.apache.hadoop.hbase.mapreduce.CopyTable --starttime=2 --endtime=5 --new.name=studentCopy StudentInfo   # 复制符合条件的最新版本数据

hbase org.apache.hadoop.hbase.mapreduce.CopyTable --starttime=2 --endtime=5 --versions=3 --new.name=studentCopy StudentInfo   # 复制多版本数据
```
4. 部分表备份:
```bash
hbase org.apache.hadoop.hbase.mapreduce.CopyTable ... --families=srcCf1,srcCf2  # copy cf1,cf2两个列族,不改变列族名字

hbase org.apache.hadoop.hbase.mapreduce.CopyTable ... --families=srcCf1:dstCf1, srcCf2:dstCf2  # copy srcCf1到目标dstCf1新列族
```

例子:
```
hbase org.apache.hadoop.hbase.mapreduce.CopyTable --families=StuInfo --new.name=studentCopy StudentInfo
```
hdfs dfs -ls 是 Hadoop 文件系统命令行工具,用于列出 Hadoop 分布式文件系统(HDFS)中的文件和目录。
使用方法是在命令行中输入以下格式的命令:
hdfs dfs -ls <path>
其中 <path> 是要列出内容的 HDFS 路径。
例如,如果要列出根目录下的内容,可以执行:
hdfs dfs -ls /
如果要列出特定目录的内容,比如 /user/hduser/stu,可以执行:
hdfs dfs -ls /user/hduser/stu
这将显示指定路径下的文件和子目录(如果有的话)。如果你想列出当前工作目录下的内容,可以省略路径不写,直接输入 hdfs dfs -ls。
HBase Java 编程
1. Centos Java 本地批量输入 HBase 数据
2. Windows Java 远程批量输入 HBase 数据
1. 本地导入 jar 包,具体步骤请参考上述提供的网址。
2. 配置 C:\Windows\System32\drivers\etc\hosts 文件,添加以下内容:
```
172.16.3.65 master
172.16.3.66 slave1
172.16.3.67 slave2
```
根据实际 IP 地址和节点名称进行填写。
3. 在提供的网址中,加入以下两行代码:
```java
configuration.set("hbase.rootdir", "hdfs://172.16.3.65:9000/hbase");
configuration.set("hbase.zookeeper.quorum", "172.16.3.65"); // HBase 服务地址
configuration.set("hbase.zookeeper.property.clientPort", "2181"); // 端口号
```
4. 在 HBase Shell 中运行 scan ‘student’,可查看相应结果。
Java 代码示例
import java.io.IOException;
import org.apache.hadoop.conf.Configuration;
import org.apache.hadoop.hbase.HBaseConfiguration;
import org.apache.hadoop.hbase.HColumnDescriptor;
import org.apache.hadoop.hbase.HTableDescriptor;
import org.apache.hadoop.hbase.TableName;
import org.apache.hadoop.hbase.MasterNotRunningException;
import org.apache.hadoop.hbase.ZooKeeperConnectionException;
import org.apache.hadoop.hbase.client.Admin;
import org.apache.hadoop.hbase.client.ConnectionFactory;

public class ExampleForHBase {

    static Configuration conf = null;

    static {

        conf = HBaseConfiguration.create();
        conf.set("hbase.rootdir", "hdfs://master:9000/hbase");
        conf.set("hbase.zookeeper.property.clientPort", "2181");
        conf.set("hbase.zookeeper.quorum", "master,slave1,slave2");
    }

    public static int createTable(String tableName, String[] family)
            throws MasterNotRunningException, ZooKeeperConnectionException, IOException {

        Admin admin = ConnectionFactory.createConnection(conf).getAdmin();
        HTableDescriptor table = new HTableDescriptor(TableName.valueOf(tableName));

        for (String str : family) {

            HColumnDescriptor column = new HColumnDescriptor(str);
            column.setMaxVersions(3);
            table.addFamily(column);
        }

        if (admin.tableExists(TableName.valueOf(tableName))) {

            System.out.println(tableName + ";already exist 已经存在");
            return -1;
        }

        admin.createTable(table);
        admin.close();
        System.out.println(tableName + ":create success 创建成功");
        return 1;
    }

    public static void main(String[] args)
            throws MasterNotRunningException, ZooKeeperConnectionException, IOException {

        createTable("People", new String[] {
    "info", "grade" });
    }
}
Phoenix操作HBase
表结构定义
如果只需查询数据而不需要对数据进行操作,可以创建视图,视图删除不影响源数据。
1. 建立映射视图和映射表时需遵循以下几点:
- Phoenix表名必须与HBase的库名.表名一致。
- Phoenix表的主键列名通常对应rowkey列,名称可自定义,但类型必须匹配。
- Phoenix表的普通列名必须与HBase的列族.列名一致。
- 表映射的结尾必须添加
column_encoded_bytes=0,否则无法从HBase中查询到数据。
-- 创建视图
create view if not exists "user_info"(
    "id" varchar primary key,
    "base_info"."name" varchar,
    "base_info"."age" varchar
)column_encoded_bytes=0;

-- 创建表
create table if not exists "user_info"(
    "id" varchar primary key,
    "base_info"."name" varchar,
    "base_info"."age" varchar
)column_encoded_bytes=0;
2. 删除表格
删除表格时可能遇到BUG,表存在但删除时提示表未定义,需要先在HBase端删除表格,然后在Phoenix中查询一下表是否存在,再删除即可:
-- 删除表
drop table "user_info";
在HBase端删除表格:
-- HBase删除表
delete from system.catalog where table_name='Student1';
3. 查看所有表
-- 查看所有表
!tables
4. 查看表结构和列出metadata信息
-- 查看表结构和列出metadata信息
!desc "user_info"
5. 修改表结构,添加列
-- 修改表结构,添加列
alter table "user_info" add "base_info.group" varchar(20);
6. 插入数据
注意values的"("之间不能有空格。
-- 插入数据
upsert into "user_info" values('1','ZhangSan','25','M','JiangSu','SuZhou','Han');
7. 查询数据
在Phoenix中查询数据:
-- 查询数据
select * from "user_info";
8. 修改数据
必须带上主键id,值只能用单引号括起来。
-- 修改数据
upsert into "user_info"("id","base_info"."age") values('1','30');
9. 删除记录
字符串值只能用单引号括起来。
-- 删除记录
delete from "user_info" where "base_info"."name"='ZhangSan';
10. 创建索引
 -- 创建索引
 create index "test_index" on "user_info"("base_info"."name");
配置HBase配置文件conf/hbase-site.xml,添加:
 <property>
   <name>hbase.regionserver.wal.codec</name>
   <value>org.apache.hadoop.hbase.regionserver.wal.IndexedWALEditCodec</value>
 </property>
11. 删除索引
 -- 删除索引
 drop index "test_index" on "user_info";
HBase查看不同版本数据
1.表结构定义
# 建表
create 'StudentInfo5','Grades',{
   NAME=>'StuInfo',VERSIONS=>5}
2.输入数据
put 'StudentInfo5', '001', 'StuInfo:Name','Green',1
put 'StudentInfo5', '001', 'StuInfo:Age','18' ,1
put 'StudentInfo5', '001', 'StuInfo:Sex','male',1
put 'StudentInfo5', '001', 'Grades:English','100',1
put 'StudentInfo5', '001', 'Grades:Math','100',1
put 'StudentInfo5', '001', 'Grades:BigData','100',1

put 'StudentInfo5','001','StuInfo:Name','Tang',2
put 'StudentInfo5','001','StuInfo:Age','15',2
put 'StudentInfo5','001','StuInfo:Class','01',2
put 'StudentInfo5', '001', 'Grades:BigData','95',2
put 'StudentInfo5', '001', 'Grades:Math','89',2

put 'StudentInfo5','001','StuInfo:Name','Allenboy Trans',3
put 'StudentInfo5','001','StuInfo:Age','20',3
put 'StudentInfo5', '001', 'StuInfo:Sex','Male',3
put 'StudentInfo5','001','StuInfo:Class','07',3
put 'StudentInfo5', '001', 'Grades:BigData','100',3
put 'StudentInfo5', '001', 'Grades:Math','100',3

put 'StudentInfo5','001','StuInfo:Name','Toms',4
put 'StudentInfo5','001','StuInfo:Age','20',4
put 'StudentInfo5', '001', 'StuInfo:Sex','Male',4
put 'StudentInfo5','001','StuInfo:Class','04',4
put 'StudentInfo5', '001', 'Grades:BigData','100',4
put 'StudentInfo5', '001', 'Grades:Math','100',4

put 'StudentInfo5','001','StuInfo:Name','Peng',5
put 'StudentInfo5','001','StuInfo:Age','30',5
put 'StudentInfo5', '001', 'StuInfo:Sex','Male',5
put 'StudentInfo5','001','StuInfo:Class','06',5
put 'StudentInfo5', '001', 'Grades:BigData','90',5
put 'StudentInfo5', '001', 'Grades:Math','100',5
3.查询
# 查询不同版本数据
get 'StudentInfo5','001' ,{
   COLUMN=>'StuInfo',VERSIONS=>4}

# 查询时间范围内的版本数据
get 'StudentInfo5','001' ,{
   COLUMN=>'StuInfo',TIMERANGE=>[1,2]}
4.studentinfo
# 建表
create 'studentinfo','grades',{
   NAME=>'info',VERSIONS=>5}

# 输入数据
put 'studentinfo', '001', 'info:name','Green'
put 'studentinfo', '001', 'info:name','Green2'
put 'studentinfo', '001', 'info:name','Green3'
put 'studentinfo', '001', 'info:name','Green4'
put 'studentinfo', '001', 'info:name','Green5'
put 'studentinfo', '001', 'info:name','Green6'
put 'studentinfo', '001', 'info:name','Green7'
put 'studentinfo', '001', 'info:name','Green8'
put 'studentinfo', '001', 'info:name','Green9'

put 'studentinfo', '001', 'info:age','10'
put 'studentinfo', '001', 'info:age','20'
put 'studentinfo', '001', 'info:age','30'
put 'studentinfo', '001', 'info:age','40'
put 'studentinfo', '001', 'info:age','50'
put 'studentinfo', '001', 'info:age','60'
put 'studentinfo', '001', 'info:age','70'
put 'studentinfo', '001', 'info:age','80'

put 'studentinfo', '001', 'info:class','01'
put 'studentinfo', '001', 'info:class','02'
put 'studentinfo', '001', 'info:class','03'
put 'studentinfo', '001', 'info:class','04'
put 'studentinfo', '001', 'info:class','05'
put 'studentinfo', '001', 'info:class','06'
put 'studentinfo', '001', 'info:class','07'
put 'studentinfo', '001', 'info:class','08'
put 'studentinfo', '001', 'info:class','09'

# 查询不同版本数据
get 'studentinfo','001' ,{
   COLUMN=>'info',VERSIONS=>4}
MongoDB常见数据输入示例
1. 普通数据输入
db.mydb.insert({
   "x":10})
2. 批量数据输入
x=[
    {
   "username":"Foo","password":"123"},
    {
   "username":"bar","nickname":"BAR","password":"111"},
    {
   "username":"hello","nickname":"HELLO","password":"123"}
]
db.user.insert(x)
3. 数组数据输入
db.c1.insert({
   _id:2,name:"user1",post:[1,2,3,4,5]})
db.food.insert({
   fruit:["apple", "banana", "peach"]})
db.food.insert({
   fruit:["apple","kumquat","orange"]})
db.food.insert({
   fruit:["cherry","banana","apple"]})
4. 演示用常见数据
// 插入图书数据
db.book.insert({
   titile:"Mongo教程", by:"人民邮电出版社", author:"jack", price:30, description: "MongoDB 是一个 Nosql 数据库"})
db.book.insert({
   titile:"Nosql教程", by:"清华大学出版社", author:"tom", price:50, description: "Nosql 数据库"})
db.book.insert({
   titile:"Hadoop教程", by:"电子工业出版社", author:"jerry", price:60, description: "大数据图书"})
db.book.insert({
   titile:"Office", by:"机械工业出版社", author:"john", price:40, description: "office办公软件"})
db.book.insert({
   titile:"spark", by:"机械工业出版社", author:"tim", price:65, description: "大数据系列"})
db.book.insert({
   titile:"数据结构", by:"机械工业出版社", author:"lasso", price:39, description: "计算机基础课程"})
db.book.insert({
   titile:"机器学习", by:"机械工业出版社", author:"hat", price:36, description: "计算机方向课程"})
db.book.insert({
   titile:"MIS", by:"人民邮电出版社", author:"white", price:45, description: "管理信息系统"})
db.book.insert({
   titile:"MIS exercise", by:"人民邮电出版社", author:"white", price:35, description: "管理信息系统"})

// 插入客户数据
db.customer.insert({
   "_id":1,name:"jack",age:20})
db.customer.insert({
   "_id":2,name:"tom",age:18})
db.customer.insert({
   "_id":3,name:"jerry",age:25})
db.customer.insert({
   "_id":4,name:"john",age:30})
db.customer.insert({
   "_id":5,name:"white",age:19})
db.customer.insert({
   "_id":6,name:"green",age:23})
db.customer.insert({
   "_id":7,name:"lee",age:28})

// 插入项目数据
db.items.insert({
   "quantity":2,price:5.0,pnumber:"p003"})
db.items.insert({
   quantity:2,price:8.0,pnumber:"p002"})
db.items.insert({
   quantity:1,price:4.0,pnumber:"p002"})
db.items.insert({
   quantity:2,price:4.0,pnumber:"p001"})
db.items.insert({
   "quantity":4,price:10.0,pnumber:"p003"})
db.items.insert({
   quantity:10,price:20.0,pnumber:"p001"})
db.items.insert({
   quantity:10,price:20.0,pnumber:"p003"})
db.items.insert({
   quantity:5,price:10.0,pnumber:"p002"})

// 插入销售数据
db.getCollection('sales').insertMany([
    {
    "_id" : 1, "item" : "abc", "price" : 10, "quantity" : 2, "date" : ISODate("2014-03-01T08:00:00Z") },
    {
    "_id" : 2, "item" : "jkl", "price" : 20, "quantity" : 1, "date" : ISODate("2014-03-01T09:00:00Z") },
    {
    "_id" : 3, "item" : "xyz", "price" : 5, "quantity" : 10, "date" : ISODate("2014-03-15T09:00:00Z") },
    {
    "_id" : 4, "item" : "xyz", "price" : 5, "quantity" : 20, "date" : ISODate("2014-04-04T11:21:39.736Z") },
    {
    "_id" : 5, "item" : "abc", "price" : 10, "quantity" : 10, "date" : ISODate("2014-04-04T21:23:13.331Z") }
])

// 插入用户信息数据
db.userinfos.insertMany([
    {
   _id:1, name: "张三", age: 23, level:10, ename: {
    firstname: "san", lastname: "zhang"}, roles: ["vip","gen" ]},
    {
   _id:2, name: "李四", age: 24, level:20, ename: {
    firstname: "si", lastname: "li"}, roles:[ "vip" ]},
    {
   _id:3, name: "王五", age: 25, level:30, ename: {
    firstname: "wu", lastname: "wang"}, roles: ["gen","vip" ]},
    {
   _id:4, name: "赵六", age: 26, level:40, ename: {
    firstname: "liu", lastname: "zhao"}, roles: ["gen"] },
    {
   _id:5, name: "田七", age: 27, ename: {
    firstname: "qi", lastname: "tian"}, address:'北京' },
    {
   _id:6, name: "周八", age: 28, roles:["gen"], address:'上海' }
])
当然,这段代码是连接到 HBase 的 Java 应用程序示例,主要实现了创建名为 “People” 的表,包含两个列族:“info” 和 “grade”。同时,这份笔记还提供了在 Centos 和 Windows 环境下批量输入 HBase 数据的一些步骤。