本期我们将一起学习如何使用计算机视觉技术识别棋子及其在棋盘上的位置
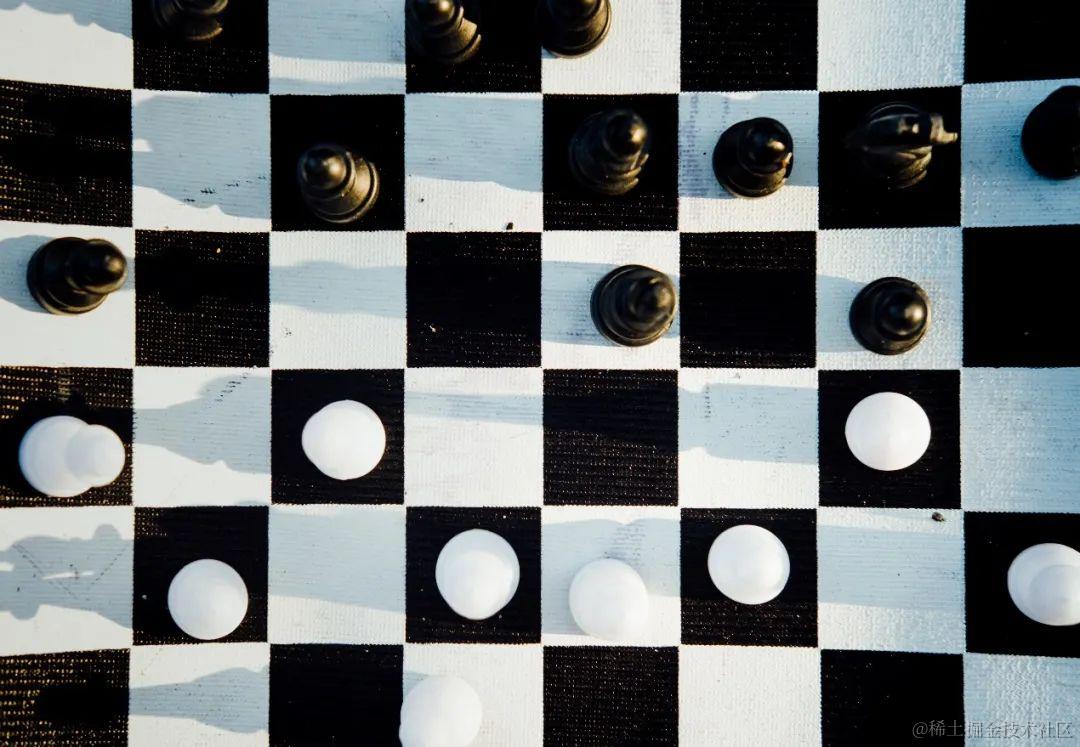
我们利用计算机视觉技术和卷积神经网络(CNN)为这个项目创建分类算法,并确定棋子在棋盘上的位置。最终的应用程序会保存整个图像并可视化的表现出来,同时输出棋盘的 2D 图像以查看结果。
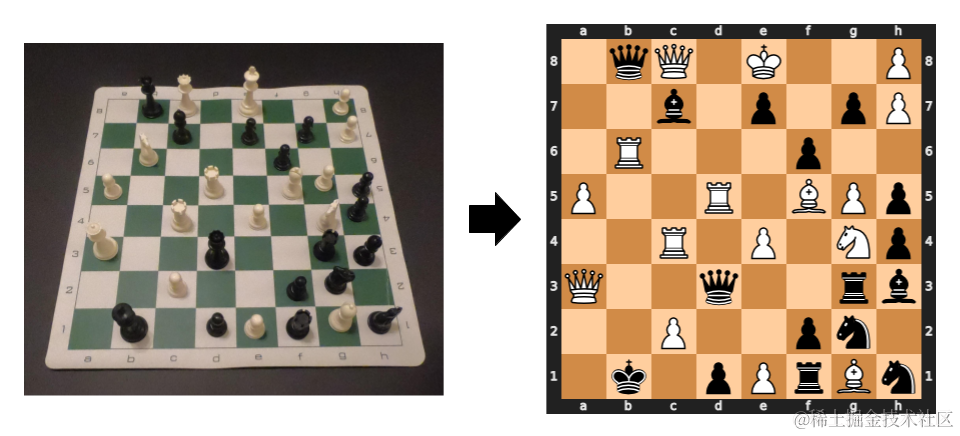
(左)实时摄像机进给的帧和棋盘的(右)二维图像
01. 数据
我们对该项目的数据集有很高的要求,因为它最终会影响我们的实验结果。我们在网上能找到的国际象棋数据集是使用不同的国际象棋集、不同的摄影机拍摄得到的,这导致我们创建了自己的数据集。我使用国际象棋和摄像机(GoPro Hero6 Black 以 “第一人称视角” 角度)生成了自定义数据集,这使我的模型更加精确。该数据集包含 2406 张图像,分为 13 类(请参阅下文)。总结:这花费了我们很多时间,但是这使得训练图像尽可能地接近在应用程序中使用时所看到的图像。
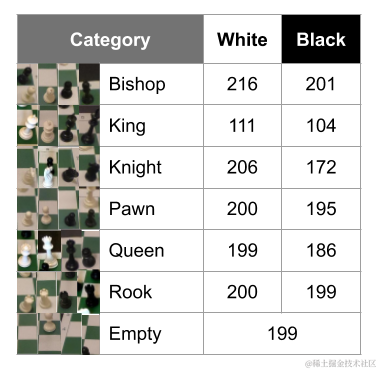
自定义数据集的细分
为了构建该数据集,我首先创建了 capture_data.py,当单击 S 键时,该视频从视频流中获取一帧并将其保存。这个程序使我能够无缝地更改棋盘上的棋子并一遍又一遍地捕获棋盘的图像,直到我建立了大量不同的棋盘配置为止。接下来,我创建了 create_data.py,以使用下一部分中讨论的检测技术将其裁剪为单独小块。最后,我通过将裁剪后的图像分成带标签的文件夹来对它们进行分类。
02. 棋盘检测
对于棋盘检测,我想做的事情比使用 OpenCV 函数 findChessboardCorners 复杂的多,但又不像 CNN 那样高级。使用低级和中级计算机视觉技术来查找棋盘的特征,然后将这些特征转换为外边界和 64 个独立正方形的坐标。该过程以 Canny 边缘检测和 Hough 变换生成的相交水平线、垂直线的交点为中心。层次聚类用于按距离对交叉点进行分组,并对各组取平均值以创建最终坐标(请参见下文)。
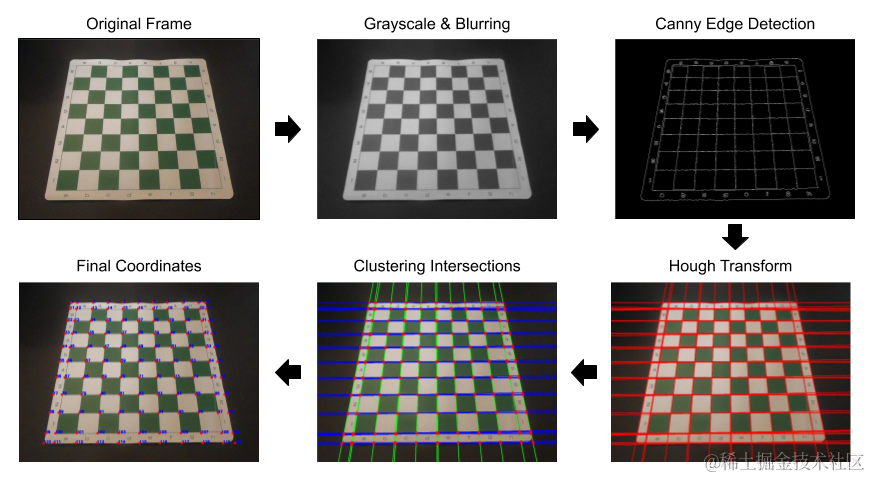
完整的棋盘检测过程
03. 棋盘分类
项目伊始,我们想使用 Keras / TensorFlow 创建 CNN 模型并对棋子进行分类。但是,在创建数据集之后,仅考虑 CNN 的大小,单靠 CNN 就无法获得想要的结果。为了克服这一障碍,我利用了 ImageDataGenerator 和 transfer learning,它增加了我的数据并使用了其他预训练的模型作为基础。
创建 CNN 模型
为了使用 GPU,我在云中创建并训练了 CNN 模型,从而大大减少了训练时间。快速提示:Google Colab 是使用 GPU 快速入门的简便方法。 为了提高数据的有效性,我使用了 ImageDataGenerator 来扩展原始图像并将模型暴露给不同版本的数据。ImageDataGenerator 函数针对每个时期随机旋转,重新缩放和翻转(水平)训练数据,从本质上创建了更多数据。尽管还有更多的转换选项,但这些转换选项对该项目最有效。
from keras.preprocessing.image import ImageDataGeneratordatagen = ImageDataGenerator( rotation_range=5, rescale=1./255, horizontal_flip=True, fill_mode='nearest')test_datagen = ImageDataGenerator(rescale=1./255)train_gen = datagen.flow_from_directory( folder + '/train', target_size = image_size, batch_size = batch_size, class_mode = 'categorical', color_mode = 'rgb', shuffle=True)test_gen = test_datagen.flow_from_directory( folder + '/test', target_size = image_size, batch_size = batch_size, class_mode = 'categorical', color_mode = 'rgb', shuffle=False)
我们没有从头开始训练模型,而是通过利用预先训练的模型并添加了使用我的自定义数据集训练的顶层模型来实现转移学习。我遵循了典型的转移学习工作流程:
- 从先前训练的模型(VGG16)中获取图层。
from keras.applications.vgg16 import VGG16model = VGG16(weights='imagenet')model.summary()
冻结他们,以避免破坏他们在训练回合中包含的任何信息。
在冻结层的顶部添加了新的可训练层。
from keras.models import Sequentialfrom keras.layers import Dense, Conv2D, MaxPooling2D, Flattenfrom keras.models import Modelbase_model = VGG16(weights='imagenet', include_top=False, input_shape=(224,224,3)) # Freeze convolutional layers from VGG16for layer in base_model.layers: layer.trainable = False# Establish new fully connected blockx = base_model.outputx = Flatten()(x) x = Dense(500, activation='relu')(x) x = Dense(500, activation='relu')(x)predictions = Dense(13, activation='softmax')(x)# This is the model we will trainmodel = Model(inputs=base_model.input, outputs=predictions)model.compile(optimizer='adam', loss='categorical_crossentropy', metrics=['categorical_accuracy'])
- 在自定义数据集上训练新层。
epochs = 10history = model.fit( train_gen, epochs=epochs, verbose = 1, validation_data=test_gen)model.save_weights('model_VGG16.h5')
当我们使用 VGG16 或 VGG19 作为预训练模型创建模型时,由于验证精度更高,因此选择了使用 VGG16 的模型。另外,最佳 epochs 是 10。任何大于 10 的数均不会使验证准确性的提高,也不会增加训练与验证准确性之间的差异。总结:转移学习使我们可以充分利用深度学习在图像分类中的优势,而无需大型数据集。
04. 结果
为了更好地可视化验证准确性,我创建了模型预测的混淆矩阵。通过此图表,可以轻松评估模型的优缺点。优点: 空 - 准确率为 99%,召回率为 100%;白棋和黑棋(WP 和 BP)-F1 得分约为 95%。劣势: 白骑士(WN)- 召回率高(98%),但准确性却很低(65%);白主教(WB)- 召回率最低,为 74%。
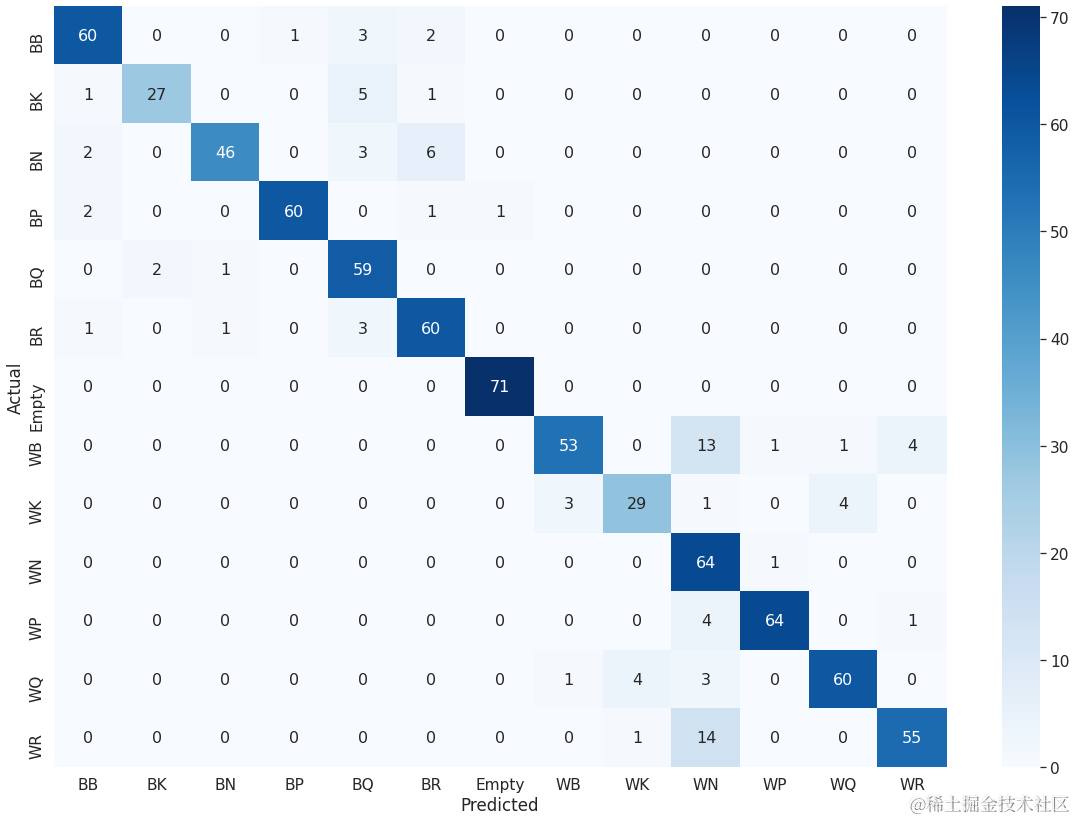
测试数据的混淆矩阵
05. 应用
该应用程序的目标是使用 CNN 模型并可视化每个步骤的性能。我们创建了 cv_chess.py,它清楚地显示了步骤,并创建了 cv_chess_functions.py,它显示了每个步骤的详细信息。此应用程序保存实时视频流中的原始帧,每个正方形的 64 个裁剪图像以及棋盘的最终 2D 图像。
print('Working...') # Save the frame to be analyzed cv2.imwrite('frame.jpeg', frame) # Low-level CV techniques (grayscale & blur) img, gray_blur = read_img('frame.jpeg') # Canny algorithm edges = canny_edge(gray_blur) # Hough Transform lines = hough_line(edges) # Separate the lines into vertical and horizontal lines h_lines, v_lines = h_v_lines(lines) # Find and cluster the intersecting intersection_points = line_intersections(h_lines, v_lines) points = cluster_points(intersection_points) # Final coordinates of the board points = augment_points(points) # Crop the squares of the board a organize into a sorted list x_list = write_crop_images(img, points, 0) img_filename_list = grab_cell_files() img_filename_list.sort(key=natural_keys) # Classify each square and output the board in Forsyth-Edwards Notation (FEN) fen = classify_cells(model, img_filename_list) # Create and save the board image from the FEN board = fen_to_image(fen) # Display the board in ASCII print(board)# Display and save the chessboard image board_image = cv2.imread('current_board.png') cv2.imshow('current board', board_image) print('Completed!')
代码链接:https://github.com/andrewleeunderwood/project_MYM


![第六章[字典]:6.1:字典的创建与访问](https://img-blog.csdnimg.cn/img_convert/0db9eb8f226faaa03c41130e00353e8d.jpeg)