📚 目录
本文学习和引用自《Flutter实战·第二版》:作者:杜文
1. 介绍
当Flutter提供的现有组件无法满足我们的需求,或者我们为了共享代码需要封装一些通用组件,这时我们就需要自定义组件。在Flutter中自定义组件有三种方式:通过组合其他组件、自绘和实现RenderObject。
- 组合多个Widget:通过已有组件来拼装组合成一个新的组件。
- 通过CustomPaint自绘:通过Flutter中提供的CustomPaint和Canvas来实现UI自绘。
- 通过RenderObject自绘:RenderObject中最终也是通过Canvas API来绘制的。而CustomPaint只是为了方便开发者封装的一个代理类。
2. 组合多个组件
实现一个渐变色背景,支持圆角,按下有涟漪效果的按钮,并且实现一个带动画的可以旋转的容器,每次点击按钮,容器旋转一点。
import 'package:flutter/material.dart';
/// 定义
class HomePage extends StatefulWidget {
const HomePage({
super.key});
State<HomePage> createState() => HomePageState();
}
/// 实现
class HomePageState extends State<HomePage> {
double myTurns = 0.0;
Widget build(BuildContext context) {
return Scaffold(
appBar: AppBar(
title: const Text('Flutter Home'),
),
body: Container(
alignment: Alignment.center,
child: Column(
children: [
TurnBox(
turns: myTurns,
speed: 500,
child: const Icon(
Icons.refresh,
size: 50,
)
),
MyButton(
colors: const [Colors.green, Colors.orangeAccent],
height: 60.0,
width: 300.0,
borderRadius: const BorderRadius.all(Radius.circular(8)),
onPressed: () {
setState(() {
myTurns += 0.2;
});
},
child: const Text('放手一搏'),
)
],
),
));
}
}
/// 自定义按钮
class MyButton extends StatelessWidget {
const MyButton(
{
Key? key,
this.colors,
this.width,
this.height,
this.onPressed,
this.borderRadius,
required this.child})
: super(key: key);
// 渐变色数组
final List<Color>? colors;
// 按钮属性
final double? width;
final double? height;
final BorderRadius? borderRadius;
// 点击回调事件
final GestureTapCallback? onPressed;
final Widget child;
Widget build(BuildContext context) {
ThemeData theme = Theme.of(context);
List<Color> myColors =
colors ?? [theme.primaryColor, theme.primaryColorDark];
return DecoratedBox(
decoration: BoxDecoration(
gradient: LinearGradient(colors: myColors),
borderRadius: borderRadius),
child: Material(
type: MaterialType.transparency,
child: InkWell(
splashColor: Colors.white70,
highlightColor: Colors.transparent,
borderRadius: borderRadius ?? BorderRadius.circular(8),
onTap: onPressed,
child: ConstrainedBox(
constraints: BoxConstraints.tightFor(height: height, width: width),
child: Center(
child: Padding(
padding: const EdgeInsets.all(8.0),
child: DefaultTextStyle(
style: const TextStyle(
fontWeight: FontWeight.bold, fontSize: 18.0),
child: child,
),
),
),
),
),
),
);
}
}
/// 自定义旋转
class TurnBox extends StatefulWidget {
const TurnBox({
Key? key,
this.turns = .0, // 旋转的“圈”数,一圈为360度,如0.25圈即90度
this.speed = 200, // 过渡动画执行的总时长
required this.child
}) :super(key: key);
final double turns;
final int speed;
final Widget child;
TurnBoxState createState() => TurnBoxState();
}
class TurnBoxState extends State<TurnBox> with SingleTickerProviderStateMixin {
AnimationController? myController;
void initState() {
super.initState();
myController = AnimationController(
vsync: this,
lowerBound: -double.infinity,
upperBound: double.infinity
);
myController!.value = widget.turns;
}
void dispose() {
myController!.dispose();
super.dispose();
}
Widget build(BuildContext context) {
return RotationTransition(
turns: myController!,
child: widget.child,
);
}
void didUpdateWidget(TurnBox oldWidget) {
super.didUpdateWidget(oldWidget);
// 旋转角度发生变化时执行过渡动画
if (oldWidget.turns != widget.turns) {
myController!.animateTo(
widget.turns,
duration: Duration(milliseconds: widget.speed??200),
curve: Curves.easeOut,
);
}
}
}
3. 自绘组件
对于一些复杂或不规则的UI,我们可能无法通过组合其他组件的方式来实现。比如一个正六边形、一个渐变的圆形进度条、一个棋盘等。在Flutter中,提供了一个CustomPaint 组件,它可以结合画笔CustomPainter来实现自定义图形绘制。
3-1. CustomPaint
画笔CustomPainter绘制时我们需要提供前景或背景画笔,两者也可以同时提供。我们的画笔需要继承CustomPainter类,我们在画笔类中实现真正的绘制逻辑。
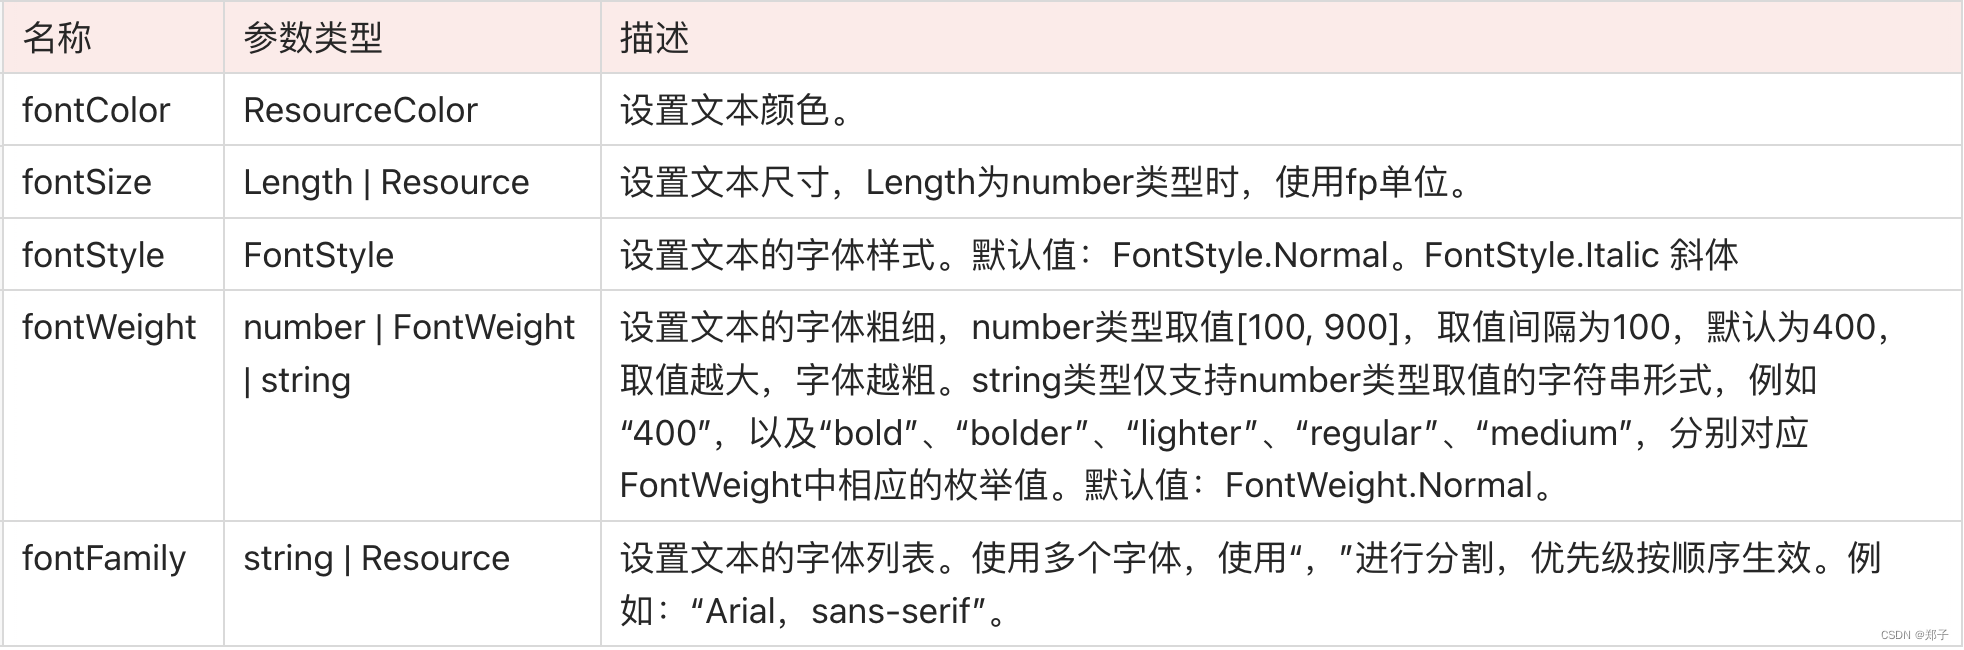
| 属性 | 描述 |
|---|---|
| painter | 背景画笔,会显示在子节点后面 |
| foregroundPainter | 前景画笔,会显示在子节点前面 |
| size | 当child为null时,代表默认绘制区域大小,如果有child则忽略此参数,画布尺寸则为child尺寸。如果有child但是想指定画布为特定大小,可以使用SizeBox包裹CustomPaint实现。 |
| isComplex | 是否复杂的绘制,如果是,Flutter会应用一些缓存策略来减少重复渲染的开销。 |
| willChange | 和isComplex配合使用,当启用缓存时,该属性代表在下一帧中绘制是否会改变。 |
3-2. 绘制边界RepaintBoundary
如果CustomPaint有子节点,为了避免子节点不必要的重绘并提高性能,通常情况下都会将子节点包裹在RepaintBoundary组件中,这样会在绘制时就会创建一个新的绘制层(Layer),其子组件将在新的Layer上绘制,而父组件将在原来Layer上绘制,也就是说RepaintBoundary 子组件的绘制将独立于父组件的绘制,RepaintBoundary会隔离其子节点和CustomPaint本身的绘制边界。
CustomPaint(
  // 指定画布大小
  size: Size(300, 300),
  painter: MyPainter(),
  child: RepaintBoundary(child:...),
)
3-3. CustomPainter与Canvas
CustomPainter中提定义了一个虚函数paint。它有两个参数,Canvas和Size。Canvas是Flutter中绘制UI的底层组件,它是一个画布,包括各种绘制方法。Size是当前绘制区域大小。Canvas常用API如下:
| API | 描述 |
|---|---|
| drawLine | 画线 |
| drawPoint | 画点 |
| drawPath | 画路径 |
| drawImage | 画图像 |
| drawRect | 画矩形 |
| drawCircle | 画圆 |
| drawOval | 画椭圆 |
| drawArc | 画圆弧 |
3-4. 画笔Paint
Flutter提供了Paint类来实现画笔。在Paint中,我们可以配置画笔的各种属性如粗细、颜色、样式等。如下例子:
// 创建一个画笔并配置其属性
var paint = Paint()
  ..isAntiAlias = true // 是否抗锯齿
  ..style = PaintingStyle.fill // 画笔样式:填充
  ..color = Color(0x77cdb175); // 画笔颜色
3-5. 绘制组件例子
如下,是一个自定义绘制的饼状图。
- 饼图完整代码
import 'dart:math';
import 'package:flutter/material.dart';
typedef PieChartViewTap = Function(int index);
typedef OutsideText = Text Function(PieChartModel model, String scale);
class PieChartView extends ImplicitlyAnimatedWidget {
final List<PieChartModel> models;
/// 是否显示内部圆
final bool isShowHole;
/// 内部圆的半径
final double holeRadius;
/// 内部圆的颜色
final Color holeColor;
/// 扇形分割线宽度
final double spaceWidth;
/// 溢出上方文字
final OutsideText? outsideTopText;
/// 溢出下方文字
final OutsideText? outsideBottomText;
/// 扇形点击事件
final PieChartViewTap? onTap;
const PieChartView(
this.models, {
Key? key,
this.holeRadius = 55.0,
this.isShowHole = true,
this.holeColor = Colors.white,
this.spaceWidth = 2.0,
this.outsideTopText,
this.outsideBottomText,
this.onTap,
Curve curve = Curves.linear,
Duration duration = const Duration(milliseconds: 150),
}) : super(
key: key,
curve: curve,
duration: duration,
);
CustomPieViewState createState() => CustomPieViewState();
}
class CustomPieViewState extends AnimatedWidgetBaseState<PieChartView> {
CustomPieTween? customPieTween;
List<PieChartModel> get end => widget.models
.map((e) => PieChartModel(
value: e.value, color: e.color, name: e.name, radius: e.radius))
.toList();
Widget build(BuildContext context) {
return CustomPaint(
size: Size.infinite,
painter: PieChartPainter(
context,
customPieTween!.evaluate(animation),
holeRadius: widget.holeRadius,
isShowHole: widget.isShowHole,
holeColor: widget.holeColor,
spaceWidth: widget.spaceWidth,
outsideTopText: widget.outsideTopText,
outsideBottomText: widget.outsideBottomText,
onTap: widget.onTap,
),
);
}
void forEachTween(TweenVisitor<dynamic> visitor) {
customPieTween = visitor(customPieTween, end, (dynamic value) {
return CustomPieTween(begin: value, end: end);
}) as CustomPieTween;
}
}
class CustomPieTween extends Tween<List<PieChartModel>> {
CustomPieTween({
List<PieChartModel>? begin, List<PieChartModel>? end})
: super(begin: begin, end: end);
List<PieChartModel> lerp(double t) {
List<PieChartModel> list = [];
begin?.asMap().forEach((index, model) {
list.add(model
..radius = lerpDouble(model.radius, end?[index].radius ?? 100.0, t));
});
return list;
}
double lerpDouble(double radius, double radius2, double t) {
if (radius == radius2) {
return radius;
}
var d = (radius2 - radius) * t;
var value = radius + d;
return value;
}
}
class PieChartPaint extends CustomPaint {
const PieChartPaint({
Key? key}) : super(key: key);
}
class PieChartPainter extends CustomPainter {
final BuildContext context;
final List<PieChartModel> models;
final bool isShowHole;
final double holeRadius;
final Color holeColor;
final double spaceWidth;
final OutsideText? outsideTopText;
final OutsideText? outsideBottomText;
final PieChartViewTap? onTap;
final List<Path> paths = [];
final Path holePath = Path();
Offset oldTapOffset = Offset.zero;
PieChartPainter(
this.context,
this.models, {
this.holeRadius = 60.0,
this.isShowHole = true,
this.holeColor = Colors.white,
this.spaceWidth = 2.0,
this.outsideTopText,
this.outsideBottomText,
this.onTap,
});
void paint(Canvas canvas, Size size) {
//移动到中心点
canvas.translate(size.width / 2, size.height / 2);
//绘制饼状图
_drawPie(canvas, size);
//绘制分割线
_drawSpaceLine(canvas);
// 绘制中心圆
_drawHole(canvas, size);
// drawLineAndText(canvas);
}
bool shouldRepaint(CustomPainter oldDelegate) => oldDelegate != this;
bool? hitTest(Offset position) {
return _interceptTouchEvent(position);
}
bool _interceptTouchEvent(Offset offset) {
if (oldTapOffset.dx == offset.dx && oldTapOffset.dy == offset.dy) {
return false;
}
oldTapOffset = offset;
for (int i = 0; i < paths.length; i++) {
if (paths[i].contains(offset) && !holePath.contains(offset)) {
onTap?.call(i);
oldTapOffset = offset;
return true;
}
}
onTap?.call(-1);
return false;
}
/// 绘制分割线
void _drawSpaceLine(Canvas canvas) {
var sumValue = models.fold<double>(0.0, (sum, model) => sum + model.value);
var startAngle = 0.0;
for (var model in models) {
_drawLine(canvas, startAngle, model.radius);
startAngle += model.value / sumValue * 360;
_drawLine(canvas, startAngle, model.radius);
}
}
void _drawLine(Canvas canvas, double angle, double radius) {
var endX = cos(angle * pi / 180) * radius;
var endY = sin(angle * pi / 180) * radius;
Paint paint = Paint()
..style = PaintingStyle.fill
..color = Colors.white
..strokeWidth = spaceWidth;
canvas.drawLine(Offset.zero, Offset(endX, endY), paint);
}
/// 绘制饼状图
void _drawPie(Canvas canvas, Size size) {
var startAngle = 0.0;
var sumValue = models.fold<double>(0.0, (sum, model) => sum + model.value);
for (var model in models) {
Paint paint = Paint()
..style = PaintingStyle.fill
..color = model.color;
var sweepAngle = model.value / sumValue * 360;
canvas.drawArc(Rect.fromCircle(radius: model.radius, center: Offset.zero),
startAngle * pi / 180, sweepAngle * pi / 180, true, paint);
Path path = Path();
var centerX = size.width / 2;
var centerY = size.height / 2;
path.addArc(
Rect.fromCircle(
radius: model.radius, center: Offset(centerX, centerY)),
startAngle * pi / 180,
sweepAngle * pi / 180);
path.moveTo(centerX, centerY);
path.lineTo(centerX + cos(startAngle * pi / 180) * model.radius,
centerY + sin(startAngle * pi / 180) * model.radius);
path.lineTo(
centerX + cos((sweepAngle + startAngle) * pi / 180) * model.radius,
centerY + sin((sweepAngle + startAngle) * pi / 180) * model.radius);
paths.add(path);
// 为每一个区域绘制延长线和文字
_drawLineAndText(
canvas, size, model.radius, startAngle, sweepAngle, model);
startAngle += sweepAngle;
}
}
/// 绘制延长线和文字
void _drawLineAndText(Canvas canvas, Size size, double radius,
double startAngle, double sweepAngle, PieChartModel model) {
var ratio = (sweepAngle / 360.0 * 100).toStringAsFixed(2);
var top = outsideTopText?.call(model, ratio) ??
Text(
model.name,
style: const TextStyle(color: Colors.black38),
);
var topTextPainter = getTextPainter(top);
var bottom = outsideBottomText?.call(model, ratio) ??
Text(
"$ratio%",
style: const TextStyle(color: Colors.black38),
);
var bottomTextPainter = getTextPainter(bottom);
// 绘制横线
// 计算开始坐标以及转折点的坐标
var startX = radius * (cos((startAngle + (sweepAngle / 2)) * (pi / 180)));
var startY = radius * (sin((startAngle + (sweepAngle / 2)) * (pi / 180)));
var firstLine = radius / 5;
var secondLine =
max(bottomTextPainter.width, topTextPainter.width) + radius / 4;
var pointX = (radius + firstLine) *
(cos((startAngle + (sweepAngle / 2)) * (pi / 180)));
var pointY = (radius + firstLine) *
(sin((startAngle + (sweepAngle / 2)) * (pi / 180)));
// 计算坐标在左边还是在右边
// 并计算横线结束坐标
// 如果结束坐标超过了绘制区域,则改变结束坐标的值
var endX = 0.0;
// 距离绘制边界的偏移量
var marginOffset = 20.0;
if (pointX - startX > 0) {
endX = min(pointX + secondLine, size.width / 2 - marginOffset);
secondLine = endX - pointX;
} else {
endX = max(pointX - secondLine, -size.width / 2 + marginOffset);
secondLine = pointX - endX;
}
Paint paint = Paint()
..style = PaintingStyle.fill
..strokeWidth = 1
..color = Colors.grey;
// 绘制延长线
canvas.drawLine(Offset(startX, startY), Offset(pointX, pointY), paint);
canvas.drawLine(Offset(pointX, pointY), Offset(endX, pointY), paint);
// 文字距离中间横线上下间距偏移量
var offset = 4;
var textWidth = bottomTextPainter.width;
var textStartX = 0.0;
textStartX = _calculateTextStartX(
pointX, startX, textWidth, secondLine, textStartX, offset);
bottomTextPainter.paint(canvas, Offset(textStartX, pointY + offset));
textWidth = topTextPainter.width;
var textHeight = topTextPainter.height;
textStartX = _calculateTextStartX(
pointX, startX, textWidth, secondLine, textStartX, offset);
topTextPainter.paint(
canvas, Offset(textStartX, pointY - offset - textHeight));
// 绘制文字前面的小圆点
paint.color = model.color;
canvas.drawCircle(
Offset(textStartX - 8, pointY - 4 - topTextPainter.height / 2),
4,
paint);
}
double _calculateTextStartX(double stopX, double startX, double w,
double line2, double textStartX, int offset) {
if (stopX - startX > 0) {
if (w > line2) {
textStartX = (stopX + offset);
} else {
textStartX = (stopX + (line2 - w));
}
} else {
if (w > line2) {
textStartX = (stopX - offset - w);
} else {
textStartX = (stopX - (line2 - w) - w);
}
}
return textStartX;
}
TextPainter getTextPainter(Text text) {
TextPainter painter = TextPainter(
locale: Localizations.localeOf(context),
maxLines: text.maxLines,
textDirection: TextDirection.ltr,
text: TextSpan(
text: text.data,
style: text.style,
),
);
painter.layout();
return painter;
}
/// 绘制中心圆
void _drawHole(Canvas canvas, Size size) {
if (isShowHole) {
holePath.reset();
Paint paint = Paint()
..style = PaintingStyle.fill
..color = Colors.white;
canvas.drawCircle(Offset.zero, holeRadius, paint);
var centerX = size.width / 2;
var centerY = size.height / 2;
holePath.addArc(
Rect.fromCircle(radius: holeRadius, center: Offset(centerX, centerY)),
0,
360 * pi / 180);
}
}
}
/// 数据
class PieChartModel {
double value;
Color color;
String name;
double radius;
PieChartModel({
required this.value,
required this.color,
required this.name,
this.radius = 100,
});
}
- 使用
import 'package:flutter/material.dart';
import 'package:demo1/widget/MyPieChart.dart';
/// 定义
class HomePage extends StatefulWidget {
const HomePage({
super.key});
State<HomePage> createState() => HomePageState();
}
/// 实现
class HomePageState extends State<HomePage> {
double myTurns = 0.0;
Widget build(BuildContext context) {
return Scaffold(
appBar: AppBar(
title: const Text('Flutter Home'),
),
body: Container(
alignment: Alignment.center,
// 饼图
child: PieChartView(
[
PieChartModel(
value: 35,
name: 'A',
color: Colors.blue,
radius: 100,
),
PieChartModel(
value: 15,
name: 'B',
color: Colors.red,
radius: 100,
),
PieChartModel(
value: 22,
name: 'C',
color: Colors.yellow,
radius: 100,
),
PieChartModel(
value: 18,
name: 'D',
color: Colors.orange,
radius: 100,
),
PieChartModel(
value: 39,
name: 'F',
color: Colors.green,
radius: 100,
),
],
),
));
}
}
本次分享就到这儿啦,我是鹏多多,如果您看了觉得有帮助,欢迎评论,关注,点赞,转发,我们下次见~
往期文章
- 手把手教你搭建规范的团队vue项目,包含commitlint,eslint,prettier,husky,commitizen等等
- Web Woeker和Shared Worker的使用以及案例
- Vue2全家桶+Element搭建的PC端在线音乐网站
- vue3+element-plus配置cdn
- 助你上手Vue3全家桶之Vue3教程
- 助你上手Vue3全家桶之VueX4教程
- 助你上手Vue3全家桶之Vue-Router4教程
- 超详细!Vue的九种通信方式
- 超详细!Vuex手把手教程
- 使用nvm管理node.js版本以及更换npm淘宝镜像源
- vue中利用.env文件存储全局环境变量,以及配置vue启动和打包命令
- 超详细!Vue-Router手把手教程
个人主页