文章目录
简介
- 原始链接:https://huggingface.co/docs/sagemaker/inference#deploy-with-modeldata
- https://docs.datarobot.com/en/docs/more-info/how-to/aws/sagemaker/sagemaker-deploy.html
- 这个可以是java环境或者python环境。
部署的都是从huggingface上的model或者根据huaggingface上的model进行fine-tune后的。
一般输入格式如下:
text-classification request body

{

    "inputs": "Camera - You are awarded a SiPix Digital Camera! call 09061221066 fromm landline. Delivery within 28 days."
}
question-answering request body

{

    "inputs": {

        "question": "What is used for inference?",
        "context": "My Name is Philipp and I live in Nuremberg. This model is used with sagemaker for inference."
    }
}
zero-shot classification request body

{

    "inputs": "Hi, I recently bought a device from your company but it is not working as advertised and I would like to get reimbursed!",
    "parameters": {

        "candidate_labels": [
            "refund",
            "legal",
            "faq"
        ]
    }
}
所有官方示例
- https://github.com/huggingface/notebooks/tree/main/sagemaker
推理工具
- https://github.com/aws/sagemaker-huggingface-inference-toolkit
使用model.tar.gz
1.从huggingface上下载模型
由于模型文件比较大,需要先安装git-lfs
CentOS7安装Git LFS的方法如下:

# 安装必要的软件包:
sudo yum install curl-devel expat-devel gettext-devel openssl-devel zlib-devel
# 安装Git LFS:
curl -s https://packagecloud.io/install/repositories/github/git-lfs/script.rpm.sh | sudo bash
# 安装
sudo yum install git-lfs
# 配置Git LFS:
git lfs install
# 检测是否安装成功:
git lfs version
如果出现版本信息,说明安装成功。
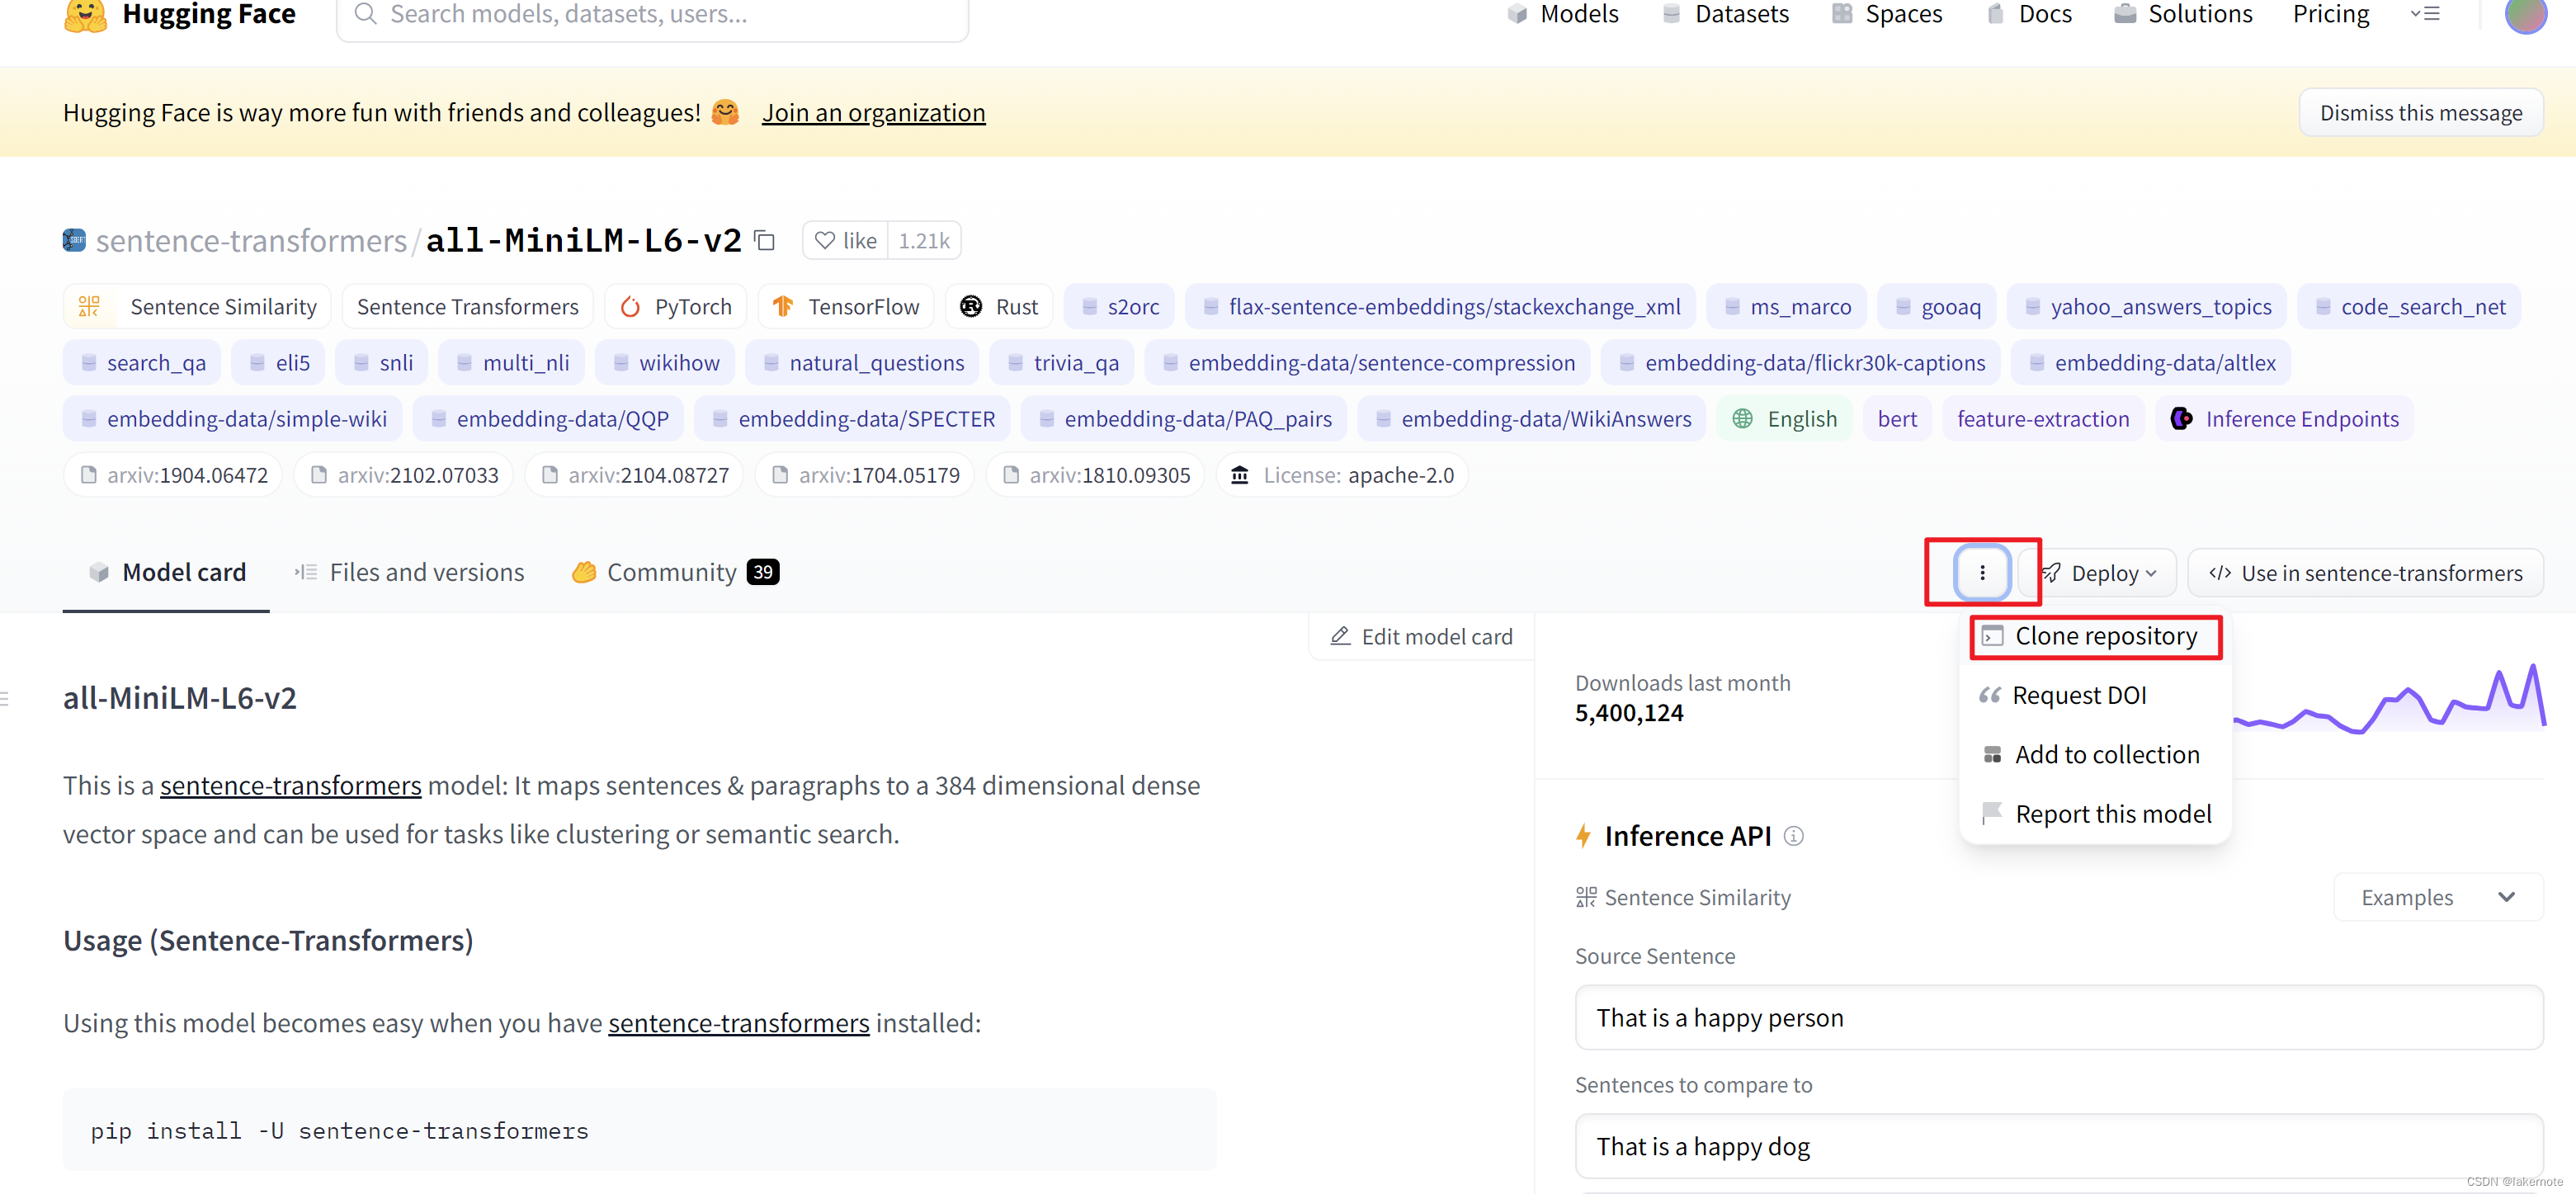
从huaggingface上clone你想使用的模型,以https://huggingface.co/sentence-transformers/all-MiniLM-L6-v2 为例子
git clone https://huggingface.co/sentence-transformers/all-MiniLM-L6-v2
2.自定义代码
允许用户覆盖 HuggingFaceHandlerService 的默认方法。您需要创建一个名为 code/ 的文件夹,其中包含 inference.py 文件。
目录结构如下:
model.tar.gz/
|- pytorch_model.bin
|- ....
|- code/
  |- inference.py
  |- requirements.txt
inference.py 文件包含自定义推理模块, requirements.txt 文件包含应添加的其他依赖项。自定义模块可以重写以下方法:
model_fn(model_dir)覆盖加载模型的默认方法。返回值model将在predict中用于预测。predict接收参数model_dir,即解压后的model.tar.gz的路径。transform_fn(model, data, content_type, accept_type)使用您的自定义实现覆盖默认转换函数。您需要在transform_fn中实现您自己的preprocess、predict和postprocess步骤。此方法不能与下面提到的input_fn、predict_fn或output_fn组合使用。input_fn(input_data, content_type)覆盖默认的预处理方法。返回值data将在predict中用于预测。输入是:input_data是您请求的原始正文。content_type是请求标头中的内容类型。
predict_fn(processed_data, model)覆盖默认的预测方法。返回值predictions将在postprocess中使用。输入是processed_data,即preprocess的结果。output_fn(prediction, accept)覆盖后处理的默认方法。返回值result将是您请求的响应(例如JSON)。输入是:predictions是predict的结果。accept是 HTTP 请求的返回接受类型,例如application/json。
以下是包含 model_fn 、 input_fn 、 predict_fn 和 output_fn 的自定义推理模块的示例:
from sagemaker_huggingface_inference_toolkit import decoder_encoder

def model_fn(model_dir):
    # implement custom code to load the model
    loaded_model = ...

    return loaded_model

def input_fn(input_data, content_type):
    # decode the input data  (e.g. JSON string -> dict)
    data = decoder_encoder.decode(input_data, content_type)
    return data

def predict_fn(data, model):
    # call your custom model with the data
    outputs = model(data , ... )
    return predictions

def output_fn(prediction, accept):
    # convert the model output to the desired output format (e.g. dict -> JSON string)
    response = decoder_encoder.encode(prediction, accept)
    return response
仅使用 model_fn 和 transform_fn 自定义推理模块:
from sagemaker_huggingface_inference_toolkit import decoder_encoder

def model_fn(model_dir):
    # implement custom code to load the model
    loaded_model = ...

    return loaded_model

def transform_fn(model, input_data, content_type, accept):
     # decode the input data (e.g. JSON string -> dict)
    data = decoder_encoder.decode(input_data, content_type)

    # call your custom model with the data
    outputs = model(data , ... )

    # convert the model output to the desired output format (e.g. dict -> JSON string)
    response = decoder_encoder.encode(output, accept)

    return response
重点,这里的话我们 all-MiniLM-L6-v2的示例代码如下:
from transformers import AutoTokenizer, AutoModel
import torch
import torch.nn.functional as F

#Mean Pooling - Take attention mask into account for correct averaging
def mean_pooling(model_output, attention_mask):
    token_embeddings = model_output[0] #First element of model_output contains all token embeddings
    input_mask_expanded = attention_mask.unsqueeze(-1).expand(token_embeddings.size()).float()
    return torch.sum(token_embeddings * input_mask_expanded, 1) / torch.clamp(input_mask_expanded.sum(1), min=1e-9)


# Sentences we want sentence embeddings for
sentences = ['This is an example sentence', 'Each sentence is converted']

# Load model from HuggingFace Hub
tokenizer = AutoTokenizer.from_pretrained('sentence-transformers/all-MiniLM-L6-v2')
model = AutoModel.from_pretrained('sentence-transformers/all-MiniLM-L6-v2')

# Tokenize sentences
encoded_input = tokenizer(sentences, padding=True, truncation=True, return_tensors='pt')

# Compute token embeddings
with torch.no_grad():
    model_output = model(**encoded_input)

# Perform pooling
sentence_embeddings = mean_pooling(model_output, encoded_input['attention_mask'])

# Normalize embeddings
sentence_embeddings = F.normalize(sentence_embeddings, p=2, dim=1)

print("Sentence embeddings:")
print(sentence_embeddings)
我们需要改造下,改为我们自己需要的自定义代码:
from transformers import AutoTokenizer, AutoModel
import torch
import torch.nn.functional as F

# 这个方法直接同上
def mean_pooling(model_output, attention_mask):
    token_embeddings = model_output[0] #First element of model_output contains all token embeddings
    input_mask_expanded = attention_mask.unsqueeze(-1).expand(token_embeddings.size()).float()
    return torch.sum(token_embeddings * input_mask_expanded, 1) / torch.clamp(input_mask_expanded.sum(1), min=1e-9)

# 覆盖 -- 模型加载 参考all-MiniLM-L6-v2给出的示例代码
def model_fn(model_dir):
  # Load model from HuggingFace Hub
  tokenizer = AutoTokenizer.from_pretrained(model_dir)
  model = AutoModel.from_pretrained(model_dir)
  return model, tokenizer
# 覆盖 -- 预测方法 参考all-MiniLM-L6-v2给出的示例代码
def predict_fn(data, model_and_tokenizer):
    # destruct model and tokenizer
    model, tokenizer = model_and_tokenizer

    # Tokenize sentences
    sentences = data.pop("inputs", data)
    encoded_input = tokenizer(sentences, padding=True, truncation=True, return_tensors='pt')

    # Compute token embeddings
    with torch.no_grad():
        model_output = model(**encoded_input)

    # Perform pooling
    sentence_embeddings = mean_pooling(model_output, encoded_input['attention_mask'])

    # Normalize embeddings
    sentence_embeddings = F.normalize(sentence_embeddings, p=2, dim=1)

    # return dictonary, which will be json serializable
    return {
   "vectors": sentence_embeddings[0].tolist()}
3.打包为tar 文件
cd all-MiniLM-L6-v2
tar zcvf model.tar.gz *
4.上传model.tar.gz到S3
5.部署推理
这里有好几种方式可选。
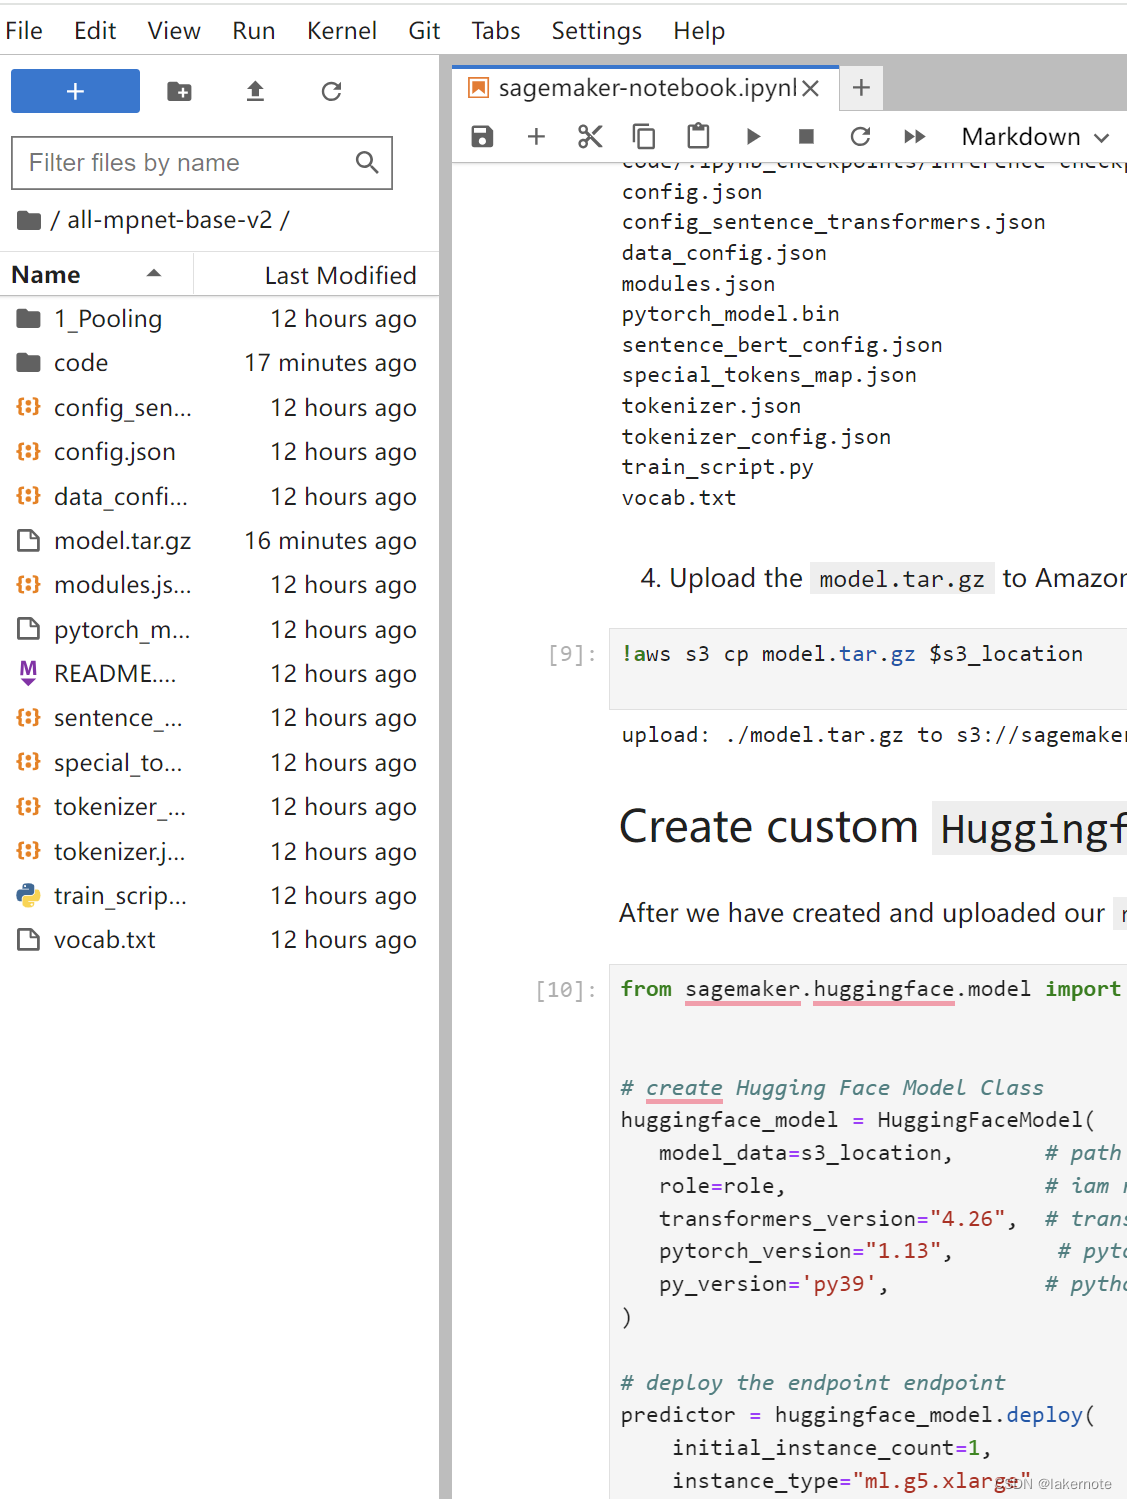
第一种:在jupyterlab执行这个脚本,替换model等参数即可。
- https://github.com/huggingface/notebooks/blob/main/sagemaker/10_deploy_model_from_s3/deploy_transformer_model_from_s3.ipynb
第二种:这个是吧上面所有步骤都包含了,但是这种无法处理我们在私有环境fine-tune后的模型。
- https://github.com/huggingface/notebooks/blob/main/sagemaker/17_custom_inference_script/sagemaker-notebook.ipynb
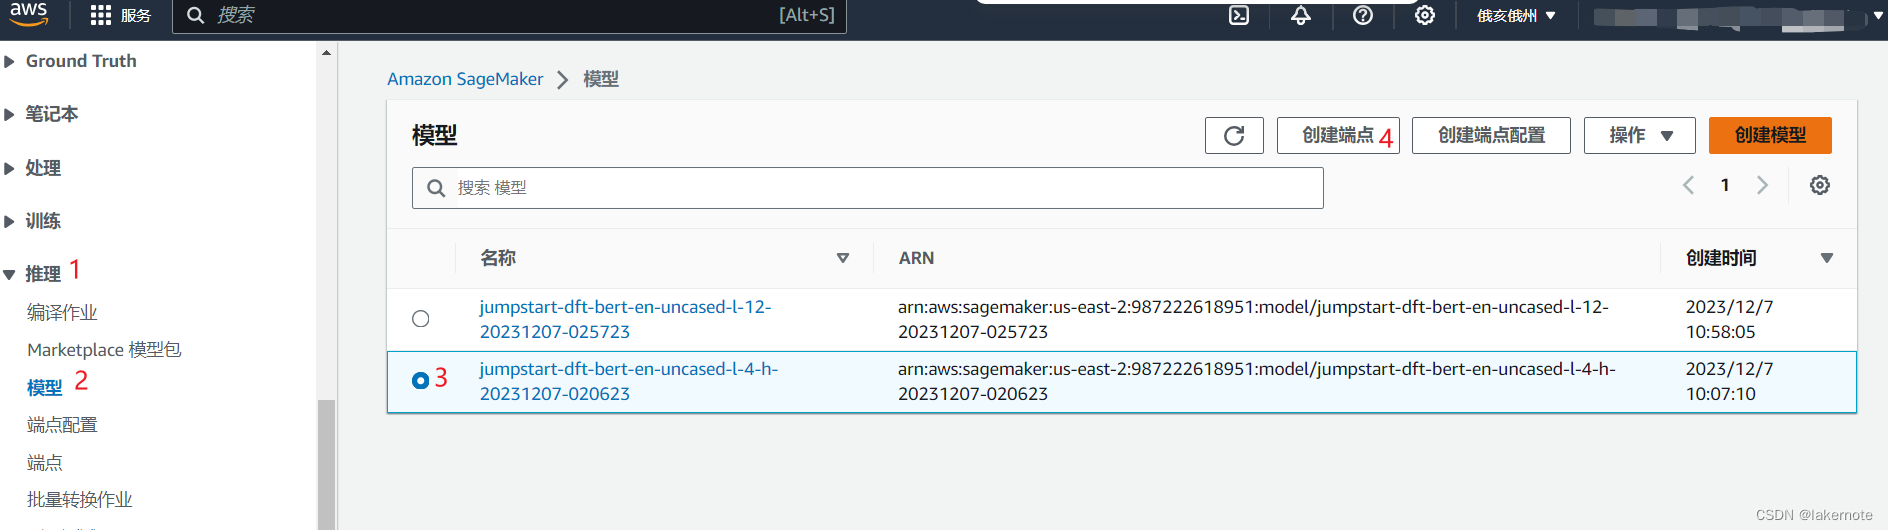
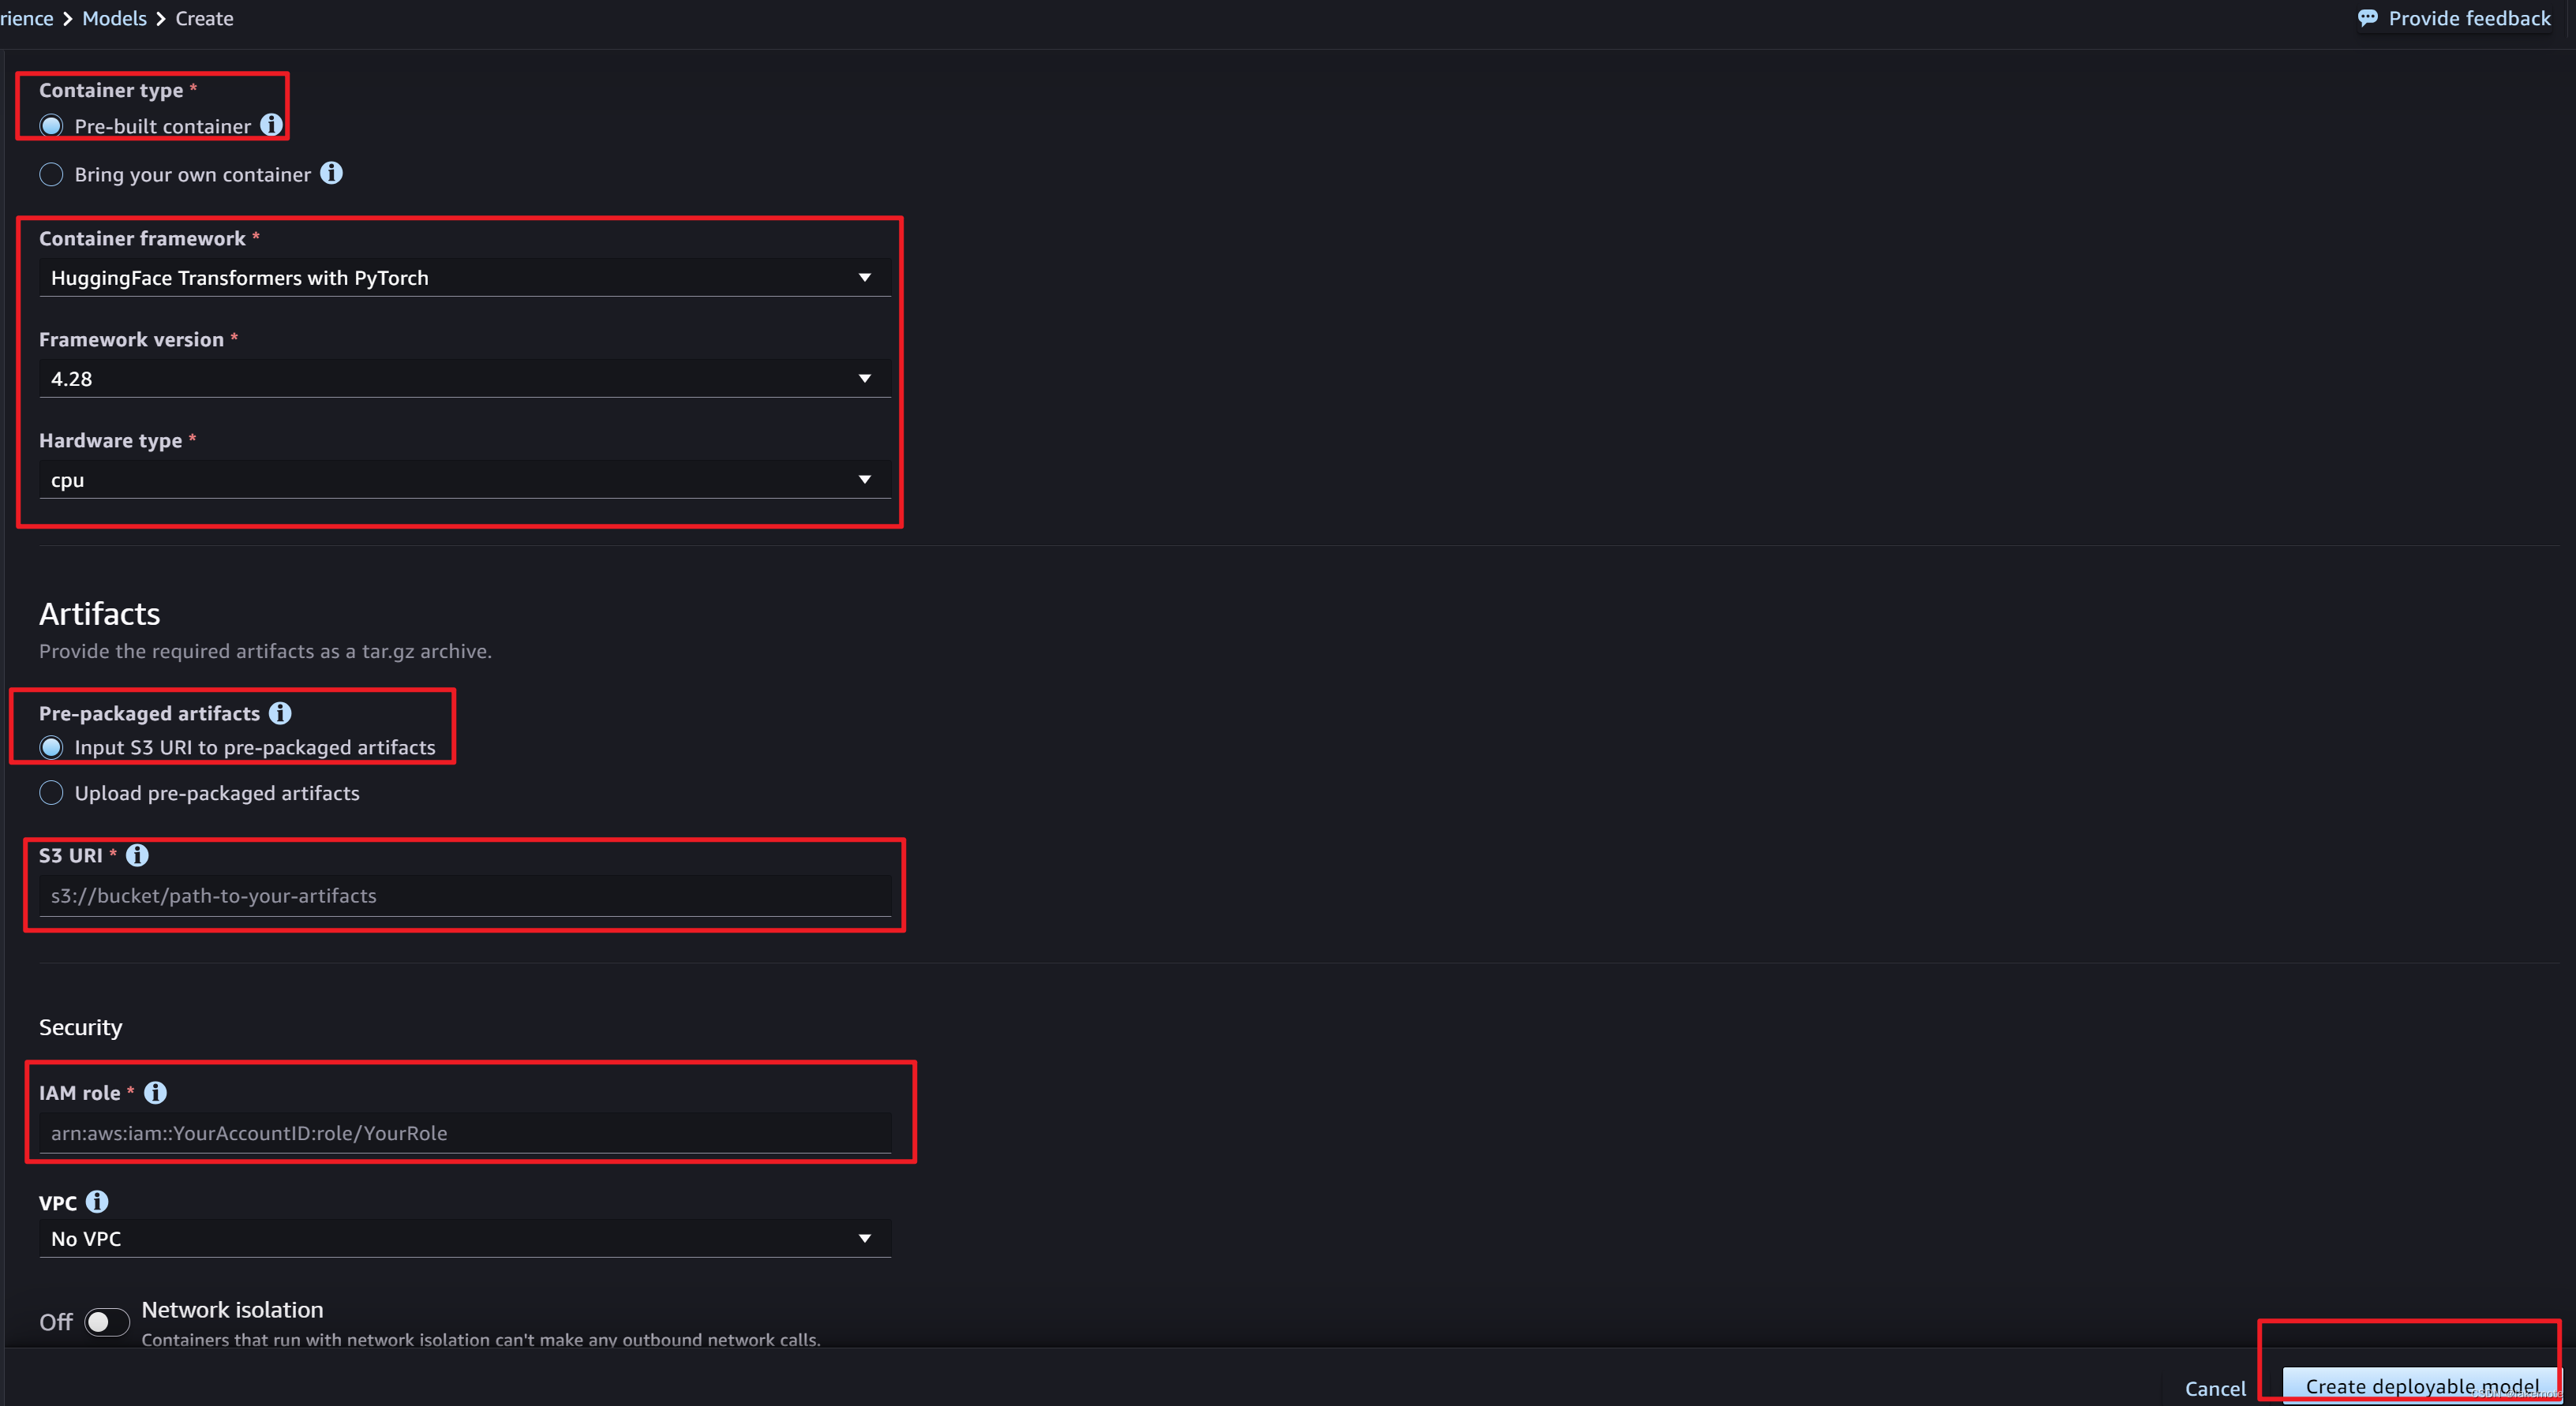
第三种:可视化部署,我重点介绍下这个吧
入口如下:

注意下面的选项
- 容器框架根据实际情况选择,这里我们就选择如图
- S3 URI
- IAM role:
- 可以去IAM创建角色
- AmazonS3FullAccess
- AmazonSageMakerFullAccess
- 也可以去JumpStart中的model去复制过来。
- 可以去IAM创建角色
使用hub
原文:https://huggingface.co/docs/sagemaker/inference#deploy-a-model-from-the–hub
这种方式没有上面的方式灵活度高,支持的model也没有上面的方式多。