jsPlumb简介
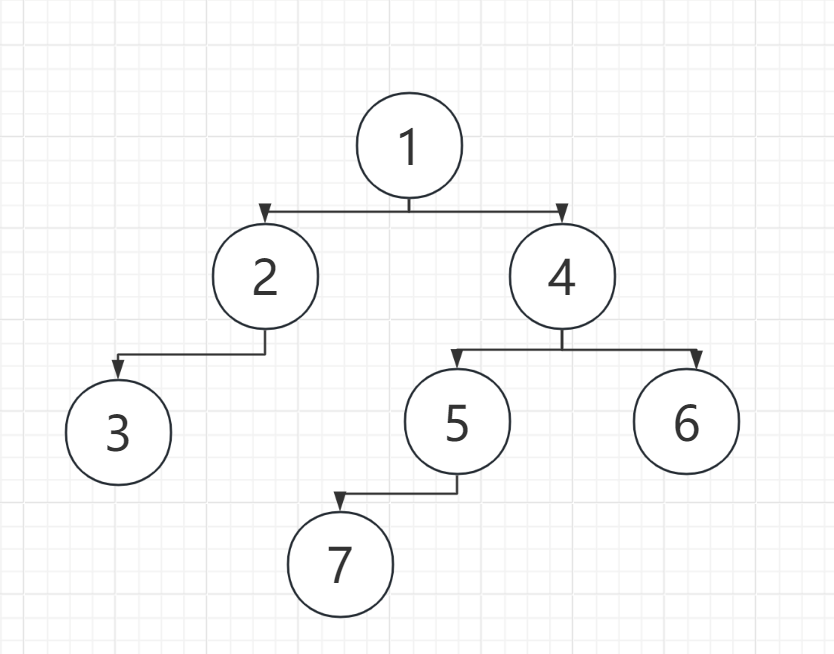
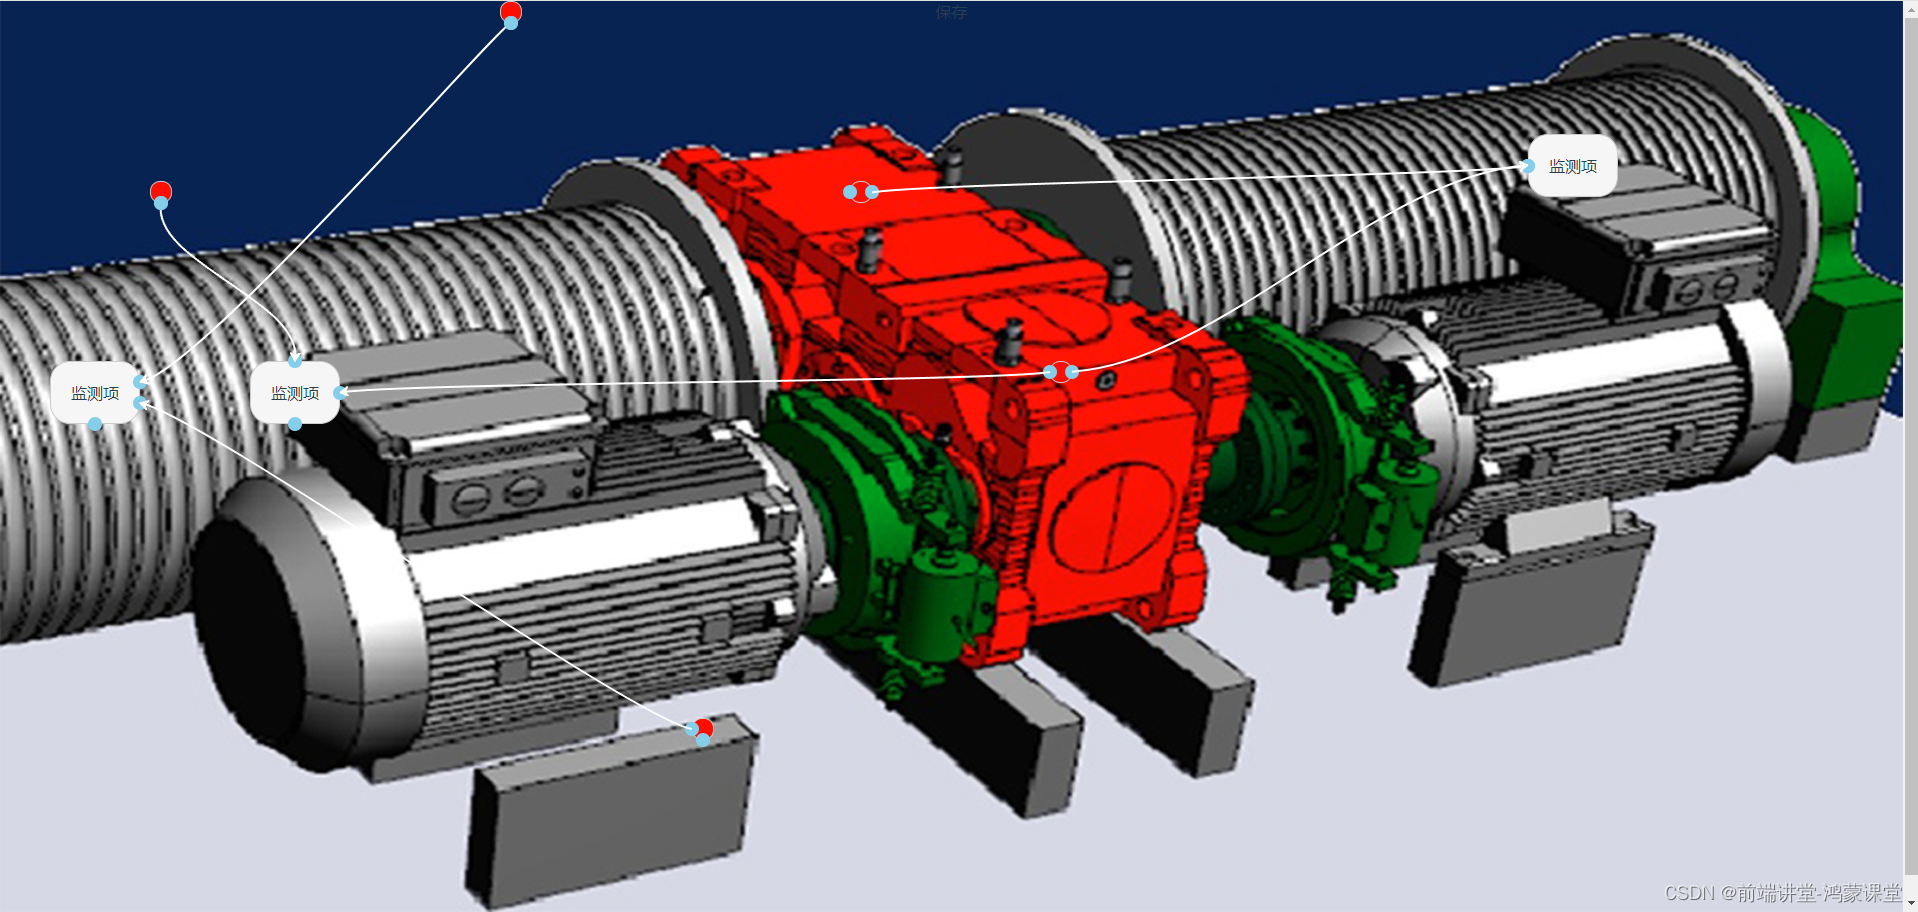
jsPlumb 是一个开源的库,用于在网页上创建、连接和管理各种流程图、关系图等交互式连接线的应用。
该库以JavaScript编写,通过SVG和HTML Canvas来渲染交互性连接线。它为业务流程和数据流的可视化、应用程序的交互逻辑建模等场景提供了完善的解决方案。
文章结尾附VUE源码
、
jsPlumb的主要功能:
- 拖拽连接节点
- 绘制自由定制的连接线
- 支持自动排列、动画等交互功能
- 可编程方式创建和管理连接
- 对不同设备和浏览器的兼容支持
使用jsPlumb
首先需要在页面中引入jsPlumb的JS和CSS文件:
<script src="path/to/jsplumb.min.js"></script>
<link rel="stylesheet" href="path/to/jsplumbtoolkit.css">
然后准备好需要连接的DOM元素,例如两个div:
<div id="div1">Node 1</div>
<div id="div2">Node 2</div>调用jsPlumb实例的connect()方法建立两个节点之间的连接:
jsPlumb.connect({source:'div1', target:'div2'});这样就可以在div1和div2之间画出一条连接线。
jsPlumb 常用选项
创建连接线时可以通过一个配置对象来定制外观和行为:
var options = {
  endpoint: ["Dot", {radius: 5}], // 端点样式
  connector: ["Bezier", {curviness:100}], // 连接线的曲线
  anchors: ["RightMiddle","LeftMiddle"], // 锚点位置
  paintStyle: {lineWidth: 3, stroke: "#056"}, // 线条样式
  overlays: [["Arrow", {location:1}]] // 覆盖层样式
}

jsPlumb.connect({
  source: "div1",
  target:"div2",
  options: options
});
jsPlumb内置许多端点、线条、锚点、覆盖层的样式,同时支持自定义。
事件绑定
可以在连接线上绑定各种事件:
jsPlumb.on(connection, "click", function() {
  alert("connnection clicked!");
});

jsPlumb.on(connection, "dblclick", () => {
  // ...
})
支持的事件有:click、dblclick、mouseenter等。
通过绑定事件可以实现连接线的交互功能。
动态操作
对于已建立的连接,可以通过连接的 id 动态修改属性或者删除连接等。
例如,隐藏连接线:
jsPlumb.toggleVisible(someConnectionId);删除一个连接线:
jsPlumb.detach(someConnectionId);jsPlumb 提供了丰富的 API 操作已存在的连接和元素,使得可以实现动态可交互的流程图。
vue源码:
<template>
	<div class="hello">
		<div id="relation-box">
			<div v-for="item in nodeList" :key="item.id" :class="item.ispoint?'point node':'node'"
				:style="{left: item.left, top: item.top}" :id="'node-'+ item.id">
				{
  { item.ispoint?'':item.name }}
			</div>
		</div>
		<div id="sub" @click="submit">
			保存
		</div>
	</div>
</template>


<script>
	import {
		jsPlumb
	} from "jsplumb";
	// import * as D3 from "d3";
	export default {
		name: 'landing-page',
		data() {
			return {
				jsPlumbInstance: "", //jsPlumb实例
				// jsPlumb默认配置
				jsPlumbSetting: {
					// 动态锚点、位置自适应
					Anchors: ['Top', 'TopCenter', 'TopRight', 'TopLeft', 'Right', 'RightMiddle', 'Bottom', 'BottomCenter',
						'BottomRight', 'BottomLeft', 'Left', 'LeftMiddle'
					],
					// 连线的样式 StateMachine、Flowchart,Bezier、Straight
					Connector: ['Bezier', {
						curviness: 60
					}],
					// 鼠标是否拖动删除线
					ConnectionsDetachable: false,
					// 删除线的时候节点不删除
					DeleteEndpointsOnDetach: false,
					// 连线的两端端点类型:矩形 Rectangle;圆形Dot; eight: 矩形的高 ,idth: 矩形的宽
					Endpoints: [
						['Dot', {
							radius: 1,
						}],
						['Dot', {
							radius: 1
						}],
					],
					// 线端点的样式
					EndpointStyle: {
						fill: 'skyblue',
						// fill: '#999'
						radius: 7,  // 修改这个值来改变锚点的大小
						outlineWidth: 1
					},
					// 绘制连线
					PaintStyle: {
						stroke: '#ffffff',
						strokeWidth: 2,
						outlineStroke: 'transparent',
						// 设定线外边的宽,单位px
						outlineWidth: 10
					},
					// 绘制连线箭头
					Overlays: [ // 箭头叠加
						['Arrow', {
							width: 10, // 箭头尾部的宽度
							length: 8, // 从箭头的尾部到头部的距离
							location: 1, // 位置,建议使用0~1之间
							direction: 1, // 方向,默认值为1(表示向前),可选-1(表示向后)
							foldback: 0.623 // 折回,也就是尾翼的角度,默认0.623,当为1时,为正三角
						}]
					],
					// 绘制图的模式 svg、canvas
					RenderMode: 'svg',
					DragOptions: {
						cursor: 'pointer',
						zIndex: 2000
					},
					// 鼠标滑过线的样式
					HoverPaintStyle: {
						stroke: 'skyblue',
						strokeWidth: 3,
						cursor: 'pointer'
					},
				},
				// 连线的配置
				jsPlumbConnectOptions: {
					isSource: true,
					isTarget: true,
					// 动态锚点、提供了4个方向 Continuous、AutoDefault
					anchor: "Continuous",
					overlays: [
						['Arrow', {
							width: 8,
							length: 8,
							location: 1
						}]
					] // overlay
				},
				commonLink: {
					isSource: true,
					isTarget: true,
					anchor: ["Perimeter", {
						shape: "Circle"
					}],
					connector: ['Bezier'],
					endpoint: 'Dot',
					// 不限制节点的连线数量
					maxConnections: -1,
				},
				nodeList: [{
					"id": 1,
					"name": "监测项",
					"left": "500px",
					"top": "0px",
					"ispoint": true,
					"lineId": 4
				}, {
					"id": 2,
					"name": "监测项",
					"left": "150px",
					"top": "180px",
					"ispoint": true,
					"lineId": 5
				}, {
					"id": 3,
					"name": "监测项",
					"left": "850px",
					"top": "180px",
					"ispoint": true,
					"lineId": 6
				}, {
					"id": 4,
					"name": "监测项",
					"left": "50px",
					"top": "360px",
					"ispoint": false,
					"lineId": ''
				}, {
					"id": 5,
					"name": "监测项",
					"left": "250px",
					"top": "360px",
					"ispoint": false,
					"lineId": ''
				}, {
					"id": 6,
					"name": "监测项",
					"left": "650px",
					"top": "360px",
					"ispoint": false,
					"lineId": ''
				}, {
					"id": 7,
					"name": "监测项",
					"left": "850px",
					"top": "360px",
					"ispoint": true,
					"lineId": 4
				}, {
					"id": 8,
					"name": "监测项1",
					"left": "1050px",
					"top": "360px",
					"ispoint": true,
					"lineId": 5
				}],
				// lineList: [{
				// 	"source": "node-1",
				// 	"target": "node-4",
				// 	"overlays": [
				// 		["Arrow", {
				// 			"width": 10,
				// 			"length": 10,
				// 			"location": 0.5
				// 		}]
				// 	]
				// }]
			}
		},

		mounted() {
			this.drawLines();
		},
		methods: {
			submit(){
				// 获取所有连线
				var connections = this.jsPlumbInstance.getAllConnections();
				console.log(connections)
				// 如果需要获取最后一条连线的数据,可以使用以下代码
				// var lastConnection = connections[Object.keys(connections).pop()];

				// // 获取连线的源节点和目标节点的Id
				// var sourceId = lastConnection.sourceId;
				// var targetId = lastConnection.targetId;

				// // 获取连线的其他属性(如果有的话)
				// var connectionData = lastConnection.getData();

				// console.log("源节点 Id:", sourceId);
				// console.log("目标节点 Id:", targetId);
				// console.log("连线数据:", connectionData);
			},

			drawLines() {
				this.lineList = this.nodeList.map(item => {
					if(item.lineId != ''){
						return {
							source: `node-${item.id}`,
							target: `node-${item.lineId}`,
							overlays: [
								["Arrow", {
									width: 10,
									length: 10,
									location: 0.5
								}]
							]
						}

					}else {
						return {}; // 添加默认返回值
					}

				})
				console.log(this.lineList)

				this.$nextTick().then(() => {
					jsPlumb.ready(() => {
						// 创建jsPlumb实例
						this.jsPlumbInstance = jsPlumb.getInstance();
						// 导入准备好的jsPlumb配置
						this.jsPlumbInstance.importDefaults(this.jsPlumbSetting);
						// 开始节点间的连线
						this.lineList.forEach((item) => {
							this.jsPlumbInstance.connect(item, this.jsPlumbConnectOptions);
						});
						// 让每个节点都可以被拖拽
						this.nodeList.forEach((item) => {
							this.jsPlumbInstance.draggable("node-" + item.id)
							// 给每个节点添加锚点
							this.jsPlumbInstance.addEndpoint("node-" + item.id, {
								anchor: ['Bottom', 'Top', 'Left', 'Right'],
								Overlays: [
									['Arrow', {
										width: 10,
										length: 8,
										location: 1,
										direction: 1,
										foldback: 0.623
									}]
								]
							}, this.commonLink)
						})

					})
					this.jsPlumbInstance.repaintEverything(); // 重绘
				})
			}

		}
	}
</script>


<style scoped>
	#relation-box {
		position: relative;
	}

	.node {
		position: absolute;
		padding: 20px;
		border: 1px solid #ccc;
		border-radius: 20px;
		text-align: center;
		background-color: #f6f6f6;
	}

	.node.point {
		width: 20px;
		height: 20px;
		overflow: hidden;
		background: red;
		padding: 0;
		margin: 0;
		border-radius: 10px;

	}
	.hello{
		width: 100%;
		height: 100%;
		background: url(../../public/backgroundImg.png) no-repeat;
		background-size: 100% 100%;
		}
</style>
小结
通过上面的介绍,可以使用 jsPlumb 的大部分主要功能来绘制基本的连接图,并实现一定交互。进一步地,可以探索其丰富的样式定制功能和动态API来开发复杂交互性的流程图等应用。
希望本文可以帮助你快速上手这个非常实用的库!