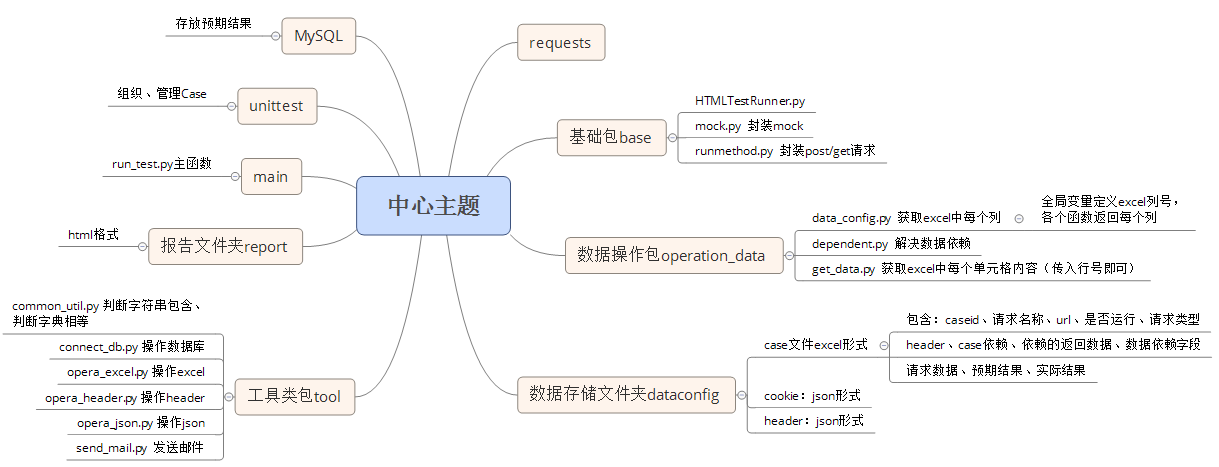
- 编写ansible.cfg和清单文件
- ansible的基本用法
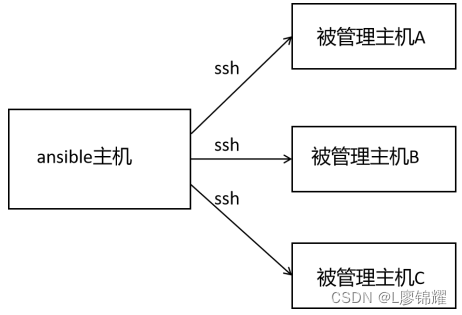
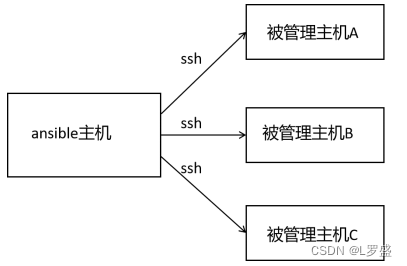
本章实验三台RHEL8系统(rhel801,rhel802,rhel803),其中rhel801是ansible主机
这里要确保ansible主机能够解析所有被管理的机器,这里通过配置/etc/hosts来实现,/etc/hosts的内容如下
[root@rhel801 ~]# cat /etc/hosts
127.0.0.1   localhost localhost.localdomain localhost4 localhost4.localdomain4
::1         localhost localhost.localdomain localhost6 localhost6.localdomain6
192.168.161.16	rhel801
192.168.161.17	rhel802
192.168.161.18	rhel803
[root@rhel801 ~]#
在rhel802和rhel803两台机器上确认已经创建好jin用户(三台机器都需要创建jin用户),如果没有请自行创建,然后配置sudo
[root@rhel802 ~]# cat /etc/sudoers.d/jin
jin ALL=(root) NOPASSWD:ALL
[root@rhel802 ~]#
[root@rhel803 ~]# cat /etc/sudoers.d/jin
jin ALL=(root) NOPASSWD:ALL
[root@rhel803 ~]#这样在这两台机器上,jin 用户通过sudo -i可以无密码切换到root用户
[jin@rhel802 ~]$ sudo -i
[root@rhel802 ~]# exit
注销
[jin@rhel802 ~]$
使用jin 用户登录server,配置好ssh密钥登录,使得jin 用户可以无密码登录到 server2和 server3
1.1 编写ansible.cfg和清单文件
执行ansible或ansible-playbook命令时,优先使用当前目录中ansible.cfg的配置。如果 当前目录中没有,则使用默认的/etc/ansible.cfg中的配置
下面的操作都是rhel801上的jin用户操作的,先在家目录下创建ansible.cfg
[jin@rhel801 ~]$ cat ansible.cfg
[defaults]
inventory = ./hosts

[privilege_escalation]
become=True
become_method=sudo
become_user=root
[jin@rhel801 ~]$
这里在[defaults]字段下只添加了一句inventory = ./hosts,表示把当前目录下名称为hosts的文件当作清单文件(什么是清单文件马上就要讲到)
在 [privilege_escalation]字段下定义了如何提升权限,因为是使用lduan用户登录到被管理主机的,所以需要提升权限。这个字段下写了3条,分别如下
(1)become=True:登录到被管理主机时要切换到其他用户
(2)become_method=sudo:以 sudo的方式切换
(3)become_user-root :切换到root用户
这三句的意思是,当用ssh登录到被管理主机时,以 sudo的方式切换到root,这也是为什么一开始要在被管理主机上配置好sudo的原因
所有的被管理机器都要写入清单文件中。在实验环境中有两台被管理主机,那么分别写在 hosts中,内容如下
[jin@rhel801 ~]$ cat hosts
rhel802
rhel803
[jin@rhel801 ~]$
这里一行一台主机,我们在使用ansible或ansible-playbook命令时,指定的主机名必须 是这个名称才行。要确保能解析rhel802和rhel8803,写成相应的IP也可以
如果环境中被管理的主机很多,把主机一台台地写进去太冗繁,所以可以改成如下写法
[jin@rhel801 ~]$ cat hosts
rhel802
rhel803
rhel8[10:15]
[jin@rhel801 ~]$
这里加了一行rhel8[10:15],表示 rhel810到 rhel815,这样在清单文件中就写了8台主 机(需要注意的是,在我们的练习环境中rhel810到rhel815不存在)
如果在执行ansible命令时只是想在部分主机上执行,那么在清单文件中可以对主机进行 分组。定义主机组时,组名写在中括号“[]”中,在[下面写的主机名都属于这个组,直到定 义下一个组的位置为止。修改清单文件的内容如下
[jin@rhel801 ~]$ cat hosts
rhel802
rhel803
rhel8[10:15]

[db1]
rhel80[2:5]

[db2]
rhel806
rhel807
[jin@rhel801 ~]$
这里定义了两个主机组db1和db2,db1组中包括的主机有rhel802到rhel805,db2组中包 括的主机有rhel806和 rhel807
如果想定义一个主机组,这个组中包括db1和db2两个主机组的主机,可以用 children关 键字,修改hosts的内容如下
[jin@rhel801 ~]$ cat hosts
rhel802
rhel803
rhel8[10:15]

[db1]
rhel80[2:5]

[db2]
rhel806
rhel807

[db3:children]
db1
db2
[jin@rhel801 ~]$
这里定义了一个主机组db3,但是后面加了“:children",则这个主机组下面的db1和db2 就不再表示主机了,而是表示主机组。所以,db3这个主机组中所包括的主机是rhel802到 rhel805及rhel806和 rhel807这6台主机
下面查看每个主机组中有多少主机。首先查看主机组db1中的主机
[jin@rhel801 ~]$ ansible db1 --list-hosts
  hosts (4):
    rhel802
    rhel803
    rhel804
    rhel805
[jin@rhel801 ~]$
共4台主机。查看主机组db2中的主机
[jin@rhel801 ~]$ ansible db2 --list-hosts
  hosts (2):
    rhel806
    rhel807
[jin@rhel801 ~]$
共2台主机。查看主机组 db3中的主机
[jin@rhel801 ~]$ ansible db3 --list-hosts
  hosts (6):
    rhel802
    rhel803
    rhel804
    rhel805
    rhel806
    rhel807
[jin@rhel801 ~]$
共6台主机,与分析的是一样的。还有一个内置主机组叫作all,表示所有主机
了解了清单文件的写法之后,最终把清单文件写成如下内容
[jin@rhel801 ~]$ cat hosts
rhel802
rhel803

[db]
rhel802
rhel804
[jin@rhel801 ~]$
1.2 ansible的基本用法
ansible的基本用法如下
ansible 机器名 ‐m 模块× ‐a "模块的参数"这里的机器名必须出现在清单文件中,整体的意思是在指定的机器上执行模块x。例如,在 rhel802上执行hostname命令,命令如下
[jin@rhel801 ~]$ ansible rhel802 -m shell -a "hostname"
rhel802 | CHANGED | rc=0 >>
rhel802
[jin@rhel801 ~]$
shell模块用于执行操作系统命令,执行的命令就作为shell模块的参数,这里在-a中写要执行的系统命令。所以,上面的命令就是在rhel802上执行hostname命令,显示的结果是rhel802.rhce.cc
要完成不同的任务就需要调用不同的模块来实现,系统中存在的所有 ansible模块可以通过ansible-doc -l来查看
不同的模块有不同的参数,模块的参数及使用方法可以通过“ansible-doc模块名”来查看