将Tensor或模型移动到指定的设备上:tensor.to(‘cuda:0’)
- 最开始读取数据时的tensor变量copy一份到device所指定的GPU上去,之后的运算都在GPU上进行
- 在做高维特征运算的时候,采用GPU无疑是比用CPU效率更高,如果两个数据中一个加了.cuda()或者.to(device),而另外一个没有加,就会造成类型不匹配而报错。
1. Tensor.to(device)
功能:将Tensor移动到指定的设备上。
以下代码将Tensor移动到GPU上:
device = torch.device(“cuda:0” if torch.cuda.is_available() else “cpu”)
1.1 修改dtype
a = tensor.to(torch.float64).
- tensor.dtype : torch.float32
- a.dtype : torch.float64
1.2 改变device:用字符串形式给出
a = tensor.to('cuda:0').
- tensor.device : device(type=‘cpu’)
- a.device : device(type=‘cuda’, index=0)
1.3 改变device:用torch.device给出
cuda0 = torch.device('cuda:0') .
b = tensor.to(cuda0) .
- tensor.device : device(type=‘cpu’)
- b.device : device(type=‘cuda’, index=0)
1.4 同时改变device和dtype
c = tensor.to('cuda:0',torch.float64) .
other = torch.randn((), dtype=torch.float64, device=cuda0) .
d = tensor.to(other, non_blocking=True) .
- tensor.device:device(type=‘cpu’)
- d :tensor([], device=‘cuda:0’, dtype=torch.float64))
2. model.to(device)
功能:将模型移动到指定的设备上。
使用以下代码将模型移动到GPU上:
import torch
import torch.nn as nn

class Net(nn.Module):
    def __init__(self):
        super(Net, self).__init__()
        self.fc1 = nn.Linear(10, 5)
        self.fc2 = nn.Linear(5, 1)
    def forward(self, x):
        x = self.fc1(x)
        x = self.fc2(x)
        return x

model = Net()
device = torch.device('cuda:0' if torch.cuda.is_available() else 'cpu')
model.to(device)
如果有多个GPU,使用以下方法:
if torch.cuda.device_count() > 1:
    model = nn.DataParallel(model,device_ids=[0,1,2])

model.to(device)
将由GPU保存的模型加载到GPU上。
device = torch.device("cuda")
model = TheModelClass(*args, **kwargs)
model.load_state_dict(torch.load(PATH))
model.to(device)
将由GPU保存的模型加载到CPU上。
将torch.load()函数中的map_location参数设置为torch.device('cpu')。
device = torch.device('cpu')
model = TheModelClass(*args, **kwargs)
model.load_state_dict(torch.load(PATH, map_location=device))
model.to(device)
将由CPU保存的模型加载到GPU上。
将torch.load()函数中的map_location参数设置为torch.device('cuda')。
device = torch.device("cuda")
model = TheModelClass(*args, **kwargs)
model.load_state_dict(torch.load(PATH, map_location="cuda:0"))  # Choose whatever GPU device number you want
model.to(device)
参考:PyTorch之Tensor.to(device)和model.to(device)
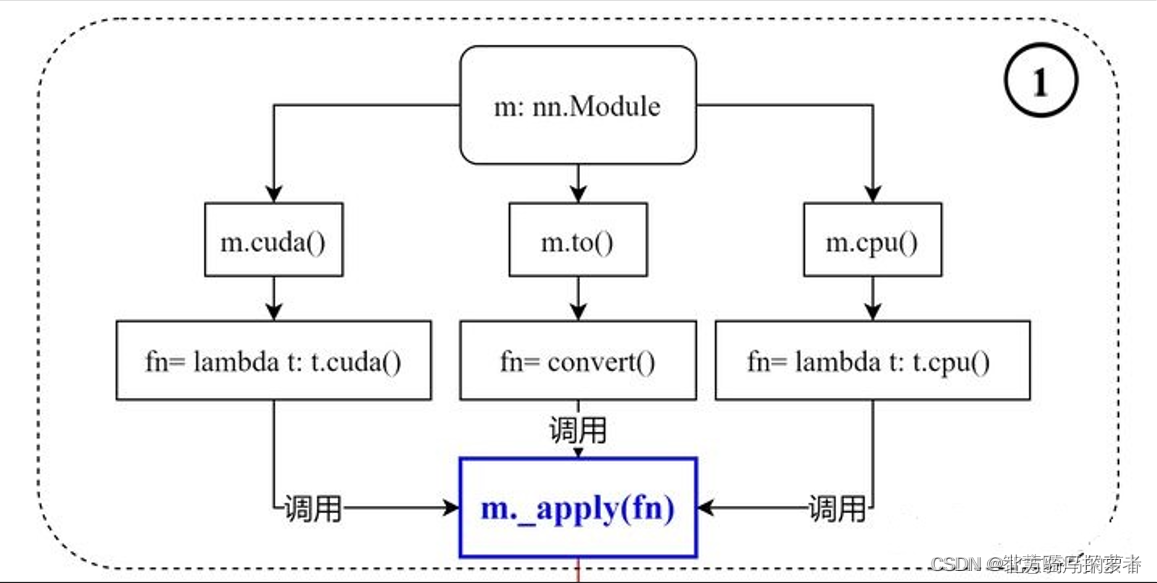
3. .to(device) 和.cuda()的区别
- .to(device) 可以指定CPU 或者GPU
- .cuda() 只能指定GPU
图参考:pytorch中.to(device) 和.cuda()的区别
官方文档:CUDA SEMANTICS
with torch.cuda.device(1):
    # allocates a tensor on GPU 1
    a = torch.tensor([1., 2.], device=cuda)

    # transfers a tensor from CPU to GPU 1
    b = torch.tensor([1., 2.]).cuda()
    # a.device and b.device are device(type='cuda', index=1)

    # You can also use ``Tensor.to`` to transfer a tensor:
    b2 = torch.tensor([1., 2.]).to(device=cuda)
    # b.device and b2.device are device(type='cuda', index=1)
- 两个方法都可以达到同样的效果,在pytorch中,即使是有GPU的机器,它也不会自动使用GPU,而是需要在程序中显示指定。
- 调用model.cuda(),可以将模型加载到GPU上去。这种方法不被提倡,而建议使用model.to(device)的方式,这样可以显示指定需要使用的计算资源,特别是有多个GPU的情况下。
4. CUDA相关信息查询
import torch
print('CUDA版本:',torch.version.cuda)
print('Pytorch版本:',torch.__version__)
print('显卡是否可用:','可用' if(torch.cuda.is_available()) else '不可用')
print('显卡数量:',torch.cuda.device_count())
print('当前显卡的CUDA算力:',torch.cuda.get_device_capability(0))
print('当前显卡型号:',torch.cuda.get_device_name(0))
>>>
CUDA版本: 11.7
Pytorch版本: 1.13.1
显卡是否可用: 可用
显卡数量: 1
当前显卡的CUDA算力: (8, 6)
当前显卡型号: NVIDIA GeForce RTX 3060 Laptop GPU
参考:https://blog.csdn.net/weixin_43845386/article/details/131723010